


|
So I've decided I wanted to learn how to make garments. I'm starting with a onesie for my boy, since I figure the garment quality doesn't matter that much, as long as it doesn't immediately disintegrate. Plus they're usually loose fitting so getting the measurements perfect isn't that big of a deal. I'm basically gonna follow this lady's tutorial: https://www.youtube.com/watch?v=ohfaVlbskWY For the side and armhole seams, I'm going to use my wife's sewing machine (b05 academy) and use its "overlock" stitch with to finish the raw edges. I gave it a spin on some pieces from an old t-shirt: 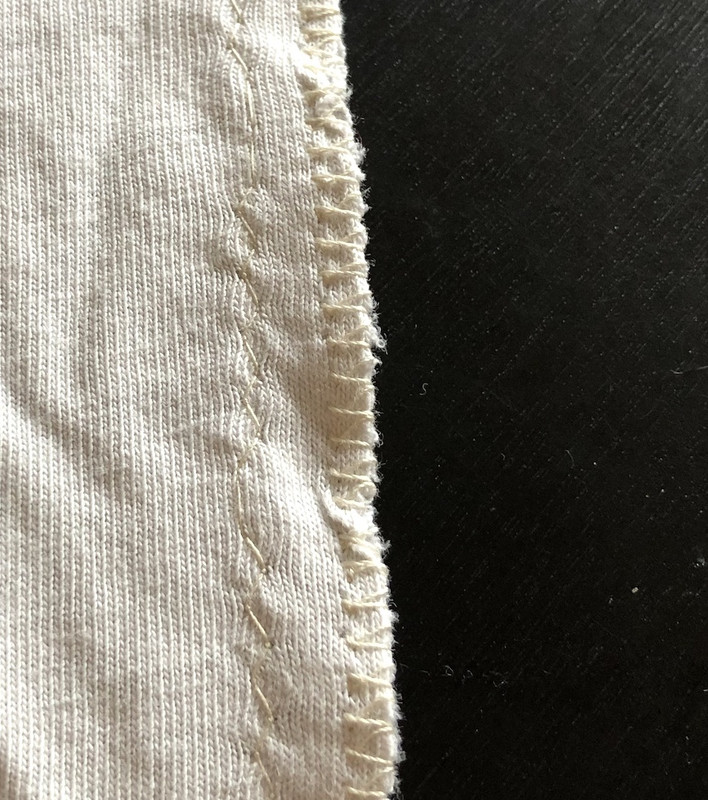 (I realize now I did the seam backwards, in an actual piece the right sides should be together but that's why I make mistakes with old t-shirts) I did a zigzag stitch at the seam allowance for my pattern (this is not a pattern piece here, just me messing around), then used the overlock stitch on the edge. I had two problems: It looks like the zigzag skipped a couple seams and the edge stitch tended to bunch up and pull away from the machine as I sewed it. Are the skipped stitches in zigzag just me not handling it properly and having the wrong stitch length/width and or needle? Same with the edge seam. Do I just play around with the width until I get it right? And is there much to be done about it pulling away? That was the hardest part, the piece kept wandering towards my left as I sewed so the edge kept on getting closer to the needle and at the end it skipped off the piece entirely.
|
 #
¿
Dec 18, 2023 21:07
#
¿
Dec 18, 2023 21:07
|
|


|

|
| # ¿ Apr 29, 2024 04:15 |
|
|
Lead out in cuffs posted:Skipped stitches is usually a tensioning problem with the sewing machine relative to the fabric that you're using. It's always a good idea to do a few test seams on the actual fabric you're using to get the tension right. The manual for the sewing machine should explain how to adjust tension and will probably give some recommended tensions for different fabrics. Yeah I'll play around with that next. The manual isn't very specific, just tells me the default tension, then recommends changing it based on whether or not the thread from the bobbin is on the topside or not. Sagebrush posted:You can practice on some plain woven cotton without any stretch in it. A cloth napkin or handkerchief would work, or you can buy some cheap muslin if you don't have any scraps. You could also cut up some old non-stretch jeans, though that's going to be significantly heavier fabric. I've taken a bunch of scrap leftover from when my wife made curtains, plus she probably has some pieces here and there. So maybe I'll try out a small project with the same finishing techniques but on that first. I did buy a jersey needle from schmetz so that's at least right. My wife quilts so she has quilting needles. effika posted:Ballpoint or jersey needles solve a lot of knit fabric problems! Be sure you're using one. The machine came with a foot with an edge guide:  I'm not sure what was causing it to pull away from the needle. I think it actually might have been the seam getting curved as it was sewed and then the edge pulling away from the guide because it was curving. I'll definitely try other ways to support the work as it's being sewed though. My wife usually uses the extension table but maybe she'd like something bigger when she's doing the quilting part.
|
|
#
¿
Dec 19, 2023 01:19
|
|
|
Ok so I had a weird idea of something to sew with my wife's scraps before I try a bigger project. I'm going to make a little decorative wine holder, so basically just a little bag to carry wine around so it looks fancier. Basic idea is it has a pentagon base, then 5 panels around the outside, finish the top rim with bias tape (since I'll be using that technique later anyway), then sew on some kind of handle. I made a model in some cad software and made the panels twist to give it a little flair. Most of that sounds straightforward, but I'm not sure the best way to treat the seams on the bottom. Here's a paper model I developed out of the pattern I made (so obviously no seam allowances): 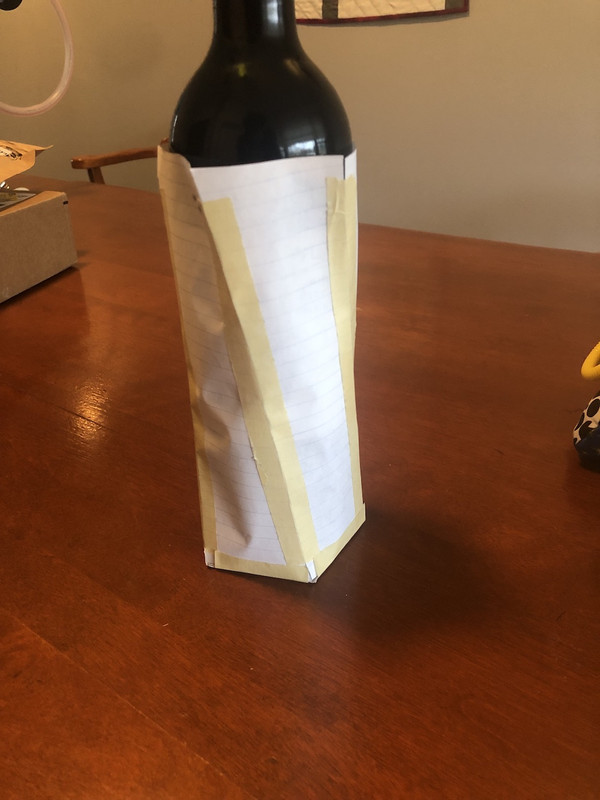 And then the pattern: So obviously just a standard seam allowance on the long sides, nothing on the top (since I'm binding it). On the bottom, it looks like a regular seam allowance will end up with some extra fabric on the corners of the pentagon. Would I just fold those up, or is there anything more fancy I can do?
|
|
#
¿
Dec 21, 2023 17:40
|
|
|
Alright work in progress just using super basic stitches (straight stitch and my machine's "double overlock stitch"). Looks mostly fine so far! I didn't want to bother with facing fabric for a first attempt. It seems mostly fine at the base, the top is kinda flopping over. I bet if I can figure out a stiff binding that'll do a lot to give it a more distinct shape. I only sewed the wrong sides together once, so that's a good start. 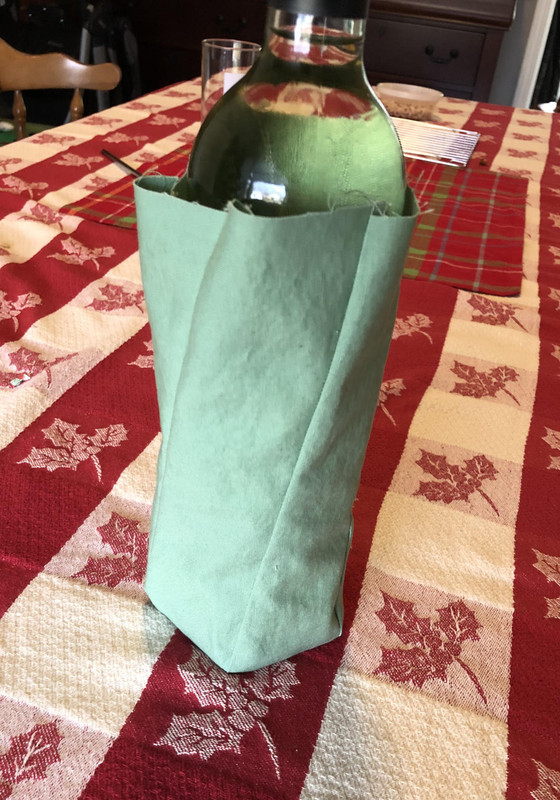 Now to finish the top with some binding and sew on a handle.
|
|
#
¿
Dec 27, 2023 22:28
|
|
|
Alright finished product. I didn't have a good plan for the handles or how to attach them. Just sewed a long piece with a zigzag stitch and tucked it inside out. Then I stuck it inside the binding and stitched over it a couple times. I think I'll have to study how tote bags are made and figure out a better handle method. 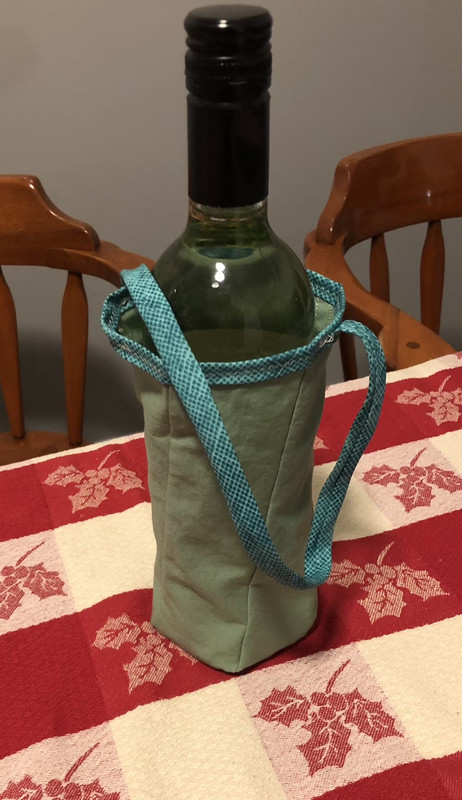 As a first attempt at sewing something it turned out pretty good. I might work on a version two and fix the problems I ran into.
|
|
#
¿
Dec 29, 2023 04:50
|
|
|
Alright finished up my first baby clothes. Just did a shirt since I don't have a snapper insterter.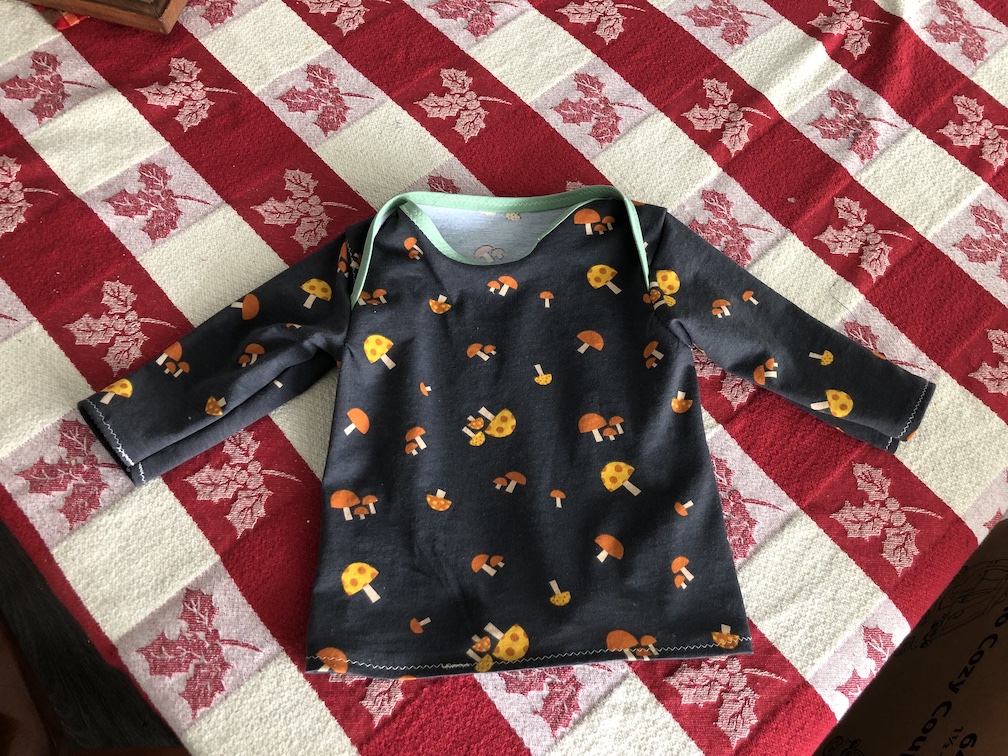 Thankfully it fits my boy very well! I hosed up the binding on the front a bit, had to go back and give it an extra stitch to make sure it was attached. The front had a strong curve so it was hard to apply it well. I hosed up the sewing on the shoulders a bit. I sewed the front and back pieces together first per the instructions, but that extra stitch shows up after I sewed in the sleeves. The instructions had me "baste" it, but I wasn't 100% sure what that meant. Getting the hem right was also a pain. I should have started/stopped the hem stitch at the side seam but there's a little section of double stitch at the front. Oops!
|
|
#
¿
Jan 19, 2024 21:58
|
|
|
The bottom hem on the little shirt I made is rolling up. Anything I can do to make that less likely?
|
|
#
¿
Feb 1, 2024 03:23
|
|
|
Yeah it�s folding up. It�s a regular double fold hem, but what was originally the bottom of the hem is now pointing up. I didn�t think much about it at the time but the fabric does curl a bit on the edges when I was cutting. I guess the other option is just do bias tape on the bottom, presumably that would be less likely to fold over itself?
|
|
#
¿
Feb 2, 2024 05:54
|
|
|
effika posted:Does the foot pedal suck? Yes. I�m running in to this with my wife�s machine (bernette b05 academy). I press the foot, it makes a humming noise but no movement, then when I depress it another hair it�s immediately in  mode and goes way too fast. mode and goes way too fast.Not sure if it�s the machine having a bit of static friction or the foot being kinda poo poo. The foot is definitely terrible. It�s jumpy/not smooth, no ability to change sensitivity, and is really light weight plastic so it kinda flops around on the floor. But it could just be the machine. I think the humming sound is the motor trying to engage, but not being able to. I can often get it to slow down once it goes really fast, but I can�t seem to get it to start off very slow. The sweet spot on the pedal is super tiny too and almost impossible to hit, possibly just because the pedal is terrible. I don�t think my wife has ever serviced it since buying it a few years ago so I�ll have to give it a go. Maybe a bit of lube in the right places will make it more graceful.
|
|
#
¿
Feb 12, 2024 05:29
|
|
|
Yeah I opened it up a few nights ago, looks pretty similar and has the same trim pot (the speed adjustment). Weirdly mine also has a microswitch in it. I guess it's there to turn on/off the power when the foot is up? I tried tweaking that so it clicked earlier but it didn't help. I'll try the adjustment dial and do some cleaning an oiling and hopefully that will help. Thanks! Also I don't think I'll play with it while it's plugged in, that could get pretty spicy lol. 
|
|
#
¿
Feb 12, 2024 18:19
|
|
|
Alright I oiled it up and tweaked the dial, it did help out. A bigger help was switching it from the �snail� mode to the �rabbit� mode. Our machine has 2 modes with different top speeds. But for some reason the slow mode has no response on the bottom end, so it starts at a really high speed when the motor kicks in. But in the fast mode it�ll actually start sewing much sooner and I can control it at slower speeds much better. Funny how that works!
|
|
#
¿
Feb 17, 2024 22:44
|
|
|
Alright I'm going to make some pajamas for my wife and I. First set will be flannel pajamas for me. It's pretty thicc flannel. I was able to do a straight stitch through it ok. I'm thinking about doing a bound seam finish with some double gauze (since it's so nice and soft), but the tape I made out of double gauze is much harder to work with than my wife's quilting fabric. I had difficulty sewing on the edge of the bias tape - the tape kept buckling a little bit right before the presser foot, and the presser foot would pick up the fabric in its central slot as it sewed. I can probably make it work if I make some wider tape and sew a little farther from the edge. I'm planning on sewing my wife's pajamas with some french terry fabric. I tried sewing on a swatch I ordered and gently caress it's way harder than the thin knits I worked with earlier. It keeps stretching out as I sew it, so doing a bound finish is probably a bad idea. Like the seam will end up like 10 or 20% longer than as cut. Any tips to help out with buckling/stretching of seams? I tried my wife's walking foot and that seemed to help quite a bit, but it's still not super great.
|
|
#
¿
Mar 3, 2024 03:39
|
|
|
That�s what I was thinking. I also searched it and some people just use elmer�s glue (the white stuff), which sounds a bit easier to apply
|
|
#
¿
Mar 4, 2024 15:44
|
|
|
Does it matter much where I shorten pants? Got a pajama pattern that doesn't look too bad, but I'll have to cut off about 3 or 4 inches off it and it doesn't have a shorten line.
|
|
#
¿
Mar 11, 2024 21:29
|
|
|
Lead out in cuffs posted:Usually you shorten at the ankle. Messing with the waist or crotch will drastically change Yeah, I'm a bit confused by the inseam, since it kinda depends on where the band sits and how deep the crotch is for that measurement. I'm basing this off of a current pair of pajamas that I know are too short. If I lay down the top piece of my extant pants on top of the pattern it matches up pretty well around the waist, but the pattern is very long compared to the pants. I'll have to shrink it by a bit to get it where I want the ankle hem to sit, assuming the waist/hip area sits where I like it to. Sagebrush posted:Shorten it at the ankle, but don't just cut it 3 inches shorter. If you do that, and the legs are tapered, the cuff will be too large (and it won't fit the separate cuff piece if you have one). Instead, move the line for the bottom of the cuff up as far as you want it to go, then redraw the lines for the inseam and outseam connecting the crotch and hip to the cuff's new location. The taper angle will be very slightly less. The pattern calls for just a hem on the bottom, no cuffs. The pattern looked strange to me at first glance, it tapers to a waist at the bottom, then the hem flares back out a bit.  So I guess I'll keep that flared hem part the same, move it up however many inches, then draw a line from the edges towards the top?
|
|
#
¿
Mar 12, 2024 00:01
|
|
|
Oh right, so when you fold it the inseam matches and there�s no extra material, got it. I was probably going to do a double fold hem since I don�t have a serger, so I�ll make a copy of that piece and attach it upside down to the bottom, so it�ll fold right.
|
|
#
¿
Mar 12, 2024 01:52
|
|
|
Finished up my pajamas. They turned out nice and soft, and I like how the pockets turned out. The waistband is just slightly too loose though, oops. I also didn't realize that the pocket piece actually makes up part of the waistband. I ended up just finishing the seams with the overlocking stitch, which was pretty quick.
|
|
#
¿
Mar 17, 2024 01:33
|
|
|
Torquemada posted:I don't have a massive amount of space, but I'd like to buy my wife an overlocker. I know less than nothing about such things, can i just buy the Brother 2104 D that Ebay is shoving at me, or is that way too much overlocking power? I'm allergic to money so I got a serger recently, so here's what I've been reading. The used machines can be good, but people seem to think they can be a little more dicey than used sewing machines. There's more to go wrong, in particular the timing of the machine can be off. IDK what's involved with fixing that but it's at the very least more specialized than fixing a sewing machine. My general reading is that the brother machines tend to be favorably reviewed. Over here in the states the common basic model is the 1034D, idk if you get that in Europe(?). I don't know much about the particular models. Juki machines were also well-regarded and the feeling seemed to be that they were a bit more robust than the brothers. The common ones are the 644DE and 654DE (the latter one can do heavier stuff, is slightly easier to thread, and can take more needle types I think). They're more expensive than the brothers, but since they have a reputation for being more robust may be a good option for used. Looking at the price of the 2104 and the features that's about what you'd expect for a base machine. For features you want at a minimum: 2/3/4 thread operation Differential feed (this does great things for difficult fabrics) Foot pressure adjustment Retractable knife Adjustable stitch length The basic models are all compact like the 2104. They're like half the footprint of my sewing machine. You should also avoid old models that you can't buy new knives for. You need to replace the knife occasionally and if you can't source it then it won't cut well.
|
|
#
¿
Mar 29, 2024 19:08
|
|
|
Oh two more things. The primo feature that�s on the top end models is �air threading�. Basically it pulls a vacuum and sucks the thread through the machine to thread it automatically. Then there are some machines that are combo serger/coverstitch machines. The coverstitch is a bit different, that�s the really common stitch on ready-to-wear clothes, for example on hems. That�s the two threads on top and the loopy poo poo on the bottom. The combo machines cost more and IDK much about them or coverstitches. So if you want a basic serger those would be the big features to avoid.
|
|
#
¿
Mar 29, 2024 21:26
|
|
|
I'm thinking of making a pair of pajama shorts, so taking the pajama pant pattern I already used and cutting it off short. What's the right method to get the pattern to still work? My first thought was just marking a line parallel to the hem, but higher. However, when I measured the pattern at that line, the inseam doesn't match between the front and back panels - they have a different slope so the measurements don't match quite right. So I'll obviously have to just measure some amount from the inseam and outseam. Is there a way to make sure what I end up with is parallel to the ground?
|
|
#
¿
Apr 14, 2024 02:46
|
|
|
Yeah using your scraps to test out construction and machine settings is a good idea. I've been doing that to tweak the foot pressure and tension and that sort of stuff.
|
|
#
¿
Apr 15, 2024 19:43
|
|
|

|
| # ¿ Apr 29, 2024 04:15 |
|
|
Not a $250 one but the manual threading juki I got (mo 654de) isn't so bad. The lower and upper loopers were pretty easy, the needles were harder for me. It's so fuckin' smooth and quiet compared to my wife's sewing machine. It's just such a pleasure to feed in a seam and get out a beautiful soft overlocked seam. I haven't had to mess with the tension yet though. Speaking of tension, should I change the tension/other settings if I'm just doing one layer of fabric? The seams I do on it feel great and are actually nice and stretchy. I serged around a hem before doing a single-fold hem and the serged stitch was very not stretchy.
|
|
#
¿
Apr 18, 2024 03:35
|
|