


|
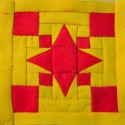
Goldaline posted:Posted the making of, but never the finished lamp. Oh my, that is incredible. I bet it looks incredible lit up, does it get rather warm?
|
 #
?
Feb 24, 2009 12:53
#
?
Feb 24, 2009 12:53
|
|


|

|
| # ? May 5, 2024 17:02 |
|
|
Sprinx posted:Oh my, that is incredible. I bet it looks incredible lit up, does it get rather warm? Nope, I used leds to light it. It's not very bright, it just sort of glows.
|
|
#
?
Feb 24, 2009 17:58
|
|
|
My first try at resin jewelry, I'm super addicted already. I used EasyCast brand Clear Casting Epoxy resin mix that I got from Michael's and some of their special resin molds. I cast the resin components first, and decoupaged the images on after. There is a way to cast the images right in the resin, but I haven't been able to get that to work well yet.   I've already ordered some more molds on eBay. Can't wait to start my next batch! I put the angel pendant for sale up on my etsy shop. I'm keeping the crow for myself ")
|
|
#
?
Feb 26, 2009 04:01
|
|
|
Wow, the crow one is so cool! Surely to put the picture in the resin you would just print the picture on card and then pour the resin over? That's how you preserve other things, like insects. BTW, dead butterfies in resin look very pretty... if a little morbid.
|
|
#
?
Feb 26, 2009 13:58
|
|

|
madlilnerd posted:Wow, the crow one is so cool! Surely to put the picture in the resin you would just print the picture on card and then pour the resin over? That's how you preserve other things, like insects. BTW, dead butterfies in resin look very pretty... if a little morbid. Yeah, I thought it would be easy to embed the pictures, but they kept sliding around. Also, the resin molds I have are curved on the bottom..so you want the picture to sit on the top of the wet resin (if that makes sense) because that will be the back of the piece. I'll keep experimenting! And I'll keep my eye out for dead bugs, lol.
|
|
#
?
Feb 26, 2009 19:35
|
|
|
ambrosia posted:And I'll keep my eye out for dead bugs, lol. I always wanted to know how to embed stuff in resin. I imagine it would be hard not to have a lot of little air bubbles. If you try this out I'd love to see what you learn from it.
|
|
#
?
Feb 26, 2009 20:15
|
|

|
sucks to ur assmar posted:https://id261.securedata.net/necromance/catalogue.php?category=entomology Those spider webs are amazing, I never thought of trying that.
|
|
#
?
Feb 26, 2009 20:32
|
|
|
ambrosia posted:Those spider webs are amazing, I never thought of trying that. Well those are sandwiched between glass and a background (I think is how they do it) but if you kept scrolling down they sell "loose" bugs. There's neat little bones in the zoology section if you were interested in that, too. I tried casting some python vertebrae when I was in school, and it never worked quite right...however you can blame that on the fact that I blow rear end at casting.  Bottom line is that Necromance carries awesome stuff for crafting. Bottom line is that Necromance carries awesome stuff for crafting.
|
|
#
?
Feb 26, 2009 20:36
|
|
|
This is my glass blowing (lampwork) studio I put together around Xmas '08. Most of my tools are self made from graphite. I'll take more, better pictures soon, as well as shots of stuff I made/ will make... I might be taking the semester of to work glass full time. I'm making mostly small stuff mainly pendants, "tobacco" pipes, marbles, artsy stuff, etc (not vases, etc). Torch is a GTT lynx  Sorry quality... camera phone e: if anyone has any requests for stuff that I'm to make feel free to PM. Onta vasa fucked around with this message at 21:17 on Feb 26, 2009 |
|
#
?
Feb 26, 2009 20:50
|
|


|
In ceramics, I only ever got to do glass slumping, but I'd love to make beads. Since reading this tutorial (http://www.beadworx.com/HowToMakeABead1.html) I think I'd be able to do it, but I'm a bit worried about choosing the right blowtorch and annealing (sp?) the beads afterwards. Onta vasa, got any advice for someone wanting to start out in lampwork? p.s that site also shows how to make tiny vessels!
|
|
#
?
Feb 26, 2009 21:22
|
|
|
madlilnerd posted:In ceramics, I only ever got to do glass slumping, but I'd love to make beads. Since reading this tutorial (http://www.beadworx.com/HowToMakeABead1.html) I think I'd be able to do it, but I'm a bit worried about choosing the right blowtorch and annealing (sp?) the beads afterwards. For soft glass (coe 94-106) you can use a propane cylinder with a "hot head" torch tip and I'm not sure the annealing temperatures but you can probably just let them cool in a ceramic blanket or vermiculite filled crock pot. They sell hot head kits that are about everything you need except fuel and a way to cool the glass for just over $200. For hard glass (coe 33 aka pyrex/borosilicate) *what I use and your guide is using* This generally uses propane and oxygen. A setup for just bead making only will cost $400+ plus... well I guess you already have a kiln but they're expensive. With beads you could probably get away with flame annealing and then cooling the same way as soft if you had to, but its generally done with a 1150F soak & ramp depending on thickness of work (you'd be fine putting the beads in at 1150F for a half hour and just turning off your kiln, letting it cool slowly). ...Anything bigger then beads and the torch alone is generally $400 minimum I don't have a lot of soft glass experience but I can tell you what you'll need, recommend a torch for what you want, some useful reading, and tell you good suppliers to get glass if you let me know what your thinking of doing. I researched glass for about two years before I finally got into it. The good news about glass is that most equipment holds its value indefinitely if you take care of it (GTTs generally don't lose a cent in value do to waiting lists, quality, etc). Most people don't wear gloves or anything but I personally recommend Kevlar sleeves to prevent any major (3rd+ degree) burns or cloths sticking to you. You'll learn fast whats hot and whats not (I've lost some finger prints) e: for anyone that didn't know... the treads on propane tanks/regulators are backwards. (lefty=tighty) ...that can really piss you off ...they never taught me that in school. Onta vasa fucked around with this message at 22:15 on Feb 26, 2009 |
|
#
?
Feb 26, 2009 22:08
|
|
|
I'm working on a wire-haired version of the Ibizan Hound pins I posted on the last page. Finally figured out how I want it to look. I'm pretty pleased, I think they're going to end up really cute.   It's not even soldered together yet, but it made me smile.
|
|
#
?
Feb 27, 2009 21:55
|
|
|
The buttons from my sweater started getting a bit ratty and torn up. Like so:  I figured my sweater could use a bit of pizzaz. 
|
|
#
?
Mar 3, 2009 12:54
|
|
|
Sprinx posted:The buttons from my sweater started getting a bit ratty and torn up. So you made these yourself? What material is it?
|
|
#
?
Mar 3, 2009 16:11
|
|


|
Cakefool posted:So you made these yourself? What material is it? I looked through a bin full of buttons at a craft store. I had a nice time. I'm not one to sew or do anything, and it took me forever. Sorry to disappoint. They feel heavy like metal.
|
|
#
?
Mar 4, 2009 10:55
|
|
|
Sprinx posted:I looked through a bin full of buttons at a craft store. I had a nice time. I'm not one to sew or do anything, and it took me forever. If that's your project, it belongs in this here Megathread. The only thing I have to add is installing automatic door closers to my interior doors, not nearly as pretty.
|
|
#
?
Mar 7, 2009 16:29
|
|
|
T6 posted:I built this AV tower out of gable louvers, steel tubing, steel angle, and pieces of glass. I've always had a really strong desire to make furniture out of metal, although I don't really have any metal working skill or artistic talent to speak of. Oooh! Nice work and thanks for the link. I got too many machines in the appartment, and I've been agonising for a couple of years about how best to rack them. This is a very tidy method.
|
|
#
?
Mar 8, 2009 08:26
|
|


|
A little while back I finished a working replica of Tom Servo from Mystery Science Theater 3000: So I figured I might as well start work on his shipmate as well. I recently got a hold of all the same parts that they used on the show to build Crow, and I finally started some basic construction on him.  Here's his beak, made from an old toy bowling pin. I need to buy some new drill bits before I start to construct his torso.
|
|
#
?
Mar 9, 2009 05:38
|
|

|
Not a current project, but I just caught up on the thread and saw a few of these, so I wanted to mention that I made the original Break in Case of Zombies Kit: I never watermarked that image and you can find it all over the blogs, fake motivational posters, etc. One of my proudest moments, though I've been FAR outstripped by the ingenuity of others using the same idea. This original kit was a dollar-store shadowbox, a spray-painted squirt gun, and the lettering was printed on photo paper and stuck to the glass using the natural tackiness of the ink. I since moved on to some hand-made ones:  These were made by screwing pine 1x2s to the back of existing picture frames and cutting MDF backing with a handsaw (no woodshop  ) and painting it. The vinyl lettering is done by our very own stormrider. ) and painting it. The vinyl lettering is done by our very own stormrider.I also made a bunch of these out of First Aid Kits from the dollar store (sadly, they ran out of clear ones and only have opaque green now):  Also, this, which is...a smoke alarm with a big vinyl Z on it. And custom packaging. 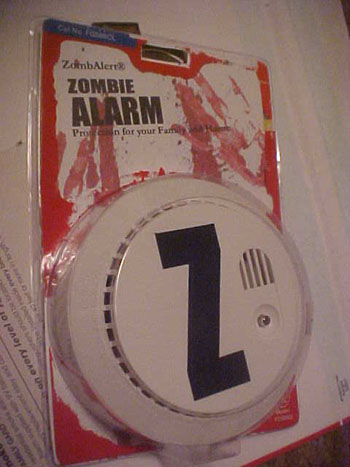 It's nice when you can combine your fixations with your love for do-it-yourself crafts.
|
|
#
?
Mar 9, 2009 12:23
|
|


|
PipeRifle posted:Not a current project, but I just caught up on the thread and saw a few of these, so I wanted to mention that I made the original Break in Case of Zombies Kit: Man, I want a house full of zombie stuff...
|
|
#
?
Mar 9, 2009 13:39
|
|
|
PipeRifle posted:Not a current project, but I just caught up on the thread and saw a few of these, so I wanted to mention that I made the original Break in Case of Zombies Kit: Oh hey, you inspired the wedding present I made for a mate, back on page umpteen Good man.
|
|
#
?
Mar 9, 2009 18:54
|
|
|
Cakefool posted:Oh hey, you inspired the wedding present I made for a mate, back on page umpteen That's what I saw that made me think to post it. I'm glad such a simple starting step inspired so many really cool projects, and while I'm sure other people would have had the idea, a lot of them say they saw that first image up there and it gave them the idea, so I'm trying to lay claim to it where I can. Also I still have that lovely Xbox racing wheel if anyone wants it! madlilnerd posted:Man, I want a house full of zombie stuff... Almost all of the Zomb-Aid kits and the Z-Alarm were done as gifts, and the 3 "new" kits were sold on SA-Mart. My original "Break Glass" kit fittingly broke when I moved, so I currently don't have any of this stuff on display. Just an excuse to make more, I guess.
|
|
#
?
Mar 9, 2009 21:46
|
|
|
^^^ I remember your first (I think) zombie kit from way back in the day of PIF... many, many years ago
|
|
#
?
Mar 10, 2009 06:10
|
|
|
I've got a rather large set of projects that I am going to get started on this spring and all involve the backyard. This will be an on-going project for a few years due to funds (getting married will take most of my funds) and time (loving work). 1. The current fence that is up is a piece of poo poo and it looks ugly. Year 1 I am going to replace the two sides of the fence that face the road and that get seen the most. I've already started on this due to the previous owner rigged the fence up when three of the loving posts broke off in the ground and failed to let me know they were broken. After a strong wind day, three sections of my fence were on the ground, yeah gently caress that guy. 2. The back-lawn is bare at the moment, a nice clean slate for me. This spring I am going to plant two or three trees in the back and maybe some small shrubs and bushes along the back end of the fence. I want to look at something nice when I am looking out my kitchen window, a fence doesn't do it for me. I also want to put some bushes in front of the electrical box out back, because it's ugly as hell. (I am going to focus on re-doing the front landscaping during the first year, black mulch...loving gross.) 3. Build a deck (or have one build due to time restraints). I am looking to build a 15x24 foot deck with seating around the outside (maybe a rail along one side). Nothing fancy, just simple and nice looking. Year 2 4. Finish the landscaping, not sure what I want to do yet. I am going to have my former boss (I used to work landscaping) design my landscaping in the back. 5. Pour a slab and install a hot tub (may come in year 2). 6. Anything else Luckily I live on a col-d-sac and my house sits close to the road giving me a huge back lawn (it was the selling point of the house for me). Because I am going to need the room. I'll take pictures to document the gradual change of the backyard. It is going to be a fun and interesting time! Regnevelc fucked around with this message at 17:47 on Mar 10, 2009 |
|
#
?
Mar 10, 2009 17:43
|
|

|
Regnevelc posted:Luckily I live on a col-d-sac and my house sits close to the road giving me a huge back lawn (it was the selling point of the house for me). Cul-de-sac  And I'm in the same boat, I love my backyard. Only thing is mine didn't come with fence, like at all. It'd be nice to have neighbours to split the bill with. And I'm in the same boat, I love my backyard. Only thing is mine didn't come with fence, like at all. It'd be nice to have neighbours to split the bill with.
|
|
#
?
Mar 10, 2009 20:21
|
|

|
IsaacNewton posted:Cul-de-sac I knew I was spelling it wrong =/. Yeah, when I replace that side of the fence (year 2 or late year 1) I need to figure out when I am going to do it. My fence is the only fence standing between our lawns, they didn't put their's in that spot. Not to mention that mine extends out a bit and I am not re-fencing that area. That is going to be a fun conversation with them!
|
|
#
?
Mar 10, 2009 22:57
|
|
|
I know it's not as amazing as most of the projects in the the thread but I reupholstered an antique gossip/telephone chair that I'm pretty proud of  Sorry for the lack of substantial before photos... The original chair:  The original fabric with bonus cat hair: 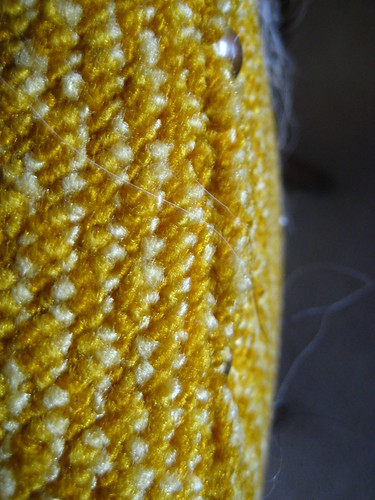 The "finished" reupholstery (table needs to be refinished and wrinkles ironed out): 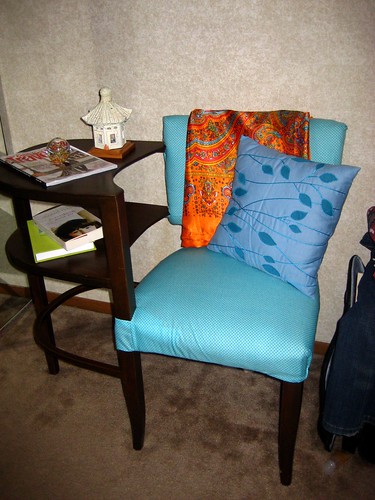 Bigger pictures
|
|
#
?
Mar 16, 2009 14:49
|
|
|
After reading the thread about the people staining or refinishing their floors, I figured it couldn't be that hard to stain the doors at the back of my place. They had once been stained but it had mostly turned to powder that would come off if you brushed against it, and when it rained they would soak up the water. Also, there were a few leaks around the glass. As we're coming up to winter in NZ, I didn't want to go another year with them soaking up water and generally turning to crap. I decided to stain rather than paint because they had previously been stained, so it was an attempt to keep the same look and also because I am not a big fan of painting with all the prep work, different types of paint and me never being able to achieve a nice smooth finish. As it turns out, the cost was similar to what paint might have been as I got some extra tools to finish the job, but I like to think that it was easier and faster to complete, and the tools will be used on other staining jobs I have planned later in the year. The original stain was a sort of burnt red, but was so faded it was hard to tell, and I couldn't work out what timber was used for the doors - it is possible they are Totara (the same as the weatherboards), Rimu (the same as the interior doors), or something else (as they were added after the original house). In the end, the stain I used was Cabot's door and window finish, in a mahogany (because I managed to forget what colour the original stain was when I went to the shop), which I applied after cleaning the wood. As it happens, we'll be repainting the house a different colour, and the dark mahogany will go well with this, so no big deal. Tools used were a speedbrush and paint tray to apply, plus bits and pieces to get the doors on/off and remove the attachments etc, the hose and brush to clean and wash the doors and a couple of sawhorses and so on to rest the doors on during cleaning/staining. Three coats were required to be applied, each after three hours drying time and all within seven days. Here is a speedbrush - I had never heard of these things before talking to the paint reps. Bloody handy things, and I also had a mini one for use in the corners and edges: 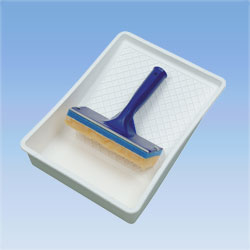 On with the show... One door cleaned and replaced, the other ready to clean:  The inside of the door to be cleaned:  To clean the doors, I first brushed them while dry to remove any excess dust etc, then applied the diluted cleaning solution, let it rest then scrubbed the door and hosed them off. Repeat this for both doors/sides, and use pure cleaning solution for any odd spots - with these doors, some of the panels seem naturally darker than others for some reason. These differences were covered up by the colour of the stain in the end of things:  Both doors cleaned and re-hung from the outside:  And from the inside:  This was the end of day one. On the second day, I noticed one of the doors was sticking at the bottom. After a lot of buggerising around with the sandpaper, I figured it might be possible to find the sticky bit by grating chalk over the width of the frame and opening and closing the door a couple of times - the sticky bit would have smudged chalk and the rest would remain untouched. This worked, and the sticky bit turned out to be in a different bit that I'd not been sanding. You can see the scuff-marks by the bolt hole:  One of the doors cleaned and ready to stain:  The same door after one coat:  Both doors re-hung after two coats:  The instructions on the stain call for three coats within seven days - I've not managed that, but might get the final coat done this weekend. Next steps, in no particular order: - Stain the frame where it will show outside or where weather can be expected to penetrate. - Re-putty the windows. - Clean up the over-stain and varnish the interiors. Things that went well: - Using speedbrush instead of a paintbrush. These things are great, and I was able to coat the bulk of the door in about two minutes. - Keeping the screws, fixtures and other bits in separate containers for each door. I hadn't planned this, just saw two empty containers about the right size as I started work and thought they'd be handy. - Using a dark colour. The doors were in a bit of a crap state, and I wasn't all that happy after cleaning them, but the dark stain has covered a multitude of sins. - Staining the doors on two days with no wind. Where I am, it blows all the drat time, so finding two days with no wind to stir up leaves and other crap was just a fluke. - Buying enough stain for both sides of two solid doors with no glass. I think I overestimated the square area of the doors, and got the 4 litre tin. This will be handy, as I have another door to stain that I'd not initially planned for. Things that I'd do differently: - Get a second person to help re-hang the doors. Doing this on my own was a pain in the arse, and I ended up losing a screw under the house and munting a couple of screw holes. I also would have preferred to take the bolt out of the hinge, then unscrew each half while there was no weight on them, but the hinges I have did not seem to allow that. - Apply the stain inside my garage rather than out in the heat of the day. The day I did this, the outside temp was over 25deg and I think the stain dried too fast (also, we have brutal UV in New Zealand which may affect things, although Cabots is an NZ brand, so maybe not). If I didn't have so much crap in the garage, I would have stained them in there and maybe things would have been less tacky - not sure here, but I was in a rush to get them done over these particular days due to the weather forecast and the drying time required. - Stain them earlier in the year so there are more daylight hours for work, more fine days, and more hours in the day over 10deg, at which point the stain stops drying. - A couple of drips formed and stain overflowed a small amount onto the interior of the doors. This just stems from inexperience - I can always sand back the stain that I spread to far, but I'm not sure how to stop drips forming, especially when things look OK as I apply the stain. Overall, I'm really happy with the result - it has rained since I finished the 2nd coat, and the doors soaked in no water and there were no leaks inside.
|
|
#
?
Mar 26, 2009 10:13
|
|

|
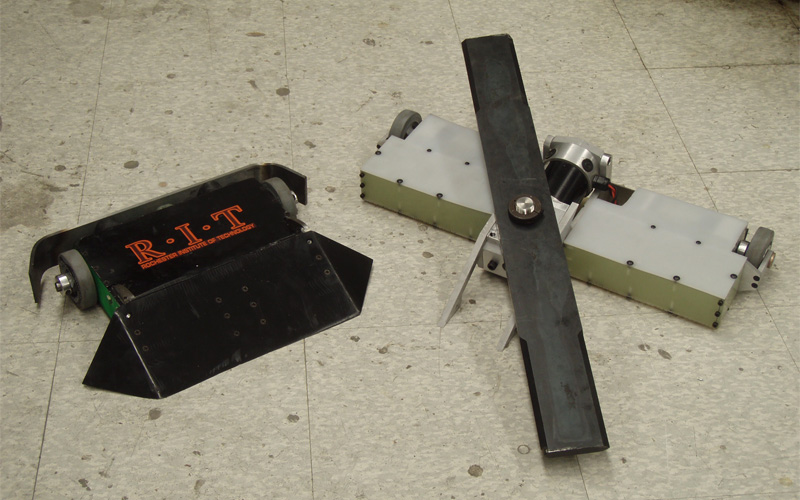 These are the two I've got right now. The one on the left competes as both a 12lb and 15lb robot and is getting shipped to CA soon to compete at BotsIQ/Battlebots in the 15lb college class. It's a fairly simple design with a lot of drive power. Top speed of 15mph and 1.2hp in the drive system. 4130 front wedge and a brand new S7 rear bumper. The one on the right is my latest project, a complete overhaul of my old 60lb robot, stripping it down and shoving the weapon into the 30lb weight class. Somehow, I actually improved the drive system while cutting down the weight. Drive top speed is 15mph via two 18v dewalt drill motors. Weapon is geared for 2625rpm, but with wind resistance, I suspect somewhere near 2000rpm is close, giving a tip speed of 170mph. Weapon bar is 28x3x.5" S7. Externally, the robot is done. Internally, I'm waiting for some new speed controllers to be released before I finish the wiring. Both robots are using 2300mAh A123 LiFe battery packs. The wedge uses a single 5 cell pack. The spinner uses one 6 cell pack for drive and one 6 cell pack for the weapon. Besides the receiver the weapon and drive systems are electrically isolated. 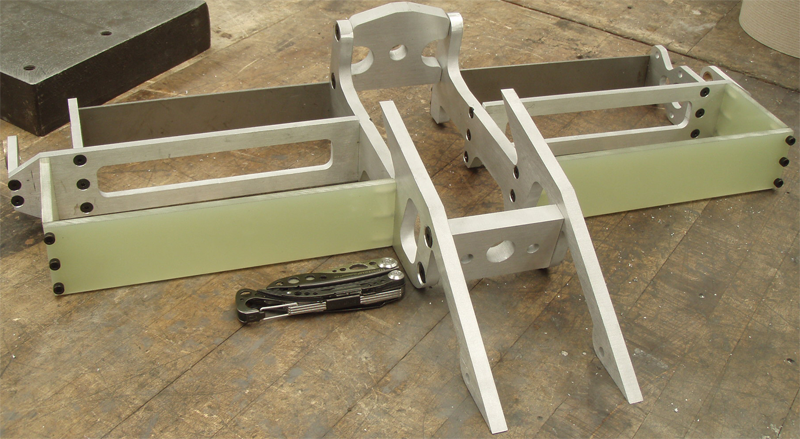 That's the entire internal structure of the larger robot. Not counting the screws, the weight is under 4lbs. Materials are 2024 aluminum, grade 5 titanium and garolite.
|
|
#
?
Mar 27, 2009 03:16
|
|

|
I'm in the middle of a custom guitar build right now. My first one from scratch   So far so good  I'll make a dedicated thread for it once I get a little further along since I'm going to be coming to a stopping point while I amass funds to order hardware, etc...  I'm going to be working on carving the neck tomorrow.
|
|
#
?
Mar 28, 2009 02:49
|
|

|
Cross posting a speedbag mount from the blacksmithing thread because this is a multi-material project. The wood is terrible, I tried to cut a circle out with a jigsaw, but it works. 
|
|
#
?
Apr 9, 2009 04:18
|
|

|
The two I tackled over the winter: The Chair of Awesomeness:  An old chair that I got for Christmas two years ago. My mother was supposed to reuphoslter it for me, but apparently, she's where I get my laziness from. It has arms, but I think I'm gonna leave them off, because it makes an awesome gaming chair I can just flop down in. If I can find some more material like that and about three more miles of the wicked fringe, I'm pretty sure all the rest of my living room furniture is going to end up looking like this. And beside this marvel of the upholsterer's art sits this: The Table Of Greatness:  Basically an old TV stand thingy, now covered with approximately 350 beer caps and repurposed. Two weeks of mixing plaster, filling caps, and sanding them flat has taught me to never attempt this again. Unfortunately, I already have three people that are going to pay me (with beer, naturally) to cover a table for them. There are small imperfections that should have been worked out, but I did the best I could. Neat fact: the whole thing was constructed with scavenged parts. Also, the new Clue game is awful.
|
|
#
?
Apr 9, 2009 06:58
|
|
|
I moved into a really old house not too long ago, and here's the first room I've mostly finished. Before (I wish I had taken a few more of these): 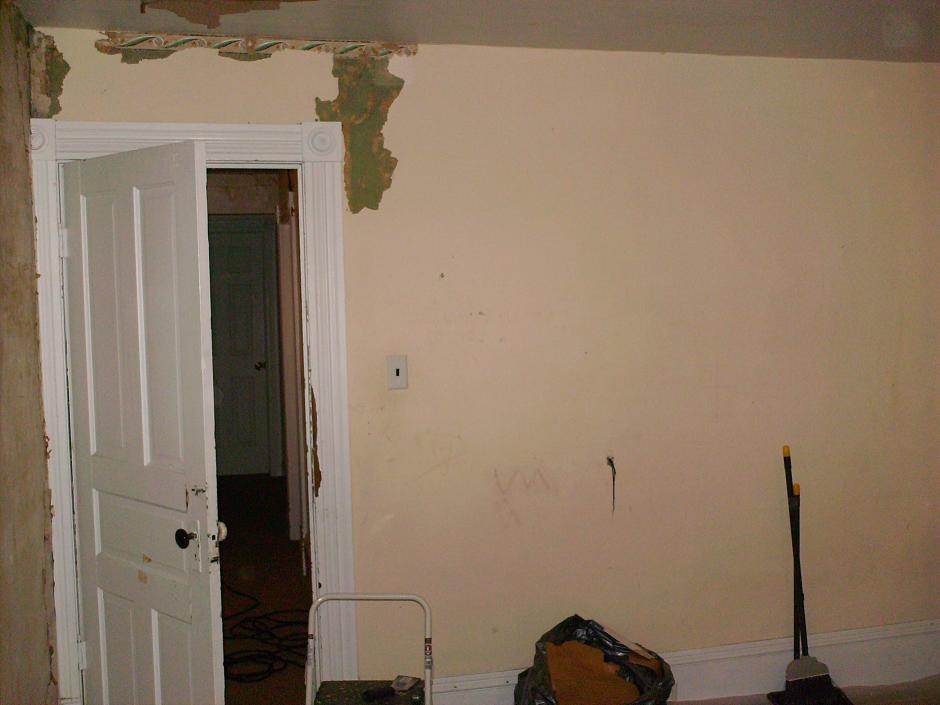 Click here for the full 940x705 image.  Click here for the full 940x705 image. This is the wallpaper that was under a layer of some kind of cover-up paper and another layer of latex paint. Holy poo poo.  Click here for the full 940x705 image. Getting down to the plaster:  Click here for the full 940x705 image.  Click here for the full 940x705 image. 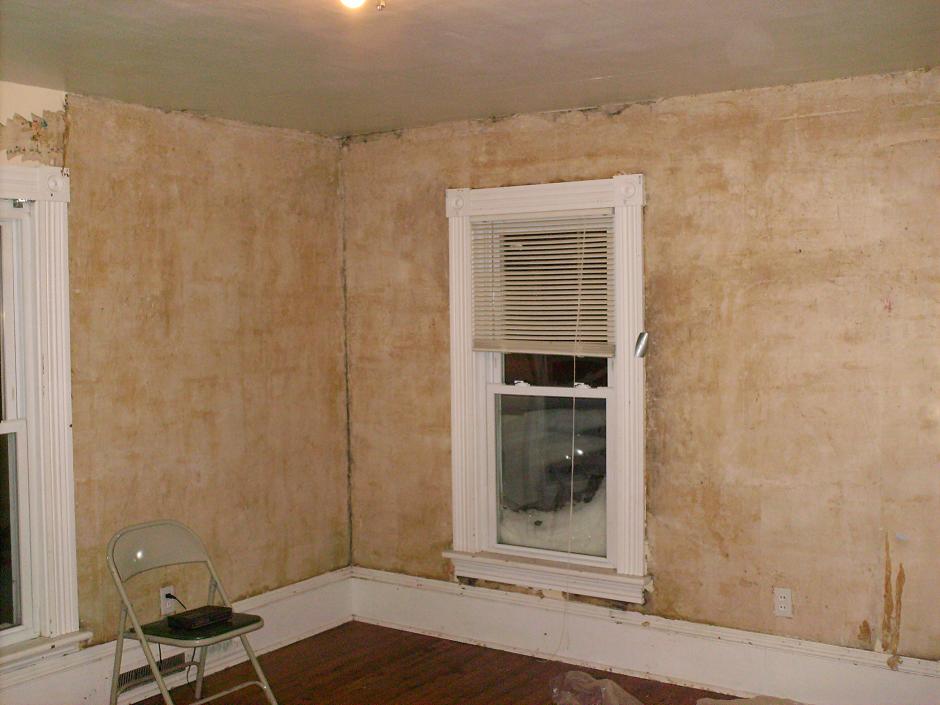 Click here for the full 940x705 image.  Click here for the full 940x705 image. The ceiling had to be scraped too:  Click here for the full 940x705 image. 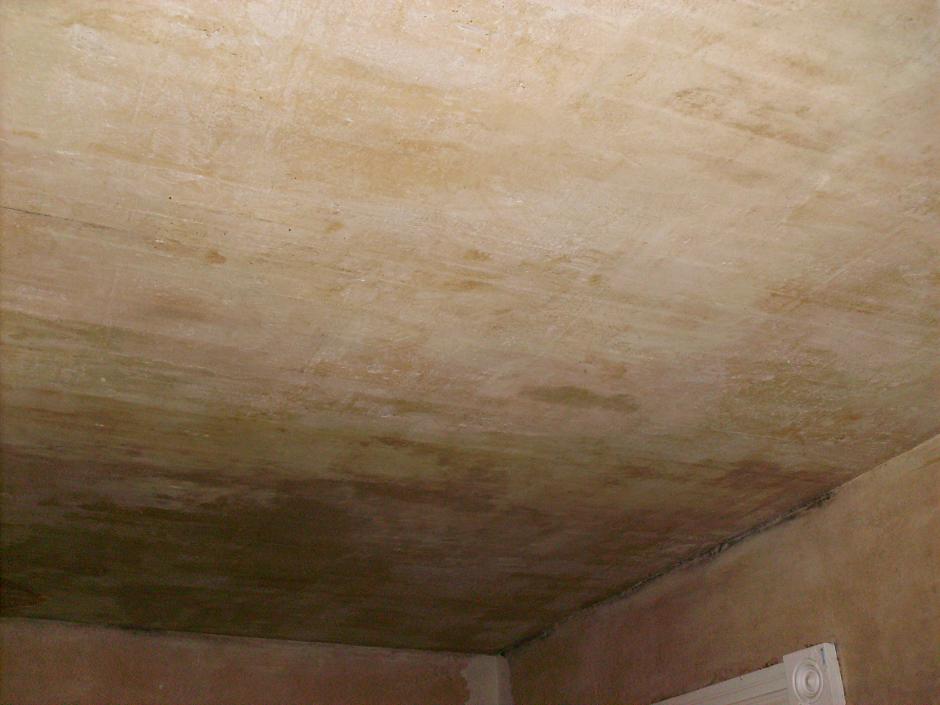 Click here for the full 940x705 image. I decided to do this texture by hand with a stenciled pattern around the light, and it probably wasn't worth the amount of time I put into it. I still enjoy the result though, and it looks a lot better in natural light than it does with the camera flash.  Click here for the full 940x705 image.  Click here for the full 940x705 image. After primer, paint and molding (pardon the mess, we're still unpacking): 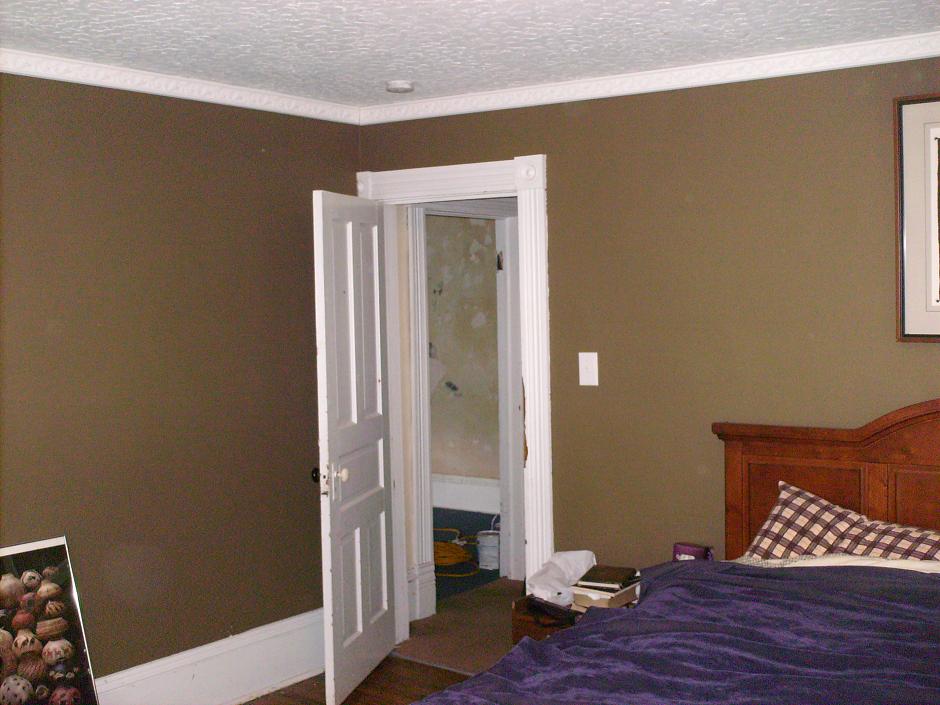 Click here for the full 940x705 image. 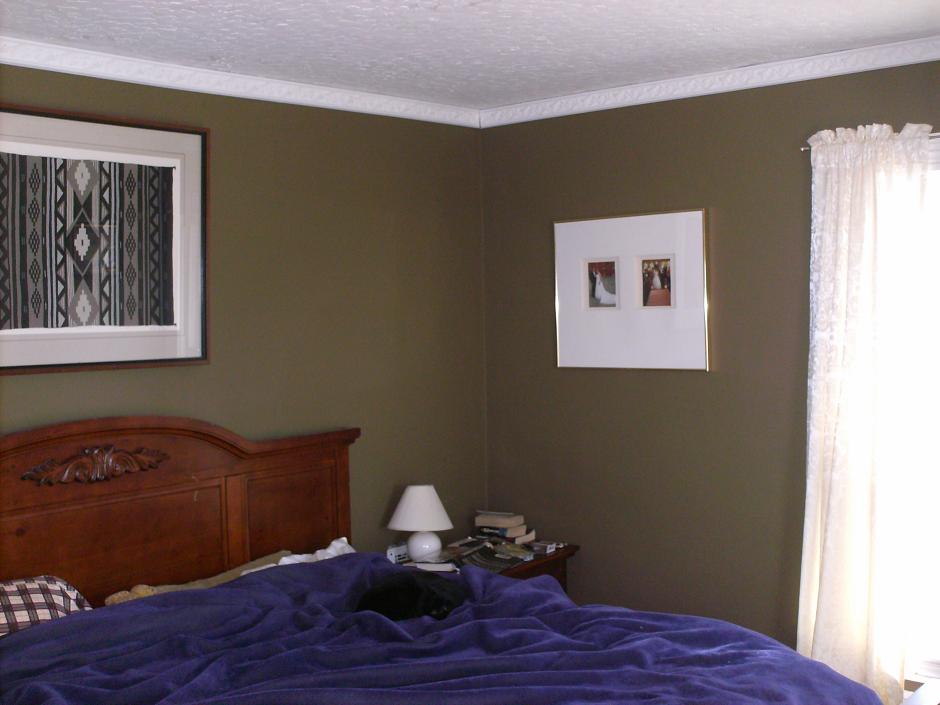 Click here for the full 940x705 image.  Click here for the full 940x705 image.  Click here for the full 940x705 image.
|
|
#
?
Apr 9, 2009 22:06
|
|

|
gross posted:
Looks like a heap of work, but it also looks like it was worth it. Things look classy and clean now. We're halfway through a similar project. I hate peeling wallpaper, but thankfully I think we're finally one with that part.
|
|
#
?
Apr 10, 2009 03:42
|
|

|
Slung Blade posted:Cross posting a speedbag mount from the blacksmithing thread because this is a multi-material project. The wood is terrible, I tried to cut a circle out with a jigsaw, but it works. As for cutting a circular piece that size with a jigsaw if you ever redo it I'd recommend something as low tech as drilling a hole in the center point and then shoving a dowel rod in there with a piece of twine tied to the jigsaw. Start off with a square piece the width and depth of the diameter you want, find the center by drawing two x's, drill, dowel, then set the jigsaw in the middle of the flat side and have a buddy tie the string on good and tight. What you did looks quite alright though. This is what I drew up for him. I'm assuming that a circular platform would be preferable to a square one?  The idea was to mount it to the wall using construction adhesive and butterfly bolts.
|
|
#
?
Apr 10, 2009 04:30
|
|

|
The bolts I had were just slightly too short, so the bag and the wooden backing plate are currently held to the frame with 2 thin little anchor bolts we found in the garage, so it's not permanent yet. However, my sister and I both used it for a short time just to make sure it would be ok and it seemed quite solid despite not being secured properly. It's loud, but the impact is absorbed quite well, having 3/4" iron bar backing up the wood helps a lot in the rigidity department. The wood is just some scrap my grandfather was getting rid of, so I'm not sure the exact size, but 3/4" sounds like a good estimate. He gave me a square of it so I cut it into triangles and glued them together, then I cut the circle. I did use a screw with some string on it to mark the circle, but I didn't think a string tied to the jigsaw would work all that well, considering there's not really a good place to attach it. However, looking at the result makes me wish I had at least tried it. Circle or square, I don't think it really matters. I wanted a circle just for aesthetic reasons. That wood one you designed looks really good, nice and sturdy.
|
|
#
?
Apr 10, 2009 06:59
|
|
|
gross posted:I moved into a really old house not too long ago, and here's the first room I've mostly finished. Looks fantastic! One thing I'd suggest for the trim is to get some bathroom caulk, and run a bead along where the trim meets the ceiling/wall/itself. It'll cover up the cracks and make it look perfect.
|
|
#
?
Apr 10, 2009 15:27
|
|

|
dreg posted:Looks fantastic! Thank you. That's just one of the things I'm putting put off until after I get some of the other areas done. I have to fill around all of the baseboards, doors, and windows in every room since the walls are uneven and leave funny gaps everywhere, and many of the pieces were removed at some point and reattached over the older layers of wallpaper.
|
|
#
?
Apr 10, 2009 17:57
|
|
|
Patio Project I had thought about doing this last year, but the idea came in August and there was no way I was sweating my taint off in 90+ degree weather for something I wouldn't get to enjoy much before the weather turned. This year we're getting a nice tax return so we decided to put in a patio (actually, it started with talk of a grill). We have a small deck off the back of our house, but it's more of a landing than anything else. You can barely seat two and it's a half a walkway into the backyard anyway. The patio will basically be at the bottom of the stairs leading from the deck into the back yard. Last weekend the weather was great and I started by clearing out a huge patch of ivy and some random bushes (ivy seems to have been an obsession with the previous owner; we have several other sections in the yard). Around the ivy planter area are half buried cinder blocks (another great idea from the previous owner). Here are a few pictures of the ivy removal process. This wasn't loose, in the woods ivy, but dug in and roots spread ivy. In addition to the ivy, there were some leaves left over from last fall (how the hell are you supposed to rake ivy?!) as well as a couple little bushes. Once it was all cleared there were 11 bags worth of debris (not including the bushes, which I've left separate to let them wilt a tad). Ivy partially cleared (this first bit at the bottom was deceptively easy)  Click here for the full 800x600 image. This part was much more dug in and tangled.. I half expect to get dragged under Evil Dead style:  Click here for the full 800x600 image. Of course, Daisy had to supervise the job site. She loves stomping through the ivy and was confused, but too lazy to really complain about anything.  Click here for the full 800x600 image. After clearing the bulk of the ivy, I started prying up the shrubs. The one on the right came up pretty easy. The one in the middle was a real bitch and once I heard the wooden handle of my shovel give a little splinter/crack sound, I decided to call it a day and go to Home Depot to get a pick axe to deal with the roots (as well as a fiberglass handled shovel). The next day I was finally able to get the middle bush out as well as the rest of the ivy along the fence. Next up was bagging and cinder block removal. Bagging this made me really glad I don't have hay fever or allergies: 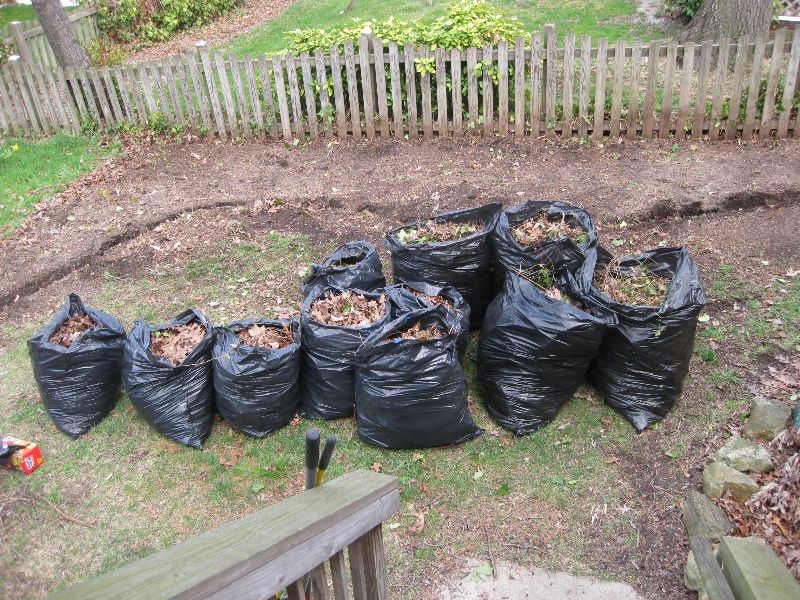 Click here for the full 800x600 image. Here are the cinder blocks. In the back under the deck you can see cinder blocks from another area that was cleared last year. 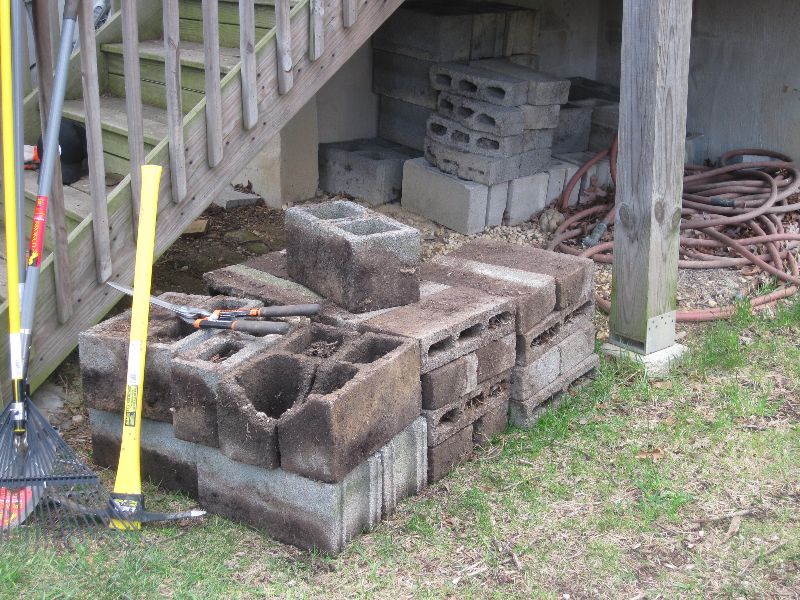 Click here for the full 800x600 image. Here's a final shot to get an idea of the space we have to work with.  Click here for the full 800x600 image. Finally, the fun stuff! Here is a Sketchup model of how I plan on doing the patio. The raised part farthest away from the house will be a circular seating area where we can put one of those metal fire pit dealies when entertaining. I decided to have that section higher to try and prevent too much damage to the nearby tree roots without sacrificing patio space. I've not yet had a chance to visit the local stone merchant, but there is a huge quarry near my house with a place right across the street that looks like it sells all the rocks under the sun.  Click here for the full 1366x738 image. Any feedback/ideas would be appreciated. I'm also still trying to decide what to do between the patio and the fence. This weekend I hope to clear out the mulched area next to the house and maybe stake out the patio layout. I'll also take a trip to the stone place to get material ideas as well as prices.
|
|
#
?
Apr 11, 2009 04:27
|
|

|

|
| # ? May 5, 2024 17:02 |
|
|
MikeNCR posted:
That 30lb robot looks great. It would shred my Botbash 2001 30lb champion robot if they were to ever meet. It is cool to see the evolution of the fighting robot. The range of competitive designs has certainly distilled down. My robot from nealry 8 years ago, Mr Smashy 2001: Wacky pneumatically loaded surgical tubing sprung over head cold chisel axe thing, assembled in 3 days from parts from my larger robot. 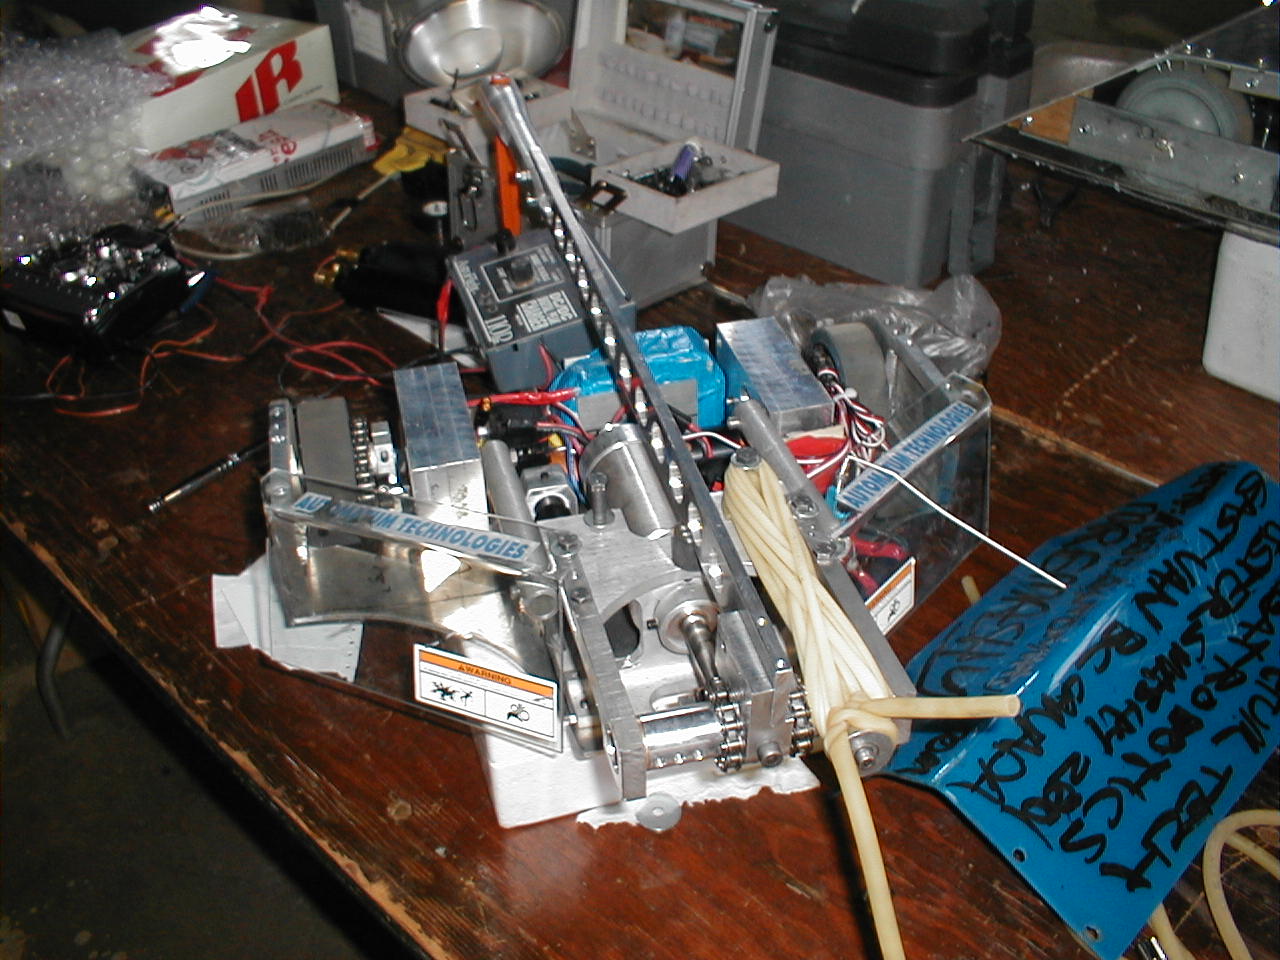 Click here for the full 1280x960 image. 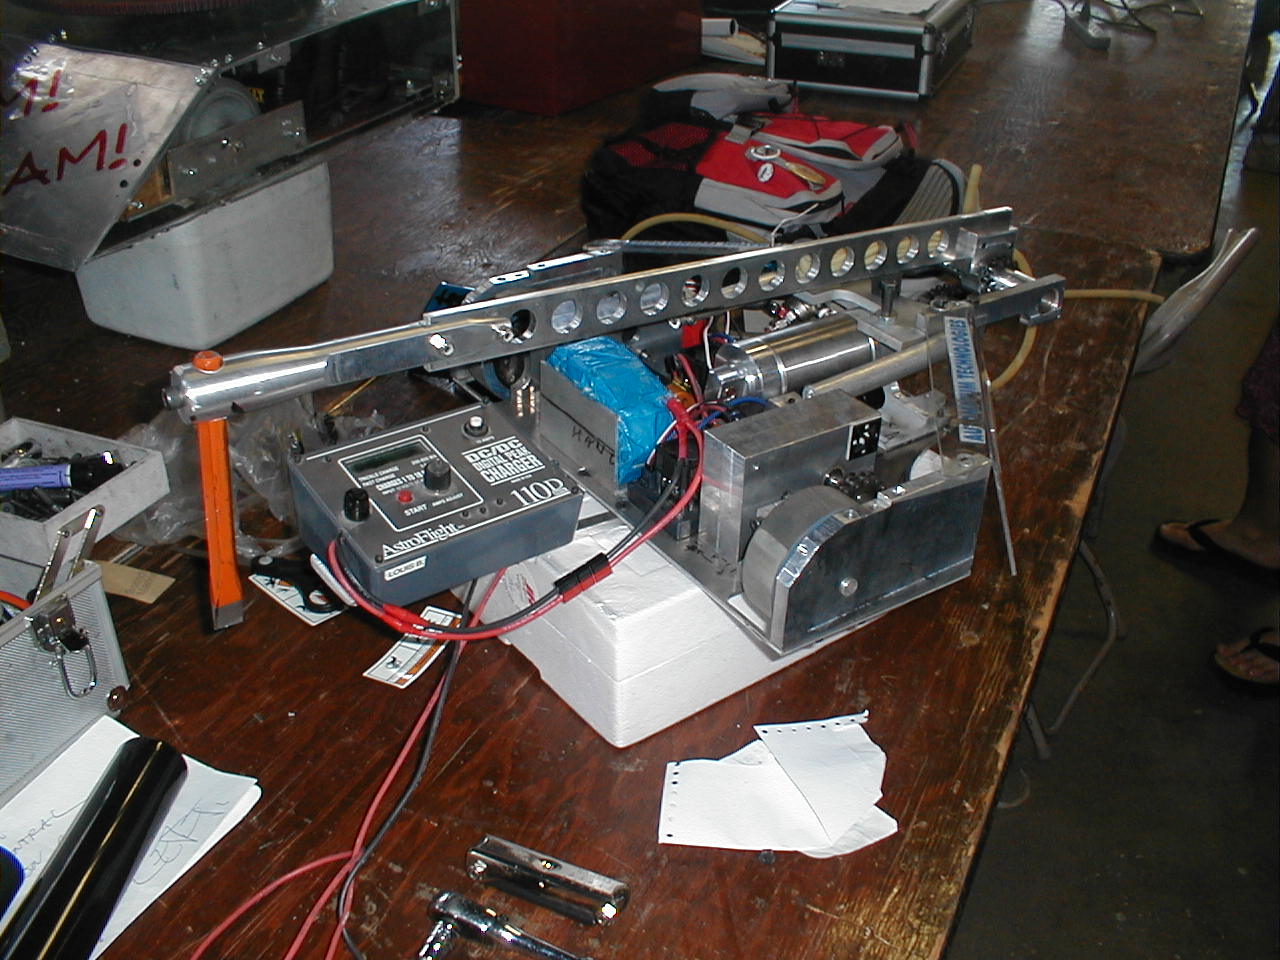 Click here for the full 1280x960 image.
|
|
#
?
Apr 13, 2009 04:24
|
|
