


|
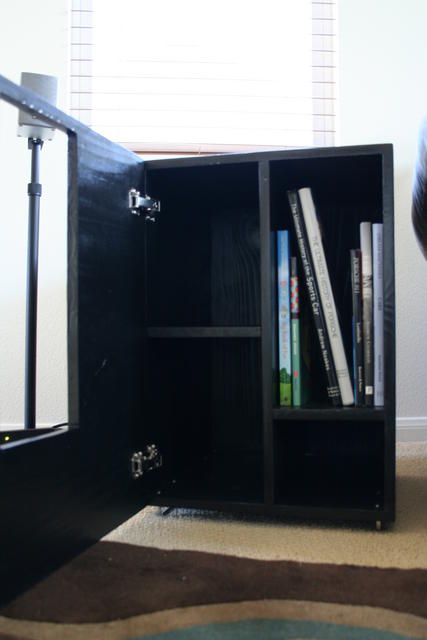
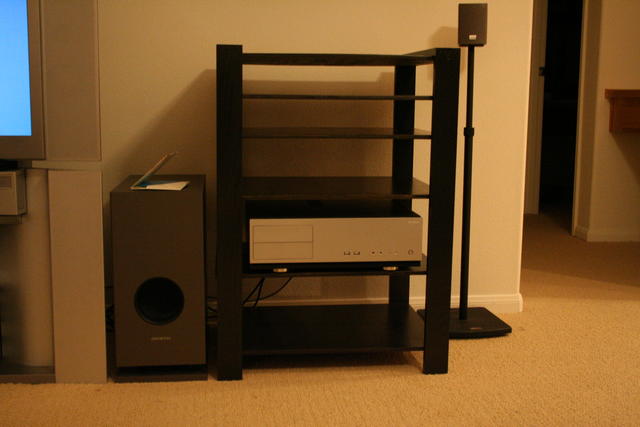
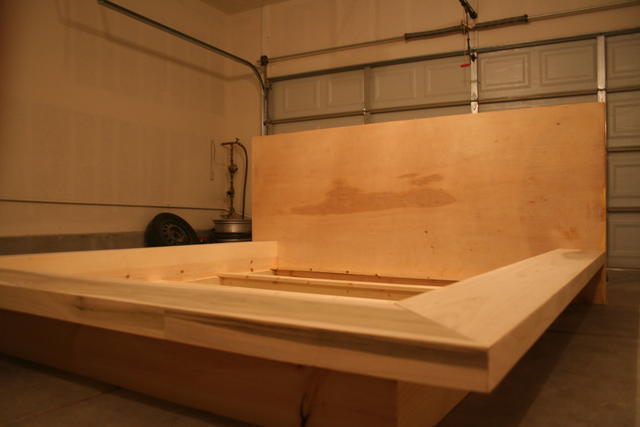
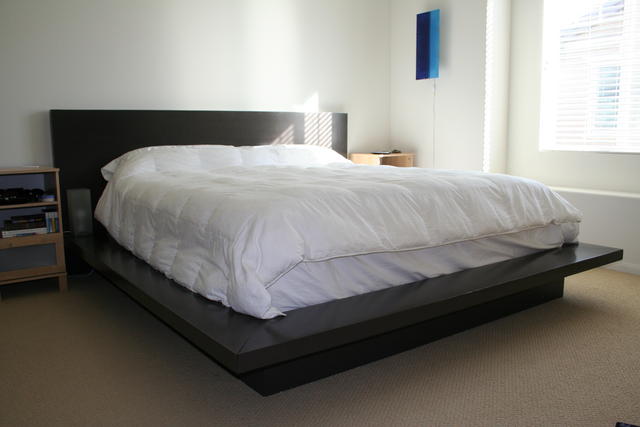
optikalus posted:Here are some projects I've built recently -- mainly because I can't justify the prices that some of the contemporary furniture outlets ask for what is just basic boxes with some black paint on them :P It's good to see something like this, because it gives me ideas. I like the platform look, too. My mattress is pretty old, as are the boxsprings and frame. Provided I stay here for grad school, I plan to get new mattresses and possibly build my own bedframe.
|
 #
¿
Jul 11, 2008 06:08
#
¿
Jul 11, 2008 06:08
|
|


|

|
| # ¿ Apr 29, 2024 04:24 |
|
|
I'm bored. I'm out of school for the rest of this month, and I'm itching to make something with hand tools. I don't care to make anything big, so I'm looking at making a small box; probably going to look at something I can put my cufflink, watches, and stuff in. I've got three questions: 1) Anyone have a set of plans? I'm really looking for ideas here. Some of the boxes posted earlier in the thread are neat, but I'm looking for something more... traditional. I'd like to browse sets of plans for ideas. I like the look of Shaker-style cabinets, but I kind of want something decorative for the 'feet' of the box. If you watched the New Yankee Workshop this past weekend, Norm built an "antique" table that had a scalloped skirt. Something like that is what I'm looking for. 2) Dovetails: Is there an easy way to cut these by hand? 3) Any recommended hand tools? I'm wanting to stay on a small budget, but I can afford a few inexpensive hand tools. I already know I'm going to need a better hand saw (maybe a coping saw?) I'll probably need a small plane. I've got a good set of chisels.
|
|
#
¿
Jan 4, 2009 22:12
|
|
|
That's similar to what I though I should do. It's fascinating to see different variations. Thanks!
|
|
#
¿
Jan 6, 2009 05:52
|
|
|
ChaoticSeven posted:So has anyone been making anything at all? I haven't been able to do anything much due to moving to another state and setting up the new house and shop. Still don't have my dust collection set up. Only thing I've made since Christmas is this box I started keeping seeds in. Meh. Not yet. I've been busy, but the first thing I plan to build (when I get a moment) is a side table. I want something simple and sturdy to put beside my chair. I know what I want; basically, a better version of the one I have now.* I got an idea for the top, too, that I want to try. Couple years ago on Garage Takeover I saw them make a worktable where they embedded screws and such in epoxy for the worktable's surface. I want to do the same with bottle caps. Basically, it's like concrete in a way. You build up a form around the top of the table, lay the caps down in a single layer, then fill your form with clear epoxy. It's pretty simple, I think. I'll be testing it out here in a couple weeks. *I bought it at Hobby Lobby. It's nice, but prone to tipping over.
|
|
#
¿
Apr 12, 2009 07:46
|
|

|
mcrandello posted:Dad always took a wet sponge or rag and went over it right after gluing until it was clean. You raise the grain a little that way but you're going to be sanding/scraping it again anyway, right? For what it's worth, this is what I've seen Norm Abram do for years on The New Yankee Workshop.
|
|
#
¿
Aug 7, 2009 02:42
|
|
|
I'm looking to make a couple of small boxes. I vaguely recall there being a site hat had lots of boxes on it - I'm looking to browse and get some ideas. I'm thinking of laminating a few oak dowels to form the sides of the box, but I'm pretty sure that wouldn't work, but I can't really think of any reason other than expansion/contraction of the wood. Good idea? Bad idea?
|
|
#
¿
Nov 5, 2010 05:02
|
|
|
QuarkMartial posted:I'm looking to make a couple of small boxes. I vaguely recall there being a site hat had lots of boxes on it - I'm looking to browse and get some ideas. Update: All the square dowels I could find were poplar, so I went with some 3/4"x2"x2' oak pieces. Pics will come when I'm finished with this box. It has some fairly crude, but completely handmade and tight, dovetail/finger joints.
|
|
#
¿
Nov 7, 2010 16:08
|
|
|
Starker44 posted:I want to redesign the bed, thinking like a captains bed with drawers underneath yet high enough to ditch the box springs. I did something similar with our bed when we couldn't get the boxsprings up the stairs in our house. I built two platforms for the mattress to sit on out of 3/4" plywood and 2x4s. Building two allowed me to get them up the stairs, then when they were in place upstairs, I could screw them together to make one platform. 3/4" plywood with a 2x4 frame, then doubled up 2x4s (to make 4x4 posts) for legs in each of the corners. I used single 2x4s in the middle for legs, so when I connected the platforms they'd make a 4x4 post. Made it so that it fit snugly within the bedframe and sat at the height the boxspring would if it were there, and a bedskirt hides the legs. It works great and does give you a lot of storage space underneath. I didn't include drawers in ours as that's not quite our style, but there's room and it would be a simple job to add them. However, I will suggest you look into a proper mattress as it will definitely make your bed more firm.
|
|
#
¿
Aug 18, 2013 00:42
|
|
|
My father-in-law's birthday is tomorrow, and we're thinking about getting him a new back door. The one he has now is solid wood, but has some broken glass, doesn't shut properly, and has no lock. The wife and I are going to investigate today to see if it's cracked or not; it might have a large crack in it as well. If it doesn't, then the plan is to just fix the old door by installing a new piece of glass, new coat of paint, and installing a deadbolt. Any tips on this process? I've seen new doors installed plenty of times to know how to do it, but those usually include the frame. This would just be replacing the door itself. Best course of action I can tell is to ensure that all the hinges are properly tightened and secured, then use a sander (or a handplane, but I don't have one...) to trim down the door until it fits and closes as it should. Still, I'd appreciate any advice someone with more experience may have on this subject.
|
|
#
¿
Aug 22, 2013 16:18
|
|
|
I'm on my phone, otherwise I'd share a link. For what it's worth, I found a jig by Dewalt that clamps to the door and with the use of a drill, it drills everything at once. I was planning to investigate that and see if it'd work. I do have a set of decent chisels (Stanleys, I think... Nothing amazing, but good enough), and I'll be sure to bring those along.
|
|
#
¿
Aug 22, 2013 17:40
|
|
|
Update: I got to check out the door, and unfortunately it needs to be replaced. It's beat to hell and can be easily pulled apart, so we're replacing it (I plan to take the door and make it into a new workbench  ) )My plan is to cruise a couple of salvage yards and find a door that'll fit, trim it with a plane (or saw, if necessary), and put it in place. Aside from lining up hinges and the lock (if it's not already cut for one), anything sound terribly wrong with this plan? Of course, my brother-in-law wants to go buy a new door and jamb from Lowes and install it since "they're only $200," but it's not his Lowes card paying for it!  Also, we're looking to get this done in a couple of hours as a surprise; we can't cut out an old door and jamb, install and trim out a new door in a couple of hours. Maybe we could, but frankly, I'm not spending what'll be 300 to 400 dollars once you factor in blades and other tools. Besides, the jamb itself is fine and doesn't need replacing. Also, we're looking to get this done in a couple of hours as a surprise; we can't cut out an old door and jamb, install and trim out a new door in a couple of hours. Maybe we could, but frankly, I'm not spending what'll be 300 to 400 dollars once you factor in blades and other tools. Besides, the jamb itself is fine and doesn't need replacing.
|
|
#
¿
Aug 23, 2013 03:32
|
|
|
I ended up going with the door + jamb set from Lowes. Salvage yard wanted $150 for a door and wouldn't budge on the price at all. Went to Lowes and got a great door for $189. It took my brother-in-law, myself, and an uncle (who does this for a living) to get it installed. My b-i-l and I had no idea what we were doing and ended up getting frustrated with trying to level and plumb a way crooked opening and warped floor. The uncle came in and had the door basically hung and shutting properly in 15 minutes. I'm going back over there this afternoon to trim it out and do some other finishing work. E: Even though it took us a lot longer than it should have (something like 7 or 8 hours so far), I'm not upset. It's our first time installing a door, so of course it takes longer, and we took the time to do everything right with proper shims and patching the floor* instead of just rigging it for now. *There's no floor in this part of the house, only some crappy subfloor. Our next project will be ripping the subfloor up, putting down a better one and putting a real floor in. briefcasefullof fucked around with this message at 16:38 on Aug 24, 2013 |
|
#
¿
Aug 24, 2013 16:06
|
|
|
My mother-in-law has an old door she wants made into an outdoor table. She wants a standard table, not a picnic style table. What is the best way to attach legs to it? Everything I'm seeing right now just has a skirt being made, then screwing the four pieces of the skirt into the legs, then bolting the skirt to the table... but there's no mention of screwing the legs themselves to the table. What I'm thinking is this: 1) Use pan-head screws instead of deck screws to bolt the legs to the skirt, and the skirt to the table top. 2) Use pocket screws to keep everything hidden and neat 3) Drill out the legs and bolt in some leveling feet. It'll mostly be used in a carport on a concrete pad, but I think these would be a nice addition to keep it from being wobbly. 4) Cut out a rectangular area where the knob and lock assembly currently is and use it to fit a metal bin [muffin tin sized] to hold napkins/condiments/etc. Is there anything in particular I need to do to prevent racking / side to side movement? I've not discussed finishes with her, but what are my options for paint? For a more natural look? It's the first thing I've built in a while, and I'm a little stoked to have something to do. It's a solid door her dad made for his house, and it just got replaced. He passed away about 20 years ago, so she wants to keep it as a reminder of him. I'm thinking that I'll turn it into a table, get the surface looking good and apply a natural finish (but something weather resistant as they can be neglectful...). I've not really built a table before, and I want this to turn out really well, so I'm open to suggestions.
|
|
#
¿
Jul 20, 2014 05:59
|
|
|
wormil posted:1) Wallow out the screw holes (or just use a drill bit a few sizes larger than you need) in the apron to give the top some ability to expand/contract. That way the top will be secure but the screw will have room to move side to side a little bit. It's a door so shouldn't move much but better to err on the side of caution. Thanks for the expansion tip. As for racking, I was referring to how to keep everything from moving back and forth. I guess if the skirt and legs are screwed together, and also screwed to the top, then it won't move. I just want to make sure there's nothing simple I'm overlooking to make the table more stable. Paint/Stain: Sorry that wasn't clear. Those are two separate thoughts, really. For paint on a table outside, what sort of paint should I use? For a stain, to get a more woodgrain/natural look, what would I use? I've not talked to her about what sort of finishes she wants, so I want to be informed about both with regard to how to make it hold up outdoors.
|
|
#
¿
Jul 21, 2014 04:30
|
|
|

|
| # ¿ Apr 29, 2024 04:24 |
|
|
wormil posted:When wood isn't allowed to move is when you get problems because it will move, nothing will stop it. Which is why the legs are only attached to the apron or else the top would pull everything apart. You're on the right track. One last tip and this gets a lot of people ... finish the top evenly, whatever you do to one side, do to the other. And flip flop, finish on top, then bottom, top, bottom, etc.; otherwise it can cause the top to bow or warp. Finishing evenly is definitely a good reminder, thanks! So, basically screw the legs and skirt/apron together, then screw that to the top (through the skirt), making sure to have slightly larger holes to account for expansion/contraction. Sound right? E: This is all stuff I'm familiar with and have basically done in the past, but since it's for someone else I just want to make absolutely sure I don't mess it up. If it were for me, and I messed up, I wouldn't sweat it near as much.
|
|
#
¿
Jul 21, 2014 17:24
|
|