|
I had the good fortune to acquire a set of Nikon PB-6 bellows late last year. It was the first time I was actually able to afford them, and I've been hooked on high-magnification work ever since. I mostly use old enlarger lenses, but I'm experimenting with old LOMO microscope lenses too (with limited success). My own interest is more in documenting critters in detail, so my setup involves stacking between 60 and 200 exposures of a single critter into one image. It's super labor-intensive, but the results can be really rewarding. Obviously, the subject have to be perfectly still (read: dead), so I try to collect only common bugs. Specimen handling, positioning and cleaning is a massive chore, and one that I struggle with quite badly, so any handy hints would be appreciated.  Click Beetle - A Portrait by spongepuppy, on Flickr  Bull Ant (Myrmecia Nigrocincta) by spongepuppy, on Flickr These were created with Zerene Stacker, which is a great piece of software written by a microscopy enthusiast / retired programmer. If you're interested in this sort of thing, I really encourage you to give it a go - it's truly excellent.
|
 #
¿
Mar 1, 2013 09:04
#
¿
Mar 1, 2013 09:04
|
|


|

|
| # ¿ May 16, 2024 08:58 |
|
|
Graniteman posted:The shot below has those bands of out-of-focus regions. It's a live critter, not studio, but still not as good as I would hope for 30 stacked shots. I am slowly talking myself into a StackShot, but I don't know if the rest of my technique is up to it. I've got a Tamron 90mm, but the old EL-Nikkor 50mm/2.8 I use is sharper on the bellows, and is much lighter, which helps keep the bellows stable. The one I got was moldy inside, but it was easy enough to clean, even for someone with no practical skills like myself. I have also had fun with the stuff from Surplus Shed, some of which is remarkably good, and costs $3-5. Graniteman posted:I'd love to hear more about what you do for specimen prep and lighting. There are some fantastic Chinese friction arms that are copies of Manfrotto's "magic arms" that I am working on adding to my setup. They have ball joints at both ends and a central pivot with a locking knob that locks the whole assembly when tightened (the cost about $10 on ebay). On the specimen prep front, at the moment I pop critters in the fridge before submerging them in methylated spirits. I don't want to make the critters suffer, so I always wait until they are torpid from the cold before doing this. The metho kills and cleans them without leaving much residue, but you need to let them dry back out before shooting, and hairy bugs tend to wind up looking matted no matter whay I try. I have found that leaving them immersed in the methylated spirits for too long causes the sclerotized parts of the exoskeleton to go clear and lose its colour. Also, it turns green bugs (like grasshoppers, katydids, leafhoppers) yellow. Dia de Pikachutos fucked around with this message at 06:55 on Mar 2, 2013 |
|
#
¿
Mar 2, 2013 06:52
|
|
|
Graniteman posted:The enlarging lenses are cheap on ebay so I'll scoop one up to try it. I've got a Nikon 10X/0.25 CFI BE Planachromat lens on order at the moment - it should give me better image quality, and without the need to use the bellows. Cost was $75US from opticsplanet.com. It's an infinity corrected objective, which means you need a converging lens between it and the imaging plane. To get the rated magnification, a 200mm lens (focused to infinity) is the go. Apparently you can push infinite objectives to lower magnifications by sticking them on the end of a lens with a shorter focal length - so I'm planning to use it on an old 135mm lens. The numerical aperture stays the same, so in theory I should get better sharpness from this than with my enlarger lenses, because they're seriously diffraction limited at that magnification (about 6.5x). I'll post some images once I've had a go.
|
|
#
¿
Mar 10, 2013 07:59
|
|
|
Graniteman posted:I ordered a 4x infinity corrected objective, too. It's back ordered 30 days or so, but I'm also looking forward to playing with that. I think a higher magnification would require the stackshot. The Nikon CFI 10x BE PLAN arrived today. No time for a proper test, but I did locate one tiny victim for a quick resolution test:  Nikon 10x/0.25 BE PLAN Test by spongepuppy, on Flickr That crop is from a 1mm wide section of the bug - resolution is outstanding! I'm using a $20 T2-mount Titar 135mm f/3.5 lens as a tube lens, and it seems to work just fine. On the downside, pushing the 10x down to 7x means extremely tiny DOF, which translates into lots of stacking time. Still, I'm looking forward to some great results. Let us know how you go with the 4x!
|
|
#
¿
Mar 23, 2013 08:27
|
|
|
Graniteman posted:Correct me if this is wrong, but my understanding is that your 10x and my 4x are both at their nominal magnification on a 160mm tube lens. I'm not sure. The old DIN/JIS specs were mostly for finite lenses, and used a 160mm long tube between objective and eyepiece. Once most manufacturers moved to infinity corrected systems, the focal lengths of the tube lenses diverged, since the design of the optical systems mean that the tube lens FL only impacts on magnification. All of the Nikon literature I have found says that they use 200mm tube lenses for their CFI objectives, but there is precious little documentation on the BE series (that I could find). They don't seem to be touting compatibility with 3rd party systems, so it's possible that they're 200mm because that how they roll at Nikon. When I have some time to test I'll work out what the actual magnification is (and hopefully what FL Nikon uses for these lenses). Graniteman posted:In any case, I was planning to put my 4x on the front of a 100-400 L as a tube, so I could then move the magnification up and down. I haven't tried my 80-200 2.8 yet. I'm unsure what impact the zoom lens design will have in terms of vignetting (if any), since I did find that cheap yum-cha brand objectives tended to vignette badly on my zooms. Will post results when I do some tests - being able to zoom would be a boon!
|
|
#
¿
Mar 24, 2013 22:23
|
|
|
Nice! I often comp together a Dmap and Pmax stack, because the Dmap image has cleaner margins/background. Sometimes it's problematic on hairy things though. Incidentally, the boffins on the microscopy forum have confirmed that Nikon uses 200mm tube lenses on all of their CFI objectives  Edit: Have done a couple of fairly deep stacks with the CFI 10x. If these are representative of the 4x, then I'm buying one ASAP. This one was 167 images:  Newly moulted White-tail spider by spongepuppy, on Flickr And this was 176 images (and I still didn't get all of it):  Woodlouse Carapace Detail by spongepuppy, on Flickr Dia de Pikachutos fucked around with this message at 08:43 on Mar 31, 2013 |
|
#
¿
Mar 25, 2013 06:18
|
|
|
Bellows units are bulky, and the effective aperture of most lenses at long extensions/high magnifications means you have a very dark viewfinder. It's not impossible to do, just difficult. I can't use my PB-6 bellows hand-held, but that's probably more a reflection of my spaghetti arms than anything else. Some people do some superb high magnification work with reversed enlarger lenses or short focal length primes stopped down. I have had some success using LED torches as focus aids with reversed enlarger lenses (and it costs $20-40 for a cheap 40mm enlarger lens). Where the MPE would shine is being able to compose and focus wide open, and then stop down when making the shot. TTL flash metering is also rather nice. I haven't used an MPE myself, but some owners I know have complained about the fact that it's sometimes difficult to light subjects over the wide, blunt barrel. Sticking a teleconverter on macro lenses works to increase maximum magnification, since the minimum focus distance remains the same. Since you're usually stopping the lens down to f/11 or more the loss in quality is pretty marginal. I have used a 1.4x TC on my Tamron 90mm to go up to 1.4x life size with great [optical, not artistic] results. I imagine that you could also throw extension tubes there to push things even more. The Raynox DCR-series macro close-up lenses can increase maximum magnification, too. This guy even managed to make the Canon 100mm macro into a telecentric lens at some magnification ratios with one.
|
|
#
¿
Apr 3, 2013 10:56
|
|
|
quote:Do tubes exaggerate inherent lens flaws? Extension tubes push a lens a long way past their intended design envelope. quote:What I get is crisp center with image getting blurrier as I get to the left and right edges... This is happening at f8. Stopping down to f22 helps a lot with the edge blurriness. I have checked the film flatness, and it seems ok. Putting a regular SLR lens on extension tubes violates the lens designer's assumptions about the distance relationship between subject and imaging plane. Increasing extension magnifies the image, and any aberrations it has. This generally means increasing spherical aberration (and CA if relevant). Enlarger lenses are designed the opposite way - the distance to the subject was constant, and the distance to the imaging plane varied. Consider buying an old enlarger lens and doing the same thing - the field will be much flatter, although you may need to reverse it for best results. You can score EL-Nikkor 50 and 75mm's for a song on ebay (added bonus: and they also make great macro lenses). You could also try reversing the 85mm lens, since this would reverse the distance relationship in the right direction (because most lenses are designed on the assumption that the front element is further away from the subject plane than the rear element is from the imaging plane). Dia de Pikachutos fucked around with this message at 08:45 on Apr 7, 2013 |
|
#
¿
Apr 7, 2013 08:39
|
|
|
Sorry, I keep forgetting that most people don't stuff about with bellows units. I guess you could try extension tubes with the enlarger lenses, but it might be difficult to get exactly the right reproduction ratio. Pretty much any macro lens would be great for slide copying - 1:1 and 1:2 are where they're optimized for best performance. I doubt you'd be able to find a macro lens without a very flat field.
|
|
#
¿
Apr 7, 2013 10:04
|
|
|
f8-f16 is probably good starting point, assuming you can see what you're doing through the viewfinder. You'll find that DOF decreases as magnification increases, though, so don't sweat getting everything in focus - I usually just try for the eyes. Alternatively, you can try focus stacking, unless you value your sanity.
|
|
#
¿
Apr 8, 2013 11:29
|
|
|
Danoss posted:I'm wondering how well using Photoshop's auto align/auto blend layers would go to achieve this in comparison. As of Photoshop CS5.1 (which I am currently using), the auto align works really well, and the auto blend basically is the same as using DMap in Zerene stacker / Helicon Focus / CombineZ. Good for some things, but not for anything with hair/bristles. CS6 may have brought improvements that I don't know about. It's also limited in that you need a terrific amount of memory to stack more than a few photos, because each slice is loaded into a separate layer. It also (from memory) loads every image to be stacked before commencement. My home machine has 24 gigs of ram, and I brought it to its knees trying some fairly trivial stacking early on.
|
|
#
¿
Apr 10, 2013 06:59
|
|
|
General Apathy posted:I'm just starting with macro and photography in general so I would appreciate some advice.
Dia de Pikachutos fucked around with this message at 09:35 on Apr 14, 2013 |
|
#
¿
Apr 14, 2013 06:20
|
|
|
General Apathy posted:I think one of my major problems is I'm using a cheap microscope objective, most likely a chinese one, would it be a better idea to avoid microscope objectives and go for something like an enlarger lens? To achieve 10x magnification with an enlarger lens, you'll need bellows or a pretty spectacular set of extension tubes. Or a relatively exotic enlarger lens, like a Schneider 28mm Componon S, which is way above my pay grade. On one hand, you would have a lot more flexibility in your magnification / DOF / working distance options with bellows and enlarger lens. On the other, at 10x you're well into diffraction territory with a f2.8 enlarger lens wide open. So in many respects it depends on what magnification ratios you're working in, and how much flexibility you want. If you're using an infinity corrected objective with tube lens, then the the Nikon CFI BE 4x and 10x lenses are both high quality, well-tested options. I have recently acquired the 10x, and it is easily the best lens I have used to date. It costs $99 at opticsplanet.com. It only has a working distance of 6.7mm, which can be limiting, though. Both of these lenses can also be pushed to lower magnification ratios - I use the 10x at 6.75x (by connecting it to a 135mm lens instead of a 200mm). e: How are you coupling the microscope objective to your camera? Can you post up any info about the objective? Depending on your setup you might be under-utilizing the objective you already have. Infinity-corrected objectives need a converging lens between the objective and the imaging plane, whereas finite objectives generally need ~160-180mm of empty extension instead. You can do it the other way around, but at the expense of optical performance. Dia de Pikachutos fucked around with this message at 09:34 on Apr 14, 2013 |
|
#
¿
Apr 14, 2013 09:30
|
|
|
If you've got lots of extension tubes, you could use reversed enlarging lenses quite happily for lower magnification work. Have a look around for old LOMO microscope objectives. I had good results from the 9x, which is a stubby little thing with a good inch of working distance. They were supposedly for use with compensating eyepieces, but you can correct a lot of the lateral CA in post.
|
|
#
¿
Apr 14, 2013 10:20
|
|
|
InternetJunky posted:In terms of the 65mm, if I want to get more than 5x can I use extension tubes? As Platystemon says, your effective aperture will become a limiting factor in resolving detail. Assuming you're shooting at 5x wide open, your effective aperture would be f16. Increasing magnification with extension tubes would increase your effective maximum aperture progressively: 5x = f/16.8 6x = f/19.6 7x = f/22.4 8x = f/25.2 9x = f/28 10x = f/30.8 etc. How much of that additional magnification would yield additional detail would need some testing. You can calculate (roughly) the effective f-number with the formula: Effective f-number = f-number x (magnification + 1)
|
|
#
¿
Apr 15, 2013 06:57
|
|
|
NoneMoreNegative posted:I don't want to make you guys Actually, it made me  a bit. a bit.
|
|
#
¿
Apr 20, 2013 11:39
|
|
 but it needs to be posted
 ")
|
Danoss posted:I know these photos aren't the best, but I saw my first ever jumping spider today and was really excited. These are great! Content:  Cockatoo flight feather by spongepuppy, on Flickr I made up a handy PS action for removing light falloff that I used on this image - it is here if you want to give it a go. Dia de Pikachutos fucked around with this message at 00:16 on May 3, 2013 |
|
#
¿
May 3, 2013 00:05
|
|
|
 Rhinotia hemistictus by spongepuppy, on Flickr
|
|
#
¿
May 7, 2013 14:55
|
|
|
Graniteman posted:Finally got some time to play with my 4x microscope objective. These are fantastic. I've done some fairly crap stacks with my 10x so far, but I hope to do some good work soon.
|
|
#
¿
Jun 5, 2013 09:59
|
|
|
Graniteman posted:Thanks! You do some great work so I appreciate the comment. Random household objects. Fruity coloured paper gift bags are quite good, because they stand up by themselves. The backgrounds in most of my better stacks on Flickr are the front cover of my copy of Invertebrate Zoology (Fox, Barnes and Ruppert) .
|
|
#
¿
Jun 6, 2013 09:21
|
|
|
Edit: [Crappy image removed] 2013-06-10-17.58.49 ZS retouched by spongepuppy, on Flickr Edit: Now with better processing. 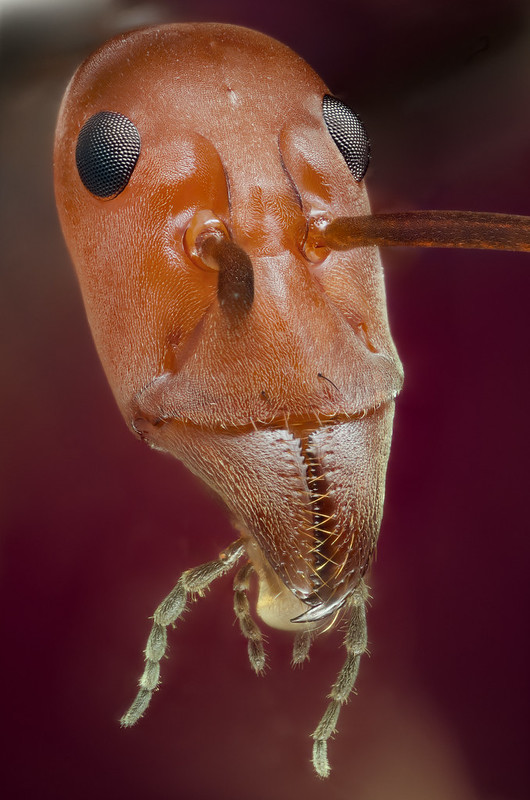 Leptomyrmex erythrocephalus by spongepuppy, on Flickr Dia de Pikachutos fucked around with this message at 11:41 on Jun 10, 2013 |
|
#
¿
Jun 10, 2013 09:26
|
|
|
^^^ This is great
|
|
#
¿
Jun 11, 2013 11:14
|
|

|
Most of my stacks are between 70 and 250 images, shot in raw. I generally use Zerene's PMax method, because it handles complex detail better. The reason for this is the way it works - essentially, it separates everything into component frequencies and then takes the parts with the highest detail at each scale. That's why backgrounds and specular highlights end up funky. If the subject isn't very hairy, I do a second DMap stack, and set the slider to the lowest possible setting, and then basically brush in the margin that way. If the subject is hairy, then it's much more painful, because you get those crappy artifacts you refer to. I have had some success in using frequency separation to separate the high frequency detail from the low, and then basically paint in a flat background, although it's quite labour intensive. My workflow is basically the same as yours - the only difference is in the sharpening side of things:
Since I'm operating in diffraction territory, Smart Sharpen does a really good job of reconstructing pixel values and building high-frequency contrast. Here is a 100% pixel-for-pixel example of before/after: 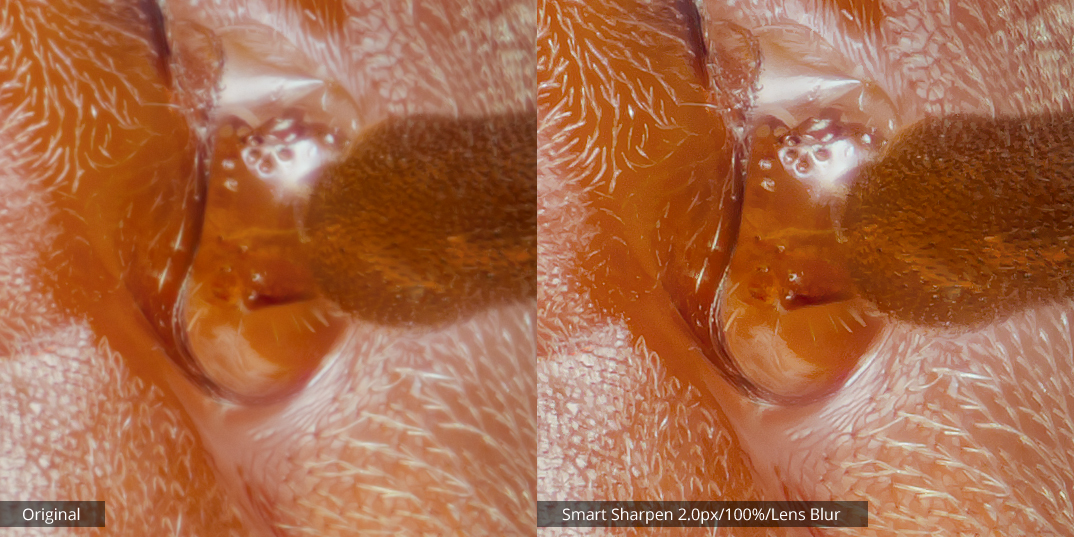 ppexample by spongepuppy, on Flickr
|
|
#
¿
Jun 12, 2013 10:32
|
|
|
Pre-press (over)sharpening really depends on output size and effective image resolution, as well as the actual printing process. I don't tend to print much of my stuff (because I always hate it on some level). I find that inkjet prints need *heaps* of sharpening, while most non-inkjet digital processes seem to include a certain amount of sharpening at the RIP stage. Lithographic offset print is pretty tolerant of heavy oversharpening provided that the screens aren't that fancy new stochastic-dot type that make everything all gritty.
|
|
#
¿
Jun 13, 2013 12:00
|
|
|
Mr. Despair posted:
For those of us with a morbid horror of spiders, smaller is generally preferable. Edit: you could probably do some pretty amazing stuff with moulds and lichen with a setup like that. Maybe even catch a few tardigrades? My microscope objective setup is worthless for field use, but something like that where you could stop down the front objective could be great (if you can keep it steady). Dia de Pikachutos fucked around with this message at 08:30 on Jun 18, 2013 |
|
#
¿
Jun 18, 2013 08:23
|
|
|
Abugadu posted:My friend recently opened his website where he does macro photo/video of nudibranchs and other tiny marine life from the Philippines and Guam, worth a look I promise gently caress yes, these are amazing
|
|
#
¿
Jul 3, 2013 10:17
|
|
|
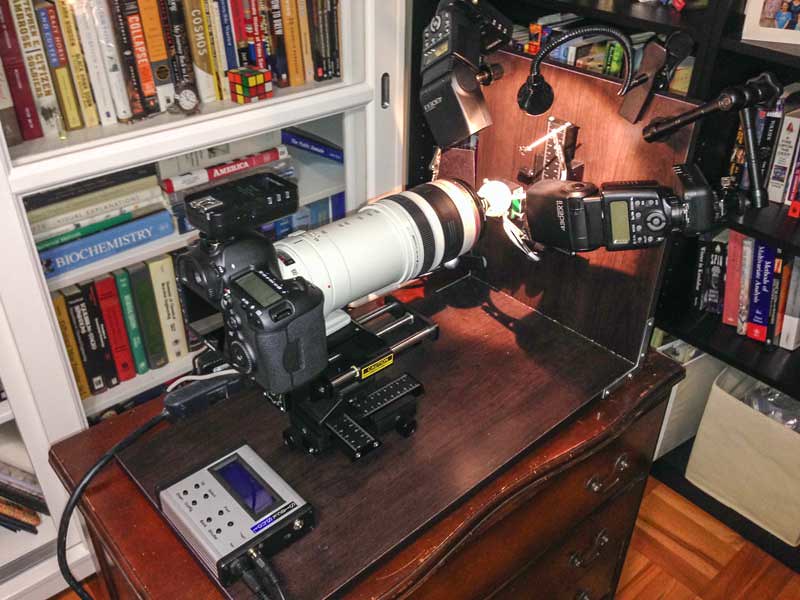
Tricerapowerbottom posted:The guy on the blog says he's using a reversed Nikkor EL 50mm f2.8 on "cheap bellows", a Yongnou YN560 flash, a styrofoam cup, black paper "hood", and a manual focus rail. My question is, is this the cheapest I can get away with? The Nikkor enlarging lens and Yongnou flash seem reasonable when I look them up individually, but I don't know what reversing adapter, bellows, rail, hotfoot to flash attachment, and remote shutter release I would want to get. I'd like to keep it as cheap as possible, of course, but don't want to gently caress myself by buying something that doesn't fit, or end up with really lovely shots because of some technical aspect of a component that I didn't think of or wasn't aware of. This is a pretty flexible setup, but you'll probably need to look into something better than a cheap bellows for stacking at the upper end of your magnification range. Even with a motorized rail, probably be best magnification you can really hope for is about 20x, so an object-size frame size of about 1.2 x 0.8mm. I haven't had any luck at that size, though, because the scale of even small movements is huge, and diffraction destroys detail at those scales unless you use some fairly good microscope objectives. I use a Nikon PB-6 bellows with various enlarger lenses and microscope objectives on a stackshot motorized rail (http://www.cognisys-inc.com/stackshot/stackshot.php) with a couple of YN-560's. I can't overstate how much of a boon the stackshot rail is for this sort of work. You can find PB-6's in good condition for ~$300 on ebay, and it's an investment you won't regret. You can use the bellows movements for low-magnification (0.5x - 1.5x) stacking if you have good technique (I don't). Some Pentax M42 bellows would probably suit as well (with suitable mount adaptors), and they seem to share many design elements with the PB-6. More recently, I have been using $6 M42 extension tubes instead, because they are less bulky and super solid. I have 4 sets, for greatest flexibility. I have wasted money on those cheap bellows units, and they are uselessly flimsy - stability will be something you NEED at high magnification. For lenses I use:
These give me a wide magnification range, although at greater than 2x you are probably going to get better results from a regular macro lens. Also, don't waste you money on generic Chinese microscope objectives - they are all rubbish, and you can get old LOMO objectives for the same price. The boffins at http://photomacrography.net/forum have a wealth of information on setups (for every budget), lens choice and lighting technique. Take a look - you will probably have all of your questions answered in short order if you have a click around for an hour or so. A number of the forum regulars are award-winning micrographers, and they're always eager to help by answering [well-composed] questions.
|
|
#
¿
Aug 22, 2013 23:42
|
|
|
Bob Mundon posted:Anyone have any experience with the Tamron 60mm f/2? Sub $300 on KEH and was thinking of it as a good intro to macro lenses, potentially being able to double as a portrait lens. Am I far off on that? I have it, and optically it's great, with a working distance only slightly shorter than the 90mm. BUT the AF is terribly slow (on my Nikon), so bear that in mind for non-macro stuff.
|
|
#
¿
Sep 17, 2013 10:18
|
|
|
Bob Mundon posted:If you were to combine it with extension tubes, what kind of stuff could you do? You could push the maximum magnification well past 1:1, although potentially at the cost of some optical quality as you push the lens further outside of its design envelope. I've never tried the 60mm on extension tubes, but it would probably be OK. You may find that reversing it once you start using longer extensions gives better quality at higher magnification (although aperture control would be problematic).
|
|
#
¿
Sep 19, 2013 14:09
|
|
|
Finally got a chance to test the Lomo 3.7x/0.11 microscope objective I ordered months ago. It's very sharp across the field, so for $35 it's a winner in my book.  Lomo 3.7x/0.11 Test by spongepuppy, on Flickr
|
|
#
¿
Oct 5, 2013 04:48
|
|
|
Blacking out the silver trim ring helped, from memory. You may also need to fashion a short hood over the objective, because the one I have looks to be single-coated (or maybe even uncoated). The tube length is 160mm, less 10mm, so you want the distance from the objective shoulder to the sensor plane to be around 150mm. For my Nikon, that ends up being about 105mm of bellows. You can use shorter extension, but the edges get worse and worse the more you push the magnification down. I actually prefer the Lomo 9x to the Nikon 10x - the Nikon is optically better, but it's a pain in the rear end to work with because the working distance is so much shorter. So far I'm really impressed with the 3.7x, which is *nearly* an APO lens as far as I can tell. It's really contrasty, too.
|
|
#
¿
Oct 7, 2013 01:26
|
|
|
Some pictures of things that aren't bugs and flowers: RBY by spongepuppy, on Flickr  RY by spongepuppy, on Flickr  BY by spongepuppy, on Flickr
|
|
#
¿
Oct 20, 2013 04:41
|
|
|
AceClown posted:* does anyone know why this lens only macros at 70mm? If it's crazy lens science I understand but it just seems strange. I think they figure that anything in the 1:4 - 1:2 range justifies throwing "macro" into the name. Tamron used to do this a lot with their "Tele Macro" zooms. I have a couple them - one is a 35-135 where you get a whole lot of extra travel in the focus mechanism once you zoomed to 135mm - which gives 0.25x magnification at closest focus. It's a push-pull design, so you can't zoom back out until you focus at the minimum focus distance for the rest of the range, but it does work pretty well in a pinch once you stop down a little bit.
|
|
#
¿
Oct 26, 2013 04:56
|
|
|
Depending on its design, the plane of focus might actually be inside the lens at those focal lengths (with the amount of extension you're using). You may find that reversing those lenses gives you more flexibility at wider focal lengths, if you can get away with it - if you can't use less extension, that is. Edit: I have had trouble with wide-angle lenses on extension tubes for exactly this reason. Dia de Pikachutos fucked around with this message at 13:13 on Oct 26, 2013 |
|
#
¿
Oct 26, 2013 13:09
|
|
|
Graniteman posted:Loving my new stackshot. I'm hoping to assemble a shooting stage over the holidays this month. Just some wood and rails bolted together so I don't have to keep putting things together and breaking them down every time I want to shoot. Yes....YES! I need to dust my stackshot off and get shooting again.
|
|
#
¿
Dec 11, 2013 10:23
|
|

|
William T. Hornaday posted:Is anyone here using focus stacking, or is everyone mostly just using tiny apertures and a buttload of light? I figure the latter is easier for things that aren't inclined to sit still for very long. I've seen some amazing focus stacking work done in the field, it's just not something I have the patience to do. I find that even a studio setting bugs that look dead are often not nearly as dead as they appear once you get to 3-4x life size, and small plants can dry so quickly that they move considerably over the course of a 50-80 image stack (~4-6 minutes). I get around the former problem by giving them a swim in some isopropyl alcohol for a day or so, but that causes issues of its own when the subject is furry or has certain types of pigment.
|
|
#
¿
Dec 13, 2013 22:50
|
|
|
Content!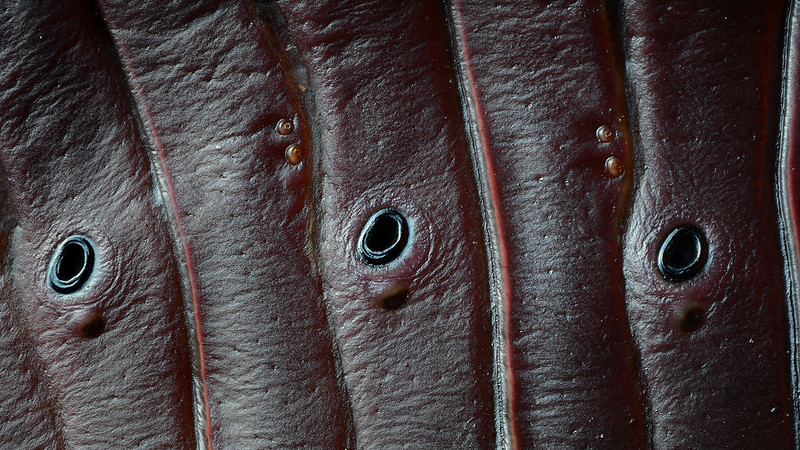 HR Giger's Bathroom by spongepuppy This is a small section of the abdomen of a Bronze Orange Bug (the whole thing looks like this)
|
|
#
¿
Dec 16, 2013 10:41
|
|
|
Graniteman posted:pretty fantastic. Are those the spiracles (insect body breathing holes)? Yes - they're quite prominent on this one, but I'm not sure what the little paired structures are on each segment above and to the left of each spiracle. They seem to correspond to each spiracle, but they don't look like mechanoreceptors.
|
|
#
¿
Dec 17, 2013 04:24
|
|
|
ah forget it posted:This is like super interesting considering the price and magnification. BE Plan seems to designate cheaper lenses for Nikon Eclipse E100 microscope. Now if I could find seller in EU... Don't forget that you can still get some fairly stellar results with finite objectives - you can stick them on the end of some $5 m42 extension tubes for a super cheap, light and stable setup. LOMO objectives can be good and cheap in Europe. Graniteman posted:Spongepuppy does great work and has a similar workflow to me so if he wants to chime in to correct / add anything I'd like to hear it too. ^^ Everything Graniteman says is true.
|
|
#
¿
Jan 9, 2014 08:02
|
|
|

|
| # ¿ May 16, 2024 08:58 |
|
|
Super ghetto polarised light microscope setup ahoy (for 10x):  Hoping to get some 40x action happening soon. E: Super 40x photos:   Dia de Pikachutos fucked around with this message at 11:16 on Jan 21, 2014 |
|
#
¿
Jan 17, 2014 00:29
|
|