


|
 Welp I started this last night, hopefully I can get everything finished by PAX. I know it is a long ways off but this is my first time doing a number of things that are needed for this project.
|
 #
¿
May 8, 2013 05:27
#
¿
May 8, 2013 05:27
|
|

|

|
| # ¿ May 15, 2024 02:12 |
|
|
TwystNeko posted:Nice! I just ordered a Guy-Manuel helmet kit, and I'm waiting for it to arrive. I got my vac-pulled glove kit as well already, but yeah I would suggest making a mold of your hands in alginate: https://www.youtube.com/watch?v=2xUo2wfsM1Q That way you can sculpt freely on your new hand ")
|
|
#
¿
May 9, 2013 21:16
|
|
|
TwystNeko posted:Where did you get the glove kit from? Volpin? Yeah Volpin set of glove plates they are really high quality... but its gonna be a ton of sanding/cutting 
|
|
#
¿
May 10, 2013 00:32
|
|
|
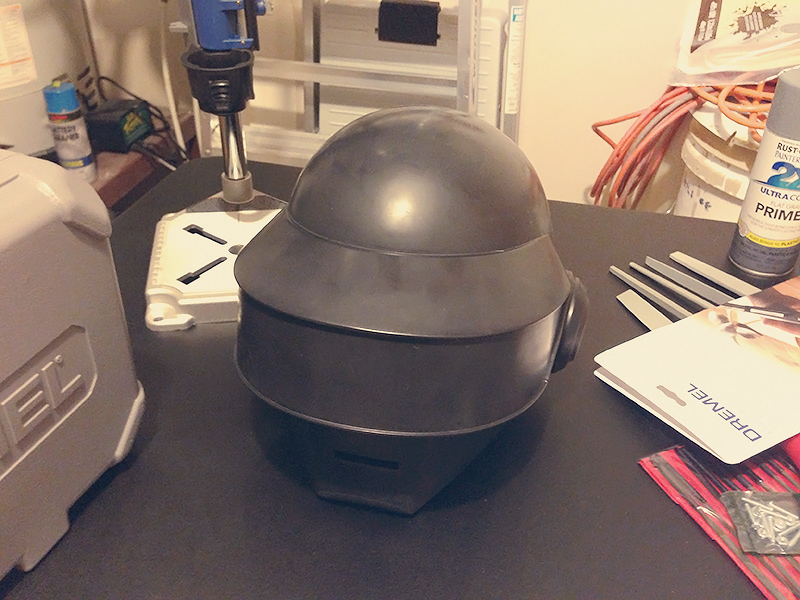
Progress! Sub-frame visor for the helmet is now hardware complete. Next up: templates for led bending/soldering, more trimming, sanding, and helmet work! Gotta get that ready for chrome.   
|
|
#
¿
May 14, 2013 07:28
|
|
|
TwystNeko posted:Looking good! Are you doing a full LED scroller? It's like you read my mind. I am adding a Bluetooth chip to my arduino and will have that work with an iOS app that should allow for both preset patterns as well as a full dynamic scrolling text system. ...I hope...
|
|
#
¿
May 14, 2013 09:35
|
|
|
I made a LED soldering jig. Not the straightest but it SHOULD work *crosses fingers* I wish I had a drill press with a laser pointer guide, would have made things soooo straight. 
|
|
#
¿
May 15, 2013 08:33
|
|
|
Hey look someone finished cutting out giant chunks of plastic and is learning to solder tiny circuit boards!  
|
|
#
¿
May 19, 2013 10:53
|
|
|
And he said: Let there be (LED) Light! (also some bondo work on the helmet to fix knicks/dents)   
|
|
#
¿
May 27, 2013 08:52
|
|
|
Helmet progress over the last two weeks: helm: primed, sanded, and more fill/touch up work... getting close to being chrome ready!  Battery powered with a on/off master switch working!  All but one of the 8x8 grids are done... sooooo close!  All prototyped up and verified that it works and I am not just a crazy person!  ANIMATION! 
|
|
#
¿
Jun 9, 2013 21:55
|
|
|
TwystNeko posted:So I finished up the trimming of my Guy-Manuel helmet today. Now it's a matter of sanding it nicely, then buffing it. looking fantastic! For heavy duty sanding (removing chunks and smoothing it out) i use a dremel with a sanding drum attached. Then you will want to most likely get grits 100 - 2000 and just wetsand the poo poo out of it until it is SUPER smooth.
|
|
#
¿
Jun 14, 2013 01:18
|
|


|
PezMaster posted:/\/\ I'm sorry about your puddle Why didn't I think of this! I have been dreading the visor... Did you just go to a local "plastics" shop? What did you ask them? I need to just do this.
|
|
#
¿
Jun 19, 2013 18:53
|
|

|
PezMaster posted:
Pez its looking great! Come out to Pax and lets be thomas buddies! If/when you are ready for electronics let me know and I can help some as I have been struggling through it for weeks
|
|
#
¿
Jun 22, 2013 20:21
|
|

|
progress shots because we are talking about shiny robot heads! Made progress on the helmet, this week gonna try and make visors. The plastic came in and I am scared! Just need to finish smoothing off the bezel that goes all around the visor area. I went with a slightly thicker and more uniform bezel from RAM because I think it looks nice and framed.  Oh and this happened:  Action shots:  
duros fucked around with this message at 10:45 on Jun 23, 2013 |
|
#
¿
Jun 23, 2013 10:42
|
|
|
LeviathanGunship posted:I have a question about visor tinting (which maybe relevant to you guys doing the awesome Daft Punk costumes). I'm currently working on a Protomen costume but unfortunately the helmet I bought does not have have a decently tinted visor, so I'm lookiing for low-cost ways of tinting my clear visor. The two best options I've seen so far are tinting it with RIT dye (which seems too light for me) or going with a spray tint like Night-Shades. Has anybody tried these methods before and if so how effective were they? I plan on using RIT dye and you can do multiple "baths" to get the desired darkness. All you need to do is dunk it in ice water for a bit in between dips into the RIT water
|
|
#
¿
Jun 27, 2013 18:44
|
|
|
PezMaster posted:After attempt #5 of the Guy Manuel visor at 1am, I'm saying gently caress it - building a vacuum forming table this morning, hopefully will have something useable by this afternoon. Also on my list: installing electronics, dremeling some decorative stuff, and dying both visors. Deadline: 6pm. Oh man. Yikes good luck getting it done. Can't wait to see the finished project! With June ending I am now starting to worry that I will not be able to get everything wrapped up in time by end of August. I need to hurry and get this helmet done (AND GLOVES EEK) and off to the chromer's so that I can move my focus to the suit. Progress last night/few days: Ripped apart the subvisor and painted the back of the LEDs black, then pained the fronts of the LEDS with Krylon Clearcoat matte finish that I had sprayed into a cup to get the liquid paint part for.  Got that all reassembled and with only minor breakage of LED solders. Also got the ears ready for the circuit boards to come in from http://oshpark.com. I was super worried about the ears because I didnt have an electric saw so when I split them i had to do it with a hand saw which caused it to be really uneven and bad. luckily I was able to fix it all with the magic of enough bondo!  And then I did more electronics work with my buddy to get the following:  
duros fucked around with this message at 18:38 on Jun 30, 2013 |
|
#
¿
Jun 29, 2013 21:32
|
|
|
PezMaster posted:Now that I'm not on a deadline, I'm going to demolish Thomas - sand and repaint to get rid of all the scratches I endured at the club. The paint was still tacky for longer than I thought it would be, so it had fingerprints galore by the end of it. I'll take out the visor - the dye job wasn't quite dark enough for my liking. The electronics were great, but I need to put in some way to defuse the LEDs a bit. Also, now I can get working with the full red array as well. Good Job Pez! To defuse the leds go buy http://www.krylon.com/products/matte-finish/ and spray a bunch into a cup from up close so that you get the liquid paint part. Then you can just paint that onto the LEDs and it frosts and defuses them quite well. For the Guy Manuel helmet, I would suggest you find a place that sells clear sheets of "2mm Pet-G" plastic. Make sure you get a sheet big enough to cover everything with the vacuum forming Also GOD drat McKilligan, I love everything that you do! Sunday Funday Edit: Bought a jacket for 50 dollars at H&M so I can bling it out.  Did a test fit of all the stuff I was working on to make sure it is gonna work. I am waiting for the fabbed boards to come in and then I can begin to assemble the ears etc.   And then I kinda put it on my head (it is really big and roomy in there.  I still need to clean up that drat lip around the visor (it has been my personal hell Then I am just waiting for the corner and ear boards to get in so that I can begin final test assembly before sending it off to chrome. Tonight I am going to try and tint the visor and then get it bent to the correct shape (thank god I cut out 4 visors).Update 2: Made brackets out of hard foam for mounting the internal visor inside the helmet. Off to gently caress up my visors, I mean tint them! 
duros fucked around with this message at 08:00 on Jul 1, 2013 |
|
#
¿
Jun 30, 2013 19:13
|
|
|
I got shades on this bitch:  Very minor warping due to my itchy stove knob hand trying to balance getting enough heat but not TOO much heat. Used 6 packs of RIT Black dye and did five 10ish minute baths followed by a cold water wash.
|
|
#
¿
Jul 3, 2013 08:01
|
|
|
PezMaster posted:Glad to see that it is possible to get your visor that dark with RIT. I only had four packs and did five 5min baths (plus cold water washes). My visor got all soft on me as well because I cranked up the heat after bath two. Looks like I'm going with more RIT after I take the visor apart. You're happy with your results? Yeah I am happy with how it turned out. Also I highly suggest you pop it into your helmet because it looks more like a smokey red color when held up to the light and I thought it was ridiculously light until I actually popped it into the helmet and noticed that with no light shining through the back it became super dark. Also for reference I used .06" PETG (http://www.amazon.com/gp/offer-listing/B00B2ARG68/ref=dp_olp_0?ie=UTF8&condition=all) at ~140-145 degree water. duros fucked around with this message at 18:54 on Jul 3, 2013 |
|
#
¿
Jul 3, 2013 18:51
|
|
|
run gobs_program.exe: coded up some hearts:  and an EKG:  Also got bluetooth working over laptop. Here is a video of it working. Next will be an iOS app that has speed control and text entry as well: https://www.youtube.com/watch?v=-zA-PBkdFQc Finally got a layer of nice primer on the thing. There are still a few dings/dents I need to clean up and smooth out but it is getting close. I also realized that I made the lip just a smidgen too big so i am gonna thin that out today.  Its getting close i wanna wrap this and get it to the chromer. I also bought some 100 yards of strung black square sequin and the lady at the fabric store thought I was crazy.
|
|
#
¿
Jul 6, 2013 21:38
|
|
|
I dunno I could do a more in depth breakout once things are finished if people would think it would be neat/interesting. I am also debating putting together some LED kits and selling them after all this for people who want to just have everything they need and just solder some LEDs into 8x8 matrixes (also possibly completed helmets if people want to give me a bag of money ).Next I plan on doing the Guy Helmet (RAM version) with a full 16x32 RGB matrix plus all the side stuff from his human after all so I can do things like this:  . . I have some early ideas and we are starting to investigate how to fab a board to handle all that nonsense. Anyways! I did this last night: https://www.youtube.com/watch?v=Iw_wrvWsY34   The visibility is anywhere from bad (dark area with a lot of LEDs on) to ok (light area with some LEDs) to good (Light area with little/no LEDs on). Removed about a 4th of the total visor "lip" after careful study of many misleading pictures of Thomas from RAM. Not its the width I want so I just have to smooth off and make the visor fit nice and snug (I will cry once the visor area is done it has been my nightmare). Started work on the fingers, got them cut out and labeled and ready for sanding to their final shape. Then touch up a few nicks, prime, and sand it to be ready.  Also got this in the mail:  Also no pictures but worked with my friend who knows how to tailor and we painstakingly recreated details for the RAM suit from a number of images so she took my jacket and ran off to start working on it. Hopefully I will have images to show soon of the progress on that end.
|
|
#
¿
Jul 7, 2013 22:46
|
|
|
McKilligan posted:Awesomeness McKilligan, are you just kinda free-wheeling all these ideas or have you drawn something out? Either way it is awesome but if you have concept sketches I wanna see them! Verloc posted:Tron! duros fucked around with this message at 05:24 on Jul 8, 2013 |
|
#
¿
Jul 8, 2013 05:21
|
|
|
They came! They finally came! I ordered these originally April 19th and then only now showed up because everything went about as bad as you could think it could go. Also: bought shoes and glitter! This is going to end in nothing but glittery tears for me very soon. I will post pictures regardless.
|
|
#
¿
Jul 12, 2013 07:23
|
|
|
I need to do some trouble shooting with half the ear LEDs (think I might have put on the wrong resistors UGH SCIENCE ) BUTTTTT here is the progress from last weekend (gonna get it all fixed up and sent to chromers by next week!): LOTS of boards (far too many)!  got the corners made up:  cut out plastic to go on them and I am now in the process of painting things hey look screws:  So pretty but I messed up the resistors or something so you only get to see the pretty half (not the really dim green-aqua-blue-violet) side.  Did another layer of primer on the helmet to get it ready for final sanding pass (with bonus unimpressed sleeping pup): 
|
|
#
¿
Jul 16, 2013 07:21
|
|
|
I'll be there
|
|
#
¿
Jul 18, 2013 17:47
|
|
|
Lights are fixed! I need to get this wrapped up and sent off to Chrome! Hopefully tomorrow.
|
|
#
¿
Jul 20, 2013 10:57
|
|
|
WOOOOOO the helmet is ready to go off for chrome, I sent the "i'm ready email" to the chrome shop and once they get back to me I will send it off (hopefully this monday/tuesday). Pictures: finished up the corner pieces (off and lit up respectively):  Gloves - just need to smooth off the edges and then prime it and send it off to chroming  Test fitting the electronics before being "done" with the helmet:    And another new pattern:  
|
|
#
¿
Jul 21, 2013 10:30
|
|
|
Fly away helmet! I shall see you again in 3-4 weeks.
|
|
#
¿
Jul 24, 2013 23:24
|
|
|
Quick 30 minute icon for the iOS app to control everything. Tried to make it feel kinda iOS 7ish (followed their crazy grid). Pretty happy with everything but the LED representations... I can do better maybe when it is not 1:30am. edit: updated it a bit 
duros fucked around with this message at 09:53 on Jul 26, 2013 |
|
#
¿
Jul 25, 2013 09:30
|
|
|
deoju posted:Holy poo poo, this is rad. Thanks! We have a lot of really insane stupid ideas for v2 of the software/hardware. The microphone one is way up there with things I was to do! Also have plans for a game of pong that could then be controlled by two iphones connected over bluetooth. Updates: Creation'n'Chrome received my package today and are starting the process of making shiny
|
|
#
¿
Jul 26, 2013 21:26
|
|
|
Faltion posted:I've got a consumer printer here at home. The parts will come out rough and require finishing, but not any more than any other method I've seen in this thread. Plastic isn't very expensive and I've even got a machine from a Goon-run kickstarter that allows me to make my own filament, dropping the price down to like 20% of what you'd buy online. You really aren't using a lot unless you're printing everything at 100% infill. Something like 30-50% provides more than enough rigidity for most things. I'd be really surprised if in total everything I print for this project came out to be heavier than half a kilogram. I would suggest making molds after of the smoothed printed plastic. From everyone I have talked to who has done the 3d printed route, the pieces are really brittle and snap in everyday wear and tear.
|
|
#
¿
Jul 27, 2013 04:11
|
|
|
RazorBunny posted:At least one of my friends has given up on body paint entirely, and is using acrylic paint now. It's nontoxic and pretty easy to remove with warm soapy water and mineral oil. Latex body paint works really well, you can even paint a "primer" coat which allows it to be peeled off the skin without hurting. http://www.liquidlatex.com/liquidlatex.html edit: sunday planning! 
duros fucked around with this message at 08:39 on Jul 29, 2013 |
|
#
¿
Jul 29, 2013 04:08
|
|
|
Ruin Completely posted:Does anyone know a good alternative to bondo that can dry inside my house without asphyxiating me to death? I have something I want to make with bondo but for 9 months out of the year it's too cold to do it outside (as in it won't set right under 65 degrees or whatever, not that I'm too sensetive to actually do it). I have heard really good things about using wood filler for a no smell approach.
|
|
#
¿
Jul 30, 2013 02:12
|
|
|
PezMaster posted:I picked up stud embellishments at my local craft/fabric store for my sets of Discworld armor. Sorta like these: http://www.dharmatrading.com/html/eng/5420682-AA.shtml?lnav=tools.html - It was ~$4 for a little pack of 75-100, so not so bad. A little hot glue and you're in business. More pictures! what are you planning for v3?
|
|
#
¿
Aug 1, 2013 01:50
|
|

|
PezMaster posted:
SHITTTTTTT son that is really well done! Come to pax with it and lets be daft punk :P Now I for sure have to step up my game and go all in for the Guy helmet.
|
|
#
¿
Aug 1, 2013 04:57
|
|


|
Uh oh!
|
|
#
¿
Aug 7, 2013 21:42
|
|
|
note: TwystNeko I will respond to your PM tomorrow I am le tired and am about to go to bed So I started Guy this weekend! I havent finished sanding down the the edges to be flat but I wanted to just get a feel for how the helmet and visor look together. I am pretty happy with it This should be a much easier to put together than Thomas from a construction/build point of view. Electronics are gonna be a bitch though.  
|
|
#
¿
Aug 12, 2013 08:29
|
|
|
Red Robin Hood posted:I've started on my 2nd Star Wars cause-play: This has always been my dream. The scout trooper + Snow trooper are two of my FAVORITE all time character designs.
|
|
#
¿
Aug 12, 2013 21:54
|
|

|
TwystNeko posted:Looks like you've got a much nicer cast than mine was. I'm jealous. Who'd you get yours from? I assume you're not doing the full-visor LED mask, as that's insanely cool but has zero visibility and is ridiculous in terms of the build. Got it from Sorenzo Props (guy out of the UK, not quite the quality of Volpin but very high still). TwystNeko posted:I assume you're not doing the full-visor LED mask, as that's insanely cool but has zero visibility and is ridiculous in terms of the build. HAHAHAAAAAAAAAAAAAAAAAAAAAAAAAAAAaaaaaaaaaaaaaaaaaaaaaaaaaaaaaaaaaaaaaaaaaaaaa yes... ridiculous indeed 
|
|
#
¿
Aug 13, 2013 01:11
|
|
|
Ugh been crazy busy buttttt I wanted to post this! (I know I still owe a write up I will work on that tomorrow at work if I have some down time )https://www.youtube.com/watch?v=PVNBY6M8ymc All the electronics are now controlled via a bluetooth app made for iOS. It is basically science.
|
|
#
¿
Aug 19, 2013 08:47
|
|
|

|
| # ¿ May 15, 2024 02:12 |
|
|
Visor electronics or: how I learned to love the solder So a few people have been asking me how/what was involved in making the crazy visor for Thomas. This will be a minor rambling on what went into it. FULL DISCLOSER: I shamelessly stole a lot of these ideas/things from Volpin Props. I spent some time chatting with him via email about everything and was able to get a lot of knowledge (saving me a great deal of time). If you really want to follow these internals I suggest the easiest way is to go buy: http://www.volpinprops.com/shop/thomas-helmet-led-matrix-circuit-boards/ (5 printed circuit boards) and http://www.volpinprops.com/shop/thomas-helmet-subvisor-frame-led-holder/ (plastic sub visor) Note: You can also PM me as I have a some extra circuit boards and might be willing to assemble them for you and mail you a "ready to go" kit of them. If you are curious for pictures just look through this thread or here: http://moderngoat.com/tagged/cosplay_wip (my tumblr where I am documenting this nonsense). The Hardware The main visor consists of 320 red LEDs. I soldered these into five 8x8 grids where the anodes and cathodes where all soldered together into one nice chain. This will create an 8x40 grid for your visor. If you wanted to you could, in theory, add more grids and boards and continue to daisy chain them. The circuit boards are custom made Volpin design x5. He did a really good job creating something compact and useful and so why reinvent the wheel. There is a hodge-podge of resisters and what not to make them all work but the key thing that makes it all tick is the "MAX7221CWG+-ND" LED driver. The information about using these LED drivers with Arduio can be found here: http://playground.arduino.cc/Main/MAX72XXHardware You get one 8x8 matrix per board which get daisy chained together. I suggest you use thin gauge wire, it will save you a ton of headache later on. I started with 18 (red) and 20 (yellow) gauge and ended up going to radio shack and buying 24 gauge instead to deal with the tight space I had to deal with. Wiring everything up consists of just a LOT of soldering... like... a lot a lot. not only do you have to solder all the chips/resistors to the board (x5 times), but you then have to solder five of the 8x8 LED matrix grids together, solder those to the boards, and then daisy chain everything together and to an Arduino board of your choice. If you wanna be fancy and go the iOS/bluetooth route, you need to find a BLE bluetooth 4.0 chip. I used http://www.makershed.com/BLE_Mini_Bluetooth_4_0_Interface_p/mkrbl2.htm to obviously great effect I was able to get all of this running on an Arduino nano board. The Software Its an old family recipe ") If anyone has more questions just shoot.
|
|
#
¿
Aug 20, 2013 05:30
|
|