


|
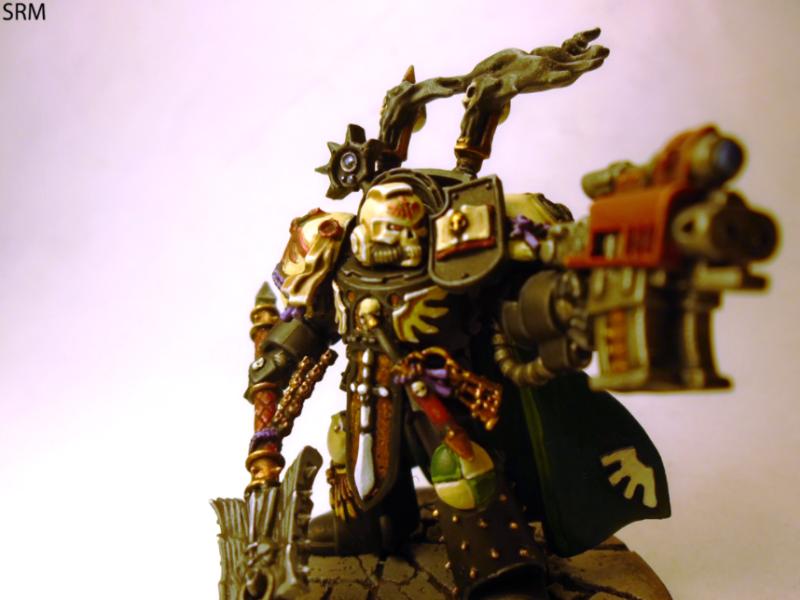
That image is at least ten times larger than the actual miniature. I've said before how Painter Vision can make people have conniptions about teeny tiny imperfections that no one else will ever notice. I scaled-down the image, this is still larger than the model but it's more true to life: That's pretty loving cool. He is splattered with gore but it's not like someone smeared a red crayon over it. This guy has been bustin' some heads. The World Eaters legion colors work really well on a thematic level, too. All the blood and viscera these soldiers wade through is a stark contrast on their white uniforms.
|
 #
¿
Aug 16, 2015 23:11
#
¿
Aug 16, 2015 23:11
|
|

|

|
| # ¿ May 9, 2024 04:01 |
|
|
Those models are really cool and you did a splendid job painting them.GreenMarine posted:Martian Skitarii have a sort of white checker pattern lining their red robes: Keep it simple and use hard edges to your advantage. I'm not going to try to make words to explain this visual process and it's not to scale so sue me:  1) Sloppy, long line 2) Block it in to get the general shape 2) Fill in that extraneous white you don't need 4) Now, block-out the teeth 5) Lastly, draw a nice straight line down the edge, the rounded "tip" of the start and end of your line are camouflaged in the blocks on the end This uses long brush strokes to create hard, right-angle corners. Otherwise, you'd need to carefully paint in those corners one at a time which would take ages and ages. Checkers aren't so different, with Lamenters I base coat white, create a grid in black, then fill it in with black. That means they are not true checkers, more like a windowsill, but at this small scale the eye tends not to notice. Post 9-11 User fucked around with this message at 03:12 on Aug 18, 2015 |
|
#
¿
Aug 18, 2015 03:08
|
|

|
Mugaaz posted:Why is the primer on this so loving bad, and how do I fix it? The other people who gave advice seem to be correct, I would add that other painting gurus told me to shake the everloving daylights out of the can. Shake it, keep shaking it, then turn it over and twirl it so that the ball inside smoothly rolls around the interior edge. This process "wakes up" the propellant and other substances in the can, "primes it" is probably a better phrase. Shake that thing like an unwanted baby! I had a problem with a can of GW paint crapping-out entirely (lots of paint in it) and someone explained that the propellant can leak out, leaving an inert canister of paint that has no way of being used. Regardless, sometimes you just get a janky can. If you bought in in person, bring the mini with the junked primer coat and asked to exchange it for a new can. If you bought it online or it's many years old it's non-refundable and not worth the effort regardless. HardCoil posted:Painted my son's bus with a red pattern to match the ones in our city: I was dating a woman with a four-year-old who liked toy cars and Ben 10, [skip the horrific accident that ended what was to be our family] so I painted one of his cars in the colors and logo of the show. I even bought some extra Hotwheels cars and added racing slicks to the back of the car, replaced the broken axle in the front. That you painted a bus for your son is very, very sweet and the paintjob is great. I've never had painter's tape work well for me (even when painting walls) but you are the latest in a string of people this year that said it works superbly. Hazard stripes, canopies, et cetera. Post 9-11 User fucked around with this message at 23:47 on Aug 20, 2015 |
|
#
¿
Aug 20, 2015 23:39
|
|

|
For reals, that Dark Angels kit has those wrap-around eye pieces? I don't care if it makes no sense at all, those look so cool. I'm not going to dig up a pic, but the blaster in Payday 2 looks like the dumbest, coolest tacticool thing in the galaxy it has all of the upgrades. Life is so surreal, this is just wonderful. He mentioned a Sawsall, I thought he was going to cut the can open. I promise that if another can of paint quits on me I'll run an experiment to cut it open and get usable paint out (eye protection and such involved, don't panic). It really sucks to buy a can of paint that's way, way overcosted but the magic blue smoke escapes so now it's just a paperweight. I missed a chance to test that when the other stuff failed, I'll try it on the ol' Boltgun Metal when that flops. Avenging Dentist posted:I haven't painted in like a decade but I decided to get back into it, so here's a fairly-basic question: when priming, about how thick should the coverage be in the end? Rattle cans have gotten better since I started painting, Krylon has a wonderfully thin, even sprayer. However, I still spray on one or two coats before finishing the rest with a paintbrush after it dries. It's been ages since I've had a can create a clotted, thick mess that obscured details of the mini. And, jesus god, those minis of yours look really, really good. Those colors are amazing. The subtle weathering and environmental grime is also great. Post 9-11 User fucked around with this message at 05:06 on Aug 24, 2015 |
|
#
¿
Aug 24, 2015 04:55
|
|
|
I've learned to stop worrying about drybrushing and love the bomb- I mean. Hrm. I brushed some metallic over the hazard stripes to make it look more "real." The stripes are at different angles and different thicknesses, I hosed up, but gently caress it. Someone on planet Earth has the Obliterators I painted, I don't remember how I painted them, the goal was to make it look like molten metal. They looked good, these guys look more like ketchup and mustard. My saturation/hue adjustments aren't 100% on this photo. The legs of the big dude have been adjusted so they don't look as awkward as before. Again, the GW basing kit is super cool even if it is over-priced. I was wondering how to paint the helmet then I realized that it shouldn't be painted like a rival faction but just like an Iron Warrior. Even after rebelling they are still facing an endless slog, walking over the corpses of their brothers. It works really well thematically, just like I wanted the colors to be murky and the molten metal effect represents how angry they are. That effect also makes the Obliterator seem like molten goo rather than having dumbass frankenstein's monster toes.
|
|
#
¿
Aug 24, 2015 18:01
|
|
|
SRM posted:The only part of the big dude that I don't think works is the really typical Imperial sarcophagus on the Dreadnought. It just looks a little too normal compared to the big freakish limbs and biomechanical stuff on the rest of the big lug. I really dig the Obliterator though, he's pretty awesome looking. You're totally right, but I used the sarco' to replace the "crazy guy's face peeking out" bits. I'm okay with those bits on the Oblit' because the concept of that creature is nuts, there's no way to normalize it. I cut off many Chaos details, maybe I could have cut off some of the Imperial stuff. Iron Warriors don't care about awards and glory, I thought using the familiar imagery on the "face" of the machine worked with the theme: no paint on it, no care given to it, a billion of these were printed out and the IW mechanics didn't care. They were neither offended by the heraldry nor cared to paint it up. I can pretend like I meant the heart of the machine, the pilot, is resisting the mutation, keeping his old "face." I didn't plan that but it fits, and it's not a ghoul face that conflicts with the pretense of a Chaos Dread.' It's fun to come full-circle on these guys, too. The first set I did was like black sludge with metal highlights, the second set was chromed-out, this feels like the right balance of grimdark metal dudes.
|
|
#
¿
Aug 24, 2015 21:48
|
|
|
BULBASAUR posted:My setup is way less advanced than krushgroove's: Fear not, that's dope. I'm in a basement apartment and the lack of natural light stinks. Even with the ceiling light and the hobby desk light on there isn't that all-enveloping light that light from a window provides.
|
|
#
¿
Sep 2, 2015 01:39
|
|

|
I always wondered how some of the molds used were ever possible, considering how intricate the mold lines are. I take it they're flexible, so the
|
|
#
¿
Sep 8, 2015 02:46
|
|
|
You should first wash a metal model in something called, "rotozip metal buffing bit." I use a razor blade to remove all the flash contact points and will even square-off some edges (the sharp tip of a cape, for instance) then buff the whole model. Hard edges means the paint will just rob off, want to wear them down just a bit first. Rinse, dry, then base coat.SRM posted:Finished up an Interrogator Chaplain in Terminator armor for these guys! The Chaplain-y bits are from Seraphicus, the Dark Vengeance chaplain model, while the rest are from the current Deathwing kit and Dark Angels upgrade sprue. Not thrilled with his cape, but I'm happy with him overall: The sculpting on that helmet is so indistinct, you did very well by successfully getting the teeth to stand-out.
|
|
#
¿
Sep 9, 2015 02:13
|
|
|
krushgroove posted:e: tried out freehand for the first time to give this guy a name This is the URL you want to use to link to it: https://goo.gl/photos/A3ojit5MAZhPJuSL9 Looks good! You even chose a specific font to do it in.
|
|
#
¿
Sep 10, 2015 17:20
|
|
|
Throbbing blob posted:Crosspost from the Frostgrave thread. Still need to finish his base up with drybrushing and some snow effects, but I like the contrast between pink healthy-looking skin and the dark base right now. He'd fit right into The Forest, looks good.
|
|
#
¿
Sep 23, 2015 00:03
|
|
|
Germ posted:Advice needed! Jesus god these look good, love the broad brush strokes used to color-in and highlight areas. Money has been spent on GW, don't give more money to the Forgeworld subsidiary. Your army has a small footprint, you could print paper decals and cut them out with scalpel, those could be spraypainted then applied using Elmer's glue.
|
|
#
¿
Oct 2, 2015 02:25
|
|

|
SRM posted:This is a pro-loving-click zone right here:  seeing the finished diorama completely open and exposed to the elements. A falling tree branch could undo months of work. seeing the finished diorama completely open and exposed to the elements. A falling tree branch could undo months of work.
|
|
#
¿
Oct 5, 2015 02:41
|
|
|
HerrMorden posted:I have way too much stuff on my plate :/ Don't eat painted miniatures they are rife with toxins! On the reals, though: I tell any hobbyist to buy one box at a time and complete assembly/painting before moving on.
|
|
#
¿
Oct 7, 2015 00:49
|
|

|
Sulecrist posted:THIS IS THE NEW poo poo Warhammer AOS: "Do We Want It? No! Do We Need It? ... Eh."
|
|
#
¿
Oct 8, 2015 07:33
|
|
|
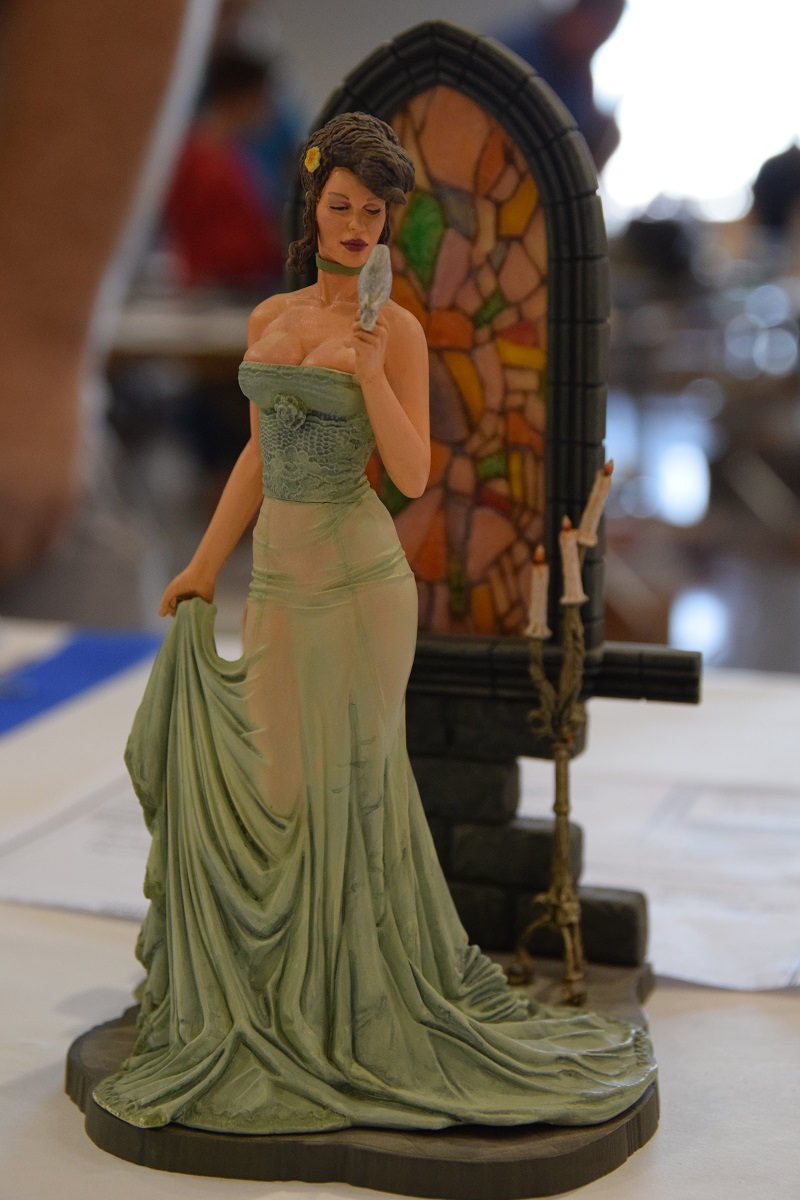
Terrific! The hair piece will never look good since it's at a perpendicular to the model, but your work makes it look like an animated statue with a mysteriously bleeding hand. I've never seen someone paint the Avatar like a golem or monument.
|
|
#
¿
Oct 9, 2015 18:49
|
|
|
I have a  weird question weird question Is there a place where I can purchase a pen with magnetic oxide ink? I see pigments and fountain pens online but I really don't have time for that, just want to buy a pre-packaged unit just like those ink markers that detect fake dollar bills. Cyclomatic posted:Painting black, or even greys, tends to straight kick my rear end. I really wish I could figure out the trick of it. Black with grey highlights is one of the easiest things to paint for me, are you able to tell me what you're struggling with or why the results don't look right? Star Man posted:Self-mutilation I commonly unload my brush onto my left thumbnail, did it once on my thigh during a hot summer night when I was deep in concentration.
|
|
#
¿
Oct 11, 2015 20:19
|
|

|
The banner looks good, nice to see it finally finished.El Estrago Bonito posted:Do you need the paint itself to be magnetic or do you just need metallic paint that will adhere to magnets? Paint/ink would need to be magnetic. Partly to experiment with tracing the numbers on cheapass checks so that MICR systems will detect them, partly to experiment with effects on miniatures.
|
|
#
¿
Oct 13, 2015 09:37
|
|
|
Foolster41 posted:yeah, I don't much care to keep the headless cows. Scissors actually works pretty well too. For variety's sake and to make it more natural, I recommend cutting both heads off so that you can get more symmetry. Makes it look like a two-headed mutant cow rather than a head was glued onto the side. Some could have no necks, awkwardly positioned at an angle (no disrespect to those sisters that are conjoined at the neck, but note how the orientation of the heads are altered to accommodate each other). HJE-Cobra posted:I ordered the Halloween bundle special from Reaper Mini, and it arrived in the mail today! Their freebie package included a little baggie with some candy in it and some free paints, plus a free miniature. So while opening up all the figures I ordered, let's see what freebie mini I get... I can hear a bean counter at GW having an aneurysm. "What are they doing at Reaper, do they not realize that they're devaluing their IP!"
|
|
#
¿
Oct 14, 2015 14:55
|
|


|
Odd that the videos are quality when the White Dwarf guides were always useless. They'd tell you to add layers that were then entirely covered-over, and most of the tips were, essentially, "Now, finely detail this area." Paint exceptionally well, you're welcome!  I've written guides that include photos and tips about how to brace your hands to steady them. I also included photos of some of my badly fishtailed brushes that I still have use for (massage the brush in the paint on the palette, gently twist it in one direction to retrain the bristles).
|
|
#
¿
Oct 24, 2015 16:05
|
|
|
Z the IVth posted:Repost of my Repentia. Funny how a newer (bridge!) camera can't do something as simple as macro focusing and metering without a shitton of fiddling with the manual controls. Oh Fuji I should never have left you for Sony. Oh, swapped the head for a Necromunda model and sculpted some hair? Real nice work, love how much detail you lavished on this one.
|
|
#
¿
Nov 1, 2015 23:49
|
|

|
Excellent.
|
|
#
¿
Nov 5, 2015 03:01
|
|

|
Yo, the Ghostkeel looks really good when it's not photographed by a Citadel lady/dude. Whoa, really shows up on the thighs and such, really amazing. w00tmonger posted:Cross post from Valhalla No one else answered the call, I sure did, it's so fuckin'  
|
|
#
¿
Nov 11, 2015 01:19
|
|

|
Hixson posted:Just a heads up guys: Hah, I winced inside at the thought of my hobby experience being that adverse, just the nature of my condition. For me, painting is meditation, I listen to music or a movie and focus on not concentrating until hours vanish in a moment to reveal a nicely painted figurine. So, no airbrush for me, but for you wizards willing to make the attempt go for it. It's been about three months since I've painted, I'm getting a bit of a tingle about how I want to paint this Haemie that is primed but collecting dust for a while. Thanks for the inspiration. I have a three day break coming up, time to paint, then time to ham it up with some new peeps.
|
|
#
¿
Nov 15, 2015 11:10
|
|
|
Venom Soag posted:

|
|
#
¿
Nov 17, 2015 02:01
|
|

|
The Sisko posted:X-Post from the 30K thread. Those are WIP? The smooth, soft skin tones combined with the flawless, glossy armor/morphs combine to drive home how hosed up those monsters are, it's stunning. Another example of how the GW/FW photos and paint don't do justice to some of these sculpts-- yours does. It's genuinely creepy how realistic the flesh looks, contrasted with the unreal nature of the metals, nice work.
|
|
#
¿
Nov 18, 2015 13:46
|
|
|

|
| # ¿ May 9, 2024 04:01 |
|
|
Zark the Damned posted:Bolter pots were the worst and rarely managed to keep the paint liquid for long. The flip top ones were less bad but the screw top ones were nightmares and I can't believe someone signed off on them. I can, planned obsolescence is a real thing. How many times have you bought new paint not because you ran out of those colors but because the lovely pot meant the paint dried-out?
|
|
#
¿
Nov 20, 2015 04:23
|
|