


|
PinheadSlim posted:I don't see it, my monitor must be broken You can't see the boobs? Your right about your monitor being broken. (I understand the mini is super cheesecake bullshit, but I can't help myself)
|
 #
?
Jun 17, 2019 05:13
#
?
Jun 17, 2019 05:13
|
|


|

|
| # ? May 7, 2024 07:49 |
|
|
Alokgen posted:Been working on an entry for a local monthly painting event this weekend. Just need to pour some resin over the next few days. Solid paint job. That sword and shield rim chipping is fantastic.
|
|
#
?
Jun 17, 2019 05:16
|
|


|
Yeast posted:Solid paint job. That sword and shield rim chipping is fantastic. Thanks, this was the first time I've done chipping. I'm usually too afraid to mess up my blends, but decided to be a bit more rushed with my blends and go for the chipping. I think I overdid it on the shield, but they distract from how not smooth the blends are.
|
|
#
?
Jun 17, 2019 05:20
|
|
|
Alokgen posted:Been working on an entry for a local monthly painting event this weekend. Just need to pour some resin over the next few days. 
|
|
#
?
Jun 17, 2019 15:24
|
|

|
Alokgen posted:Been working on an entry for a local monthly painting event this weekend. Just need to pour some resin over the next few days. Gawddayum that red is on point!
|
|
#
?
Jun 17, 2019 15:24
|
|

|
    I finally broke down and decided to start using my assembled, kitbashed, primed, airbrush highlighted Intercessors as test models instead of leaving them in their unfinished state and going out and buying more easy-to-build guys to run tests on. (I have, like, ten of them, plus three easy-to-build aggressors... and I did the math and ten multipose Intercessors is actually worth almost exactly the same number of Canadian dollars as ten easy to build Intercessors would be if you could buy just ten of them.) Edges done with Vallejo Metal Color Magnesiuum and a homemade stipple brush, followed by a ligher stipple of 1:1 Vallejo Metal Color Chrome / Daler Rowney F.W. Cool Grey Ink, which together took about a half-hour and looks way, way better than my old edge weathering (which would have taken at least an hour). Then an all-over wash of 1:1 Nuln Oil/Contrast Medium, then more light edge stippling with Magnesium and then straight Chrome (maybe ten minutes worth total, probably less). The metals are just Vallejo Metal Color Silver, with Citadel Air Valdor Gold for the gold parts (so weird a gold), then I did more of the Nuln Oil/Contrast Medium over those. This is a much simpler metal workup than I've done in the past, because I'm pretty sure most of the subtleties I was trying to establish before were getting lost, and I'd really like to get my number of steps down without visibly impacting quality. If I'd planned better I'd have done the stippling, then the metals, then one all-over wash, but this evening is less about efficiency than it is about messing around while I wait for laundry to cycle. Also I should have done the green shoulder pad trim before the initial stippling, and possibly also the decals. Also also, the backpack was off until all that was done, and then I glued it on. Hey, you know what works loving great? Nuln Oil mixed with Contrast Medium. Y'all gotta try this poo poo. I'm pretty sure it's as much of a jump up in Nuln Oil performance from Nuln Oil + Lahmian Medium as that is from Nuln Oil + Water. Just, really nice, subtle recess definition that avoids raised areas better than I've ever seen before. Really shuffling around my usual order of operations; next is all colors but the eyes, gloss, decals, satin, and then I break out the AK Interactive Streaking Grime enamel wash and mineral spirits for the first time. Then probably the eyes and some Blood for the Blood God. Stephenls fucked around with this message at 09:58 on Jun 19, 2019 |
|
#
?
Jun 19, 2019 09:53
|
|
|
My first foray into contrast, taking this off the backlog:  Perhaps not the best use of contrast, but in general I'm pretty happy with the result. I also painted up this guy for the #armiesonpride event on Instagram:     Chuds beware, it's old 'stoney' George Wallstein, pride of the Empire.
|
|
#
?
Jun 19, 2019 21:17
|
|

|
I picked up a bunch of infinity, necromunda and old warhammer 40k models and I'm intending to use them for a roleplaying game with a cyberpunk setting. I've just started getting back into painting and building miniatures after around a decade so I've decided to tackle some of the simpler minis first. Here's my first attempt:  I wanted something with a grungy urban look that wasn't too busy and that would fit on a square inch grid So I chopped up a bunch of sheet polystyrene and sanded down the edges into tiles for the base. I got impatient and used simple edge highlighting on the blue-grey bits instead of blending the whole model. I'm currently saving up for a decent quality airbrush so I can apply some better gradients for shading and highlights but until then I'll probably just stick with edge highlighting as it looks okay. I'm not really happy with the chipped effect on the armor plates. I used a small brush and painted the chips by hand but I find this doesn't look random enough and there's not enough variation in size of the chips. Stephenls posted:Edges done with Vallejo Metal Color Magnesiuum and a homemade stipple brush, I'd love to know what you're using for your stipple brush, the effect on your models is much more like what I'm after. The next models I'm going to tackle are these old Tau.  They belonged to a high school friend who wasn't the most patient sort when it came to building his minis so I've got a bunch of filling and cleanup to do. I'm planning on using them to represent some space exploration and development exo-suits. I was going to go with a white and orange color scheme, similar to the space suit from The Martian. Just wondering if anyone has some tips for building up orange.
|
|
#
?
Jun 19, 2019 22:36
|
|

|
Propitious Jerk posted:I'd love to know what you're using for your stipple brush, the effect on your models is much more like what I'm after. Take a Windsor and Newton Series 7 size 1 brush. Then take a pair of scissors. Cut the bristles off at about the halfway point between the tip and the ferrule. Then take a W&NS7 size 0 brush, and do the same, but this time about a third of the way from the tip to the ferrule. It�s best to do it with older, worn-out brushes, because doing it with new ones is expensive. I use the size 1 for general stippling and the size 0 for the chrome highlights and anything that requires using a smaller brush to get into a right area. Using another, less expensive brand of Kolinsky sable brush would probably work just as well, but it does have to be Kolinsky sable; you need bristles that are fine enough to make small marks and soft enough to spread out during use, but still substantial enough to be firm so they can land point-first in the surface and not just bend and smear the paint. Note that this technique exploits the properties of metallic paint, which tends to be pretty transparent except where the mica particles land. I�ve tried to make it work with non-metallic greys and whites and it just makes smears. The technique is taken from the Lil Legend Studio patreon. He�s got three really good demos for how to use it; one on a Blackshield, one on a Word Bearer, and one on a Night Lord. Stephenls fucked around with this message at 01:10 on Jun 20, 2019 |
|
#
?
Jun 20, 2019 01:07
|
|
|
Thanks! Good to know on the paint types, I'm probably going to be doing stippling in dark brown and black for the next few minis but I'll keep this in mind for when I get around to the corporate private army dorks. I finished cleaning up the three tau and got them primed. I took a chance on a blending scheme for the orange components and I think it came out looking pretty good. Started with a model color light orange and game color gory red in a 2:1 ratio then applied a couple coats of the same in a 4:1 ratio then finished highlighting the edges and blending the upper surface by the model's head (?) with pure light orange. I used some watered down Vallejo Air camo black brown to fill in the vents and outline the segments of the armor.  
Propitious Jerk fucked around with this message at 05:47 on Jun 20, 2019 |
|
#
?
Jun 20, 2019 01:41
|
|
|
    Did the leather and shoulder trim the way I usually do, with blending between three colors each, but for the purity seal parchment and wax I just did Pallid Wych Flesh and Alderbaran Red. I'm not sure to what extent the streaking grime enamel wash is going to annihilate subtlety. Anyway gloss then decals then satin next.
|
|
#
?
Jun 20, 2019 08:49
|
|
|
Oh, hey. Anyone tried the new Corax White base paint? Is it notably different than the Ceramite White it�s replaced?
|
|
#
?
Jun 20, 2019 09:25
|
|
|
Man, there's a lot of hard acts to follow here. I've been experimenting with a crosshatching style of painting the last day or two, with some mixed results. I need to resist the urge to slap black marks everywhere and keep developing an eye for proper detail. I'm interested in continuing though!
|
|
#
?
Jun 21, 2019 06:17
|
|

|
    And that's the decals and the satin varnish. Next step, currently scheduled for tomorrow, is the all-over spray with AK Interactive Streaking Grime followed by removing most of it with mineral spirits, getting to which was the purpose of this test, and as it will be my first time spraying or indeed even working with enamels, I am moderately terrified.
|
|
#
?
Jun 21, 2019 18:41
|
|
|
Magic Rabbit Hat posted:Man, there's a lot of hard acts to follow here. Painting a full model in tiny crosshatch patterns sounds like a nightmare, but my hands are shaky as hell. I finished up one of my re-purposed Tau.   I'll probably dial back the yellow highlights on top and drill holes for his gun at some later point. Dry pigments worked like a charm to get that heavily weathered industrial look but now I'm scared what will happen to it when I go to apply a matte varnish.
|
|
#
?
Jun 21, 2019 22:40
|
|
|
    Now with streaking grime. ...I think the next steps wait overnight for it to entirely dry, then black ink to define some shadows that have been washed out a bit, then a layer of matt varnish, then just a bit more metallic chipping, and then the eyes and the blood spatter and I'm done.
|
|
#
?
Jun 22, 2019 05:59
|
|
|
Propitious Jerk posted:Painting a full model in tiny crosshatch patterns sounds like a nightmare, but my hands are shaky as hell. Tau are a pain in the rear end to paint in my opinion. This looks really great though! I'm going to be painting a T'au Empire Commander this weekend though using contrast paints, i'm nervous about it not looking good.
|
|
#
?
Jun 22, 2019 17:55
|
|
|
Finished off Octavia tonight. The base was touch and go for a while. I had some difficulties sanding the edges and then got impatient waiting for gloss to dry. I can nit pick a lot of stuff about the base I'm bummed about, but I'm happy with the figure. I've been afraid of adding battle damage to my models for a while now and this time I went for it.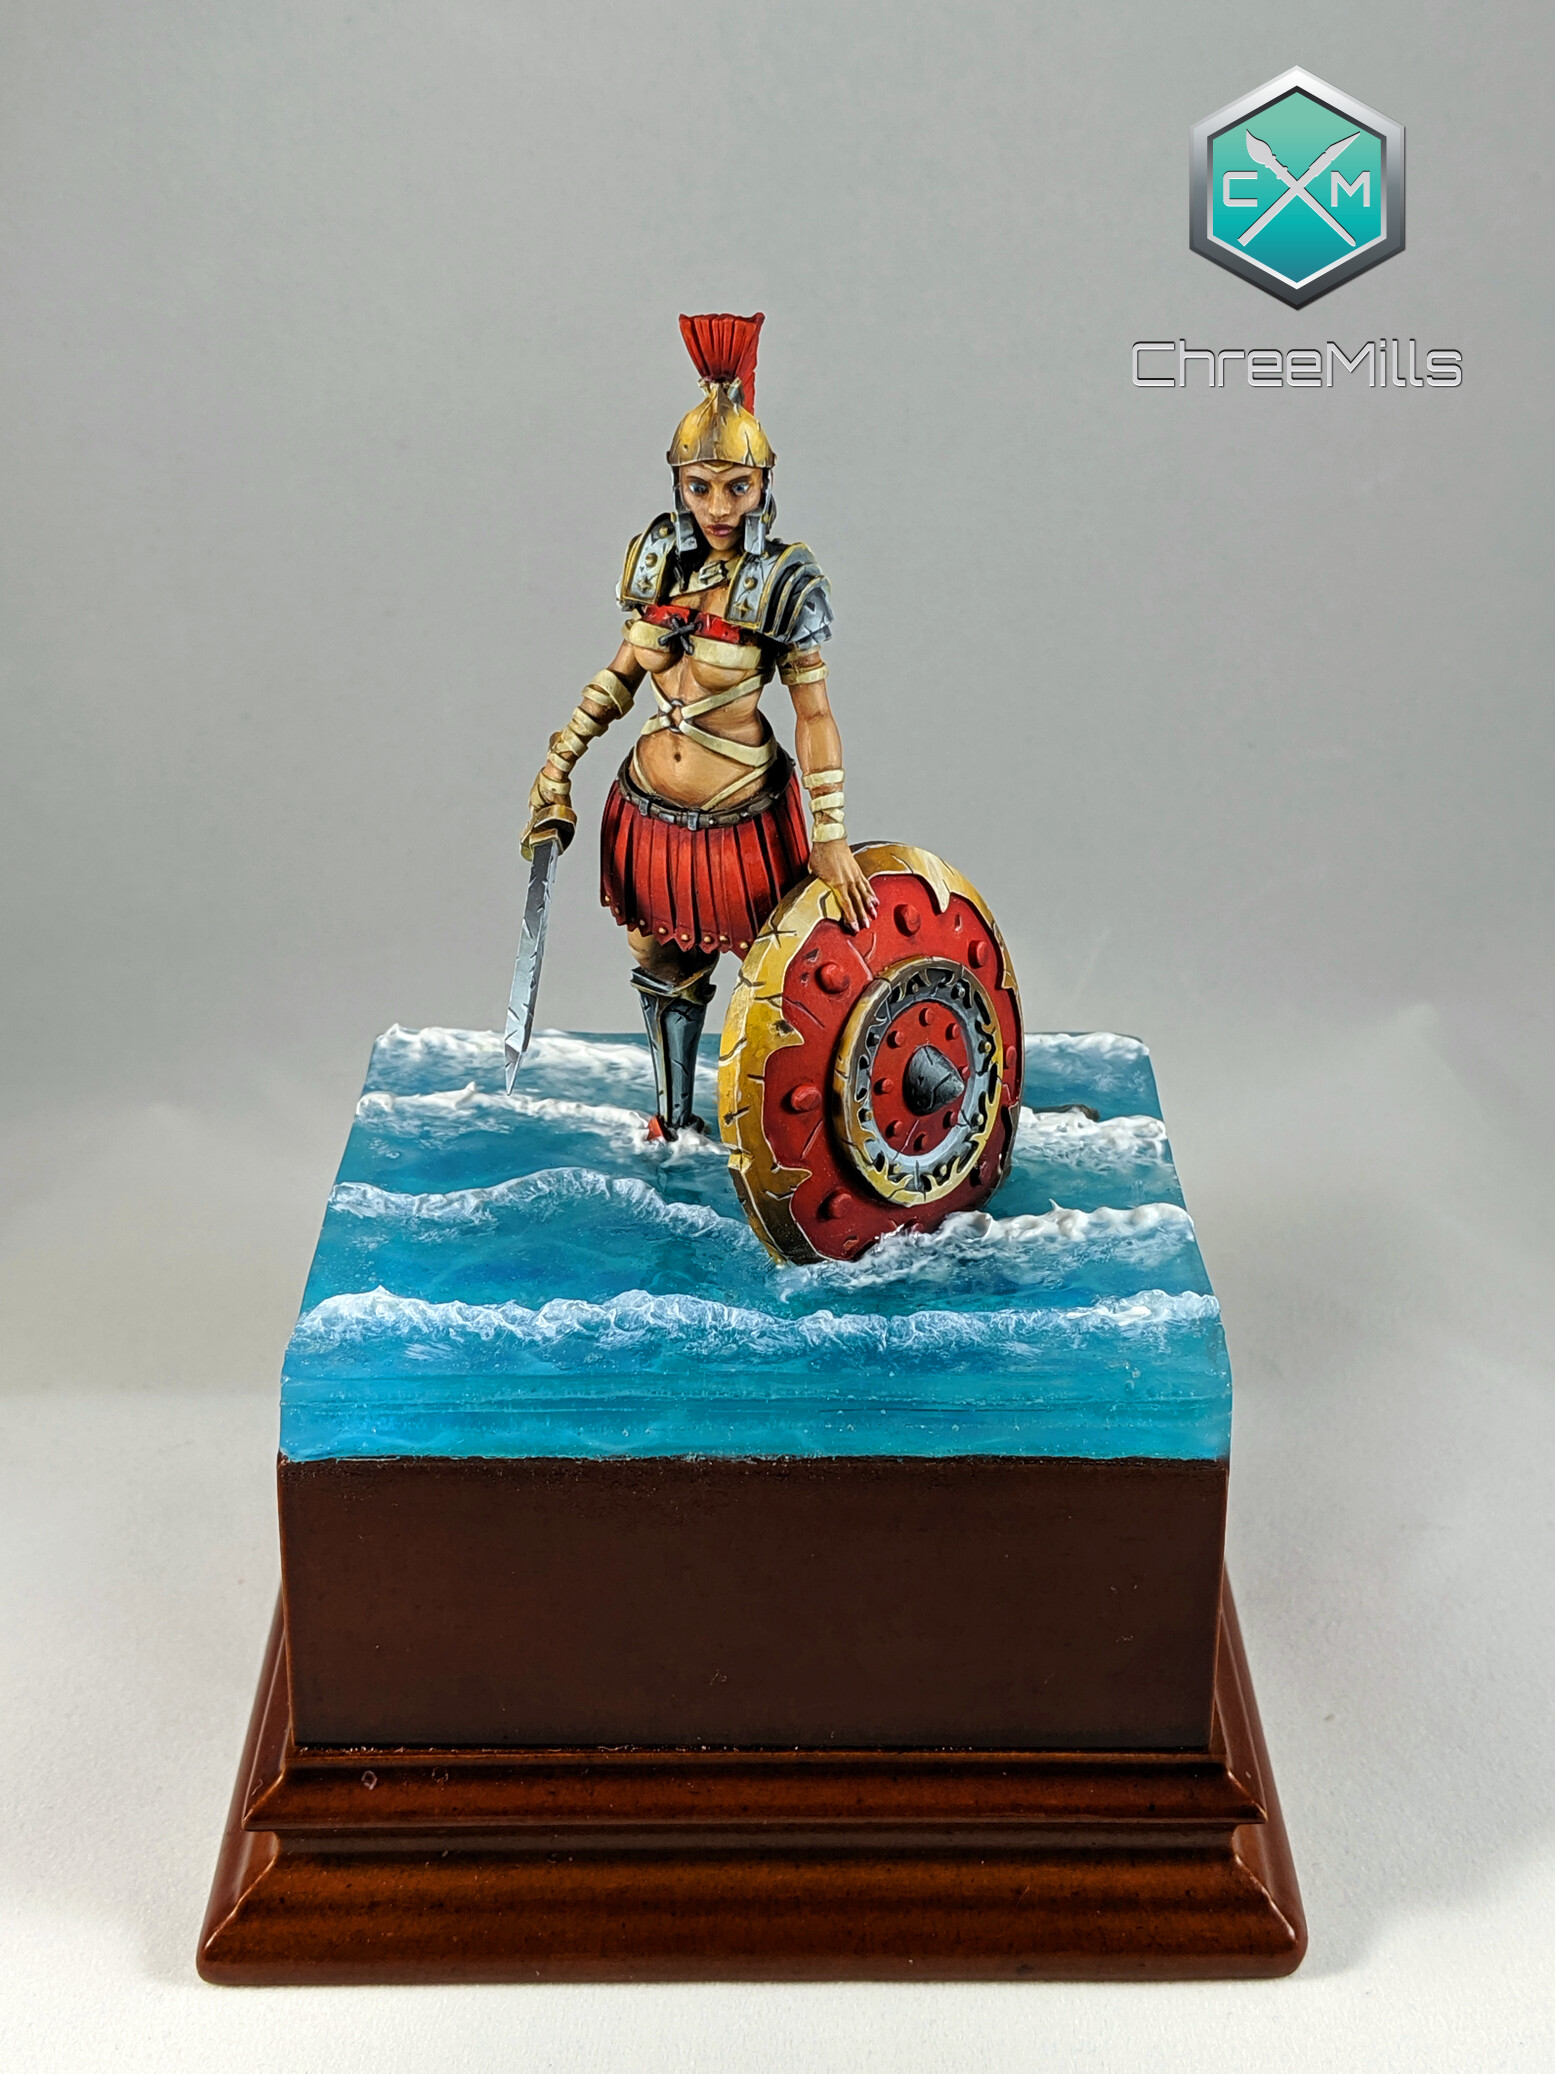 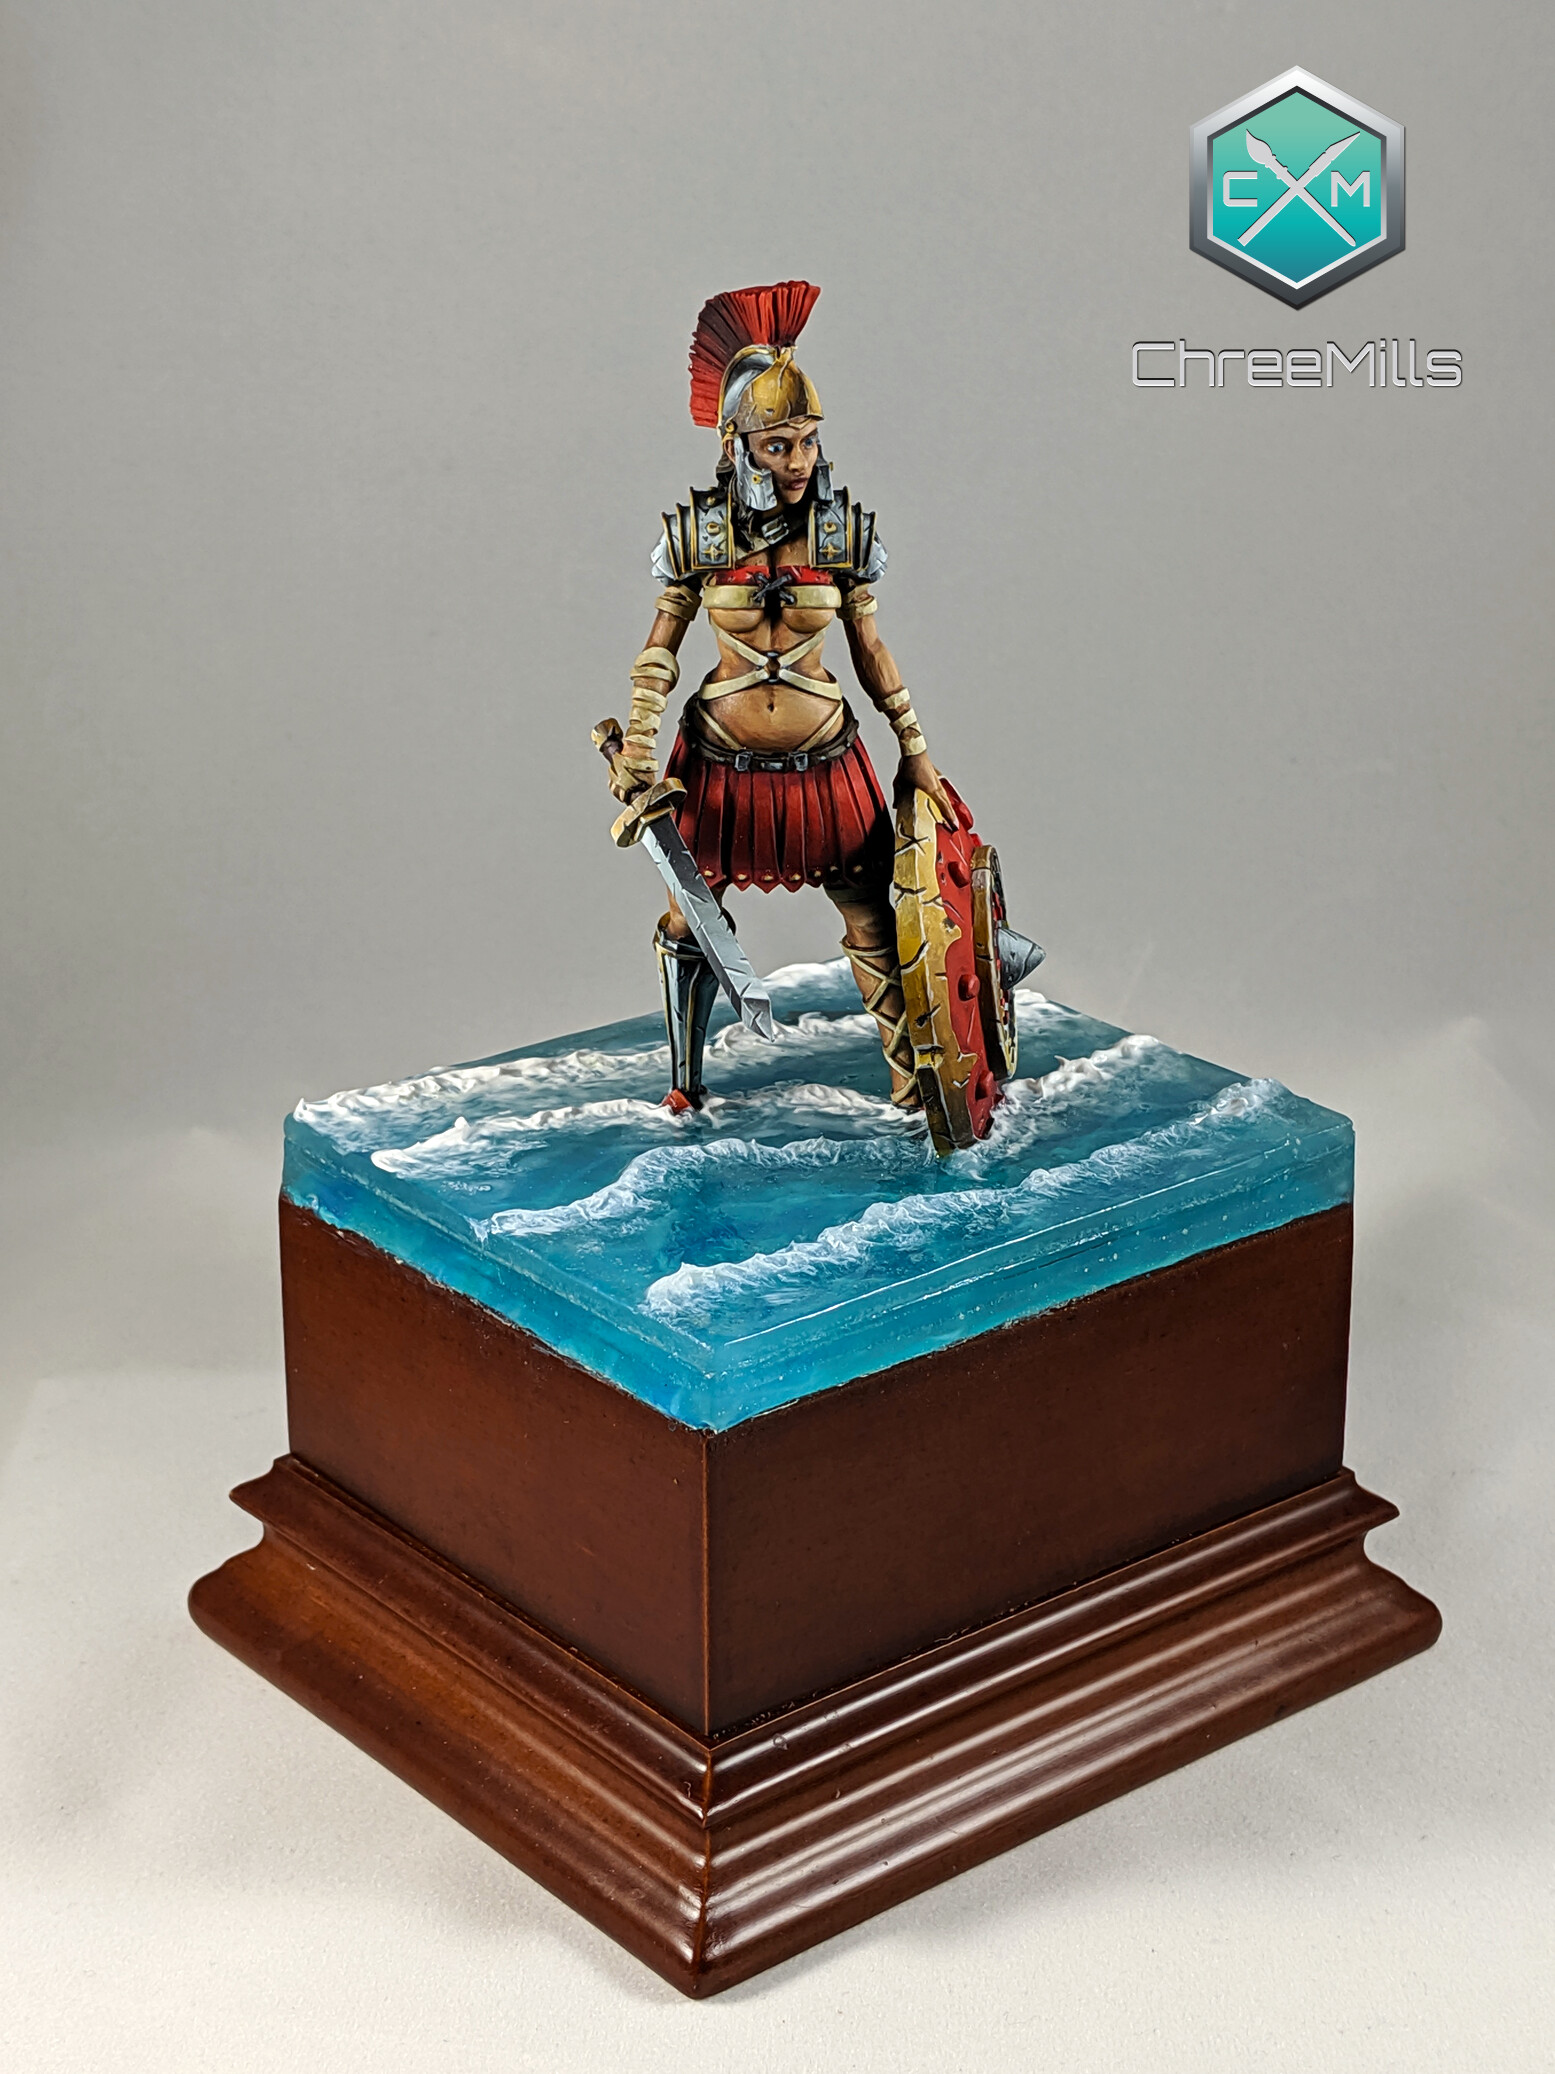 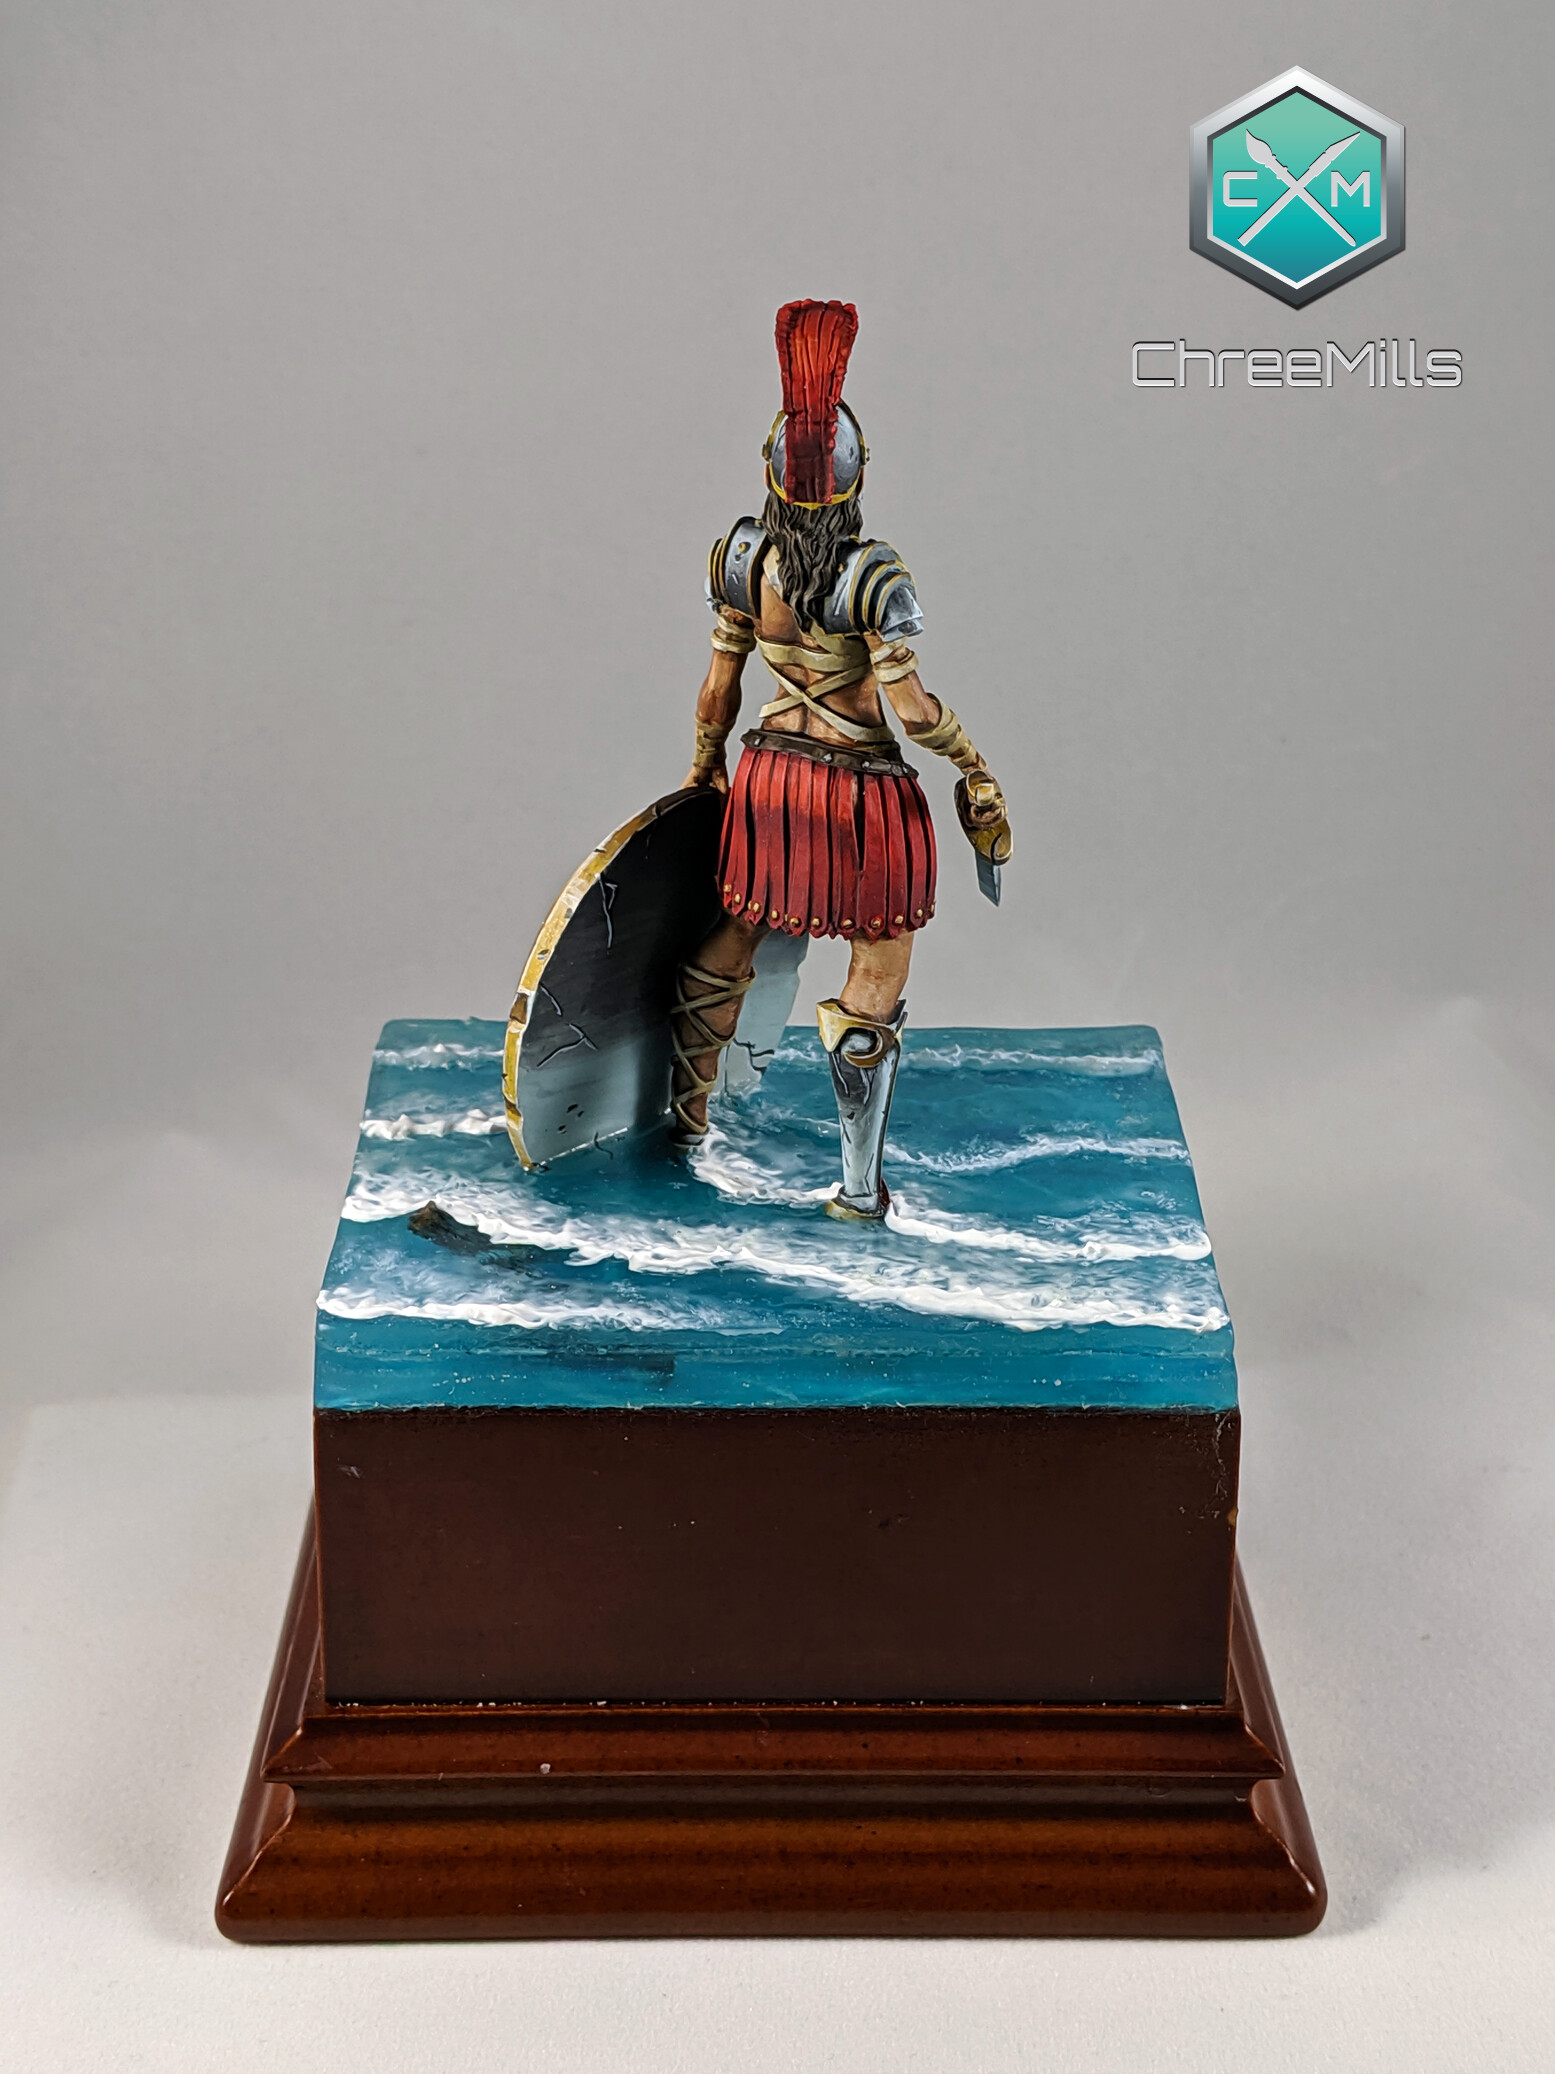 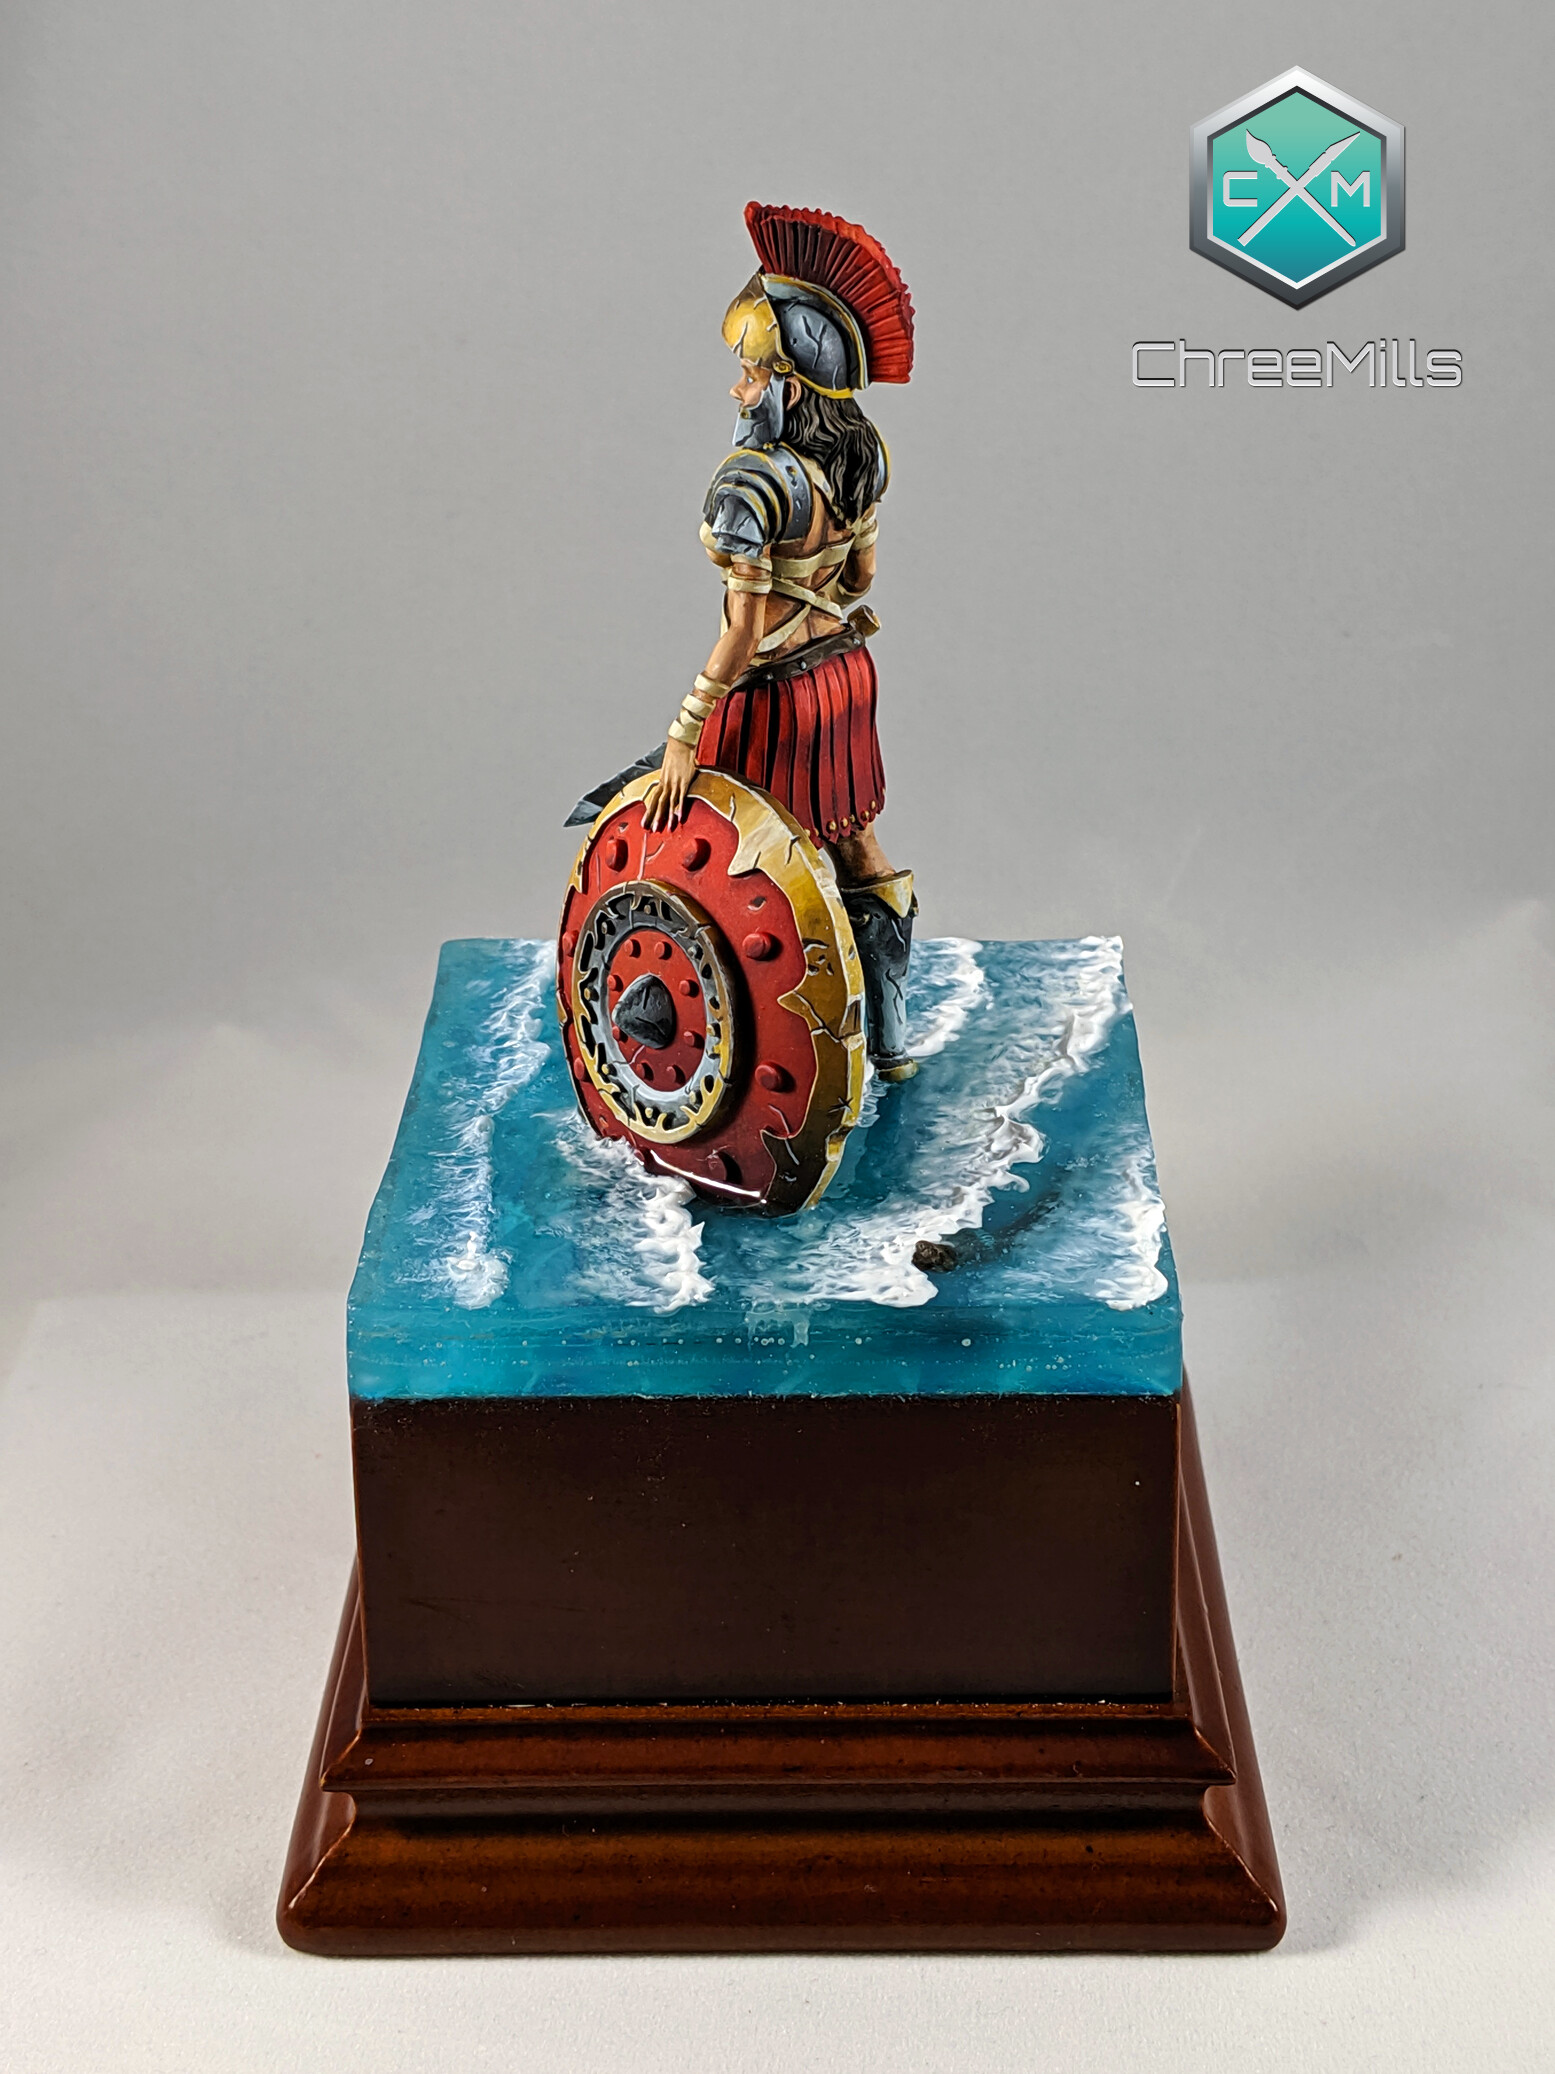
|
|
#
?
Jun 23, 2019 06:38
|
|
|
Absolutely stunning.
|
|
#
?
Jun 23, 2019 07:16
|
|
|
Alokgen posted:Finished off Octavia tonight. The base was touch and go for a while. I had some difficulties sanding the edges and then got impatient waiting for gloss to dry. I can nit pick a lot of stuff about the base I'm bummed about, but I'm happy with the figure. I've been afraid of adding battle damage to my models for a while now and this time I went for it.
|
|
#
?
Jun 23, 2019 08:03
|
|
|
Alokgen posted:Finished off Octavia tonight. The base was touch and go for a while. I had some difficulties sanding the edges and then got impatient waiting for gloss to dry. I can nit pick a lot of stuff about the base I'm bummed about, but I'm happy with the figure. I've been afraid of adding battle damage to my models for a while now and this time I went for it. The model looks amazing. If you add some thin strips of wood around the base where the resin hits the wood you could clean up the interface and make it look really sharp.
|
|
#
?
Jun 23, 2019 13:23
|
|
|
That's some really fine painting there, I should try my hand at some shallow resin water effects, just need to find the appropriate mini for it. I decided to mix things up a bit and finish basing, gluing and priming a bunch of the miniatures I plan to use for my cyberpunk role playing game.  It's a hodgepodge mix of old Warhammer 40k, Infinity and Necromunda so far. I snagged some bases from the star wars game at my LGS since they were cheaper than the stock 25mm Citadel bases and they've got nice, chunky, metal plating details which saves me having to build my own from polystyrene or hack the Necromunda bases down to size. Also, I should have been able to predict this as someone who draws and paints a lot, but matte varnish on dry pigments is a no-no. 
|
|
#
?
Jun 24, 2019 05:10
|
|
|
Propitious Jerk posted:Also, I should have been able to predict this as someone who draws and paints a lot, but matte varnish on dry pigments is a no-no. I haven't tried dry pigments, but aren't you supposed to seal them with matte varnish? Also thanks for the kind words, everyone.
|
|
#
?
Jun 24, 2019 05:39
|
|
|
    So I touched up some of the shadows with a mixture of Vallejo Model Wash Black and Contrast Medium as an experiment, and didn't much like the results, and then I remembered I had Tamiya Black Panel Liner so I just used that in the remainder of the recesses I wanted to darken -- that worked great. It's a pity; I was hoping that combining the nuclear option of the black Vallejo Model Wash with Contrast Medium would make for a powerful thinned wash, but it kinda didn't. But the panel liner ended up being everything I'd hoped for, so that's fine. Then I hit it with a layer of matte varnish. This ended up feeling like a mistake -- it reduced the shine a bit, but the remnants of the streaking grime were already pretty matte, and the varnish dusted a bit, reducing the dark of the black. Ironically, one of the reasons I felt I had to matte it down was the Vallejo Model Wash Black + Contrast Medium dried glossy in the recesses I put it in. I probably wouldn't have bothered with the varnish if I'd used the panel liner entirely. Then I re-did the metallic stippling again, which worked great but is probably redundant with at least one of the other two times I did that during this painting process, and also I touched up some of the metallic edges with more Vallejo Metal Color Chrome, which remains a lovely chrome but a great bright metallic highlight as long as you don't expect a literal chrome finish. Also did the eyes as normal. Last step was the blood, which was an attempt to follow the Zatcaskagoon Miniatures blood tutorial where one mixes Blood for the Blood God with mineral spirits (they don't mix and the blood effectively clots up), then flicks it onto the miniature, then touches it with a brush wet with water to break the weird surface tension effects the mineral spirits cause. This... didn't work, because I used a flat brush instead of a toothbrush for the flicking and because I waited too long to touch the results with the wet brush -- the blood for the blood god had largely already dried. That said, the effect is good if not what I was going for. Now I just have to base him. He's been educational! I'll do some things differently with the next one! Stephenls fucked around with this message at 06:58 on Jun 24, 2019 |
|
#
?
Jun 24, 2019 06:40
|
|
|
Alokgen posted:I haven't tried dry pigments, but aren't you supposed to seal them with matte varnish? Maybe there's a specific type? I tried using a bit of brush-on stuff and it completely washed out the rust coloured dusty finish and made the base look a lot more glossy as in the the picture of my spot test.
|
|
#
?
Jun 24, 2019 07:08
|
|
|
Alokgen posted:I haven't tried dry pigments, but aren't you supposed to seal them with matte varnish? You're supposed to fix them to the mini or base with isopropyl alcohol or specially made pigment fixer. Or depending on how you applied them you might not need to fix them at all. I made the same mistake as Propitious Jerk once, matte varnishing them completely changes the appearance.
|
|
#
?
Jun 24, 2019 11:02
|
|
|
The way competition painters preserve the look of dry pigments is... just not varnish at all. Of course their stuff isn't meant to be handled for use in play. Otherwise you just have to accept that sealing is going to alter the visual impact of pigments.
|
|
#
?
Jun 24, 2019 11:26
|
|
|
I use Secret Weapon's pigment fixer (on Secret Weapon pigments) and it preserves the look extremely well. I found matte varnishing virtually ruined the look. Your mileage may vary 
|
|
#
?
Jun 24, 2019 21:14
|
|
|
The Moon Monster posted:I use Secret Weapon's pigment fixer (on Secret Weapon pigments) and it preserves the look extremely well. I found matte varnishing virtually ruined the look. Your mileage may vary Good to know, thanks.
|
|
#
?
Jun 24, 2019 21:36
|
|
|
The Moon Monster posted:I use Secret Weapon's pigment fixer (on Secret Weapon pigments) and it preserves the look extremely well. I found matte varnishing virtually ruined the look. Your mileage may vary That's the brand I'm using. I'll have to see if my local shop has any in stock. If I'm going for the dusty look is it something that I apply before, as a sort of bonding agent to the model, or after as a varnish?
|
|
#
?
Jun 24, 2019 22:11
|
|
|
Dust the pigment on, then use a beater synthetic brush to apply the fixer directly to the pigment using capillary action.
|
|
#
?
Jun 25, 2019 00:54
|
|
|
Paired up the minis from the board game Stuffed Fables, where you play a child�s beloved toys fighting various nightmare creatures. I wanted to do the villains in drab and washed out colors and make the heroes bright and primary. I also took this as an opportunity to try out some Contrast paints. I�m pretty happy with them on the whole, although the big green guy was done with Contrast Ork Flesh and he�s just way too flat and featureless so he ended up with some pooling and visible brush strokes. If I cared about these minis more I�d probably strip and redo him, but painting them has pretty much guaranteed we will never play the game again.   
|
|
#
?
Jul 3, 2019 02:51
|
|
|
Current WIP: Aionus, from Malifaux  I've been working on getting more gradual blends without using an airbrush, so I painted this in what's effectively in reverse; after laying down a midtone, I put down the second-lightest highlight and started working backwards, adding progressively darker tones and pulling away from the highlight. Nice thin coats, almost glaze-like, and working to blend previous layers together. Hit it with the highlight after, and then the final highlight, hitting the absolutely lightest points. I feel like I'm getting to some next-level poo poo. Now I just have to make it consistent.
|
|
#
?
Jul 15, 2019 04:52
|
|

|
You all do such amazing work! I'm trying to get my skills up to a decent standard, but I'm actually kinda proud of how this Shokkjump Dragsta is starting to turn out ")   
|
|
#
?
Jul 16, 2019 03:53
|
|


|
Looking dope as hell
|
|
#
?
Jul 16, 2019 13:00
|
|


|
I'm finally actually painting models and finishing them, what a novel idea! Here's some Guild Guards and a couple Sergeants I've been working on from Malifaux.      
|
|
#
?
Jul 17, 2019 14:34
|
|


|
Propitious Jerk posted:
Cross-post from the painting thread. Finished the three tau suits and painted up one of the Necromunda figures. I definitely overdid it on the metallic chipping on the gun and it ended up just sorta looking like a random spatter. I'll probably try a different approach for painting wear and tear on future models.
|
|
#
?
Jul 17, 2019 18:25
|
|


|
Stephenls posted:
This is cool. The only part that doesn't really work for me is where you placed the sidearm, but this is a nice take on Raven Guard.
|
|
#
?
Jul 17, 2019 18:55
|
|

|
WIP shots of my next Necromunda guy. Tried to get a 5 o'clock shadow goin' with mixed results. The skin tones are a little blotchy and more pallid than I was going for, but I suppose it works for an underhive gangster who's never seen the light of day. I am pretty happy with the glow of the plasma gun he's holding. Went with a warm orange instead of the classic blue to better match the rest of his color scheme. Also the brown with metallic highlights used on the warhammer seems to work pretty well for a rusted-out metal.   I also painted up a tau drone thing to try out some more subtle "chipped paint" techniques using a small brush and stippling instead of daubing randomly with a piece of sponge. I think the results are better, and closer to what I'm looking to achieve even though they do take more time.   
|
|
#
?
Jul 19, 2019 05:31
|
|
|

|
| # ? May 7, 2024 07:49 |
|
|
Finally got the second squad of Pathfinders done!    I'm really pleased with this scheme and can't wait to start applying it to my suits.
|
|
#
?
Jul 25, 2019 04:05
|
|
