


|
Hello friends! I like big robots, and I like playing games with big robots. I like to do challenge runs of these games. Years ago, when drafts were a fad in the fire emblem community, I adapted the drafting ruleset for SRW J, got a few robot lovers together, and had a good time. Now, I'd like to do one on SA. This is all well and good, but what are drafts? The simplest explanation of a draft is this; you take a game and take all of the playable units. You get a few players together and take turns picking units. After that's done, you all play through the game with only those characters. There's more to it than that, obviously, but that's the basics. I'm a competitive person and I want to flaunt my superiority! Good for you. If you want to, you can compete to get the lowest turncount upon completion. The game even keeps track of your turncount for you. If you don't want to compete that's cool, too. My goal as host is to let people have a good time. This sounds hard. I'm bad at video games. Don't worry friend, dance officer has got your back. SRW J is not a hard game, it's in fact a very easy game. I've done five drafts of J and never encountered a team that couldn't complete the game, or even have real trouble with it. Policy on reporting progress? As much as you care to. Over the years I've seen folks do just turncounts, summarize their strategies, and even fully screenshotted reports. If you want to turn it into a Let's Play, that's cool too. Just give me a heads up so I can modify the spoiler policy. Spoiler policy? Unless someone really objects, or a LP happens, you can spoiler this game to kingdom come in this thread. Sounds good. How do I sign up? Post in this thread Onto the rules of the actual draft - This is a draft for 4-5 players. - We'll be playing SRW Judgement. - Puzzle Robo is free, and recommended. - Start with a fresh save file. No newgame+ shenanigans. - All of the Banpresto Original units are free to use, always. Same applies for the battleships, Nadesico and Archangel. If you want to use action codes or something to unlock Vorlent and play with that, be my guest. - All other units must be drafted to be used. If you use an undrafted unit you take a 4 turn penalty. - When you draft a unit, you also draft their upgrades. - You may not deploy undrafted units, unless the game forces it, or you need them to do some convincing. - Undrafted units may: persuade/convince units, and sit their butts in a battleship. They may not: attack or get attacked(outside of scripted events), they may not be used for combination attacks, or for support attack or defend. They may not be used for friendship, rivalry, love or command bonuses. You may not use them to cast Spirits, aside from Accel and Zeal, to allow them to escape combat. You may not upgrade undrafted mechs, but you may put items on them. - If there is no battleship for an undrafted unit to retreat into on map, they're free to use. Until a battleship appears. - On the Nadesico/Full Metal Panic beach episode map, you're allowed to use one unit for free, if there's no drafted units on the map. This exception lasts til reaching the unit deployment screen later in the map. To illustrate, say you're on chapter 25 or something, and you start the map with only Voltes V and Combattler V. You've drafted neither. You're free to use both of them till the plot advances enough and the Nadesico and Archangel spawn. From the moment those two appear, Voltes and Combattler go back to being regular undrafted units and you can't use them anymore. SIGNUPS TheLastRoboKy: Mazinger Z, Great Mazinger, Combattler V, Aphrodite A, Boss Borot, ARX-7 Arbalest, M9 Gernsback (Kurz), Brain Child (Kanan), Brain Child (Higgins), Million Alpha, Maxter Gundam, Buster Gundam, Duel Gundam, Sol Tekkaman 2 dance officer: Dancouga, Layzner, Baybull, Strike Gundam, Buldy, Freedom Gundam, Nanga Brain, Lasse Brain, Justice Gundam, Aestivalis - Izumi, Greimkaiser, Aestivalis - Akatsuki, Strike Rouge Gundam, Sol Tekkaman 1 MightyPretenders: Blue Earth, Tekkaman Blade, Shining Gundam, Voltes V, Aestivalis - Akito, Aestivalis - Hikaru, Nakki Brain, M9 Gernsback (Mao), Kant Brain, Moebius Zero, Tekkaman Rapier, Dragon Gundam, Aestivalis - Gai, Bolt Gundam MonsieurChoc: Zeorymer, Yuu Brain, Hime Brain, Bloody Kaiser, Aestivalis - Ryoko, Skygrasper 1, Skygrasper 2, Eternal, Baronz, Rose Gundam, Nobel Gundam, Iiko Baronz, Rising Gundam, M1 Astray Free for all to use: X-Aestivalis Dance Officer fucked around with this message at 11:48 on Apr 22, 2019 |
 #
?
Apr 20, 2019 18:51
#
?
Apr 20, 2019 18:51
|
|


|

|
| # ? May 4, 2024 11:30 |
|
|
I love SRW J. But I hate being competitive. I'd like to keep an eye on this, see how it works.
|
|
#
?
Apr 20, 2019 20:29
|
|


|
Wow, you're really doing this. I burned out halfway through when I tried playing J, but... Oh why not? MightyPretenders fucked around with this message at 20:32 on Apr 20, 2019 |
|
#
?
Apr 20, 2019 20:30
|
|
|
SRWJ was my first SRW game and I have a super soft spot for it in my heart so sign me up for this feed all the worst units directly into my dumb face.
|
|
#
?
Apr 21, 2019 01:58
|
|
|
gently caress it I'm down.
|
|
#
?
Apr 21, 2019 05:02
|
|


|
That's 4 players. I'll give it 8 hours more to get a fifth, if we don't we roll with 4 players. I've also set up a discord channel, in my experience this significantly speeds up drafting, so think about hopping in if you signed up. https://discord.gg/Stqy54
|
|
#
?
Apr 21, 2019 09:14
|
|
|
OK, sign ups are closed. Now, how the drafting process will work. I'll randomize the player order. The first player gets to pick one unit, then the second will pick one, then player three picks one. Player four gets two picks, and we go back up the list. Player three picks one, then player two, then player one gets two picks. We keep doing this until there's not enough units left to give everyone a pick. The randomized list is: TheLastRoboKy dance officer MightyPretenders MonsieurChoc
|
|
#
?
Apr 21, 2019 17:06
|
|
|
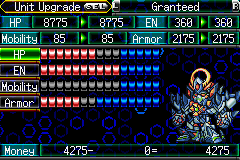
While Toya's first mission seems like it would take fewer turns, I feel obligated to pick the protagonist who has units I can use on their first mission. And it turns out Super Calvina never gets Accel... Looks like I'm stuck with the Raftclans if I want to get anywhere fast, and Granteed if I don't care about movement rate. My usable units are: Aestivalis - Akito, Blue Earth, Nadesico (Aestivalis - Gai) Original Aestivalis - Hikaru, Moebius Zero, Archangel Tekkaman Blade, Shining Gundam, Voltes V, Dragon Gundam, Bolt Gundam, M9 Gernsback (Mao), Nakki Brain, Kant Brain, X-Aestivalis Tekkaman Rapier, Aestivalis - Gai, ...I'm picking Granteed anyway. Favored Series are Banpresto, Nadesico, and Tekkaman. Let's go. MightyPretenders fucked around with this message at 18:53 on Apr 21, 2019 |
|
#
?
Apr 21, 2019 18:49
|
|
|
I went Gundam SeeD, G Gundam and Brain powerd. I also went with Calvina, but with the Belzelutte (renamed White Lynx). 13 turns for the first two stages. Not a great start.
|
|
#
?
Apr 21, 2019 19:19
|
|
|
Mission 1 (Calvina) Turn 1: Akito starts out in the middle of 6 Battas which outrange him, and his Aestivalis will run out of energy fast if he tries a Gekigan Flare or takes too many hits. Shooting the bottom-left Batta from 2 squares to it's east puts him at the range where he can counter the Top and Right wings when they approach. Turn 2: Akito picked off another one at range 4 (The one with the repair kit), but since he'd Shot Down an attack last turn, he was running low on ammo and needed to use Gekigan Flare on the two closer ones on Enemy phase. That brought in the second wave of enemies. As well as Combattler and Blue Earth. Two went after Akito (Who evaded the second, as he was out of energy), two after Combattler (who destroyed them easily), Two attacked Blue Earth and got countered, Two looked to be targeting Blue Earth but couldn't get in range). Turn 3: With 0 energy or bullets, Akito landed and walked to the last batta in range to stab it. Combattler V and Blue Earth weakened the two undamaged Battas to counterkill on EP. This worked, although Combattler got more kills and EXP than I'd like. EDIT: Mission 2 (Calvina) In the intermission, I upgrade Blue Earth's Energy and give it a Propellant Tank, because both its attack and shield rely on it. Akito gets a Cartridge just because. I can only field Gai and Blue Earth at the start of the map - and of course I put them as close to the starting enemies as possible. Turn 1: Nadesico and Blue Earth Accel into the fray, while Gai dosn't need it to get close enough. Everyone weakens a Batta on player phase. Lots of things die or get damaged on Enemy phase, and Blue Earth barely pulls through. There's one Batta which attacks Gai from out of range. Turn 2: Noel's a Gutsy fellow though, he'll be alright. Nadesico moves into range to hit a Katonbo with a missile, and counter them both next turn. Gai gets payback and takes the full-health Batta down in one strike. Blue Earth shoots down another one while moving next to the Nadesico - I might need to resupply it next turn. On enemy phase, the Nadesico shoots down enough that the plot happens and Granteed comes in for a landing. Ja-Mu comes across as slightly more competent on this route, as he admits that he screwed up. Looks like I was right to be worried about Nadesico's EN, as it's drained dry by the end of the turn. Turn 3: Gai punches the Katonbo with more health remaining, getting Support Attack from Blue Earth before it resupply's the Nadesico. The Nadesico then destroys the one which started off with less health this turn, and picks up a Booster. Enemy Phase: the last Katonbo is destroyed, causing plot to happen. The Federation shows up at the south end of the map, while Akito, Granteed, Hikaru, and two other Aesties reinforce me on that front. Granteed crushes two wings of Moebius, while the enemy Delphinium hold back. Turn 4: Festina heals the Granteed back to full - it had barely survived the previous turn. Gai and Blue Earth board the Nadesico, which Accels south. Granteed and Akito approach the southeast enemies, while Hikaru approaches the Southwest ones. On Enemy phase, they start coming to me, but can't attack just yet. Turn 5: The Aesies which I'm not using manage to board the approaching Nadesico. Hikaru is in range to shoot a Delphinum, while Akito and Calvina have their side covered. Gai and Blue Earth are actually in range to jump off the Nadesico and contribute - Gai helps Hikaru, while Blue Earth finishes off an enemy with a repair kit. Everything dies on enemy phase. That's 8 turns total so far. MightyPretenders fucked around with this message at 21:20 on Apr 21, 2019 |
|
#
?
Apr 21, 2019 19:56
|
|
|
Stage 1: 3/3 turns So first off, I pick Calvina. Others have pointed out that Calvina doesn't get Accel, but her starting stages are a bit faster than Touya's, and having Accel just doesn't matter on most units. That's my experience, at least.  Picking Belzelute.  Picking Layzner, Dancouga and the Original for favourites. Units from Favoured series earn more money and exp, and can be upgraded further than other units.  Start of stage 1. Akito in an Aestivalis vs some mooks from Nadesico. Cast focus, move 3 tiles down, end turn. Normal counter attacks on enemy phase.  Start of turn 2. Akito casts focus once again, then attacks this specific Batta, which would otherwise use its repair kit on enemy phase, and delay the reinforcements. On enemy phase, Akito just counters all the mooks dead, reinforcements spawn, and again I just counter everything normally.  Start of turn 3. Most mooks died on enemy phase, so now I just clean up a bit.
|
|
#
?
Apr 21, 2019 23:40
|
|
|
^Well, that looked a lot simpler than my approach. Mission 3: In the intermission, I remember to switch Ruri and Aki into main pilot positions. Granteed gets a booster I picked up last mission, while Blue Earth gets the Servo moter. Maybe an Aestivalus could make better use of it. Speaking of which, I switch all of the Aestivalis into Air frames. Finally, I give Granteed 10 pips in EN in case I need to spam O-Slave in later chapters. Next I'll boost up it's Armor and HP. Sadly, I can't use any of the Layzner characters I get this chapter. Turn 1: Eiji retreats into the Nadesico, Granteed heads due South, Blue Earth Accells west, Nadesico and Aesties head southwest. No one except Blue Earth gets close enough to attack. On enemy phase, the southeast front gets mostly cleaned up by Granteed, while the Northwest gets more congested around Blue Earth. It's the Katonbos I'm really worried about though... Turn 2: Thanks to Katia's range increase, Granteed is able to get in range to Finger Crush the southern Katonbo. Nadesico shoots missiles at the northern one. The Aesties help Blue Earth clear things up on the northern front. On the enemy phase, the Boss' entourage start participating, and Karla takes a critical Distortion punch from Hikaru. Unfortunately, the Nadesico runs low on energy. Turn 3: Granteed takes an O-slave potshot at her Katonbo, ready to take it out on enemy phase. Blue Earth finishes off Karla from a position that will let the Nadesico refuel. Hikaru takes a shot at Gale, while Akito and Gai do a quadruple Gekigan Flare on the Katonbo. On enemy phase, the Katonbos are taken out on the counter, while Gale eats a lucky crit from the Nadesico's missiles (Well, there goes that secret). Since Gale's HP hit 0, he forks over his ability and Hit rate modules. Then Gosterro's wave enters the field on the previously unoccupied North and East sides of the map. Turn 4: Blue Earth resupplies the Nadesico, which starts heading NNE. The Aesties struggle to keep up, but take a few potshots at Skullgunners. Granteed heads Northwest, deciding to forgo attacking on this turn to lure in more Counterattacks. On enemy phase, the Boss' entourage starts moving. Granteed doesn't lure in everything I wanted it to, but it does take out one set of 3 enemies. Nadesico takes out more than that. Turn 5: Blue Earth gives Hikaru some spot repair, so she can go punch a Katonbo more safely. Gai and Akito follow up. Nadesico Accels ahead and takes a potshot at another one. A rather worse for wear Granteed closes in and follows up on the Nadesico's attack while under Calvina's Guard. On enemy phase, the Nadesico counterkills one Katonbo, and the remaining fodder enemies. Turn 6: Hikaru punches out the last Katonbo. Blue Earth Accels to repair Akito. Nadesico takes a potshot at a Braver holding a repair kit - and blows it up with one missile. Akito attacks the second one - and gets a lucky critical. On enemy phase, Costerro closes in on the Nadesico. Ruri has 150 will, and the question is- Okay yes, A critical gravity blast is enough to take him out in one hit. The end of this mission went suspiciously smoothly, but I did not reset for those last two attacks at all. That Chobham armor and Defense +5 will be useful. In the following intermission, I beef up Granteed's Hp a lot, and armor a little, and give it the Chobham armor. The other modules and parts go where I think they'll help. 6 turns, 14 total.
|
|
#
?
Apr 22, 2019 02:44
|
|
|
Mission 3 was harrowing. Everyone suiciding themselves on the Nadesico took it's toll eventually. I'm at 24 turns, fully 10 turns behind.
|
|
#
?
Apr 22, 2019 04:11
|
|
|
Hello this is my introduction from the starting line as everyone else gets off and running As I said in my sign me up post, I'm a bit of a SRWJ fanchild who forgives everything the game does a lot more than what everyone else does. I don't think this means I'm particularly good at the game and I expect my time spent in SRWV, X and T where you can cast your spirits at any time will be a detriment to me. Even though I was completely asleep and also a fair bit ill when the draft kicked off due to a chronic case of Australianism, I managed to completely influence the brains (not Brains) of everyone present and received the entire Mazinkaiser cast. I'll introduce the units as I'm allowed to get them and talk a little about the stages as I do them too, and wax a little on what I love about this game. So here's what we need to know about the setting for the game I'm playing, SRW Mazinkaiser.  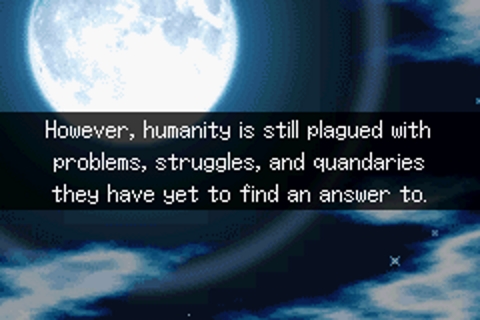 They are of course referring to the official translation for Super Robot Wars Original Generations: Moon Dwellers. Anyway the world is in strife between man and slightly superior genetically enhanced man, there's something in the ocean that keeps shooting plates that turn into fleshy robots everywhere, Dr. Hell is trying to kill Koji Kabuto still and failing, and now aliens are invading with unmanned kill-machines and no one knows how to deal with it! Pretty simple, gets us into the mood for it. I'll explain it all a bit more as I go. Thanks to this draft one of the big advantages I get for SRWJ is that right out the gate I'll have multiple units backing up my protagonist so I can pretty much pick whomever I want and put them in whatever I want. For the uninitiated SRWJ gives the player two protagonists to choose from, three starting mechs to choose from, and if you beat the game with all three of those robots you get a fourth. SRWJ is crazy cool in that regard. 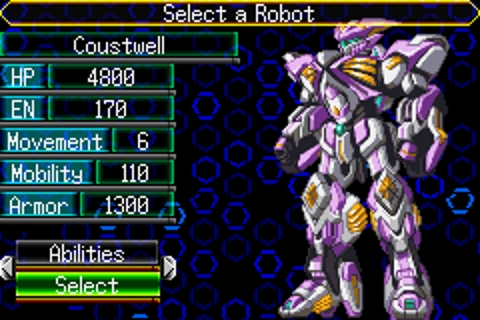 I'm putting the male protagonist in the pink punch-robot. 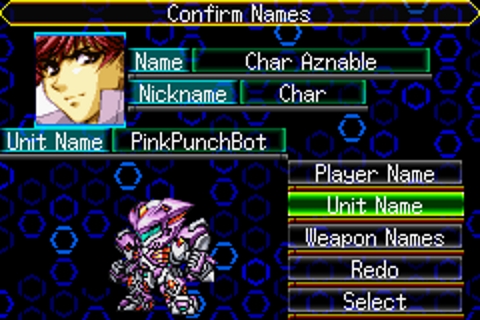 I'm not renaming any of the attacks because they're all some variation of the letter O with a word and I'm ten years old mentally, but if you want to see my protagonist yell out something embarrassing feel free to ask. The game also wants me to pick which three series I want to mark as my favourites, which is a nice little touch for a regular playthrough that actually stacks the more you new game+ it. Marking a series as a favourite gives you more money and experience when a unit from that series kills an enemy, and gives you more slots for upgrading a unit which we'll get into once I actually finish a level and get some money. For now obviously I'm picking Mazinkaiser and the Original (the protagonist) as the first two, and I won't reveal who my third pick is till they arrive because THIS IS A MYSTERY GAME?!?! 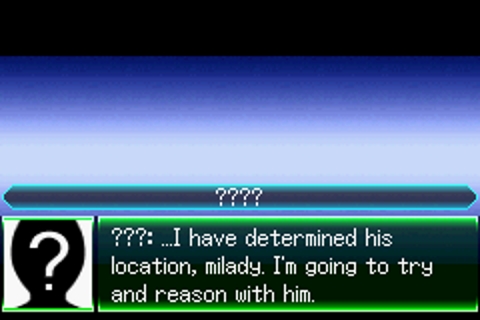 Ah poo poo someone found out I'm doing this. See you all next time in Episode 1 of SRW Mazinkaiser! NEXT TIME in Episode 1: Coustwell Dies in Charva Turn Count: 0 TheLastRoboKy fucked around with this message at 07:38 on Apr 22, 2019 |
|
#
?
Apr 22, 2019 06:47
|
|
|
U GOT THIS HOMIE
|
|
#
?
Apr 22, 2019 07:06
|
|
|
You dig giant robots! I dig giant robots! We dig giant robots! Good luck to everyone!
|
|
#
?
Apr 22, 2019 07:21
|
|

|
TheLastRoboKy posted:
Tenia: Such words... Even I could... (write a better translation than this)! Seriously though, it's wonderful. And this is picking up all of a sudden. I'll see if I can put some screenshots in my next update too.
|
|
#
?
Apr 22, 2019 08:39
|
|
|
TheLastRoboKy posted:I'm not renaming any of the attacks because they're all some variation of the letter O with a word and I'm ten years old mentally, but if you want to see my protagonist yell out something embarrassing feel free to ask. 
|
|
#
?
Apr 22, 2019 09:24
|
|
|
Stage 2: 5/8 turns For this stage I equipped the Nadesico with a Propellant Tank.  Start of stage 2. This is unfortunately a 5 turner for me; I've done 4 turns in the past when I had access to Mazinger or Combattler.  Combattler hops into the Nadesico, which casts Accel. Then it moves and attacks this Katonbo. End turn.  Start of turn 2. Most of the grunts got wiped on enemy phase, but Nadesico is now low on EN, so I pop my propellant tank.  I then move Nadesico here and attack the Katonbo. End turn.  Start of turn 3. I cast gain and kill one of the Katonbo's. Now, when all enemies are dead, the plot progresses, and Calvina and a bunch of enemies spawn, so I make sure I don't kill the second Katonbo on enemy phase. If I had one more unit here, I could have offed both Katonbo's on player phase.  Turn 4. I forgot to take a screenshot of the last Katonbo biting the dust. Calvina and Akito appear, as well as a bunch of units. Calvina is very reliant on focus for semi-decent dodging right now, so if I had spawned the enemies on enemy phase, she would not have had a good time.  In any case, Akito gets lost, Calvina casts Focus, moves here and attacks a thing. End turn.  Start of turn 5. Calvina once again casts Focus and Fury, and gets a Cheer from the Nadesico.  Then attacks and kills this thing.  And Hit&Aways to this spot, and gets another Cheer. All remaining enemies are mopped up on enemy phase.
|
|
#
?
Apr 22, 2019 09:37
|
|
|
Shei-kun posted:What's the character count? 16 characters! You imminent monster.
|
|
#
?
Apr 22, 2019 09:42
|
|
|
TheLastRoboKy posted:16 characters! You imminent monster. Any punch attack is just a variation on "FISTO" That's all I've got for now.
|
|
#
?
Apr 22, 2019 09:57
|
|
|
Stage 3: 4/12 turns Nadesico is equipped with a Booster, and a Propellant tank.  Start of the stage. Calvina is offscreen to the top-right     Nadesico casts Accel and moves south, it's going to trigger the next part of the stage by offing Gale. Calvina heads to the top right part of the map, she'll be intercepting Costello. The Layzner boys head to the mid-left, they're going to kill some mooks for now, and later deal with the top-left reinforcements. And finally Izumi will be heading bottom-left to take care of her part of the reinforcements.  Turn 2. Nadesico casts Scan on Gale, to get better hit chance. Then it moves here and attacks. It's important that it gets within 4 tiles of Gale, so he'll attack on enemy phase, and get sent packing. This will then trigger the reinforcements.  Izumi casts Focus, and heads here.     Then, the situation in the west. The boys do some attacking.  Turn 2 enemy phase, Nadesico needs to make this hit to off Gale and spawn the reinforcements. Also, because I didn't convince Gale here, that means I won't be getting him at all.  Turn 3, it's looking very empty around Nadesico.  The boys have attracted a bit of a crowd, though. Now, it's important to keep in mind that all enemies except for Costello's group will beeline for the Nadesico.     The boys get some attacks off.  Izumi spent all her EN dealing with the mooks that attacked her on enemy phase, so she lands and heads over to do some damage.   Calvina sends Costello off, then moves to this spot. Costello's lackeys will suicide on her on enemy phase, and next turn she'll be able to attack a Katonbo.  And finally, Nadesico pops a propellant tank, casts Accel and moves up.  Turn 4.    Izumi and Nadesico soften up this Katonbo, then Calvina casts Bless and Snipe and offs it for some more money.  Layzner attacks the last Katonbo.  David moves here. A few mooks will suicide on him on enemy phase.  And finally, Roanne offs the final Katonbo. All the remaining enemies are cleared on enemy phase. On to something different now. I want to do something more visual than just a bunch of words, but I'm encountering some problems with screenshot reports. I'm spending way more time taking screenshots and writing reports than I am just playing. Like, if I take 30 minutes to route a map, I then spend an 30-60 mins or so taking screenshots (or even screencapping a video, and then taking shots from that), and then another 30-60 minutes doing the report. Stage 3 is the first decently-sized map in the game, and things are only going to get bigger from here. Right now I'm thinking of screencapping my raw gameplay footage, and then uploading it on YT or something, see how that works out.
|
|
#
?
Apr 22, 2019 20:26
|
|
|
^I know from experience that it only takes 2 turns for Eiji to reach Gale. I guess you really don't care for him. Mission 4: I finally remember to set Pilot training to Disperse. Here's my starting formation: 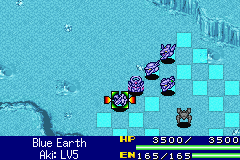 Turn 1: Everyone just moves forward towards Gale. Blue Earth could move further, but I don't feel like putting it at greater risk will help. 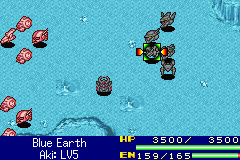 On enemy phase, Gai attracts a few shots, while Granteed and Nadesico counterkill quite a few enemies. I really should upgrade the Nadesico's energy. Turn 2:  Ruri scans Karla, then heads north to put 3 of the 4 big enemies within range of a Gravity Blast. Hikaru and Akito focus and move to follow. Hikaru shoots Karla's Dimage, as it's the only noteworthy enemy she can reach, Gai and Akito decide to join her and finish Karla off for her equipment. Blue Earth moves next to the Nadesico and takes a potshot at a Batta. Granteed attacks the southern Katonbo. On enemy phase, Akito draws the attention of some enemies which can't reach the Nadesico - including Gale. and the Nadesico switches to relying on Missiles to save energy for the big enemies. Turn 3:  Well, I can easily take out Gale this turn. Hikaru finishes off a Braver to give Gai enough morale to Double Gekigan Flare him. Then the second wave attacks and Gale becomes a yellow mission critical unit. Blue Earth resupplies the Nadesico, which charges ahead to intercept Gosterro's forces. Calvina stays behind to try finishing off a Katonbo. It's fortunate that Gale's own squad doesn't aggro on him. Nadesico's decoy strategy works like a charm. Turn 4:  At this point, I give up on keeping all of the Aesties with the Nadesico, and have Gai take on the remaining Katonbo of the initial wave. Calvina finishes off hers. Blue Earth repairs the Nadesico a bit. Akito and Hikaru clear a Batta out of Nadesico's way, though it doesn't make much of a difference. On enemy phase, Gosterro's Katonbo's close in and attack the Nadesico. Turn 5: The Nadesico's support work to weaken the Katonbos, Ruri scans Gosterro and hopes to finish him off on a counter, though it takes some tricky positioning to make sure he goes for the Nadesico. Meanwhile, Gai takes on the last of the enemies from the first wave. It takes a critical, but Gosterro goes down.  And Gai gets left behind on mars after the battle ends, because Uribatake pretends not to know what a Cross Crusher is. We won't be seeing him again for a long time. 5 turns, 19 total.
|
|
#
?
Apr 22, 2019 22:50
|
|
|
Super RoboKy Draft-Wars Episode 1: Should've stayed in school, Char. Hey wow this update is going to be a lot of words but I do kind of want to explain things to people who might not know anything about NOTHING so I apologise in advance. We actually start the game and a whole bunch of people with question marks for faces are cryptic, which leads into-  Okay wow jeez Char TMI right there we just met.  I think it's a little early to be dropping AXIS on everyone isn't it? I love the quotation marks, it's like a politician was asked to justify letting a colony drop happen. 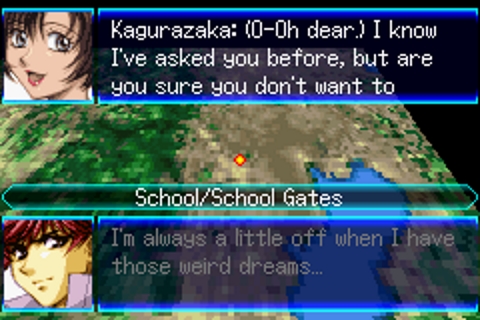 See? I told you, dude! Anyway Char goes to school with a bunch of anime protagonists and heroines, and then a giant robot falls on him and his teacher, some dudes turn up and instead of doing their job to destroy the robot they bug out and leave it to a bunch of unmanned Jovian Lizard units instead. Jovian Lizard is the name they give the invaders, which is weird but relates to how the robots kinda look like lizards. 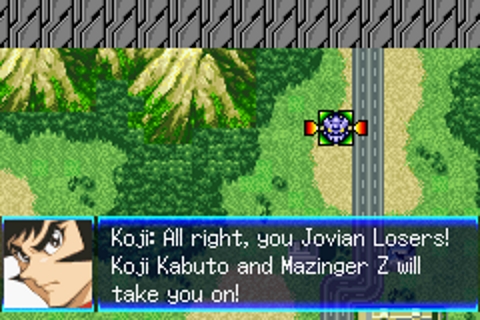 Luckily for everyone the list of anime protagonists at this school includes Koji Kabuto and he sallies forth to protect the school! 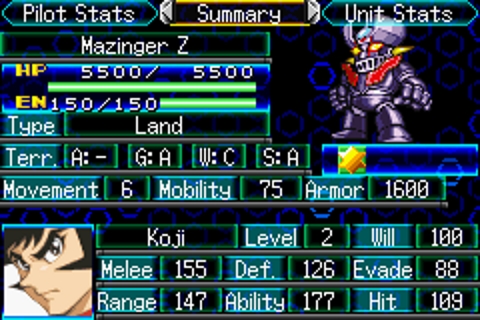 Deep breath here cause I'm about to waffle about some MECHANICS. Mazinger Z and its pilot Koji are about as Super Robot as you can get. There's always some version of a Mazin in a SRW game and they are super hard to kill due to the machine having a high armour and HP pool, and the pilot having excellent defense. Koji also has Potential (typically called Prevail) that increases the pilot's stats as their HP lowers. Potential has levels to it that increase the effectiveness and Koji starts with his Potential at level 3 and will eventually ride all the way up to Potential 9 I think? Anyway there'll come a time when he'll be at half health and attacks will do 10 damage, which is the absolute minimum damage anything can do to you in SRWJ. Thrown on top of this, once Koji's will hits 130 Mazinger Z activates MAZIN POWER which boosts all its damage by 1.25. Will/Morale is a thing in SRW games whereby a pilot's performance generally improves the higher their Will is, particularly in damage. Some attacks have a minimum Will threshold before you can use them, representing the pilot getting hyped up enough to do their big hits. Will build-up is different based on a pilot's personality in J, in Koji's case his will goes up when he takes or deals damage, and goes down if he misses an attack. Koji also starts with Guts as a spirit, so he can just regain all his HP if you're worried about him getting plinked to death somehow. OH DID I MENTION SPIRITS? You have a limited pool of points on a character called SP and they give you all manner of buffs and debuffs to play with and you can only cast them in your turn. Mazinger Z has a few flaws. It guzzles EN on its more powerful attacks, and while some units get ammo-based and freebie attacks Mazinger Z doesn't. The other issue is since I don't have Z's Scrander it cannot fly. We won't be getting the Scrander by the way. Mazinger Z always walks and suffers terrain movement penalties unless we give in a part that makes him fly. 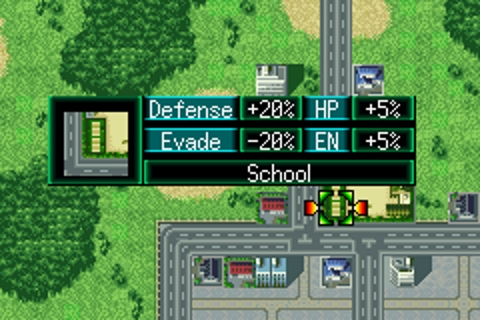 Terrain matters in SRWJ, and can be used by both you and your enemies. Aside from limiting your ground-based movement it's a boost to defence and evasion but look! Going to school gives you HP and EN regen. Anyway there's a video-game here let's go. I didn't think to just show everyone the little map you can bring up I'll do that next time, just know the school is basically north middle of the map and you've got a whole lot of buildings down south. Turn 1 is a gimme, Koji's just a little north of the school and can head south a bit and wait for the enemies to run at you. Turn 2 Sayaka turns up ready to help! 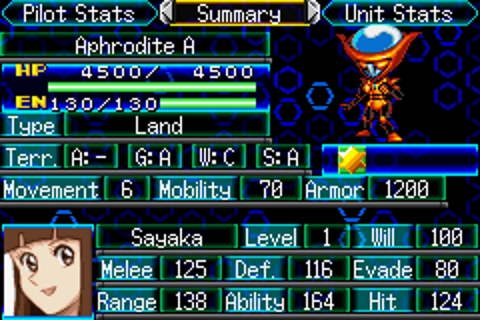 Put Koji and Sayaka side-by-side and you can kind of see how awful she is in comparison. In addition she's in a super robot that can't tank for beans, doesn't really do much damage, and it's ground-based. She has the Repair function which means she can heal people instead of attacking, and healing people does give you experience points. Healing or killing something higher level than you gives you more exp, and lower level stuff gives you less. Sayaka will likely be chasing us in levels or dying. She does have one more neat little thing to her, because she and Koji love each other they get a stat bonus when standing together. Love and friendship are super important! Sayaka starts with Potential level 1 which is mostly worthless, and can cast Alert, it's a one-time 100% dodge for a turn every time you cast it. Enemies love trying to kill her so it's never a bad idea. We keep marching towards the unmanned thingies, and Koji ends up being in range of one so I rocket punch it, crit it, and it dies instantly. I loving love Koji. 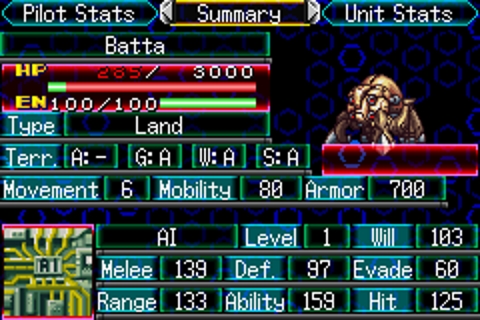 These little Batta fellas are unmanned and they pretty much suck. They'll get extremely annoying later. Fun fact! Unless you have a Spirit called �Scan� you can only know the stats of something after you have fought them. This screencap is from a later one because Koji is a wonderful man. This kill causes the event that makes Char recover from a giant robot dropping on him, and he discovers every young man's worst nightmare: A giant robot with three girls his age demanding he pilot it for them because it turns out he's actually the chosen one. Char hates it. On the enemy's phase they unsurprisingly all take a shot at Koji, and he's in range with the Rust Hurricane attack. This is an attack that'll rarely ever kill anything but will inflict them with armour down. This is a lot nicer than what happens in all Mazinger official works where Rust Hurricane just makes things horrifically melt like they'd looked into the Ark of the Covenant. Koji takes some damage but he's standing on a building and has a spirit that lets him get all his health back NO WORRIES. Turn 3 has Sayaka head down to heal Koji because she's just in range, and that's basically her job. Koji misses another Rust Hurricane on a 94% chance to hit but I'm not really heart-broken, expect I'll be counter-killing most of these guys anyway. Enemy phase and they attack both Koji and Sayaka, and get wiped out while doing buttloads of damage to Sayaka because her father is TERRIBLE at making robots. This triggers the event that actually spawns Char in his unit, along with a large number of the Batta. I love this sequence so much because the first thing our protagonist does is stagger out of the school into a nearby building because he has no loving idea how to manage a giant robot. Koji gives him some sass about that but excuse me fucko you nearly levelled a town the first time you got into Mazinger Z and Sayaka had to radio you to tell you how to stop trashing everything while you cried like a baby. We event kill a mook with our new boy and then the enemy phase continues. Events that give you a new unit or mission objective occurring in an enemy phase can happen a lot in SRW games! Sometimes it's awful and you lose. Today it's okay. 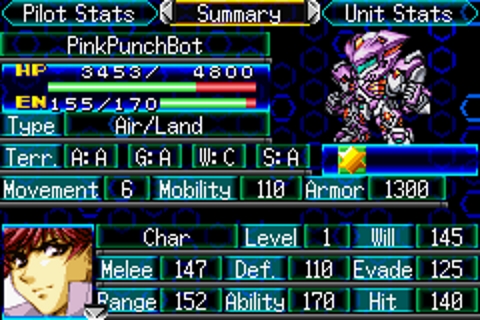 Our protagonist is in a mech that dodges and punches! Punches. Literally everything is a punch. Its ranged attack is a giant fist I'm sorry Shei-kun I'll show you the renamed attacks next time but there won't be any beam attack. Char is a protagonist so everything he does is going to be pretty good. He comes packing Hit & Away which lets you shoot and then move, Potential level 1, and Support Defence Level 1 which allows us to take a hit for someone targeted adjacent to us (more levels in that lets you do more acts of defence). Char can cast focus, it boosts chances to hit and evade for a whole turn. As a bonus our machine comes with a sub-pilot who mostly act as spirit batteries. Unlike every other sub-pilot in this game the protagonist's sub-pilot also give stat-bonuses. Festenia gives +200 to weapon damage and +10% to your critical chance. Pretty good! Turn 4 Char kills a Batta and we get him and his co-pilot Festinia a level. I move the Mazin crew into the school to get them an education and Sayaka does some more repair work. I know there'll be more enemies spawning soon but hey I'm not here to win intentionally I'm here to win accidentally. Mazinpower activates during this, ensuring Koji does even more damage. Enemy phase sees two battas survive with about 100 hp which happens sometimes and probably is because we're all in the trees. Turn 5 has Sayaka hit level 2 from repairing Koji again. Lacking anything else to do with Mazinger Z I head him south for the expected enemy waves. Char kills one of the two Battas left and uses Hit & Away to go a little south as well. Enemy phase sees that last Batta die and Char and co. hit level 3! Festinia learns Fury, probably at how slowly I'm going in the first stage. It just boosts your crit chance. Four mechabeasts turn up! The good news is that they'll all approach Koji. 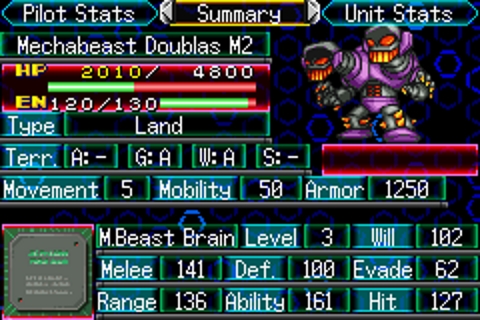 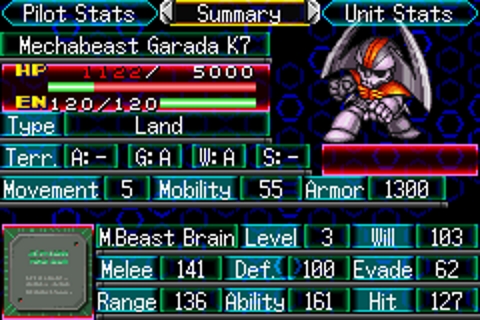 Mechabeasts (or Kikaiji if you prefer) are super robot sized enemies, but these two are fairly budget versions and honestly as much as I love 'em we're going to roll over them plenty of times. We got two of each kind. Turn 6 One more gentle heal from Sayaka and Mazinger Z goes in deep, and touches a Doublas. I'm kind of worried he's going to run out of EN fighting these guys but we'll see. Char races to catch up but I sincerely doubt he's going to manage it. Enemy phase they all pile Koji and that ones Doublas that was already damaged dies and gives us a Propellant Tank, which will be handy for when I run Koji out of EN in later stages. All other enemies get tagged, they're likely to die next turn. Turn 7 Oh gosh this sure took longer than I thought it would, but Koji gets to killing and hits level 3. One of the enemies uses a repair kit to heal itself completely back to full, which actually kind of surprises me cause I forget they can do that but then it dies in one hit to breast fire and I usually forget to use those sorts of things so it doesn't matter he can keep it. Which is a problem because now Koji has no EN to counterattack this turn. MISCALCULATIONS AHOY. Turn 8 Okay Koji has enough EN now. He hits level 4 and the stage is over and I'm FULL OF SHAME. After all the fun dies down Char goes back to the Mazinger Squad Headquarters and tries to do what he does best and abandon everyone who needs him but Great Mazinger's pilot Tetsuya Tsurugi walks in and tells him to not be a giant baby or he'll go to a military gulag, and then they ship his rear end to Mars so he can avoid that fate. Seriously Koji refers to the United Earth Federation Alliance (or whatever it's called) as �extremist pricks� in the translation and it's great and accurate. Sayaka's dad manages to completely outwit them with the Mars gig though, which just goes to show the dude was never cut out to be a scientist and that's why in Mazinger Infinity he's gone on to become the Prime Minister of Japan. Dude can run poo poo. Mars is probably a suicide mission so Koji and Sayaka are coming too. I'm still not sure if Dr. Yumi is the best or worst dad. He might be simultaneously both. Next time on SRW Tortoise-Pace! I take way too long to do literally anything. Turn Count: 8 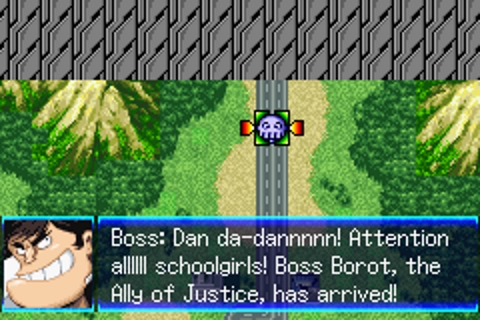 Goddamnit Boss.
|
|
#
?
Apr 23, 2019 08:39
|
|
|
Stage 4: 5/17 turns Nadesico is equipped with a Booster and Propellant Tank, Ruri has hit +5  Start of stage 4. Izumi, Roanne and David have all been loaded into Nadesico. They don't have enough movement to the action fast enough, so they'll hitch a ride with the battle taxi.  Nadesico casts Accel, moves here and attacks.  Eiji casts Accel, moves and attacks. He's not going to get attacked on enemy phase, so he doesn't need Focus.  Calvina casts Snipe and Focus, moves next to Eiji and attacks the Katonbo. End turn 1.   Start of turn 2.  Ruri casts Scan on Gale and Karla, then gets Accel, moves here and attacks the Katonbo.  Izumi, Roanne and David all pop out and attack it as well.    Eiji attacks the Katonbo with support from Calvina, then she has a go at it herself. She Hit&Aways. End turn 2.  Start of turn 3.  Eiji gets a Cheer, then offs Karla.    Roanna offs the Katonbo, then moves. Calvina gets a Cheer and offs Gale to trigger the plot. She then moves here, and David moves next to her, to resupply her next turn.  Izumi hops back into the Nadesico, which casts Accel and moves here. End turn.    Start of turn 4. Nadesico pops the Propellant tank, David resupplies Calvina. Roanne repairs Nadesico for some experience.   Calvina offs a mook to make way for Nadesico. Nadesico gets an Accel and Snipe, scans Costello, then moves in to attack him. The hit rate isn't great, as you can see, but still acceptable.  Izumi pops out and does some damage. Eiji moves up, but I didn't bother taking a screenshot of it.      Turn 5. Costello bit it on enemy phase. All that remains now is to mop up the mooks and damage the Katonbo's enough to put them in kill range for Nadesico on enemy phase. Dance Officer fucked around with this message at 15:00 on Apr 23, 2019 |
|
#
?
Apr 23, 2019 14:50
|
|
|
TheLastRoboKy posted:
EACH SEVERED LIMB MAKES US MORE AND MORE GRIM AS THE CHIN-MAN'S LOUD PRATTLE SINKS INTO US THE NECK-CANNON FIRED, NOW THE HEAD'S COME UNWIRED AND BOSS'S MOUTH IS KILLING US
|
|
#
?
Apr 23, 2019 17:26
|
|
|
TheLastRoboKy posted:
|
|
#
?
Apr 24, 2019 00:57
|
|
|
Super RoboKy Draft-Snores Episode 2: Martian Successor Nadesicohjesus you're killing EVERYONE Before we get stuck in I'll just mention a few things that can happen between turns. You get a chance to do some fiddling with your mechs and pilots to equip bits and pieces and also upgrade them. Remember that Propellant Tank we got? Yeah that's a PART and you can slap it on your mech so it can use it mid-battle. Other parts will grant bonuses of many different varieties and it's up to you to decide what to use. Or me. I guess I'm playing this I should know. Some mechs have more slots for parts than others. Pilots have slots for other stuff too which directly affects them, so you can buff existing skills or grant entirely new ones! We have none of those. 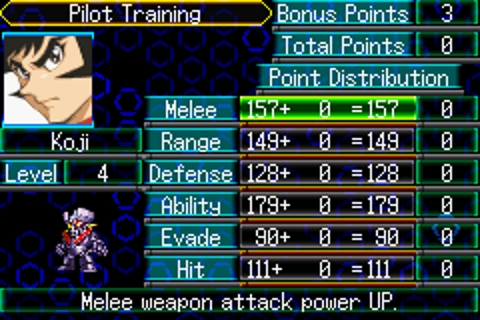 Every level you gain in SRWJ gives you a point that can be spent on buffing a character's stat. I'm giving all my super robot pilots more defence and pumping Ability on Char cause that'll boost a few things for him, his crit-rate one of them. You can set it so you can do it during battle but I find it easier to just do without. 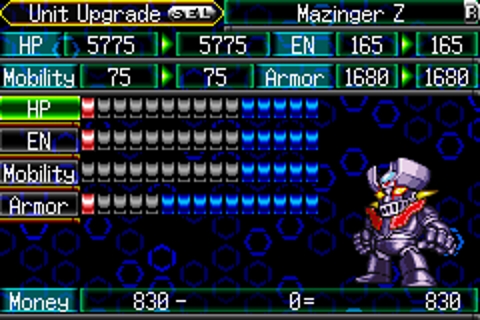 Destroying enemies gives you money, and this is where you spend it. All mechs have four stats with a varying number of squares, and you can upgrade them accordingly. Almost all units benefit from an EN boost, super robots benefit from armour and HP on top of that, and reals do like mobility most of all. One of the advantages we'll get betting in this game is that with less units to spend on we'll probably have better upgraded units over time. Those blue squares are what we get for picking out units as our favourite series, allowing us to buff our units even beyond what they were. There's a similar menu for upgrading weapon damage, and upgrading those boosts all of a unit's attacks. We don't have much to spend on so we mostly give Koji some general love, Sayaka some tankiness she really needs and some mobility to Char. Nothing is spent on weapons (yet). Lastly we can do a thing called Puzzle Robo where you have to do specific short tasks under specific circumstances to get extra money and items. You don't have to do it and a new puzzle robo stage opens up every time you clear a regular stage. It's nice. On to the episode!  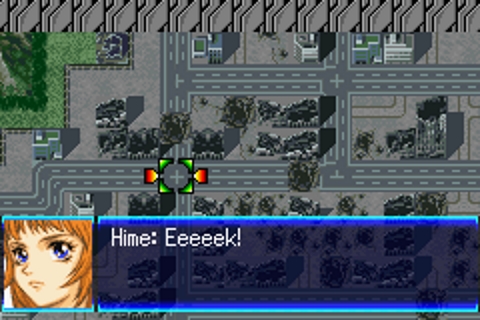 Wow Mars isn't that scary, lady. So story-wise after a non-sequitor involving Brain Powerd (not a typo or at least not the typo I thought I was making) which is a show that has an intro where naked woman float by but the intro music is sung by someone dying slowly wow it even made me get into a non-sequitor while explaining the non-sequitor- 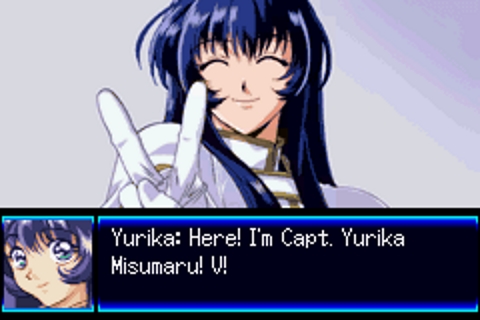 HERE'S YURIKA. She's from Martian Successor Nadesico and is the best character in the show. She's probably the best character in this game too. You know those people who are really only good at one thing? Well her one thing is commanding a battleship and she is really good at it. Char really hates being on the ship and Koji is really mad at him for complaining about it. We also meet other members of the crew and honestly most of them we won't even get to use so whoooooo cares? The Nadesico is a privately constructed corporate warship going to Mars to help out people who were sort of left behind when the Jovian Lizards went there and hosed up everything on their way to Earth. For a reason that will be explained immediately after the events of this episode the UEFA decides to play take-backs on the permission they granted the Nergal Corporation that made the Nadesico to let them make the thing and go to Mars and now they want it so they can fight their wars. Yurika laughs at them and just rolls through their first wave solo, and then we bump into the second wave. 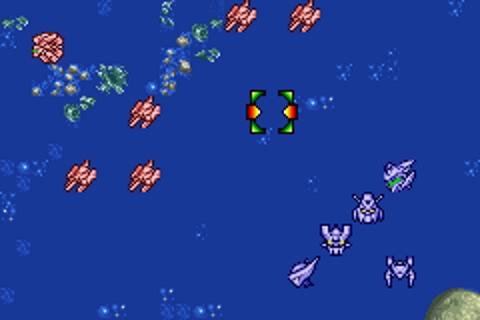 Weird I thought there was a full map display key but I rolled my face on my keyboard and nothing. Welcome to a space map! Combat terrain in SRW is broken up between Ground, Air, Water and Space and all mechs have a rating in it if they can operate in that. One thing to know about air and space travel is each space is one EN point. I fuckin' need that EN SRWJ can you not?!?! 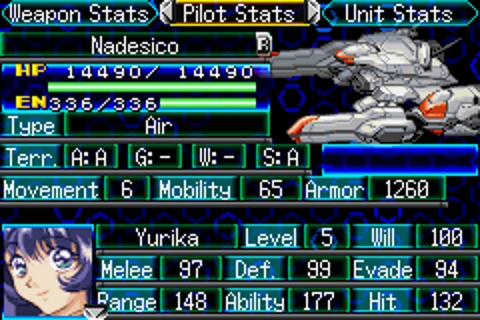 Our first Battleship! Apparently I forgot to screenshot it when we first got it so here's a little post-episode picture. The Nadesico is a fiendish exp-and-en guzzling monstrosity. The former because everyone will try to prioritize attacking the Nadesico over anyone else if they can, and the latter because it has an amazing shield that slaps down most attacks that hit it and a beam attack that just melts everything. Both shield and beam cost EN, so a Nadesico that gets prioritized by enemies tends to kill a lot of stuff but early on that also means it runs out of EN and runs at a risk of getting stranded in place. The Nadesico has a missile attack that uses ammo though so never be afraid to use that if you can, you'll get 20 shots out of that thing but its range is less than the beam. The beam can be used as a MAP attack too, but that's a little situational (but great when you can do it). The Nadesico comes pretty heavily stocked in terms of crew as well. Yurika is the Captain but she comes with four other sub-pilots and they all have spirits. So with the Nadesico alone we get access to Tire (lowers an enemy's Will by 10), Cheer (buffs an ally so their next battle gives double exp), Scan (allows you to identify an enemy and lowers their evasion by 10%), Snipe (increases max attack range by 2 for one turn), Accel (increases next movement distance by 3), Alert, Gain (self-buff to double exp), Break (nullifies enemy defence abilities on your next attack), Vigor (restores 30% of Max HP) and Wall (next attack only does 10 damage). A pretty crazy arsenal to start. The Nadesico is interesting because you actually have a choice of two people that can pilot it. If you use Yurika you can take advantage of her Command Aura which is currently level 1. Command boosts the hit and evasion rate of all units nearby, with higher levels equalling a larger boost. You can switch the main pilot to Ruri who is one of the sub-pilots currently, and she has an ability called IFS which means that as her Will goes up so do her general stats. I don't normally switch to Ruri but if my dudes become strong enough through upgrades they might not need the Command Aura and the Nadesico getting big stat gains is pretty nice. 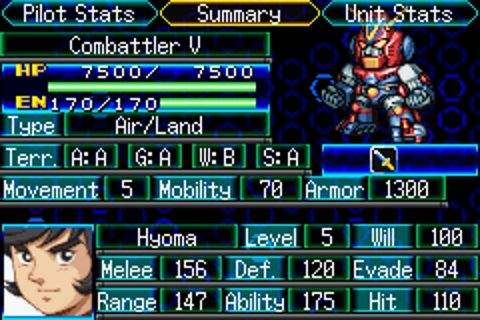 I could sing their theme-song all day. Combattler V is a super robot but it's of a different make to Mazinger Z. Combattler is a combination super robot, made up for vehicles that combine to form a larger machine. This translates to a machine with an overall higher base HP but a lower armour value as a trade-off, which is balanced somewhat by the fact that because it's a combiner it also has way too many sub-pilots with spirits they can use! As a result we get Vigor, Wall, Strike (100% hit rate for a turn), Alert, Guts, Spirit (boosts Will by 10), Guard (all damage taken over the turn reduced to �), Trust (restores 2000 HP to targeted unit), Alert, Scan, Gain, and Vigor. Yes, Alert is on there twice because two different sub-pilots are packing it. Your major issue here is that the spirit points pool of your sub-pilots aren't generally that amazing so the higher cast stuff mean that sub-pilot can do that and literally nothing else for the rest of eternity. Use your powers wisely! The actual main pilot of Combattler V is Hyoma which I cannot pronounce, and for all the major lack of plot relevancy Hyoma has he basically delivers an endless parade of zingers towards the plot. He has Potential 3 which can help with Combattler's general squishiness and inability to dodge. Char has a different sub-pilot this time, it's Katia! She has the spirits Bless (buffs an ally so their next battle doubles their money made, which can be 0 if you kill nothing) and Break. The bonus she gives us in combat is adding +1 to our attacks' maximum range and +10 to our mobility. Not too bad. 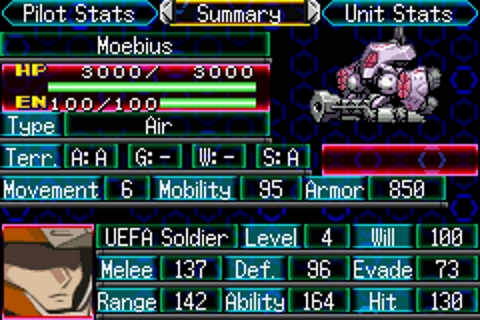 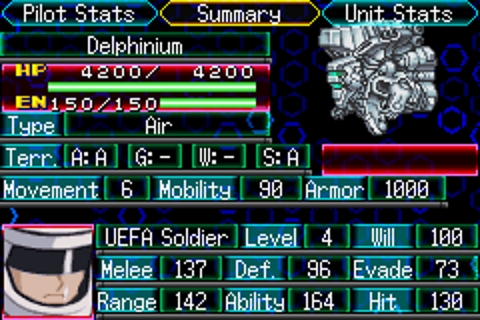 Meanwhile on the UEFA side of things we've got the finest weapons at their disposal. That is to say we've got a space-plane with a beam-gun from Gundam SEED and what looks like the world's most awkward space-suit from Nadesico. Early on both military forces had absolutely atrocious armaments so this fits. There's not much different between the two aside from the Moebius being more fragile but slightly more dodgy than the Delphinius. Turn 1 We throw Accel onto the Nadesico and send it into the mob of dudes. It fires off some missiles, and one-shots one of the little Moebius fellas. Koji moves up with the ship and crits the most distant Moebius with his weakest attack and the thing is already almost dead. Combattler V softens up a closer one and Sayaka finishes it off, and then Char sweeps in on the one Koji wounded and fists it to death. I forgot to rename its moves again! I'm a real Yumi this time sorry Shei-kun. Our enemies respond by holding all their Delphinius' back, and the Moebius sweep in to try to bring us down. Good plan! Except they attack the Nadesico. I mostly stick to missiles for its attacks where I can, and because the shield mitigates damage I'm not really that worried. Turn 2 We move everyone closer to the Delphinius stuff and start shooting, cleaning up the rest of the Moebius, and Sayaka gets to level 3. In the enemy phase they all target the Nadesico and everyone in the crew hits level 5 annihilating them out of existence. We've killed enough things to start an event that lets us know another wave of enemy reinforcements is coming. FANTASTIC. I hold off on killing everything cause the Nadesico would be getting diminishing returns from these levels that the others can still take advantage of. Turn 3 Sayaka repairs Combattler V cause it's a little dinged up, and we weaken the last two mooks so Koji and Char can get some kills to catch up on levels, and Char hits level 4. This triggers SRWJ to give both us and the enemies some reinforcements. But I can't use ours so I send them to climb aboard the Nadesico.  Woohoo yourself. 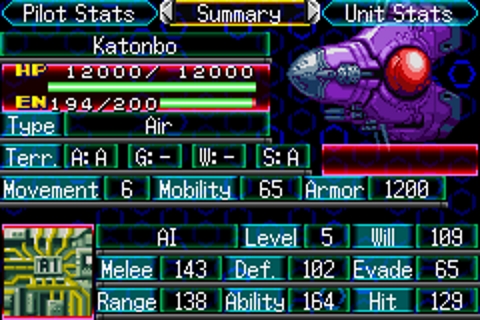 Oh poo poo it's an enemy battleship! Two of them in this case. The Katonbo will be introducing us to what is super annoying about enemies from the Nadesico series. You know that sweet-rear end defensive barrier the Nadesico has? These guys have it too and it's just as effective. They're chunky boys but not that threatening, especially since SRWJ likes to make the �tougher� enemies hang back for a turn or two before they start moving themselves, just to be sporting I suppose. Enemy phase is all our little Jovian Lizard friends coming in hot towards our reinforcements, so we try to meet them in the middle. Turn 4 Space debris slows us down so we can't actually attack anyone, but I put Koji out in front so he can start doing some damage. The enemy take the bait and Mazinpower activates, allowing Koji to kill literally anything with his weakest attack. Did I mention Koji has like 100 different attacks in this thing? You only need Photon Lasers and Rust Hurricane to kill Battas. If you use a Rocket Punch you're doing it because you're a man of fine taste and I appreciate you but I'm super paranoid about EN now. Koji counter-kills two Batta and hits level 5, learning Wall for himself. Then he counter-kills another bunch of them and hits level 6. Combattler V and Nadesico get one counter-kill each and then the last one suicides on Koji who was taking damage in the double-digits from the enemy. This leaves the two battleships! Turn 5 The enemy are too far away to attack due to being big slow phallic objects in space so we just continue our plodding advance as we have before. The enemy unsurprisingly responds by coming closer and engaging the Nadesico and Combattler V who are arguably my least banged up units at this point. The Nadesico chews off half its foes health and the Combattler tickles the enemy with a crotch-rocket thanks to their barrier. Yeah the Combattler has an ammo based missile attack that they can shoot from their crotch. Well it looks like the crotch anyway. It doesn't matter because Turn 6 So hey, the enemy have barriers right? That's where Break comes in handy but only the Nadesico and Punchbot currently have access to it. I have Mazinger Z soften up one of the thingies, and Combattler V pops some Gain and goes in for the kill, getting us a Booster Part in the process. I'll talk about that later! I LOVE SAYING THAT. Sadly even with Break we're unable to destroy the second one in our phase. Enemy phase the final enemy attacks the Nadesico who loses just enough EN through its distortion field it can't fire a Gravity Blast back and kill it. I hate everything. Turn 7 Sayaka taps the battleship lightly, and Char finishes it off. We get a Servo Motor part. We also got some other stuff earlier too but they're repair kits and propellant or whatever I dunno WHO CARES I'M MAD ABOUT ENERGY AND LIZARDS-but hey we won! One of our big issues really is we're not the fastest crew in the fight, but I can't be mad about the sheer number of enemies Mazinger Z rolled over in the middle there. 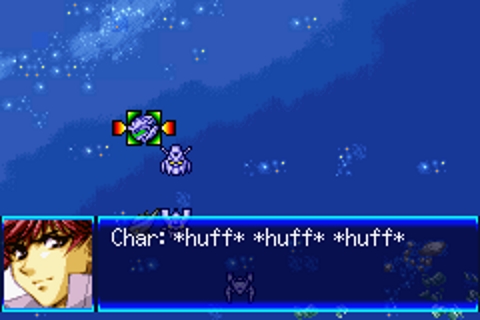 There's a lot of space colonies out here so I guess Char just got excited at the thought of dropping them on Earth and started hyperventilating. Speaking of Char, after the mission he is forced to watch giant robot anime and oh I guess we find out mankind has decided the best time to fight a giant war with itself is during an alien invasion they're losing. Not even like a little skirmish misunderstanding kicks it off either, they just nuke a large civilian space-colony and kick-start a hell-war they immediately begin losing because the genetically superior human Coordinators have devices that basically render the entire process of fission impossible so now they can't be nuked again but also Earth has lost access to its most prolific power source in the setting. The presumption is made that the Feds wanted the Nadesico so they could win the war against the armed forces of the space-colonies, ZAFT. The UEFA makes Australian politics looks sensible and responsible by comparison. Turn Count 15 Next time on SRWJ: Oh hi Mars TheLastRoboKy fucked around with this message at 06:25 on Apr 24, 2019 |
|
#
?
Apr 24, 2019 06:21
|
|
|
TheLastRoboKy posted:After all the fun dies down Char goes back to the Mazinger Squad Headquarters and tries to do what he does best and abandon everyone who needs him but Great Mazinger's pilot Tetsuya Tsurugi walks in and tells him to not be a giant baby or he'll go to a military gulag, and then they ship his rear end to Mars so he can avoid that fate. Seriously Koji refers to the United Earth Federation Alliance (or whatever it's called) as �extremist pricks� in the translation and it's great and accurate. Sayaka's dad manages to completely outwit them with the Mars gig though, which just goes to show the dude was never cut out to be a scientist and that's why in Mazinger Infinity he's gone on to become the Prime Minister of Japan. Dude can run poo poo. Mars is probably a suicide mission so Koji and Sayaka are coming too. I'm still not sure if Dr. Yumi is the best or worst dad. He might be simultaneously both. Looking at the general history of super robot anime... sending your kid and her boyfriend on a suicide mission they were excited for doesn't even ping the Egad Bad Dad board. Even going no further than Amuro's dad, there is some astonishly bad parenting on display.
|
|
#
?
Apr 24, 2019 07:00
|
|


|
chiasaur11 posted:Looking at the general history of super robot anime... sending your kid and her boyfriend on a suicide mission they were excited for doesn't even ping the Egad Bad Dad board. It's like he has to maintain balance in the universe so every super clever, beneficial thing he does, he makes a terrible mech for his daughter and sends her into battle in it.
|
|
#
?
Apr 24, 2019 07:09
|
|
|
TheLastRoboKy posted:Weird I thought there was a full map display key but I rolled my face on my keyboard and nothing. The Select button handles this.
|
|
#
?
Apr 24, 2019 08:02
|
|
|
Reiska posted:The Select button handles this. Yeah that's what I thought but I got nothin' that time. Maybe I accidentally something.
|
|
#
?
Apr 24, 2019 10:07
|
|
|
Mission 4 done, now at 33 turns. Nadesico still did most of the Job, but the White Lynx kept up a lot better this time. I never used so many Energy Tanks before in a SRW. The lack of supports until I get the skygraspers is badly felt.
|
|
#
?
Apr 24, 2019 17:42
|
|
|
Mission 5 down, 42 turns. My three pilots are so overleveled they barely gain XP anymore. I can't wait until I get more doods.
|
|
#
?
Apr 25, 2019 02:42
|
|
|
  Okay, here comes chapter 5. I upgraded Granteed and Nadesico some more, gave my usable units some Parts, and switched the Aestavelis into 0g mode. With the OGs subpilots now freely switchable, I'm putting Melua on active duty for the extra movement (between her and the parts I have, Granteed has +2 movement and +1 range.) Turn 1:  Our first encounter with the Radam. My plan is for Granteed to head to the West, while Nadesico goes South. The moment an attack is made, Akito leaves the field. To make the most of his limited presence, I have him shoot the single enemy he can reach from his starting position. Akatsuki joins here, and drops himself right next to the Nadesico - which means I can take him off the field easily.  From this position, Granteed can hit one enemy with a Finger Crush. A lucky critical takes it down. Nadesico and Hikaru go south, while Blue Earth stays near Granteed for now.  On enemy phase, Granteed finishes off the enemy Akito weakened, and Hikaru starts taking fire as the rest approach. I should have had her focus. On the plus side, she is able to 2HK them. Turn 2:  Blue Earth takes down a straggler that Granteed weakened on EP.  Granteed gets in position to finish off this bunch.  Nadesico does likewise. Hikaru finishes off the one that attacked her last turn. Which leaves the tactical situation like so:  On enemy phase, Blue Earth takes fire. Looks like I misjudged the range of one of them. Granteed takes out everything that attacks it. Nadesico can't do the same, as some of them attack from melee range, and missiles aren't quite enough to 1HK.  I do however manage to trigger the warning of the next reinforcements. Not the reinforcements themselves, sadly. Turn 3: Both Granteed and the Nadesico are suffering from movement penalties.  4 units, 4 enemies to kill. The question is, where should I move to attack from? Blue Earth Focuses, Accels, and goes to hit something that Nadesico left at critical health. Granteed finishes off the one which attacked Blue Earth last turn. Hikaru and Nadesico take down theirs easily. I try to put everyone to the southwest of their targets.  As I suspected, the next wave comes from the southwest. And Tekkaman blade shows up as a neutral unit. While I've drafted him, he's not going to join this chapter.  With nothing left I can do, time to End Turn. On enemy phase, none of the enemies get close enough to attack me, though one is heading after Tekkaman instead. Turn 4: Nadesico and Hikaru head southwest and weaken what they can.  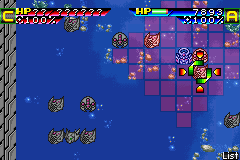 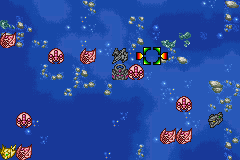 Since Granteed has enough Will to use it's long range attack, I move to put as many enemies in range of it as I can under Guard. Blue Earth stays next to Granteed for now while taking potshots under Focus. (Since we're in space, Nadesico doesn't have the energy woes it had on Mars). 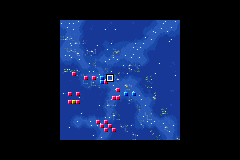 On Enemy phase, the northmost straggler I was worried about goes after Tekkaman Blade instead of Granteed or Blue Earth. Blade takes two lucky hits and goes down, but on the plus side, that means all of the Radam are coming after my units now. Turn 5: Okay, now I need to make sure everything dies on the next turn. 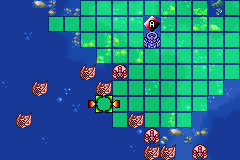  Nadesico still seems to have a movement debuff, so this is the best position I can put it in. After seeing this, I have Ruri cast Snipe, for safety's sake. The second picture doesn't show Blue Earth's final position accurately, because it takes me several tries at this turn to find places for Blue Earth and Hikaru where they wouldn't draw fire. Ultimately, I put them both one square above the unit they're supporting. Eventually I manage an enemy phase where everything dies. 5 Turns, 24 total.
|
|
#
?
Apr 26, 2019 20:35
|
|
|
Stage 5: 4/21 turns Layzner receives +1 weapons Calvina receives +3 weapons Nadesico retains the Booster  Katia always seemed the most suitable to me. Mobility is good on the Belzelute. Weapon range is good and useful on this stage, bless is good and in short supply.  Start of the stage. David, Roanne and Izumi all go into the Nadesico.  Nadesico casts accel, heads here, and Akito jumps in.  Eiji casts Focus and Accel, heads here.  Calvina casts Focus, moves here.  Start of turn 2. Akatsuki spawns in after enough mooks have been destroyed.  Ruri gets an Accel, Alert and Snipe, heads here and attack. The Alert will keep her from eating a movement reducing attack on enemy phase.  David, Roanne and Izumi pop out and damage an enemy each.   Calvina once again casts Focus, attacks, and moves away.   Eiji and Akatsuki do things.  Start of turn 3. One enemy remains. If all enemies are destroyed some plot happens and a bunch more and Tekkaman Blade spawn. I believe these will go after Blade (all the way at the south west end of the map) if they don't have better targets to shoot at. So it's important they don't get the chance to move before we present those better targets.  I forgot to take a screenshot of Calvina offing the last enemy and moving away. Eiji casts Accel and Focus, as he's wont to do, and attacks. If he's +1 weapons, he can kill the western-most enemy on enemy phase.    The three stooges do some things.  Nadesico casts Accel and Alert, moves and attacks. You can see where I moved Akatsuki and Calvina in this shot.  Turn 4.   Izumi and Akatsuki get a Cheered kill.   Roanne and Eiji get their fill.  Calvina attacks.  Nadesico gets an Accel and attacks. It was kind of low on EN but with proper management will off all remaining enemies on enemy phase. That ends the stage.
|
|
#
?
Apr 27, 2019 21:39
|
|
|
Stage 6: 3/24 turns  Both Calvina and Eiji get +2 to weapons.    Turn 1. Nothing especially exciting happens. I chose not to have Kira run ahead, it keeps the enemies from moving in my direction. Really only the positioning of Layzner, Calvina and Nadesico matter this map, and the latter not even that much.    Turn 2. Bunch of mopping up, Layzner positions itself to get attacked by Miguel on enemy phase.   Turn 3. Only Miguel survives, David gets the Cheered kill.  This causes the reinforcements to spawn in.    Le Creuset is sent off by a Blessed, Cheered Calvina, which ends the stage. Eiji got an incredibly lucky crit, which enabled the kill; Le Creuset leaves at ~10% HP. None of my other units were in a position to do anything, so I just ended it on player phase. Dance Officer fucked around with this message at 08:09 on Apr 29, 2019 |
|
#
?
Apr 28, 2019 09:34
|
|
|
Mission 6: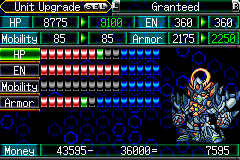 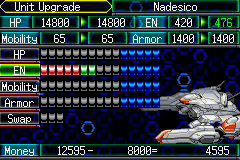 I boost Granteed and Nadesico slightly again. With a bit of warning, I switch my Aesties into Ground Frames - the achilles Heel of the Air Frame is that it can't hit things on the ground very well. While reviewing stats, I notice that Ruri has become my first Ace pilot. Turn 1: 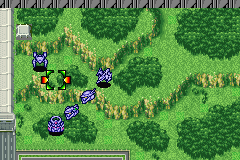 First thing I do is Accel the Nadesico as far as possible and have it attack what it can. I'm going to want to put the Strike Gundam inside as soon as possible. Akito finishes off the closest target with a Wired Fist. Calvina will be heading south after taking out an enemy in the opening wave. 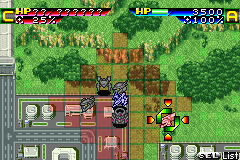 Sending the Blue Earth out ahead is becoming less and less of a good idea as the missions go on. But even without Accell, Aki can get in range of the last of the NW enemies. And I just realized that Strike Gundam isn't greyed out on the first turn. I have Kira Accel next to Granteed. Worst comes to worst, Calvina can Support defend him. (I'm wondering which character I should stick in the Moebius when I get it. Kira wouldn't be the worst choice.)  Enemy Phase, everyone closes in, and Granteed takes the brunt of the attack, as expected. Kira, unfortunately, is in just the right place to attract a long range attack, but isn't hit. Turn 2: Okay, my plan is to send Granteed South, then east towards the boss, while Nadesico and the Aesties go East, then South. Of course, the first thing I do is have the Strike board the Nadesico.   Calvina takes out the would-be Sniper. 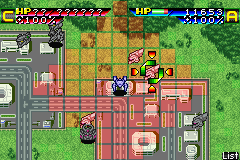 Nadesico and Akito double team one GINN.  Hikaru and Aki take the other. Unfortunately, Hikaru can't keep up with the Nadesico's movement speed. With Granteed and Nadesico having taken point, I don't forsee many problems from here on out. On enemy phase, Two GINNs take cover behind a building while aiming at the Nadesico, and survives the Gravity Blast counterattack. The third isn't so lucky. More importantly, Miguel starts approaching.  Turn 3:  First thing I do is give up on Hikaru and put her on board the Nadesico. Akito can just barely get into range to finish off a GINN Ruri left alive last turn. Melua cheers him on (Which might have mattered, as he gets Support Defend as he levels up). At this point, I realize just how many sources of Gain I have on the field.  Aki takes out the last nameless Zaft soldier, and I decide to feed Miguel to Calvina. Tempest Lancer is a one-hit kill.  At this point, the Archangel, Mobius Zero, and a wave of ZAFT units led by Rau Le Creuset enter the field (Kira re-fields from the Archangel with a sword, but I'm not leaving him on the field). The Archangel and Moebius Zero approach the new combat zone as fast as they can, but the only unit who can actually reach it is the Nadesico (I cast Vigor with Jun just in case). Surprisingly, a barrage of missiles takes out one of the ZAFT units.  On enemy phase, just about everyone who can Dogpiles the Nadesico. One GINN breaks off to attack the Moebius Zero instead. Creuset actually takes a shot at Calvina:   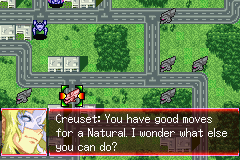 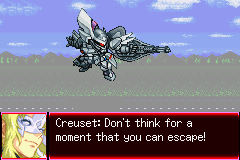 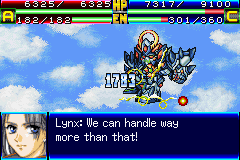  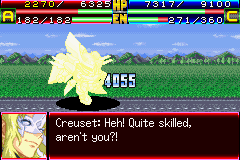 Sadly, a One-hit-Kill on the counter isn't possible. Turn 4: Time to clean up. Everyone casts whatever Accuracy buffs they have and takes a shot. Blue Earth, Calvina, and the Nadesico all manage to finish off a GINN (Though the Blue Earth snatches Moebius Zero's best target. Oh well.) The Archangel's Lohengrin just barely doesn't kill, and-  That's right, I'm siccing Hikaru on Creuset.    And so the Char-clone falls to his natural enemy: the slashfic writer.  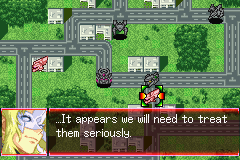 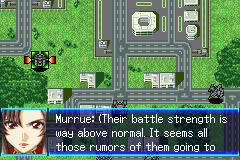 And that's our victory condition. Not bad. 4 turns. 28 total
|
|
#
?
Apr 28, 2019 23:57
|
|
|
Gonna bookmark this for later! Real interested in seeing how differently things turn out
|
|
#
?
Apr 29, 2019 00:21
|
|

|

|
| # ? May 4, 2024 11:30 |
|
|
Super RoboKy Draft Wars Episode 3 � Free Mars (previous owners deceased) Not pictured anywhere in this playthrough: Eiji. There's an exciting battle and we don't get to fight it don't worry about it we get to fight another one. There's one hundred humans left on Mars cause some aliens named Gradosians turned up, and we kill them. The humans. No I'm not kidding Martian Successor Nadesico can get pretty grim at times.  At times. 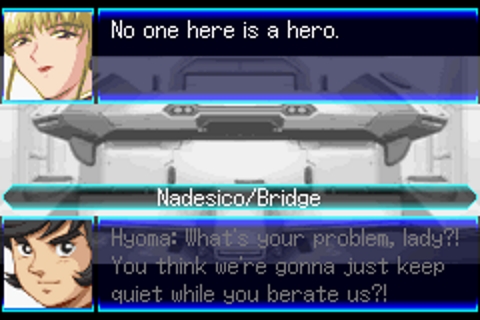 Like this lady is telling us how the idea of trying to be a hero is inherently foolish but later she'll be forcing Yurika to dress as a rabbit for her power-point explanations. Also gently caress you Koji Kabuto is on this ship the guy is basically hero incarnate. 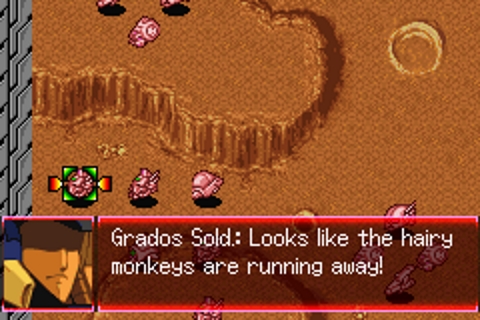 Anyway the enemy is coming and some of them have pilots! They have no eyes which I think means they're Hentai protagonists so we'd better watch out for that. Also I found my map key it only took me 100 years don't worry.  We have a forced-deploy of the main character of a series I don't get to use so we'll basically be putting him back on the Nadesico and letting my death-machines deal death. There's a first step for getting a secret character here but I didn't get that in the draft so gently caress that. Actually I don't think I got any secrets I can use so I'm free to do what I want. The enemy force has two battleships, a mix of Battas and some new units, and two characters with unique machines. 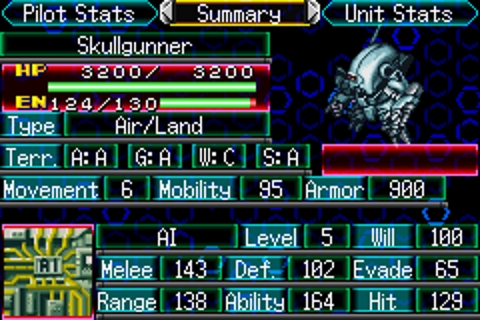 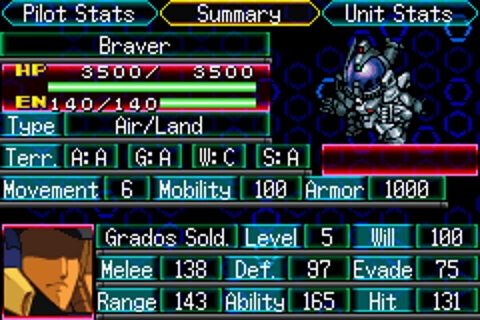 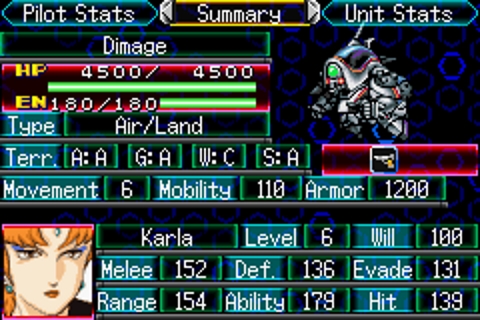 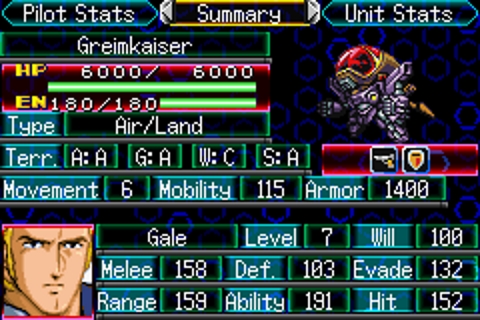 Just one look at the stats tells you what you need to know about Karla and Gale. Also one look at Gale and you can see he got lost on the way to Fist of the North Star. Both of the named pilots are much stronger, tougher and dodgier than their AI and faceless mook counterparts. That combined with them being smaller units than our super robots means hitting them is actually going to be difficult for most of our units. One of the big things about enemies in SRWJ is they tend to move the mooks first turn, then a second wave starts to move on the second turn, and then a third wave usually encompasses the named characters and battleships. Kinda weird but the predictability is nice. Lastly and most importantly, some bosses have a point where should their HP loss pass a threshold they will just straight up leave the fight which will deny you money, exp, parts and modules. Getting boss kills here can be right troublesome by and large because of their dodginess and small HP pool versus our chances to hit being low but the attacks that actually hit will hit hard so I'll be satisfied just driving them off. Turn 1 is standard approach the enemy as they approach us, we tuck Eiji into our battleship and he'll never be seen again. Turn 2 We head to the South-West to see if all these tiny things will start bouncing off our faces. All you can really do at this point is brace for it so I move as a death-blob, but they're going to go for the Nadesico most likely. The Nadesico's missiles one-shot a batta because Yurika is strong. We trade hits with a bunch of other enemies, Sayaka heals up Combattler V and hits level 4, learning Trust (the healing spirit). Enemy phase yeah we get swarmed and the Nadesico's missiles just do NOT stop one-shotting everything. But I let it go for a bit cause Yurika is getting 100 exp per kill, at 500 for a level so it's not a bad go of it. After a few she hits level 6 which means it's diminishing returns now. The Katonbo battleships come in and go for the Nadesico and Mazinger Z and get lightly bopped back for their troubles. Even more enemies just swarm us and the Combattler team one-shot a Batta to hit level 6 as well. Turn 3 The next wave of enemy units will be upon us super fast and probably gunning for the Nadesico so I just stand my ground a little and shift Mazinger Z in a more front-facing position to maybe get some attention. He can do it. We get Char to level 5 and he learns Combo level 1. This is actually really good and I'll explain it once we can actually do a combo attack. Hopefully blobbing up pays off. The enemy actually do start attacking Mazinger Z, which is nice because he can start gaining Will from getting hit and then start doing some goddamn wrecking. The Nadesico trades shots with the battleships, and Karla takes a swing at Koji which he can't answer to because she's actually dodgy and he had a 42% chance of hitting her. Turn 4 I could do a combo attack now but it's against two targets it would tickle and probably miss. Everyone else is spaced out too much sadly. I could just MAP them but the Nadesico doesn't need MORE exp does it? We finish off some of those which leaves Gale, Karla and two Battleships. We don't have a lot of good hitting potential for the two characters outside of Char and Combattler V, since they have hit increase spirits that can actually hit them but we'll see. Enemy phase sees the Nadesico wipe out one of the battleships, wound the other and Karla, and then Gale shoots down its missiles. Yeah they can do that in this game. So can your guys to be honest. Also swords can cut down these missiles too. That's not the least annoying mechanic you'll have to deal with that's for sure. The Nadesico has once again run out of EN by this point because I used Gravity Blast on the battleships so it took some damage. Turn 5 We throw Cheer onto Koji so he can double his exp from killing the Battleship, which he does barely because I hate distortion fields. Sayaka repairs the Nadesico and hits level 5, the Nadesico uses a Propellant Tank to get its EN back, Char also gets Cheer'd on and forces Karla to leave the battle with O FISTO that I forgot to screenshot (I swear I'm not doing this intentionally Shei-kun) and gets motherfucking BOSS GAINS to level 7.  Remember, every 500 exp is a level so that's a really nice number. He learns Support Attack, so now when someone next to him attacks he can follow up and attack with them (albeit with reduced damage). We get a cartridge and a module for a pilot that adds evasion +5. As you can imagine that's most suited for people who need to dodge to live so Char will get that at the end. Combattler V activates Strike and Gain so that it can guarantee a hit on Gale and then get an exp bonus from the fight. The best part of all this is that Gradosian units don't have shields. Sadly it doesn't one-shot him, and drops his health low enough that he can escape, which rather unfortunately kicks off the second wave reinforcements but all I can really do is sit there and wait for the enemy to move closer, which they'll do in turn-based waves like I mentioned. 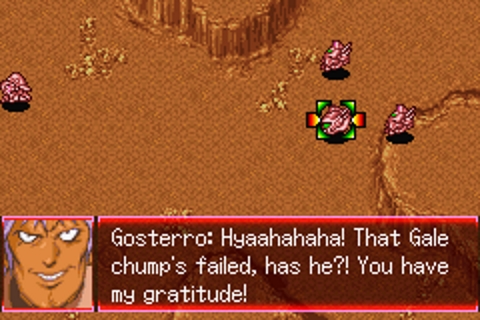  Of course, Gosterro's in the corner and the rest of his forces will be trying to hit us from a few directions. It's a similar make-up to the first wave, right down to having two battleships. 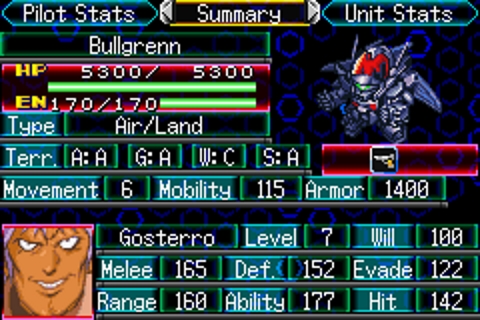 Gosterro is a little less dodgy than the other two, but he's definitely tankier. Like the others he has a fleeing threshold, and his skill as a pilot means my big guys are going to struggle to tickle him as usual. Turn 6 I hold my ground, repair the Nadesico and throw the Combattler and Punchbot into the Nadesico for some repairs and rearming. Koji takes point with the expectation he will be ignored because this game just won't loving stop trying to attack the Nadesico. The enemy swarms the Nadesico and sadly she's all out of missiles. Level 7 rolls around as enemies just bounce useless attacks off of the perfect defense of our shield. To my shock both of the battleships shoots at Sayaka, but I popped Alert on her so she's had a free dodge just waiting all this time to kick in, so she responds with her breast missiles for 1000 damage on both and only takes a little damage. THANKS DAD. Turn 7 We unload Combattler and Punchbot and get to fighting again. Koji hits level 7. Enemy phase is about what you'd expect but with no missiles to fire I just gotta wing it and shoot my Gravity Blast at EVERYTHING. I've got one more fuel part I can use so that'll help for when big crazy turns up. Turn 8 Sayaka keeps repairing, hits level 6 and learns Support Defense. Kind of risky with her but I think she can handle it. We wipe down everything down to one more battleship, two goons, and the boss. This mission is usually a lot less rough because you can take down way more enemies per turn, not so much this one. Koji and Hyoma I place way forwards for the goons to attack. The goons attack Hyoma who runs a train on them. He even deflects an enemy attack as he one-shots both of them. The Combattler crew hit level 7, and we get some more restoration parts for next time cause holy god are we gonna need more EN for the Nadesico next mission. The last battleship trades fire with the Nadesico and dies, giving the crew their level 8. Gosterro goes right for Koji who I had the good sense to Guts back to full health, and much to my surprise Koji forces him to retreat with a 45% chance to hit. I probably should have picked something less damaging! I just wasn't expecting to land a shot! This is only really a pain for the money we missed out on (parts hurt a little but we will have more than we can assign in this playthrough anyway). If we'd shot down Gale and Gosterro we might have increased our pay-day which means increasing our monies and making us stronger. Oh well! At least we survived! Unlike everyone on Mars. I'm not kidding either literally the only living humans on Mars now are aboard the Nadesico and motherfucker if we ain't going to bail as soon as we can. Turn Count: 24 Next time: Gale gets owned.
|
|
#
?
Apr 29, 2019 07:45
|
|