


|
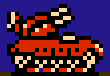
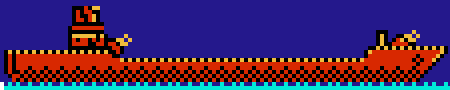
 Famicom Wars I'll let that boxart speak for itself for now. Let's jump straight into the intro.  Warning: Some animations contain rapidly flashing imagery in this post and throughout the LP! Warning: Some animations contain rapidly flashing imagery in this post and throughout the LP!  We start off on a nice clear day, blue sky as far as the eye can see. However there are air raid sirens in the background. 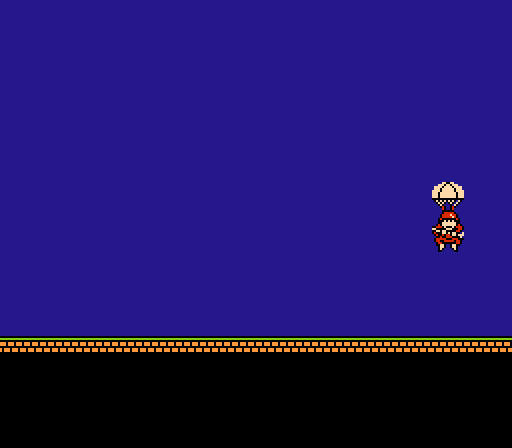 Suddenly, a lone soldier parachutes in from the sky. Note: There are no paratroopers in this game. 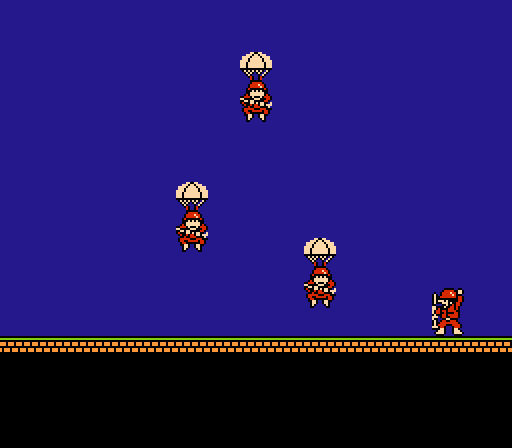 A few more paratroopers drop in as the first guy cheers them on or something. Explosions and gunfire can be heard.  The drops go on for some time, with each new trooper firing off into the distance as soon as they land. 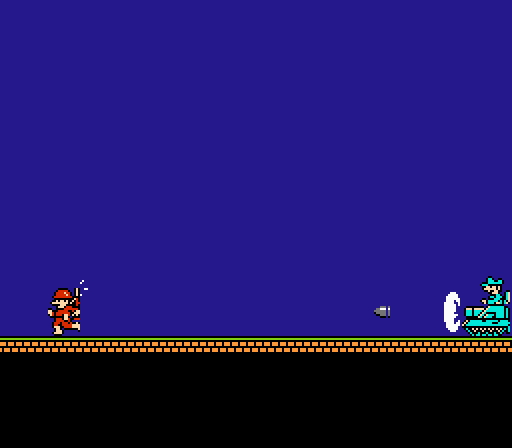 Suddenly a trooper runs back in from the right, purused by a tiny tank. Good luck little dude. 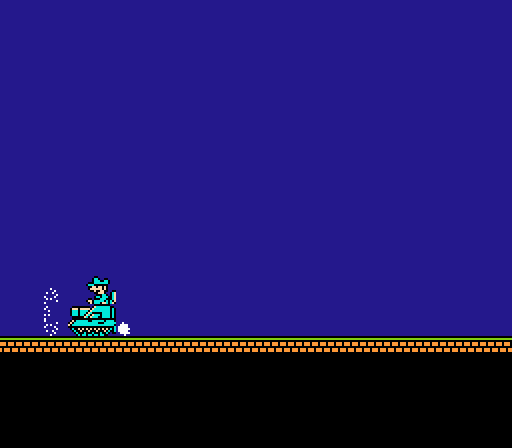 The tank chases the little guy all the way off the screen. Music: Title Theme 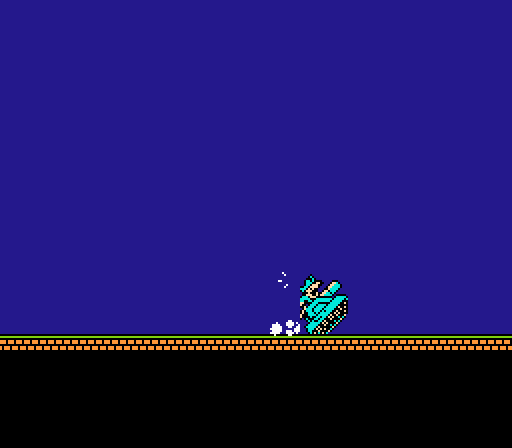 Suddenly the tank flees so quickly back to the right that its treads are up in the air. What could the tank be running from?  Ah, a giant tank. That's fair. Note: There are no giant tanks in this game. 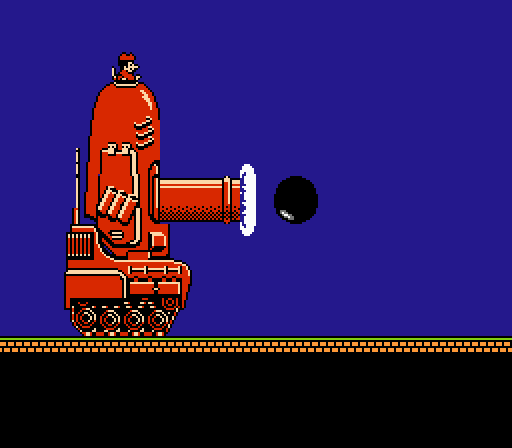 The giant tank fires a ludicrously sized round. Seriously that's as tall as the soldiers are. 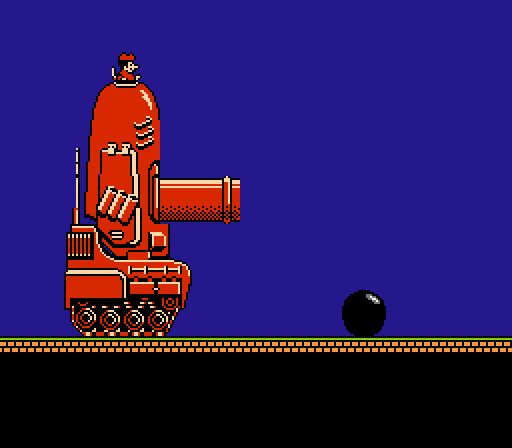 The rather large round falls straight to the ground and stops, hurting no one.  The little tank coasts back on screen, crashes into the cannon ball that's bigger than it, and somehow that works to blow up the giant tank.  And with that, welcome to Famicom Wars. Released all the way back in 1988, Famicom Wars is the first in the "Wars" series -- a turn-based strategy series by Intelligent Systems (part of Nintendo) that is better known outside of Japan as simply "Advance Wars". The first few entries of the series never left Japan; it was only with Advance Wars on the Game Boy Advance that the rest of the world got to experience it. In that, the Wars series is similar to Intelligent Systems' other strategy series (Fire Emblem). I may have also LP'ed the first game in that series. If you're familiar with the Advance Wars games, you know all those things you love and enjoy about the series? Charming characters with unique gameplay powers? A campaign that pits the player against multiple armies and a goofy villain? You won't find any of that here. But we'll get into all of that later. Really, Famicom Wars isn't a bad game, but it has aged rather horribly over the last 30+ years. Since every map in this game is available in later games, there's really no reason to play Famicom Wars yourself. Thus why I'm going to play it for you. And to spice it up, I'll throw a little challenge into each map. Other tidbits:
Table of Contents:
DKII fucked around with this message at 15:43 on Jul 11, 2022 |
 #
?
May 26, 2021 19:03
#
?
May 26, 2021 19:03
|
|

|

|
| # ? May 4, 2024 02:16 |
|
|
The game's soundtrack is pretty basic but here are the tracks we've seen so far: Soundtrack
Basic Unit Data pre:Unit Cost Move Type Fuel Ammo Reload Range Notes Infantry 1000 3 Foot 99 9 1 G 1 Can capture any property Mech 2000 2 Foot 70 3 3 G 1 Can capture any property except HQ Medium Tank 16000 6 Vehicle 70 6 5 G 1 Tank 6000 5 Vehicle 50 4 4 G 1 APC 4200 6 Vehicle 70 4 3 G 1 Can carry one infantry or mech unit Rocket 13000 4 Vehicle 50 5 7 G 3-5 Cannot attack after moving; cannot counterattack Artillery 5500 5 Vehicle 30 3 6 G 2-3 Cannot attack after moving; cannot counterattack Supply 3000 5 Vehicle 60 N/A N/A N/A Cannot attack; supplies to adjacent ground units AA Missile 11000 4 Vehicle 40 2 8 G 3-5 Cannot attack after moving; cannot counterattack AA Tank 5500 5 Vehicle 50 4 3 G 1 Fighter 22000 10 Air 99 5 8 G 1 Scout 15000 10 Air 99 4 8 G 1 Bomber 20000 8 Air 99 5 6 G 1 Copter 4000 6 Air 60 4 3 G 1 Can carry one infantry or mech unit Battleship 28800 6 Ship 99 6 6 G 3-5 Cannot attack after moving; cannot counterattack Lander 18500 5 Ship 99 6 3 G 1 Can carry any two ground units Combat Data Below is the damage each unit does at full strength to each other unit (on neutral terrain), from what's been posted so far: pre:Defending Unit Damage Inf Mch MTk Tnk APC Rkt Art Sup AAM AAT Ftr Sct Bmb Cpt Btl Ldr Infantry 4.5 3.5 0.5 1.5 2.5 0.5 1.5 2.5 0.5 1.5 0.5 0.5 0.5 1.5 0.5 0.5 Mech 5.5 4.5 2.5 3.5 4.5 3.5 4.5 9.5 4.5 4.5 1.5 2.5 1.5 2.5 0.5 0.5 Medium Tank 8.5 9.5 4.5 6.5 7.5 8.5 9.5 8.5 8.5 7.5 1.5 2.5 1.5 2.5 1.5 1.5 Attacking Tank 5.5 4.5 2.5 4.5 9.5 5.5 7.5 6.5 8.5 7.5 1.5 2.5 1.5 2.5 1.5 1.5 Unit APC 8.5 9.5 1.5 2.5 4.5 3.5 3.5 5.5 3.5 4.5 1.5 2.5 1.5 2.5 0.5 0.5 Rocket 4.5 3.5 5.5 6.5 6.5 4.5 5.5 6.5 5.5 6.5 N/A N/A N/A N/A 1.5 2.5 Artillery 4.5 3.5 4.5 5.5 5.5 3.5 4.5 5.5 4.5 6.5 N/A N/A N/A N/A 1.5 2.5 Supply N/A N/A N/A N/A N/A N/A N/A N/A N/A N/A N/A N/A N/A N/A N/A N/A AA Missile N/A N/A N/A N/A N/A N/A N/A N/A N/A N/A 6.5 7.5 6.5 7.5 N/A N/A AA Tank N/A N/A N/A N/A N/A N/A N/A N/A N/A N/A 6.5 7.5 6.5 7.5 N/A N/A Fighter 5.5 5.5 0.5 1.5 2.5 1.5 2.5 4.5 1.5 1.5 4.5 6.5 9.5 6.5 0.5 1.5 Scout 4.5 4.5 0.5 0.5 1.5 0.5 1.5 3.5 1.5 1.5 1.5 4.5 6.5 7.5 0.5 0.5 Bomber 5.5 5.5 6.5 7.5 7.5 6.5 7.5 7.5 6.5 6.5 N/A N/A N/A N/A 4.5 6.5 Copter 5.5 5.5 0.5 0.5 1.5 0.5 0.5 4.5 1.5 1.5 0.5 0.5 0.5 4.5 0.5 0.5 Battleship 8.5 8.5 8.5 9.5 9.5 8.5 8.5 9.5 8.5 9.5 6.5 7.5 6.5 7.5 4.5 7.5 Lander 1.5 1.5 2.5 2.5 2.5 2.5 2.5 2.5 2.5 2.5 4.5 6.5 5.5 6.5 2.5 4.5 Unit Icons pre:Unit Map Combat Animation Infantry DKII fucked around with this message at 03:57 on Jul 12, 2022 |
|
#
?
May 26, 2021 19:03
|
|

 Tank
Tank 
 Medium Tank
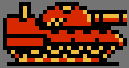
 Artillery
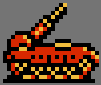
 Rocket
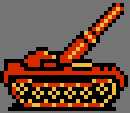
 Supply
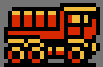
 AA Missile
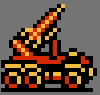
 AA Tank
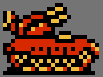
 Fighter
  Scout
Scout  Bomber
  Copter
 Battleship
  Lander
|
Part 1: Bean (1 of 2)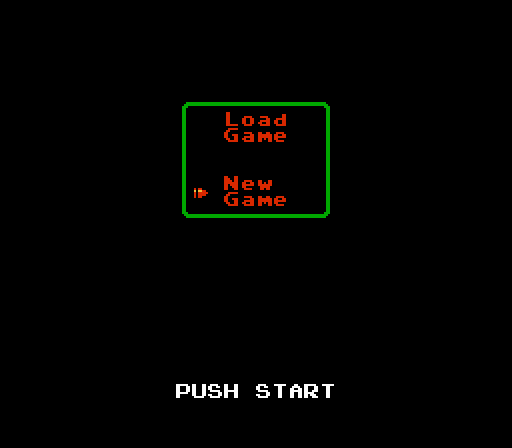 After the title screen, we get a simple prompt to either start a new game or load an existing game. I don't have anything to load, so we'll just go to a new game here. Music: Menu Theme 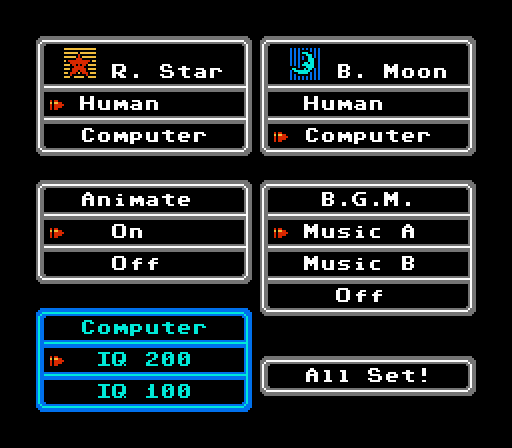 Behold, all of the advanced settings of Famicom Wars. If you're masochistic enough you can actually watch two computer players against each other. Having a local multiplayer option for an '80s-era strategy game is a nice perk, though. We can choose to play as either You can also turn off animations if you have no soul, or switch between two sets of music tracks in the game (or turn the music off entirely). The last option is for difficulty. An IQ of 100 is 'average' and an IQ of 200 is an amazing super-genius. We'll be playing on 200 here but NES-era AI isn't going to give us any problems anyway. Music: Map Select 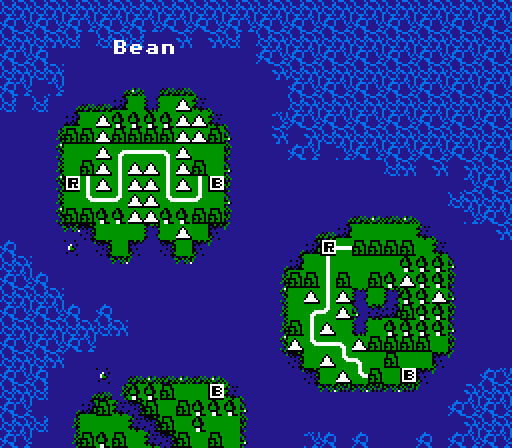 The map select screen here is pretty basic. There are 15 maps to choose from and you get a little preview of each one. We'll be starting at the top of the list, with "Bean".  A siren goes off, and we're brought straight to the map without so much as an introductory greeting. On the lower right we can see our Red Star flag, the turn number (1), and our current funds (11000). More on what those are for in a bit. Music: Mission BGM Type A  We've got a simple symmetric map to kick us off. We control the red buildings on the left side of the map, and our opponent has the blue buildings on the right. There are six neutral buildings in the upper middle area, and a road meandering throughout. There are scattered forest tiles at the top and bottom of the map, and mountains lining the road. Turn 1 I'll annotate each turn as we go, but first some basics.  Highlighted is a city. Each city under our control grants an extra 1000 G a day, plus allows injured units to recover 2 HP each turn. They also provide defensive bonuses. The three buildings to the left are the bases. These buildings allow us to build new ground units. Surrounded by the three bases is our headquarters. Typically the HQ provides the largest defensive bonus, and capturing an opponent's HQ is one way to win the map. The other victory method here is to destroy all enemy units. 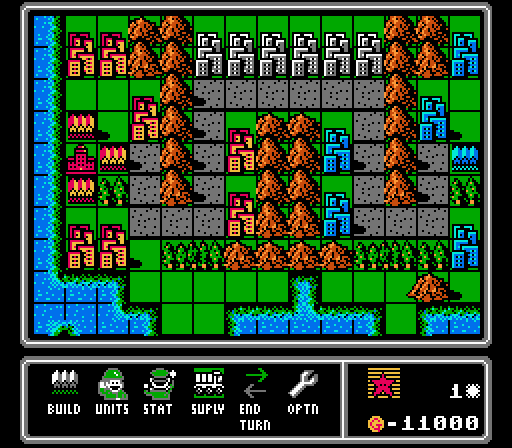 Pressing the "B" button on any space brings up the menu. "Build" will let us make a new unit, if that space supports that action and there is no unit already there. 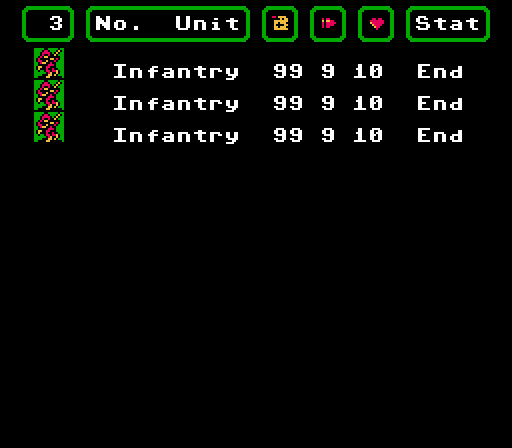 A quick shot of the "Units" screen, which as you might expect will list all of our units. Selecting a unit from the list here will actually take us back to the map with that unit selected, which is nice once the maps get busy. A status of "End" on the far right (or just "E" on the map) shows the unit has ended its turn already. All units start with the "End" status when first built - they can't be used until the following turn. 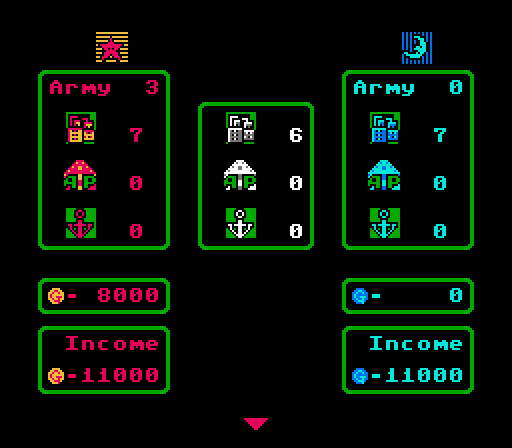 The "Stat" screen here will show the unit count, building count, funds, and income for each player, as well as the number of neutral buildings. There are two other building types shown here that we haven't seen yet. For some reason the base count isn't included though. Income is 1000 G per building owned (including cities, bases, and the HQ). So capturing cities is an important way to progress and gain an advantage during each map. 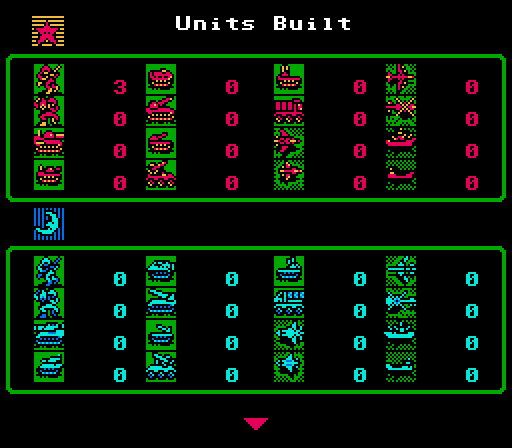 The second "Stat" screen just shows off how many of each unit type each player currently has. Or possibly has built in total (including losses). I'll let the experienced players salivate over just what unit each icon represents.  The final "Stat" screen displays the number of each type of unit that each player has lost in the current map. 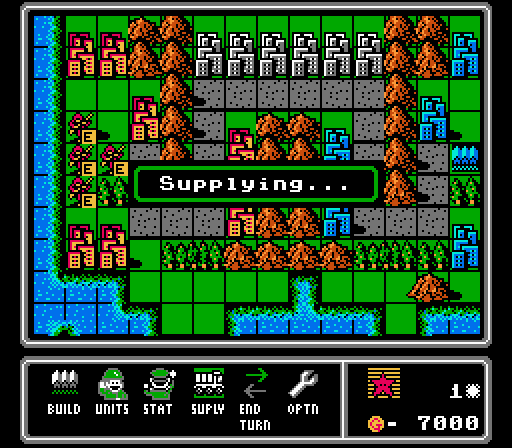 "Supply" does a few things - each unit currently sitting on one of our properties will recover 2 HP and all fuel and ammunition. Future games would automatically supply at the start of each turn, instead of making us remember to press the button ourselves. Rounding out the rest of the menu: "End Turn" is where we'll end up when we've done everything we can on a given turn, and "Option" just gives us a few more icons we can select. 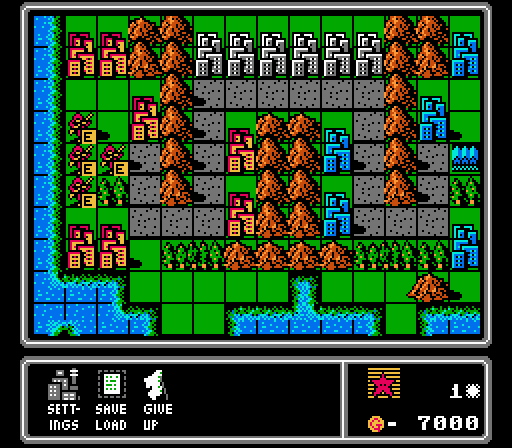 "Settings" just brings us back to the main menu, but all we can change is the animation and music settings. We can also save our game (which forces us to power off - not to be used as a quicksave option) and surrender the map if we get in over our heads or just get bored. 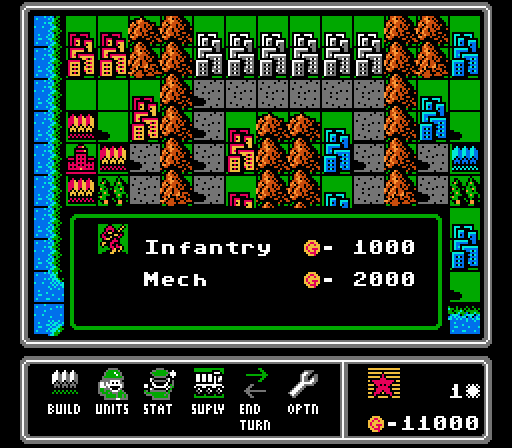 Selecting "Build" while on a base brings up a list of units we can build. Here we can scroll through all of the ground units in the game, and see the price for each. Everything is unlocked from the beginning - no tutorials or hand-holding here. With that in mind, let me introduce the first challenge of the LP: Unlock Mode - All units except infantry are locked, and can only be unlocked when the opposing army purchases one. 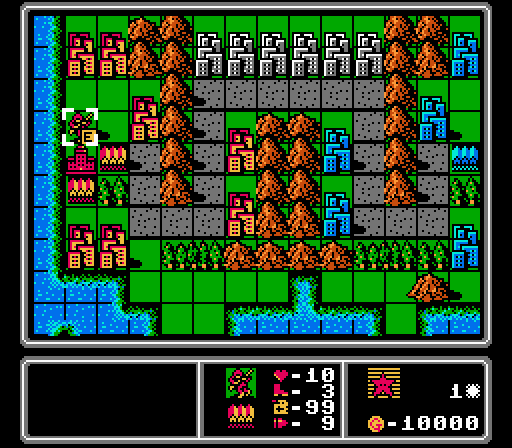 Infantry are the most basic unit, costing just 1000 G. Infantry are one of the two footsoldier unit types - only the footsoldiers can capture neutral or enemy properties. Otherwise though they're pretty terrible. 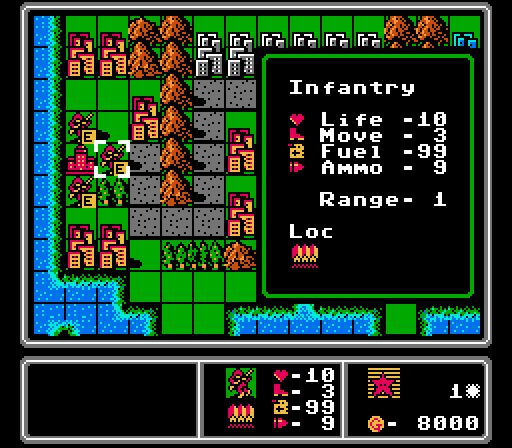 All units start with 10 "Life" (HP). Infantry can move three spaces in one turn. Each space moved consumes 1 fuel, though the infantry will never really need to worry about that with 99 fuel total. Each shot fired (in attack or defense) will consume 1 ammo, so the infantry can see 9 rounds of combat (though I've never had one survive that long). Infantry can attack from 1 space away and are produced at the base. 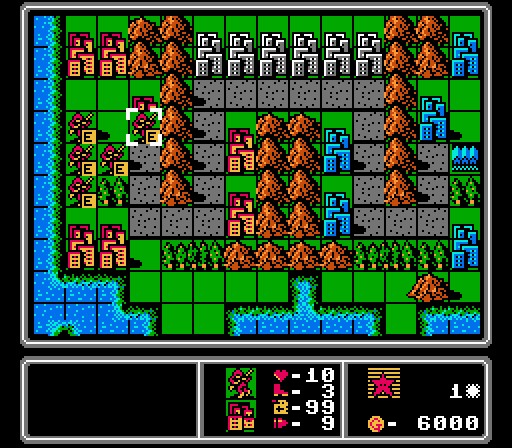 For some reason we're allowed to build units not only on our headquarters (which is normal for this game, but not in later games) but also on the city next to the bases. It's not normal to be able to build on cities; I'm not sure if it's a bug for this map or some kind of weird feature. I guess we'll find out later. No other city allows building. 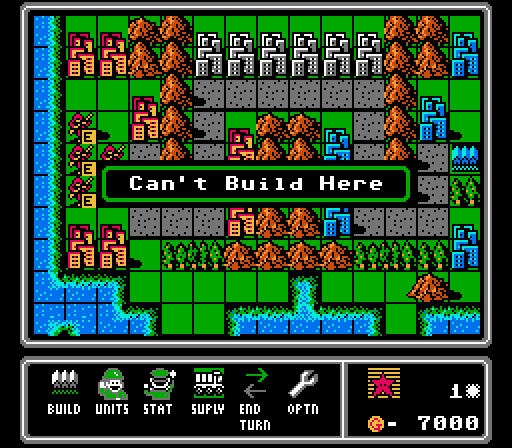 In fact, trying to build on a space that doesn't support it just produces an error message.  Since I can only build infantry, I stuff one onto each space I can before ending the turn. Music: End Turn  Ending the turn causes a neat effect where the menu slides over, to be replaced by a nearly-identical menu that has the Blue Moon flag. Music: Enemy Turn Type A  On every turn, Red Star goes first and Blue Moon goes second. Future games would maintain that approach, with the player army always going first.  Our opponent spends most of his funds on two infantry and a couple of vehicles - APCs. We'll take a look at them in a moment, but they're not what you might expect. Turn 2  Now that we have some units deployed, each turn starts with a fuel check. I'm not sure exactly what the check does in this game, but in later games certain vehicles would consume fuel on each turn (not just on movement) and a handful of vehicle types would actually be destroyed upon running out of fuel.  Selecting a unit with the "A" button will cause their stat screen to pop up. We can move the cursor from there to select a destination for the unit. The cursor will automatically be restricted to the unit's movement range, but there's no other indication of what that limitation is. Infantry can move three spaces normally, but that's reduced in forests and mountains. I believe how it's calculated is, the infantry has three movement, and most spaces consume one movement each but forests and mountains consume two movement each. Anyway, we move this infantry over the mountain and pick "Wait Here" to end its movement. It gets the "E" tag on the map to indicate that the unit has ended its turn.  Our first goal is to reach and capture the neutral cities. Whoever gets the extra income from these cities will have the advantage. 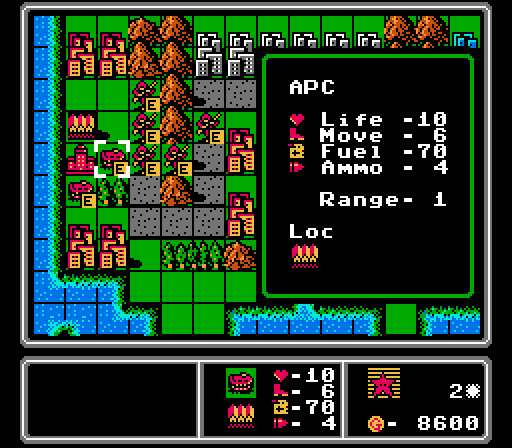 Now that they're unlocked for us, we build a couple of APCs. They cost 4200 G each, more than four times as much as an infantry. Are they worth it? Well, as a vehicle they have higher movement, but consume more movement when not on a road and can't pass through mountains at all. APCs can carry a single unit around with them, which matches their behavior from future games. However in this game APCs can actually fire on other units as well, with four ammo. 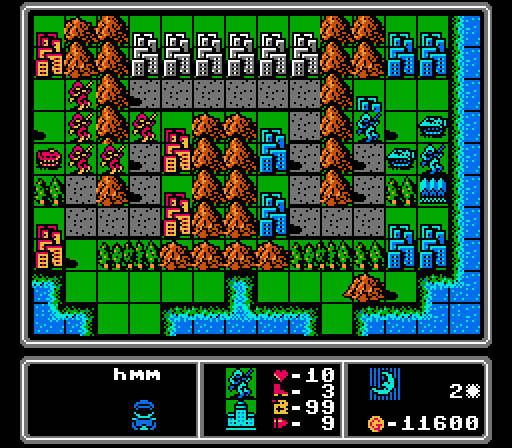 The enemy phase has a lot of this "thinking" animation on the lower left. Even more so on the higher difficulty. Luckily you all don't need to sit and watch that. 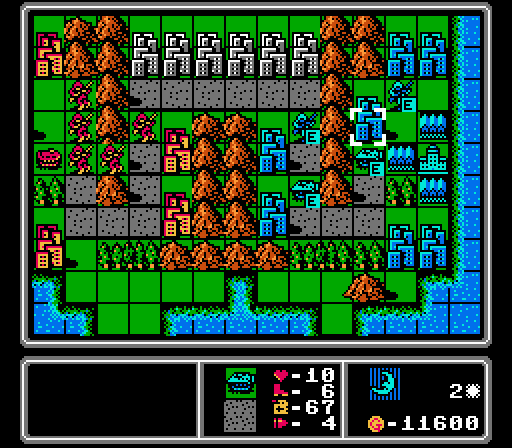 Our opponent advances their units. These maps always start with zero units deployed, so they can be a bit of a slow start sometimes. On the up side, there's no fog of war in this game.  The blue team puts out two more APCs and three more infantry. I thought it was weird that they didn't load any of the infantry into an APC this turn, but I'll show you why that didn't happen next turn. Turn 3  Moving an infantry unit onto a neutral or enemy building gives us a new option to capture it. Music: Building Takeover  A cute little animation plays showing a soldier entering a building to take it over. The bar at the bottom represents the capture progress. The bar has 40 lines, and each turn the infantry will fill up two lines for every HP it currently has (so 20 at full health, resulting in a capture after two turns). Future games would simplify the capture bar by making each building need 20 points of progress, with a unit contributing one point of capture progress for each HP instead.  Everyone else just continues to move forward. 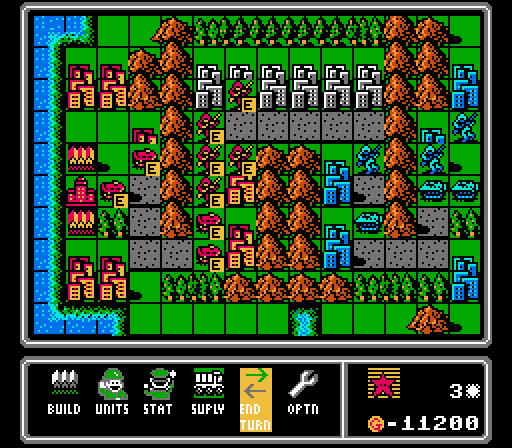 No new units unlocked so I just throw out a couple more APCs. At this point I'm not really sure which unit I'd rather have out there, but might as well match what the computer player has. 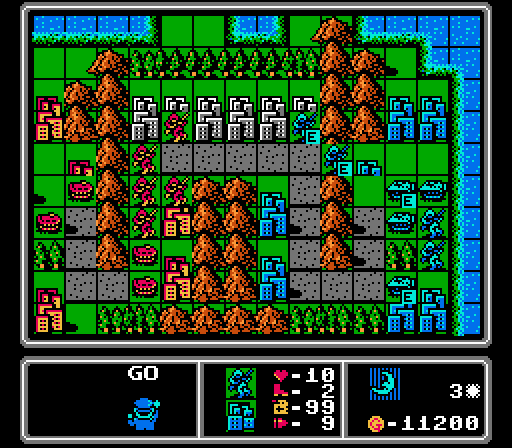 One infantry starts capturing the right-most neutral building. The lead APCs actually retreated, I'm not sure why. Note how on the lower left the animation changes when the computer player has decided what to do and is inputting the commands. 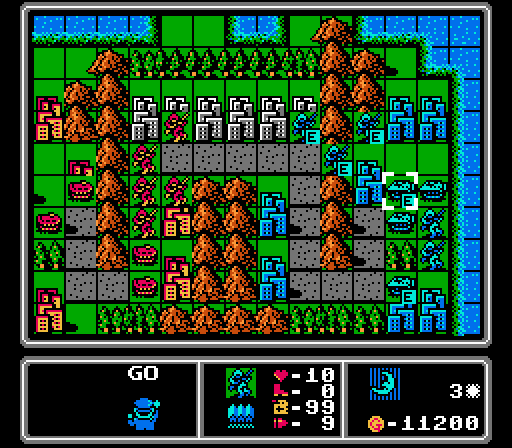 The lower-right infantry moves into one of the APCs that already moved and loads inside. Music: Transport Theme 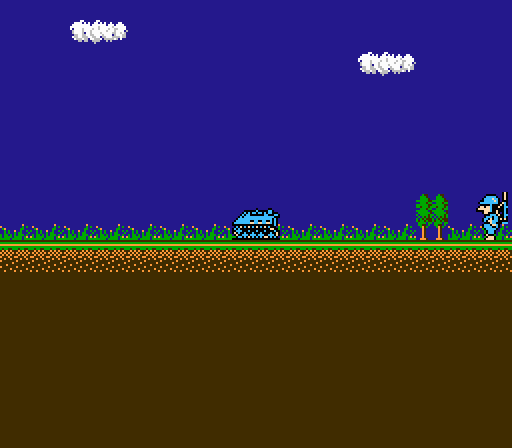 We get another cute animation for that action, with its own music. 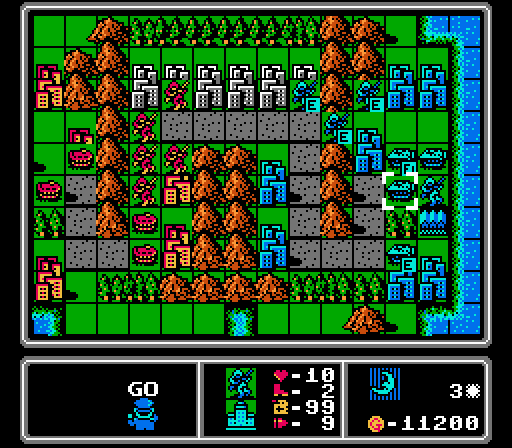 Another infantry loads into the highlighted APC. Note how this APC hasn't moved yet.  After loading, the APC's turn is also ended. So an APC can't be loaded and then moved again in the same turn in this game. Later games would allow that tactic. Note also how there is an "L" on the APC icon when a unit is loaded into it.  Our opponent builds two more APCs and two more infantry, but they've lost some initiative by having the APCs retreat to be loaded. Turn 4 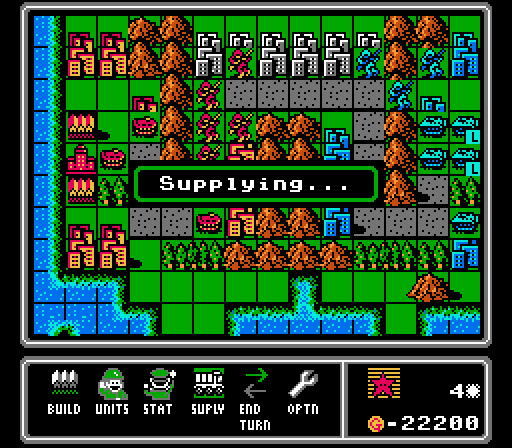 Just assume I do this at the start of every turn from here on out. You can only supply a unit that hasn't ended its turn yet, so there's no point in waiting. 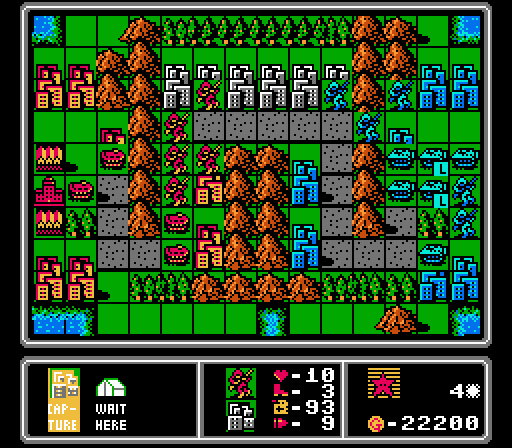 First step is to finish capturing this city.  The animation shows the infantry leaving the building to continue capturing it which is kind of funny. And then jumping up to the roof to celebrate once the capture is complete. 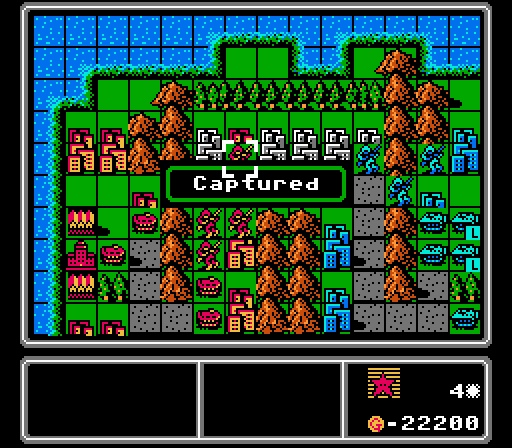 In case you weren't sure, the game explicitly tells us the building is captured and changes its color on the map. 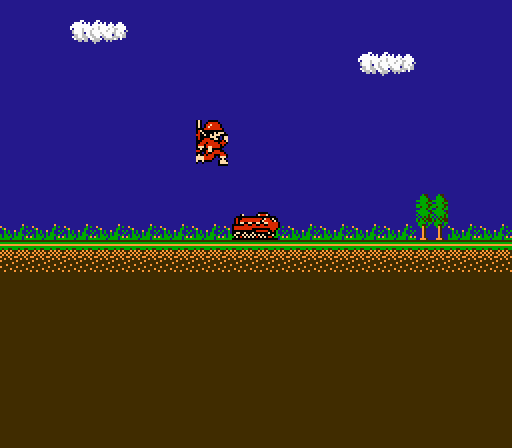 I load up an infantry into an APC here, and discover that the APC can no longer move afterward. 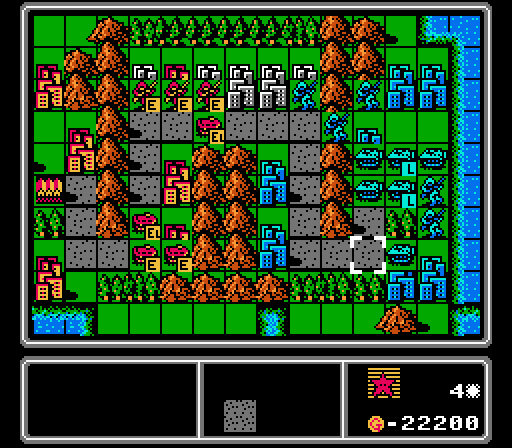 I learn from the mistake and load up the other APC only after it's already moved. The other two infantry start capturing two more cities for us. 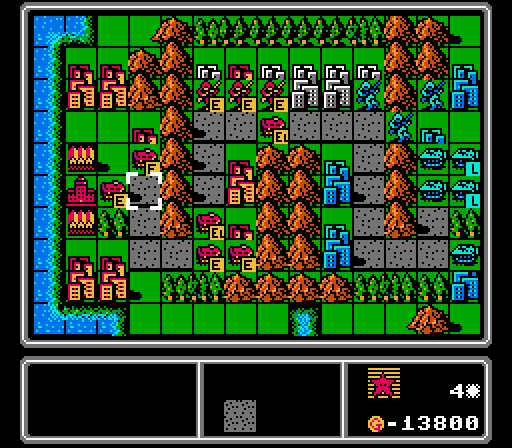 I throw out another couple APCs, but don't add any further infantry. I'm pretty sure the five I've got will be enough for now, and I'd rather save some money for when better units get unlocked. 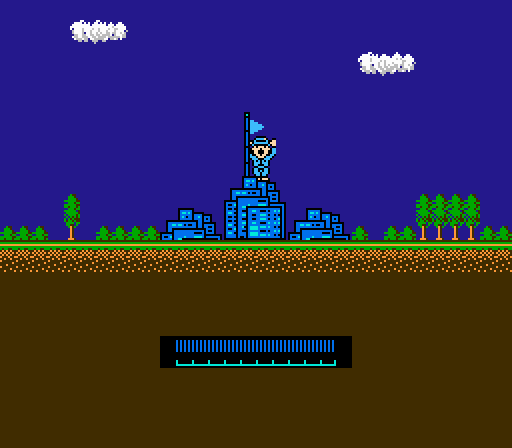 Blue likewise finishes capturing its first new city.  Another infantry starts capturing a city. Two of the APCs move up, but the others are still just hanging around the HQ for some reason.  Finally, we've got a couple new units to play with, as the computer tosses out a tank and an artillery. Turn 5  I've got a couple of goals for this turn. We need to finish capturing the two cities we're currently occupying, attack the enemy infantry that's trying to capture a city of his own, and get ourselves some new units.  The capture part is easy. There's no reason not to just finish capturing right at the start of the turn, before anything else happens. I totally haven't just forgotten to do that before, no sir.  We also move an infantry up to start capturing the fourth city. Notice the new command available, though - we can select attack when we end a unit's turn in range of an enemy.  The APC moves up to attack the infantry here. There's a targeting reticule showing which unit is being attacked. Useful in case there are multiple units in range. We also get to see the unit description, including current health and what terrain it's currently occupying. Time to see how the APC performs in combat. Music: Battle Theme  Each battle also plays out in an animation, with some new music. Each unit has a number of icons corresponding to its current life, and the icons are destroyed as the units exchange fire and lose life as a result. You can see the numeric representation up at the top, along with portraits of each commander. These portraits will have different expressions depending on the result of each battle. You can also see the terrain for each unit - a road for the APCs on the left, and a city for the infantry on the right. In this case, a full health APC takes out 5 HP from a full health infantry on a city. Not too shabby. Not only is that infantry half-dead, it'll now take an extra turn to capture that city.  The other loaded APC moves up and we can now see the option to "Drop" its loaded unit. We can't unload into the mountain, so the infantry is dumped back onto the road instead.  Of course there's another animation for getting out of an APC.  Our other APCs simply move up.  It's time to spend some of those funds we've been saving up. We've got two tanks (6000 G each) and two artilleries (5500 G each) of our own now. And I completely forget to examine them before ending the turn. Oops.  The damaged enemy infantry gives up on its capture attempt to come attack one of our own infantry.  It's almost completely wiped out as a result. It's interesting that the damaged infantry left its in-progress capture attempt. The AI in the later games would prioritize capturing over almost everything else, even if the unit had low health. 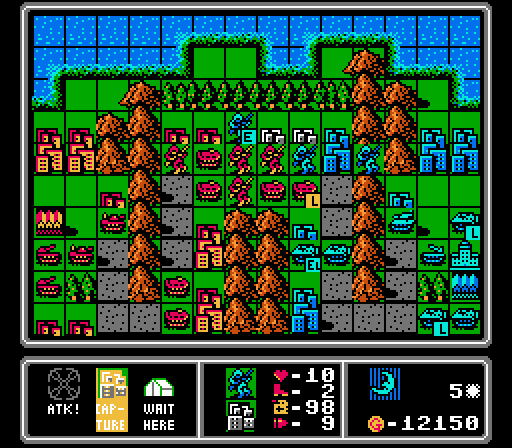 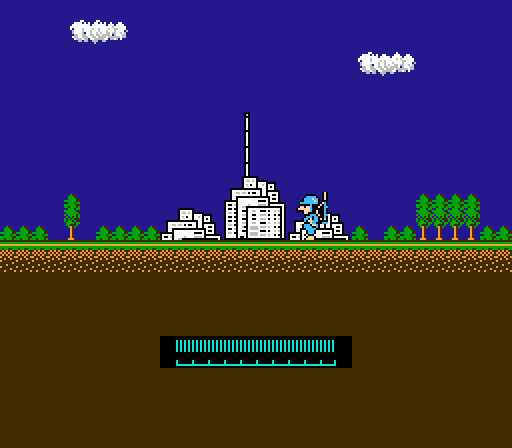 A different infantry moves up to try and capture the city, but it has to start over. 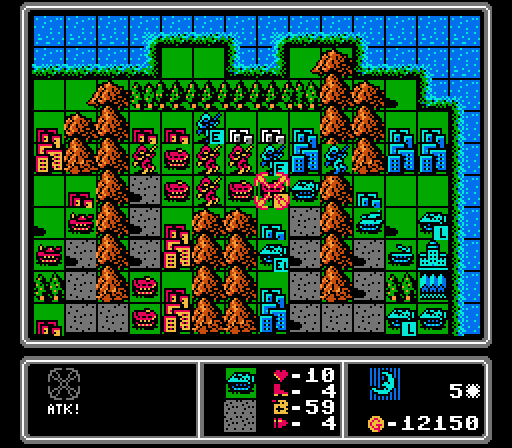 An APC moves up to attack our lead APC, which was already slightly damaged from attacking the infantry earlier.  We take another 5 damage, dishing out 3 damage in return. 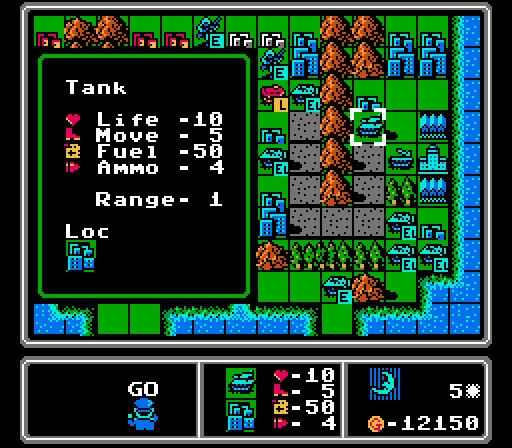 Here's the enemy tank. One less move than an APC, with a bit less fuel and the same ammo and range. Tanks (and other vehicles for that matter) can't carry units; that's an APC-only ability. 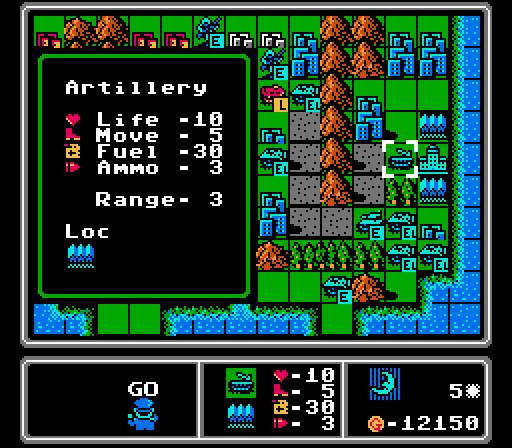 The artillery is the first ranged attack unit we've seen. It's got the same movement as the tank, with less fuel and ammo, but three times the range. These ranged units use indirect fire, which comes with some advantages and limitations. In addition to being able to strike further away, indirect fire results in no damage taken to the firing unit in return. However the ranged units also can't do damage when directly attacked by single-range units. Indirect fire also can't strike one space away, and can't be used if the unit has also moved in the same turn. Indirect fire units are great for defensive fighting, but if you're fighting defensively in this game you're doing it wrong. They're still useful for firing over the mountains, and I'll throw a ton of the indirect fire units out before this map is over. 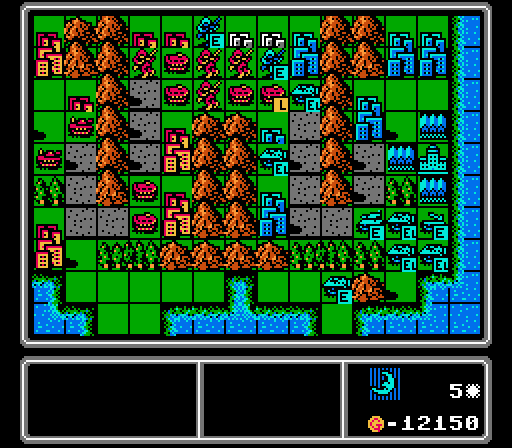 The enemy tank starts to advance and the artillery hides behind some APCs. We've got a numbers advantage on the front line for now. 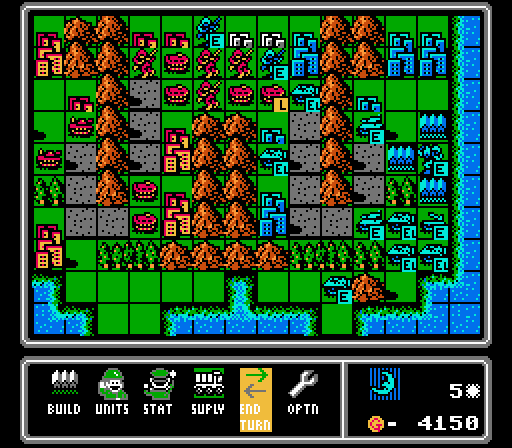 The computer builds another tank and unlocks a new unit for us - the mech, the alternate footsoldier unit. Turn 6  I start off the turn by taking an APC up to finish off the wounded infantry.  The results are predictable. Notice the enemy commander portrait is different when the unit is lost.  Reducing a unit's life to zero removes it from the map with a minor explosion.  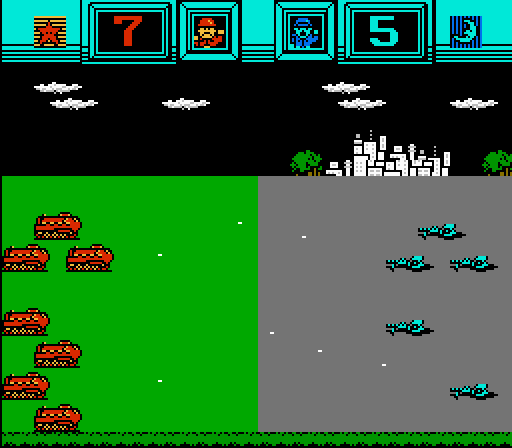 Another APC moves up to attack the capturing infantry again.  I move the damaged APC back and drop off the infantry inside, so that I don't accidentally lose both.  Here I discover another gameplay difference between this game and the newer ones - units inside an APC take the same damage as the APC does. So now my infantry is also down to 3 life. It'll be stuck on that city healing up for awhile (at 2 life recovered per turn, it'll be back to full in four turns).   Armed with this new information, we fire at an enemy APC to further damage both it and the infantry it carries. The battle is more even than I'd like - we only dealt 4 damage, but took 3 damage, even though both units are on a road. There is some variability in battle results where any given attack can do up to 1 extra damage than normal. I'm not sure how exactly that variation works or if it's the same as in later games though.  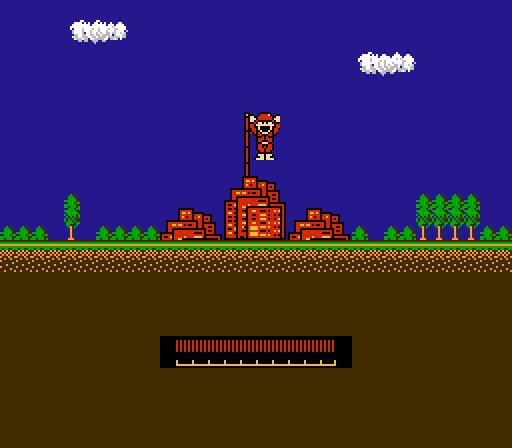 I almost use this infantry to attack the one next to it, but remember at the last moment that is was in the middle of capturing and instead finish off the capture. 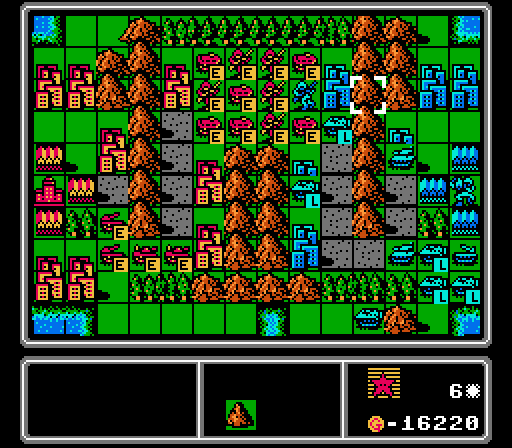 That capture brings us up to four of the middle cities in our camp now. The computer player only has one of them, giving us a 3000 G income advantage every turn. The rest of our turn is just all of our units slowly moving forward. I totally forgot to buy new units this turn, but I think we're a little clogged up in the middle right now anyway. 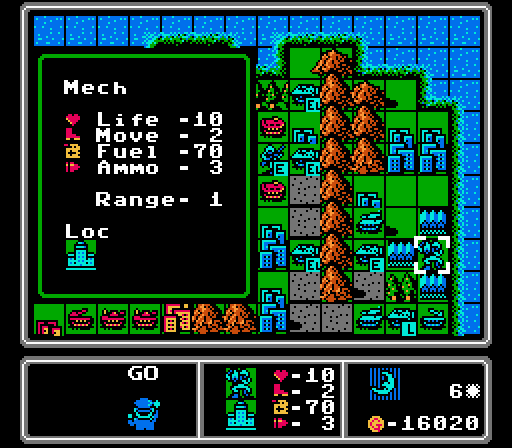 On the enemy phase, the infantry continues its capture attempt (now at just 75% progress, since it was brought down to 5 life last phase) and a few APCs move up. We also get our first look at the mech unit before it loads into an APC. It costs 2000 G (twice as much as an infantry) and has less movement, less fuel, and less ammo. In theory it should have more firepower to make up for those disadvantages, but I guess we'll see. 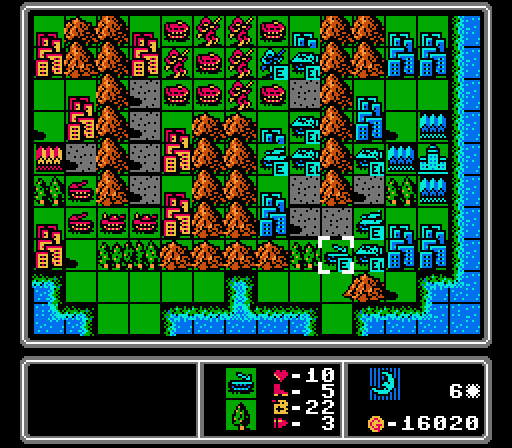 The tanks and the artillery start to move up as well. The lead tank is sitting on a city and is going to be difficult to dislodge.  With its accumulated funds, Blue purchases a medium tank. Now we're in trouble. To Be Continued... DKII fucked around with this message at 19:13 on May 26, 2021 |
|
#
?
May 26, 2021 19:04
|
|
|
I've played a ton of advance wars, but was only vaguely aware it had predecessors. Will be interesting to see what has changed and what's the same. NPCs being represented as ten actual NPCs instead of one makes the "units inside take damage too" make sense. Does it prevent loading a full health infantry into a damaged APC as well, or does the sense stop there?
|
|
#
?
May 26, 2021 21:22
|
|

|
This looks interesting, I always enjoy seeing how old systems managed to set up their AI. How is firing range affected by mountains? Seems like you might be able to lay down a solid covering fire from your side of the mountain range to soften up enemies before they get to the big clogged middle.
|
|
#
?
May 26, 2021 21:26
|
|


|
Phosphine posted:NPCs being represented as ten actual NPCs instead of one makes the "units inside take damage too" make sense. Does it prevent loading a full health infantry into a damaged APC as well, or does the sense stop there? I don't think there's anything preventing that, but here's another interesting scenario I'll try to figure out: If I put a 5 HP infantry inside a 10 HP APC, and the APC then takes 5 damage, what happens to the infantry? MagusofStars posted:How is firing range affected by mountains? Seems like you might be able to lay down a solid covering fire from your side of the mountain range to soften up enemies before they get to the big clogged middle. No effect, just like the rest of the series.. And we'll definitely see some mountain-hopping of indirect fire in the rest of the map. I'll have that up tomorrow.
|
|
#
?
May 26, 2021 22:22
|
|
|
Part 2: Bean (2 of 2) We last left off with our opponent throwing out a medium tank, the most expensive ground unit. Hopefully we can get more than infantry and APCs on the front line by the time it gets there. Turn 7 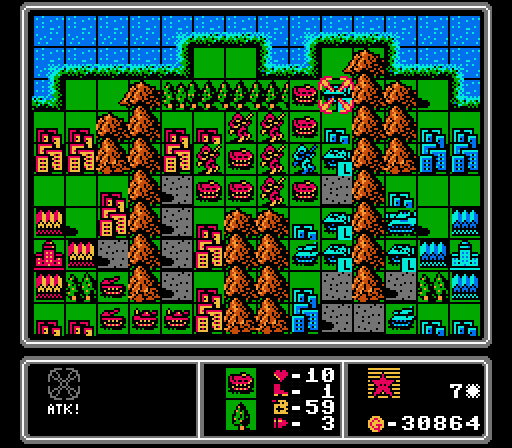 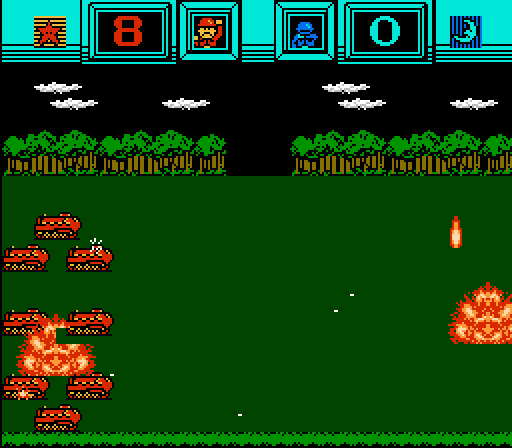 We start off with some APC-on-APC action. Our target had just three life remaining and was easily wiped out, along with the infantry it was carrying. 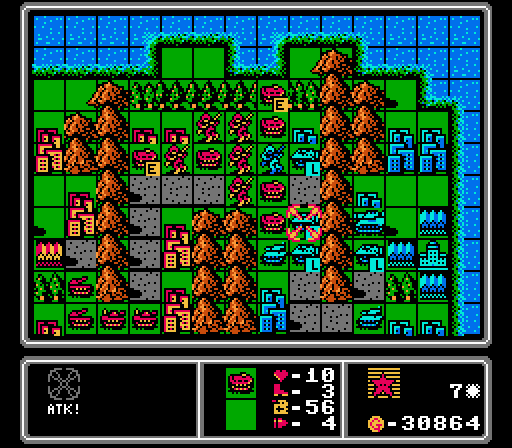 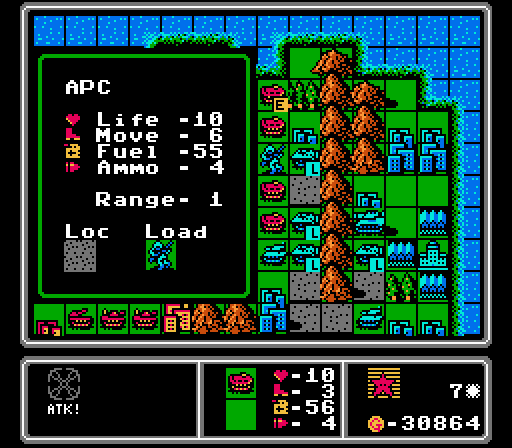 Another APC of ours moves down and strikes another loaded APC of the enemy.  I'm not sure why that one went so poorly but I suppose equal damage with equal units makes sense? Maybe there's no first strike advantage in this game.   I try to finish off the APC but no luck. At least it's out of the fight for awhile.  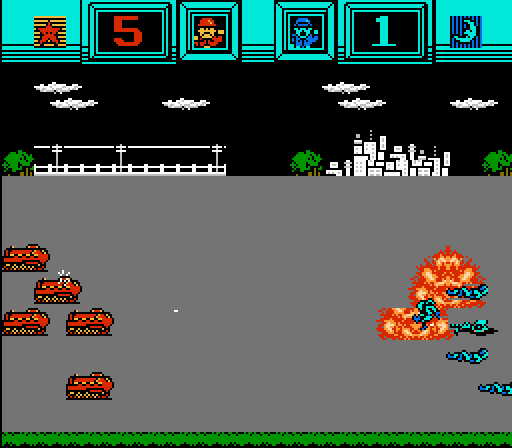 While a couple other APCs move back to the cities to heal, I take one of our wounded APCs and try to finish off the capturing infantry here. Unfortunately it's just short again. 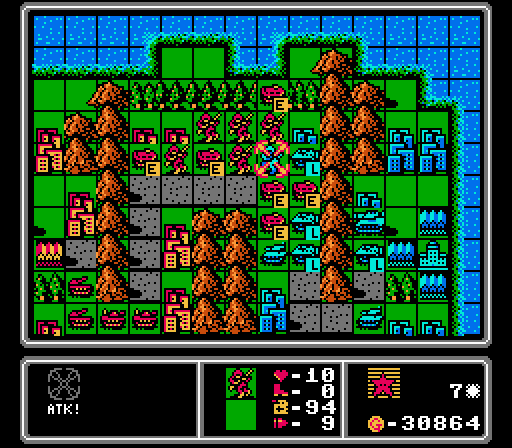 Luckily I've still got plenty of full-health infantry around to finish it off. 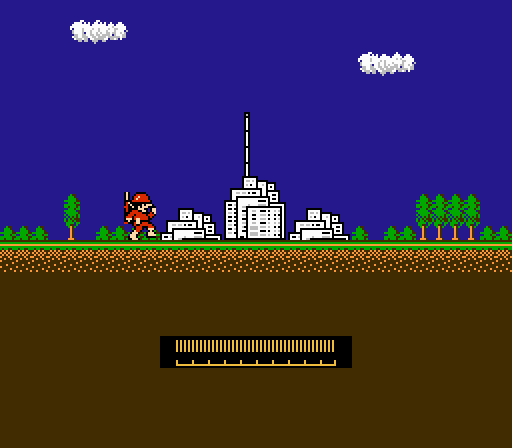 The frees up the city for one of our other infantry units to start capturing. 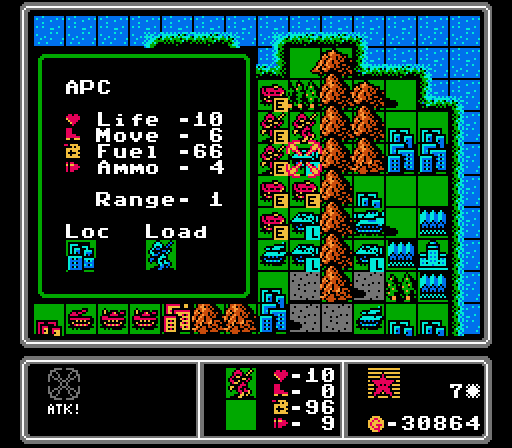 Full-life infantry attacking a full-life APC on a city....not sure what I was thinking here. 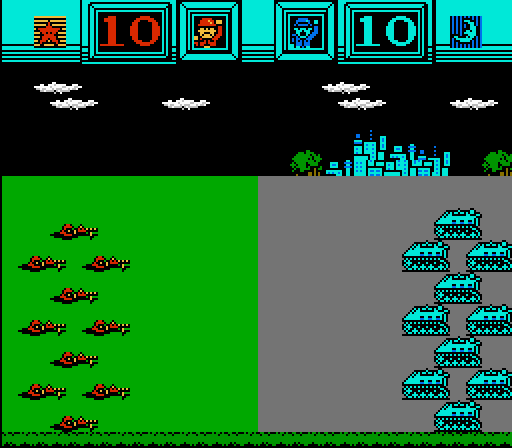 It really does not go well. 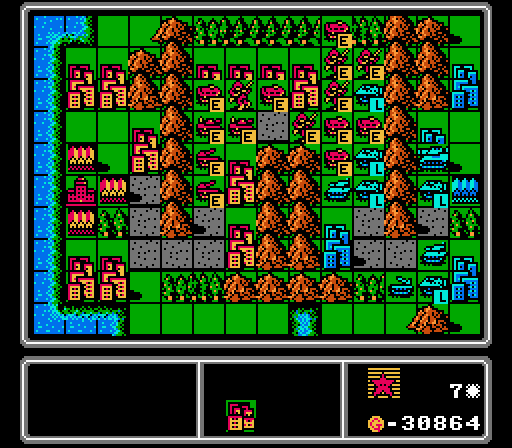 With the front line fully clogged, I just move up the tanks and artillery to try and get them closer to the action. My lead artillery could've gone onto the city instead to get in range of the enemy tank, but I didn't even notice that opening at the time. 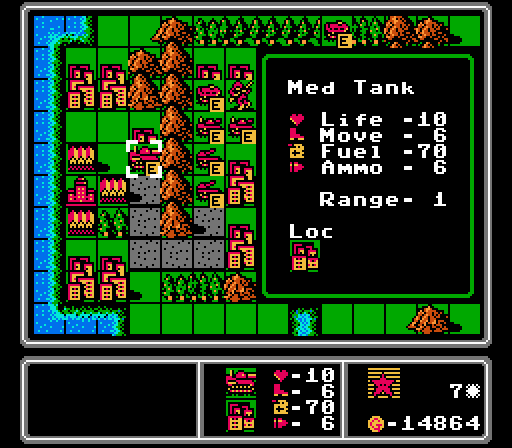 Upside to our opponent building a medium tank, is we get one of our own. It's a whopping 16000 G (almost as much as three regular tanks). It has one more movement, 20 more fuel, and two more ammo compared to a regular tank. At that price, I'm expecting it to hit a lot harder, too. 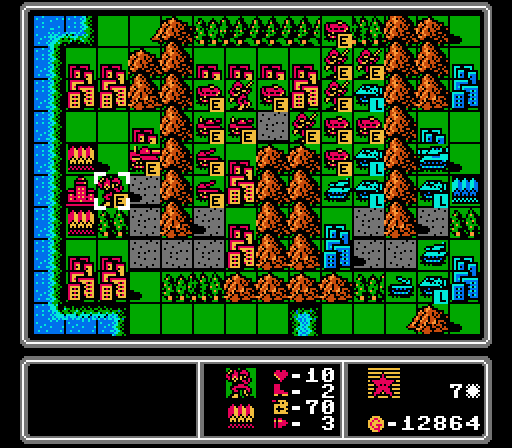 I also throw out a mech mostly just to take a look at it. Might as well point out that the center panel along the bottom will show the details of whatever's under the cursor. The mech is pictured, as is the tile it's currently occupying (the base), along with the unit's current life, movement, fuel, and ammo. I routinely forget this information is present there and bring up the full unit detail screen all the time instead.  Blue's first action is to send a full-strength tank against a weakened APC. 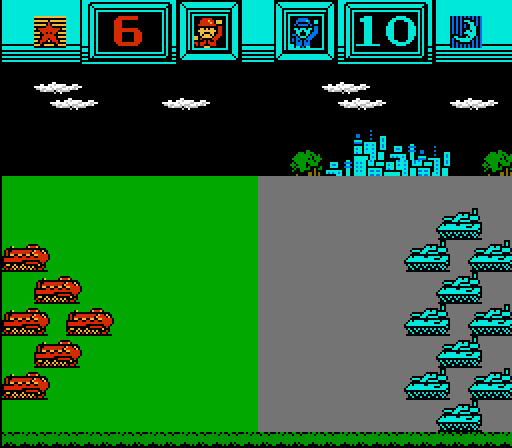 Guess we won't be doing a deathless run here. The APC didn't even get in any chip damage on that tank. I guess now we know that Tank > APC > Infantry. You can see our commander portrait change to the crying version as the APC goes down. 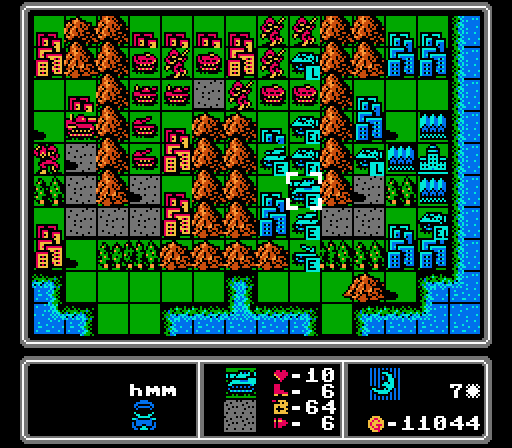 Two of the APCs don't move but the medium tank is coming up to see us, with another tank and an artillery right behind it. Suddenly our front line of APCs and infantry is looking pretty shaky. 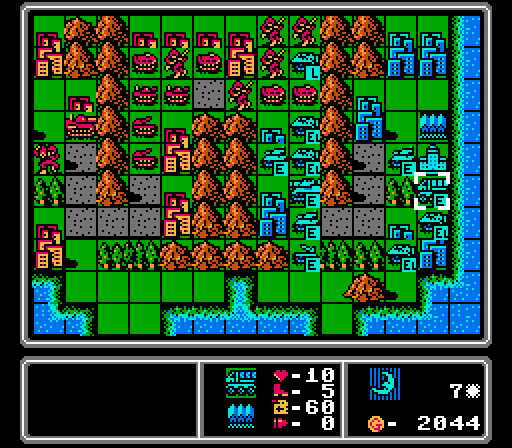 For some reason the APC up at the top of the map didn't attack our capturing infantry (or do anything else for that matter). The computer player unlocked a new unit for us though - that truck is a supply unit. It'll be pretty important later, but I'll go over it more when we get one of our own. Turn 8 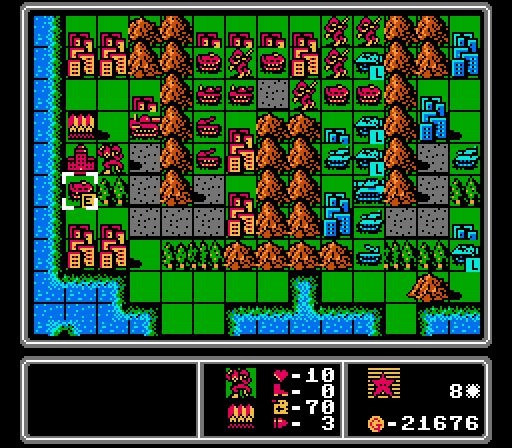 The first thing we do is buy another APC and shove the mech inside it. Otherwise at just 2 movement per turn, the mech will take forever to get anywhere. 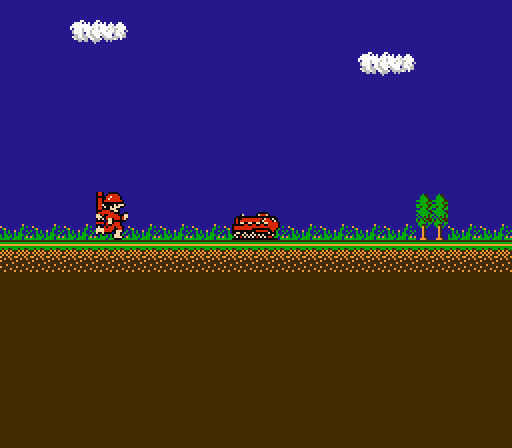 The mech has a slightly different loading animation that includes the bazooka on his back. Also be careful moving footsoldiers around near APCs - I discovered here that there's no confirmation (unlike every other action) so the mech just jumped right in unprompted. 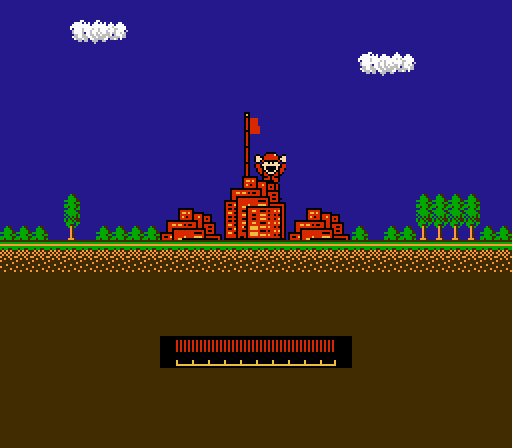 Since the AI was foolish enough to leave my capturing infantry alone, we finish taking the fifth city from the center area.  Our armies are fairly even but I've got a sizeable income advantage now. That's an extra medium tank every four turns for example. 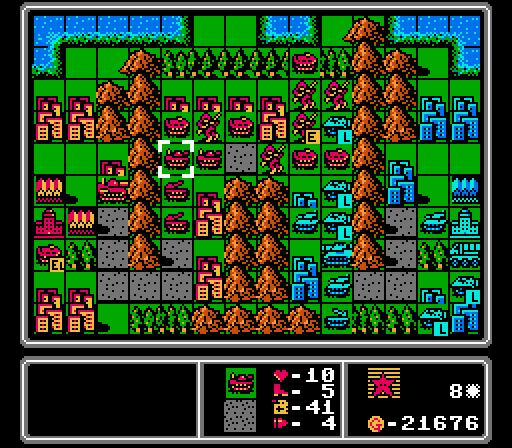 Time to try and get some strategy going. Our own tanks are finally in range to do some damage. 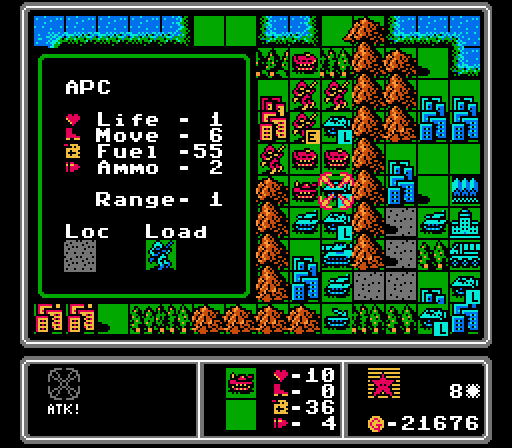 The rear one slides into the open space left by our destroyed APC, and finishes off this wounded APC without taking any damage. 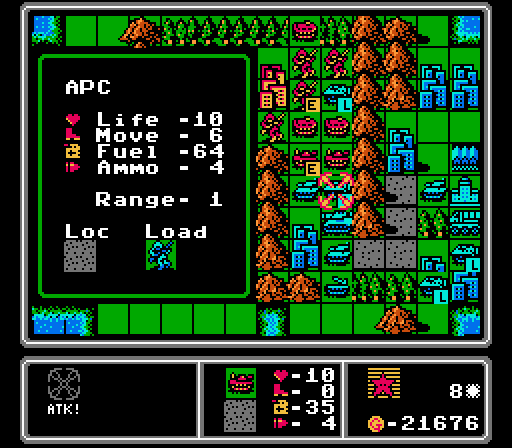 Our other tank moves up into the new empty space and unloads on a full-life and loaded APC.  Not quite a one-shot kill but I'll take it. 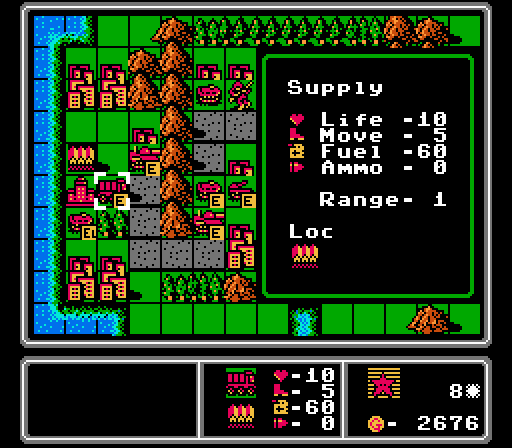 With our two tanks holding the front line, I don't have anyone left in range to dislodge the APC from the city up top. Instead I shuffle some units around and build another medium tank and our own supply. This little truck can't attack but will refill adjacent units' fuel and ammo whenever the menu "Supply" option is selected, or on command after moving. 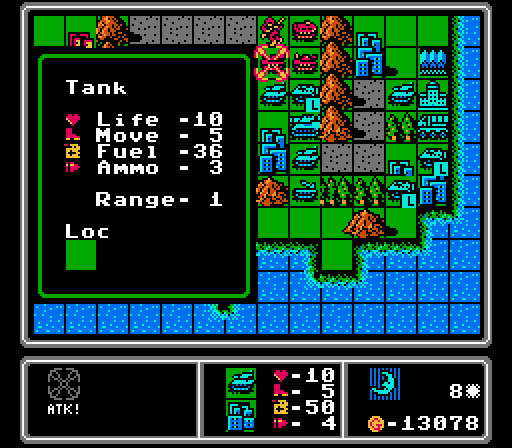 Blue's first move is a direct tank-on-tank attack. Both are at full health, but the enemy tank is parked on a city.  As a result we get mildly wrecked while barely doing any damage in return.  The artillery retreats to an odd peninsula and the medium tank just ends early instead of moving the APC out of the way. I'm not sure what determines the order of action for the AI but it worked out in our favor here.  The APC does eventually move back to a city for repair, but we also get to see on the enemy HQ the last ground unit for this map - a rocket. (Note that this translation patch calls the unit a "Howitzer", but I'm sticking with rocket.) Turn 9  I finally realized I could park the artillery on the city and fire over the mountains at the tank. I'm going to need some help to deal with what we're facing here so let's hope for a good shot.  Four damage on a city isn't too bad. I don't think I can finish it off without leaving our tanks exposed to the enemy medium tank, though. 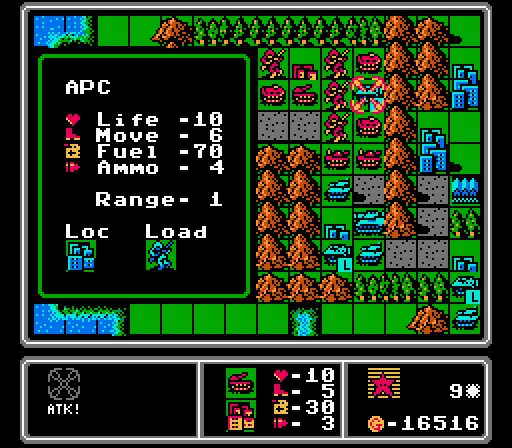 Our other artillery is in position to try and get rid of this APC that's been parked on the city up here for awhile. 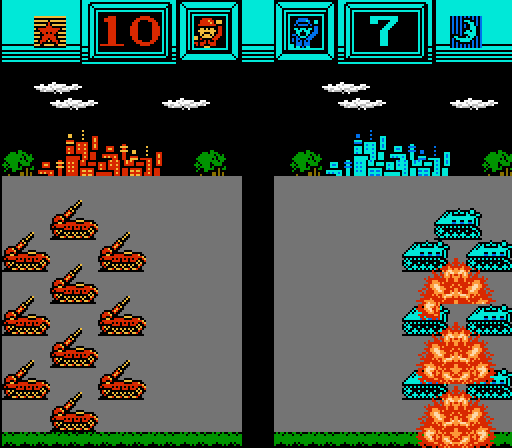 Only three damage dealt this time. With the APC getting back two life each turn, that won't add up fast enough.  I stall while trying to think about who to sacrifice on the front line this turn, by moving up our back line first. We've got a medium tank of our own ready to join in the fun next turn. 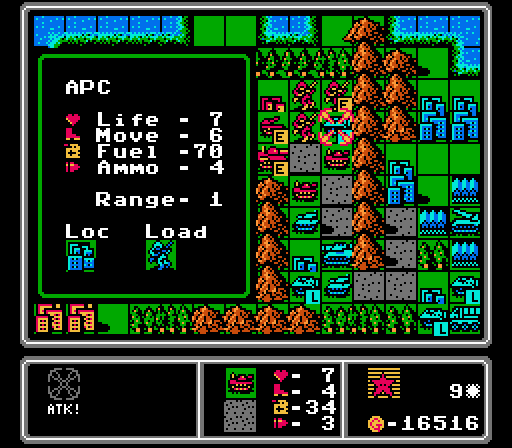 I really need this APC gone so I figure leaving a tank exposed is worth taking another crack at it. 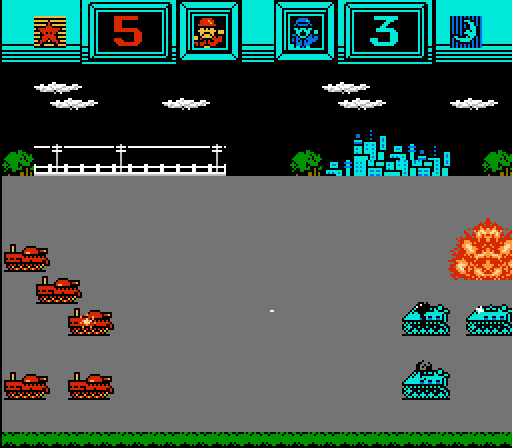 More damage than the artillery did at least. But that tank is a goner on the enemy phase.  I take a chance by giving this full-life infantry a shot at the APC. I'm hoping attacking from a city will help the infantry not get destroyed this time.  Success! And we only took one damage, too!  We immediately move another infantry in to capture that last top-row city. It isn't at full health though so it'll take three turns uninterrupted to get the job done.  Let's take a look at the rocket unit. It costs 13000 G, putting it right behind the medium tank for most expensive ground unit. It's slower than the artillery with one less movement, but it's got 20 more fuel, two more ammo, and most importantly two more range. It would actually have been able to hit one of our tanks if we hadn't just moved it up a space. The game never directly tells you anywhere, but the rocket actually has a minimum range, too - it can't hit targets fewer than three spaces away. 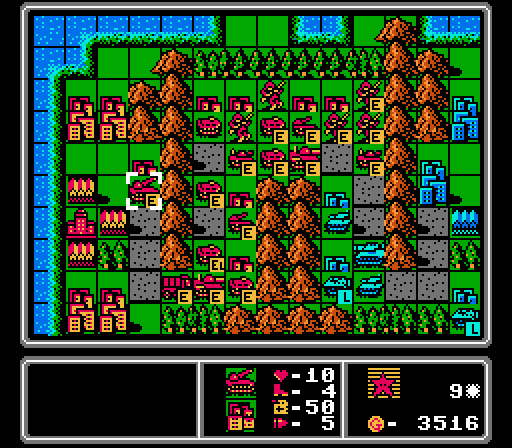 They seem pretty handy, so let's get one of our own, shall we? 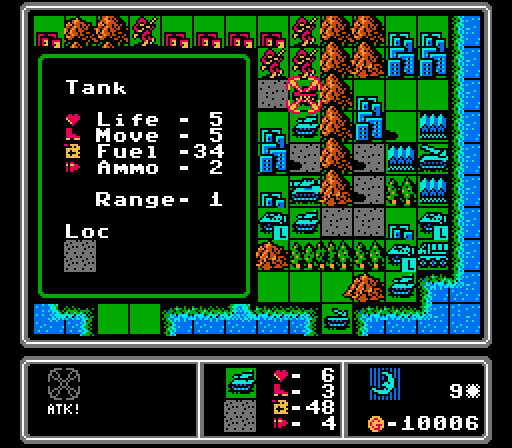 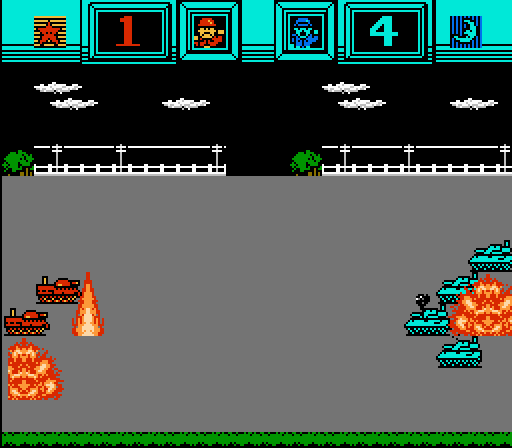 Oof our tank is in trouble. 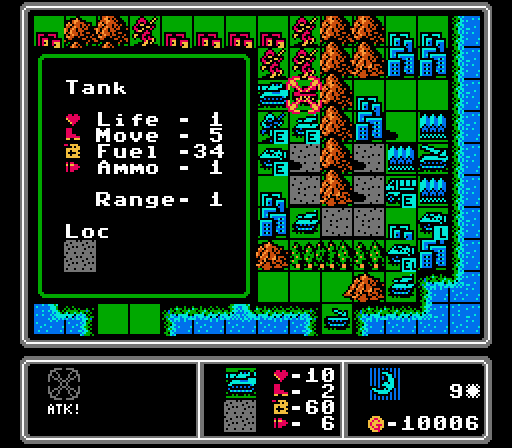 An infantry got off-loaded from the APC just below but more importantly that medium tank is seeing its first action, wiping out our severely weakened tank here. 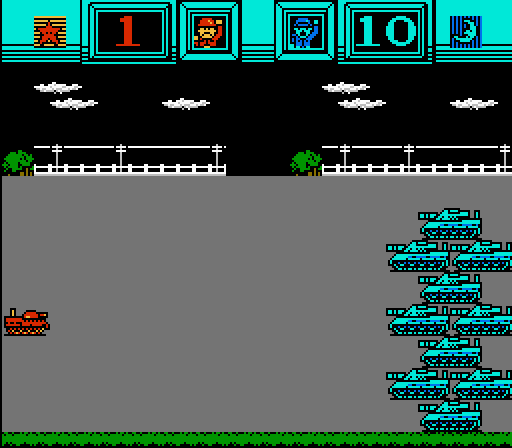 Not even a contest. 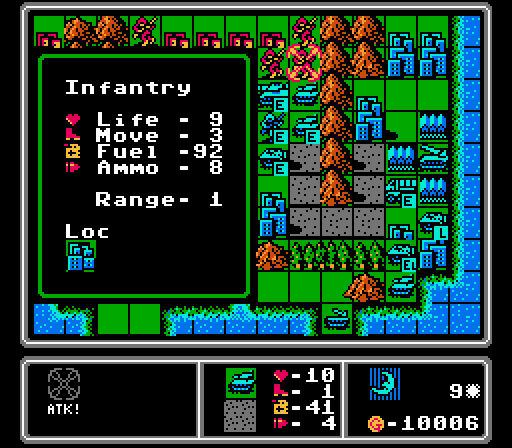  Unfortunately that frees up space for another tank to come in and cripple our capturing infantry. At least we get the benefit of the city defense bonus this time. 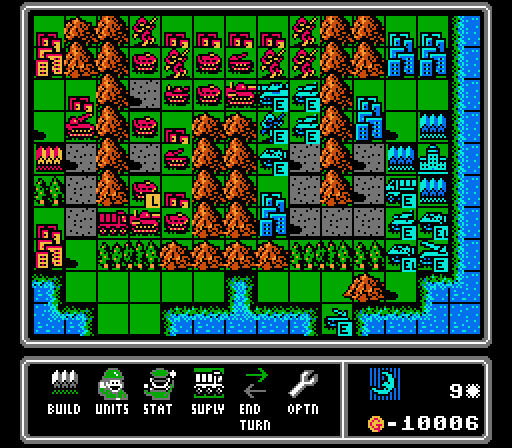 Nothing new built, which really just means they're going to throw something nasty at us next turn. I'm not liking how entrenched that rocket is in the corner, either. Turn 10 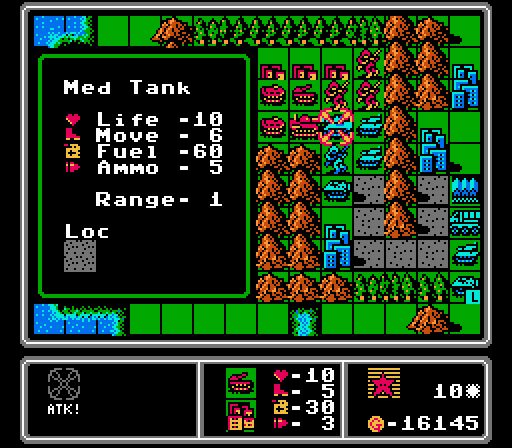  The artillery takes a respectable chunk out of the medium tank here.  Here's the heavyweight bout - medium tank vs medium tank, both on the road.  Well. That went a lot better than I was fearing.  While I try to figure out how best to finish off the medium tank, I use the artillery down below to remove the damaged APC from the city. 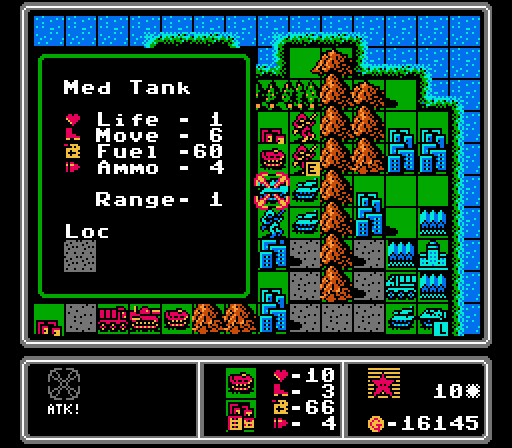 Yes, I'm attacking a medium tank with an APC. I think it'll be ok. First I moved the damaged infantry on the right out of the way, and the full-life infantry moved from above the medium tank onto the city to the right to start capturing it again.  Ha the APC didn't even take any damage since it was attacking from a city. Raise your hand if you legimitately thought you'd see a medium tank destroyed by an APC in this LP. 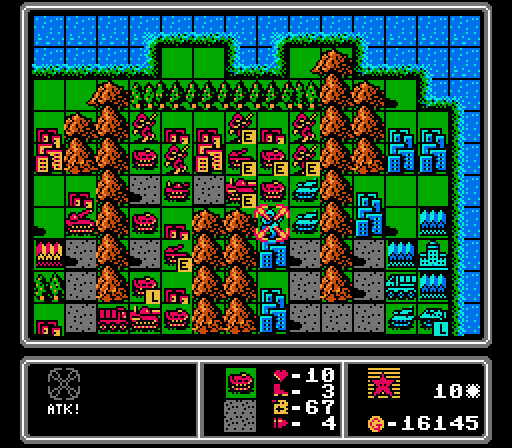 While I'm on a roll, I bring an APC down to finish off this broken infantry unit. All that's left on the front line is two tanks. 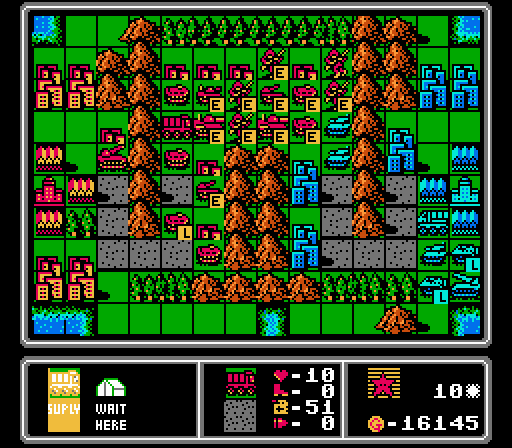 I don't really have a need for it right now, but while I was rearranging units for better repairs and moving the back line closer to the front, I decided to show off the supply unit. Remember that only units that haven't already acted can be supplied, and the APC above the supply already got supplied by the city, so it's just the APC below the supply unit actually getting topped off here. Music: Receive Supplies 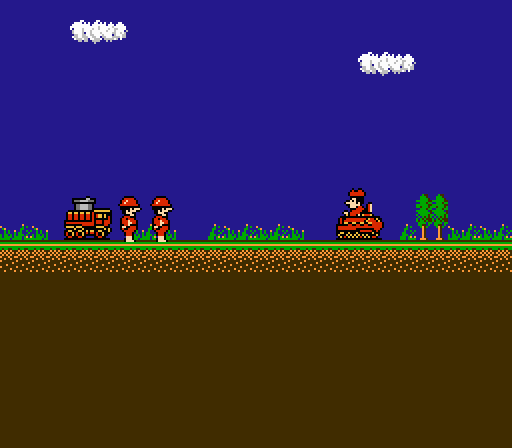 The guys in the supply truck toss a barrel of fuel and a crate of ammunition directly to the dude poking out of the APC, and then run off-screen instead of getting back into the truck. This animation even gets its own unique music. 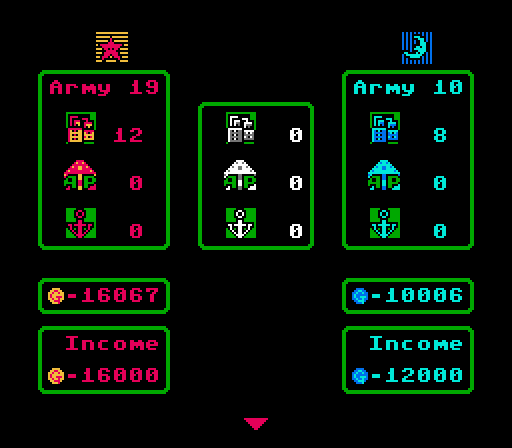 Suddenly we've got almost double the army of our opponent, including two full-strength medium tanks.  A quick look at what each side has built so far. 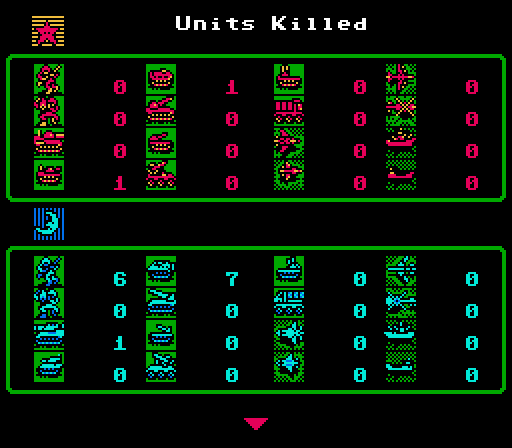 And finally a casualty count, where you can see where we've really come out ahead. If you don't remember us killing all those infantry, half of them were stuck inside APCs at the time. I haven't kept count but I don't quite understand how we've killed seven enemy APCs if they've only built six of them, either. There are actually two enemy APCs still left on the map, too. Maybe there's a bug where a loaded APC that is destroyed gets counted twice? 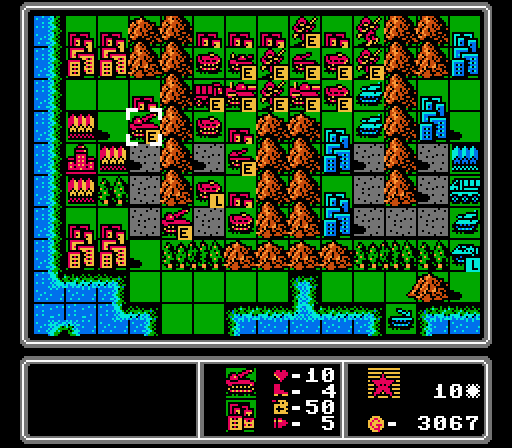 Since I've got the cash lying around and we've unlocked everything we're going to see in this map already, I throw out another rocket.   After first moving their rocket down offscreen, our opponent is drawn to the APC we left sitting out front. It's another slaugher, but the APC is still there blocking off our medium tank.  The other tank (at 4 life) runs away instead of finishing off our APC.  Oh good, another medium tank for us to play with. Turn 11 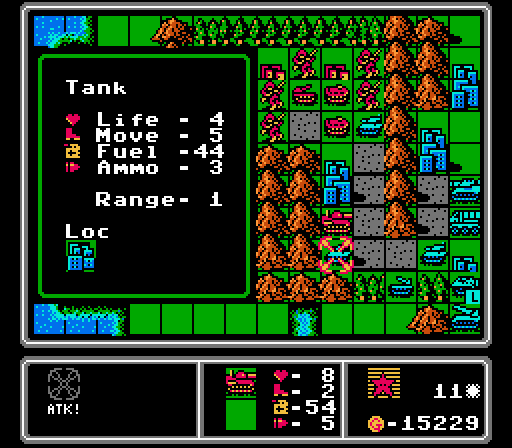 I'm not real inclined to let that other tank get fixed up so we send our medium tank down to harass it.  Even the city's defensive bonus isn't enough to save the tank.  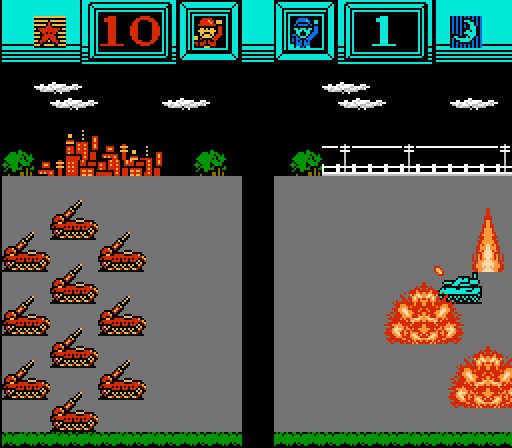 Then the artillery we've had parked on the top row of cities the last few turns puts the other tank into critical health. 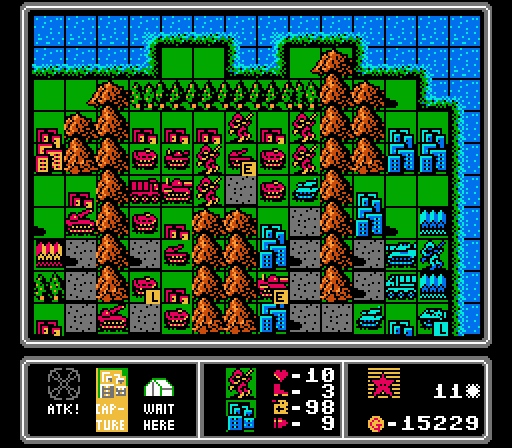 Time to finish capturing the last of the formerly-neutral cities. 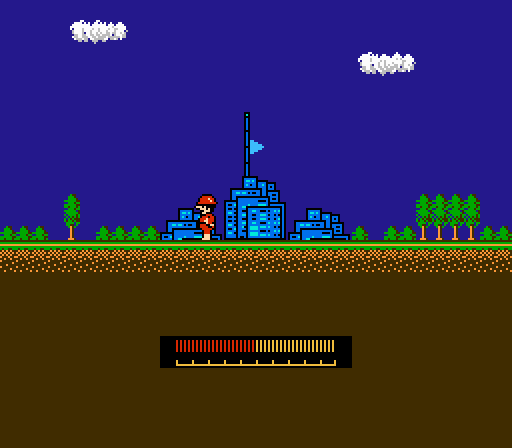 The animation is a bit different for capturing an enemy city, with an enemy soldier getting kicked out. 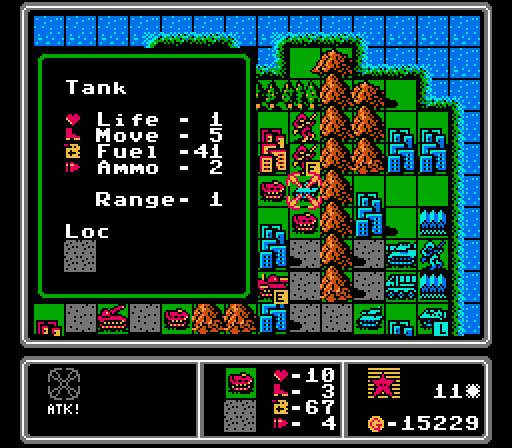 I get an APC out in front to finish off this tank, and suddenly we not only have the entire strip of six formerly-neutral cities, but we also have a lot of open space in front of us. 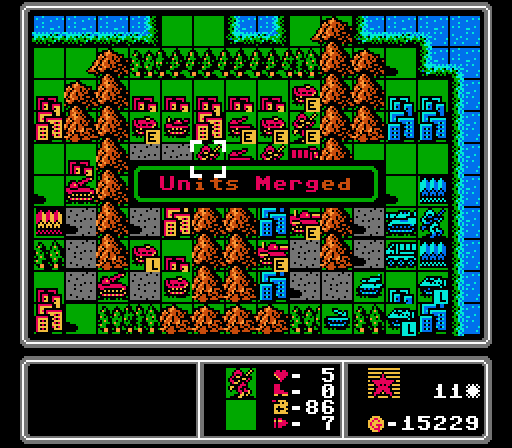 We've now got a wall of two medium tanks encroaching on enemy territory. While moving some units around in the middle I move one damaged infantry onto another, causing them to automatically and (again) without prompting merge together. Merging units will take one off the field but the one remaining will have the combined life of the originals (up to the maximum of 10 life). 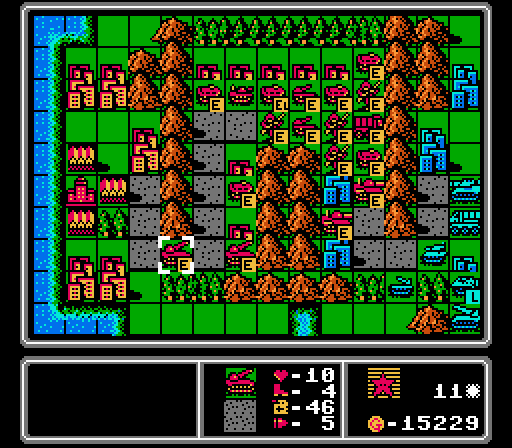 I've now got two rockets slowly moving up. One is now in position to fire upon anything that moves to attack our medium tanks. It's pretty well-protected between the city and the wall of mountains, too. 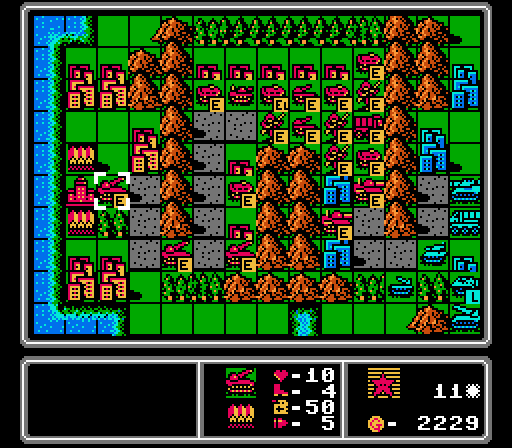 I haven't even used them yet, but I've already decided I like the rockets enough to grab a third one here.  Our advantage is starting to snowball a bit here, but the AI does the smartest thing it can right here and parks its medium tank on a city to go after our damaged medium tank.  We live through the assault, barely.   Instead of finishing off one medium tank, the AI for some reason spends its last tank weakening our other medium tank instead. I suppose that's a good trade for them - we took 4800 G of damage (0.3 * 16000), and the tank took only 3600 G of damage (0.6 * 6000). But it's not enough to offset the extra 6000 G we get every turn now. 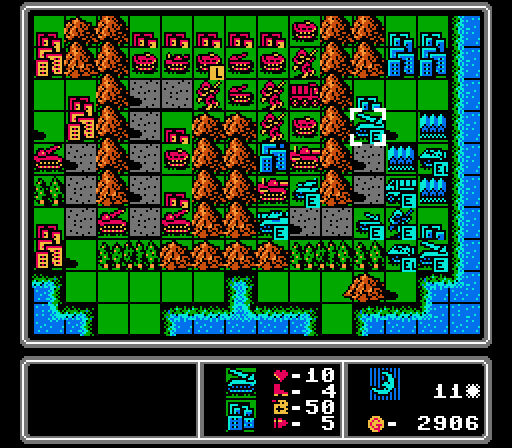 This new rocket is going to be trouble. It's perfectly positioned to keep sniping at our army as we come down the road. And down below, even if we get rid of the two tanks, we can't attack the artillery without being in range of both rockets. Turn 12 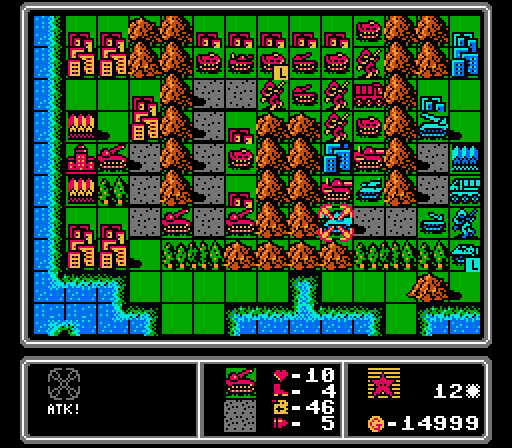 Time to see a rocket in action for the first time. The enemy medium tank is actually in range of both of our rockets. 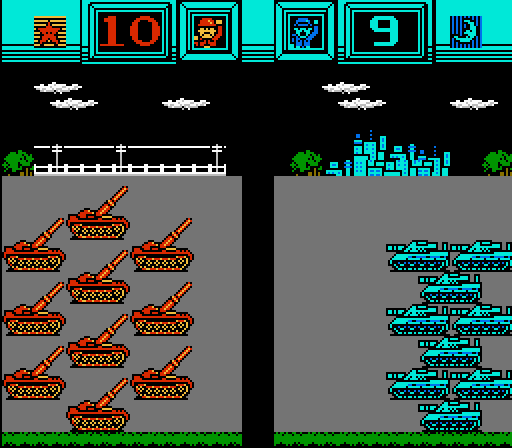 The first attack does four damage to the medium tank despite it being on a city. I was a little disappointed at the time, but after writing everything up and analyzing the data in more detail that's actually a fantastic result. 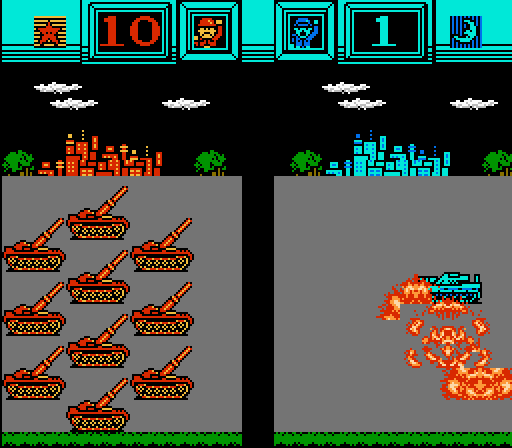 The second rocket attack does the same amount of damage, almost killing the medium tank outright. 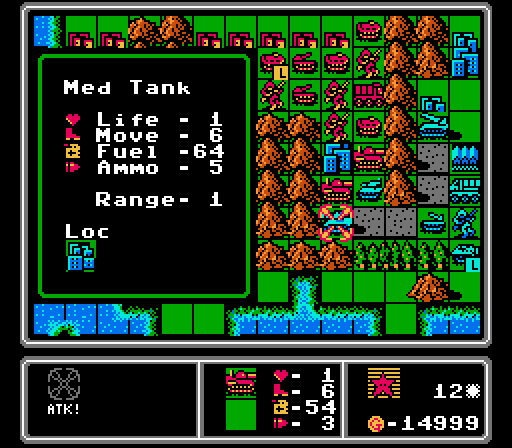 I'm a little curious what will happen here. Our 1-life medium tank is attacking the enemy 1-life medium tank. I figure we had a good shot here, but I forgot to take the enemy city into account.  The animation actually shows both medium tanks firing and destroying each other simultaneously, which I'd never seen before in this series.  Unfortunately only our medium tank gets removed from the map. Not sure if that's a bug or what.  Anyway, we send one of our many infantry down to start capturing another city.  Then I'm able to get a fresh APC down from the very top of the map to get rid of the medium tank for us. That's two medium tank kills for our APCs now.   Meanwhile our last medium tank is able to take out the damaged tank below it.  I'm used to indirect fire units being pretty vulnerable to direct attacks, so I was happy to expose a damaged APC here just to get in a free shot at the artillery.  It doesn't really go that well though.  The rest of the turn is more positioning. Our two artilleries move up to be able to fire on the rocket next turn. One infantry starts crossing the mountains to get at the rocket next turn, while another sneaks all the way down to start capturing another city in the lower middle area. The mech finally makes it near the front and is ready to cross the mountains next turn as well.  I realize I just barely can't afford to get another medium tank, and decide to just save up for next turn instead. My income is 17000 G at this point, so why don't I have enough for a 16000 G medium tank? Well apparently resupply actually costs some of our funds. Ammo and fuel are cheap - 10 G per unit of fuel and even less for each ammo, from what I could tell examining the footage afterward. However repairing units costs 10% of the unit price for each life point returned to the unit. So there's no cost advantage to repairing a damaged unit instead of just building a new one. However we do save time (since the damaged unit is already at the front) and we don't have to waste a build tile on a new unit (which can be a limitation in some maps). All of which would've made me feel better if it weren't for the fact that the funds spent reparing APCs kept me from building another medium tank this turn. Oh well. I guess that's one argument for making supply a manual command - you can choose to save the funds instead.   On the enemy phase, the artillery first takes a shot at our capturing infantry. I was hoping it would be lured by our supply truck instead, but no such luck. At least it was only able to do two damage due to the city's defensive bonus.   The rocket on the lower right goes after the APC in range, almost-but-not-quite killing it.  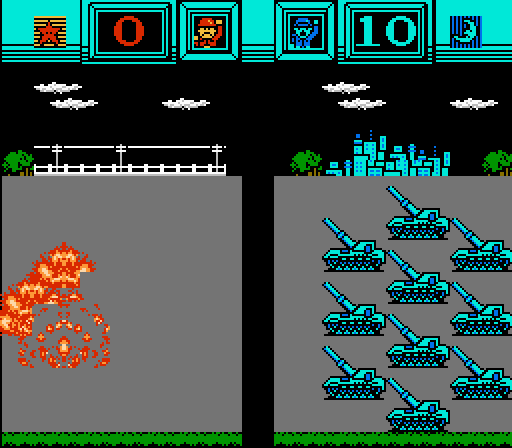 The other rocket destroys our medium tank, which is totally unfair when it's done to me. 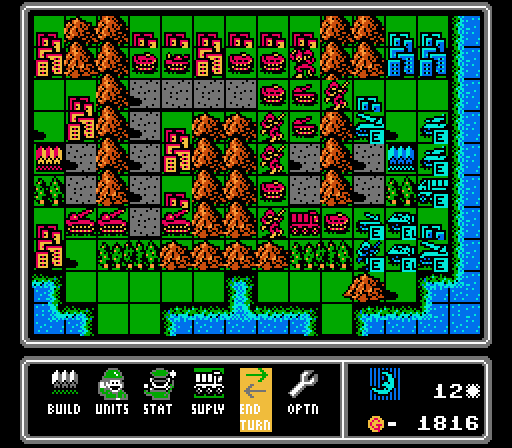 The AI buys two more tanks, but really the only question left is how much blood is it going to take to take out those rockets? Turn 13 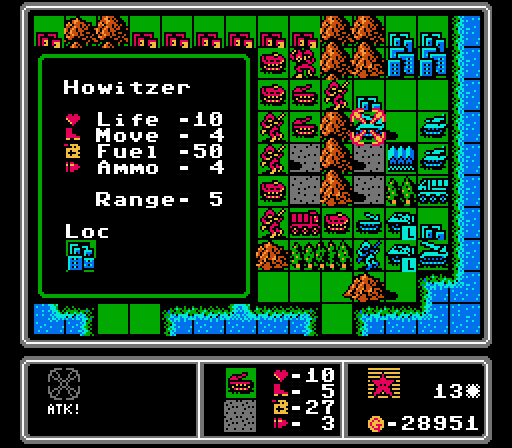 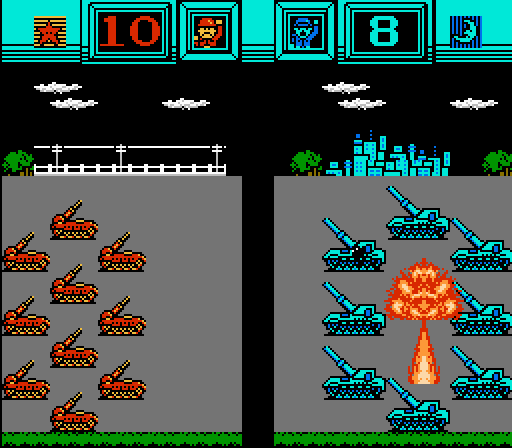 Our first action is trying to dislodge the upper set of rockets with the artillery. The first attack is underwhelming, but at least the rocket can't fire back even against another ranged attack.  The second attack likewise does just two damage. 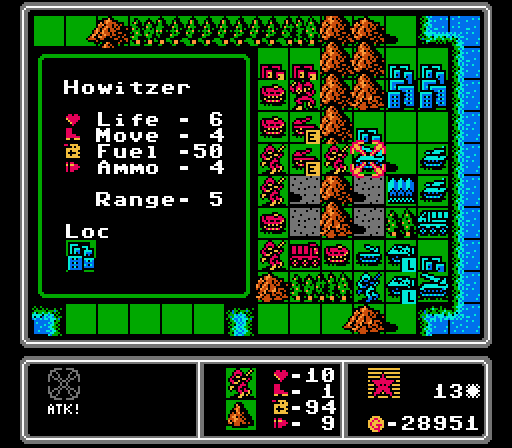  I send in an infantry to go after the rocket from the mountain and it literally does zero damage. What the hell?! 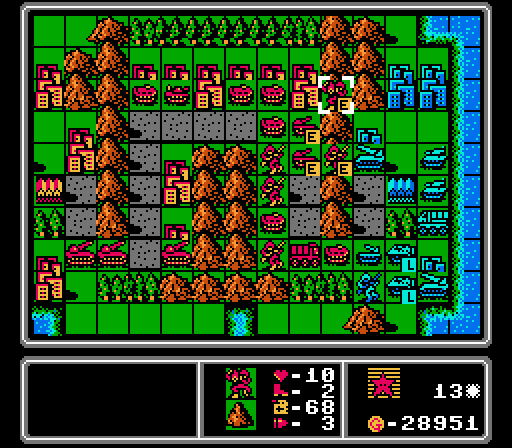 In later games, the mech unit makes up for only having two movement by not having any movement penalties in any terrain. Pictured above is me discovering that in this game the mech unit can still only cross mountains one tile at a time.   On the bright side, this infantry got left alone and is able to finish capturing this city, further putting the squeeze on the blue team. 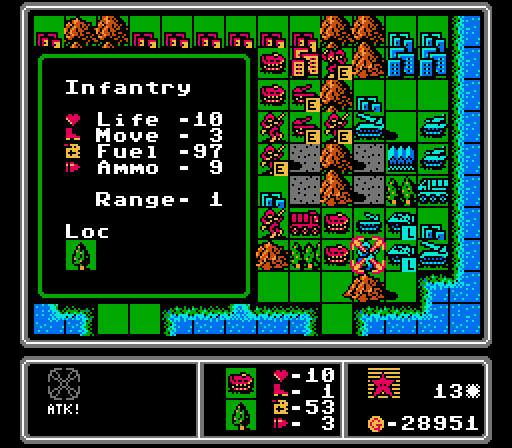 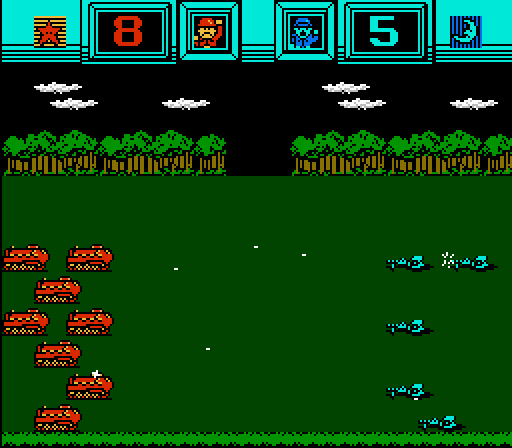 I don't really have much left to do with our APCs, so I send one forward to harass this infantry. 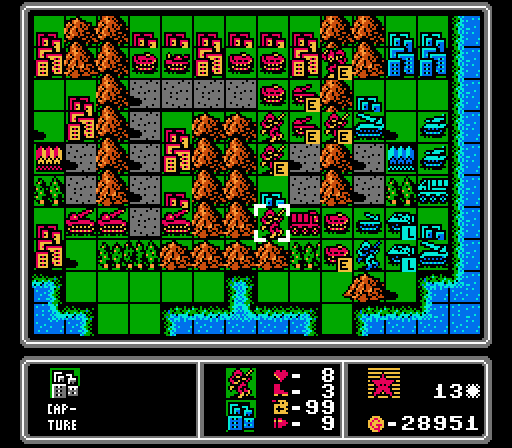 The lower infantry here is able to get its city 90% captured. He's not in range of either rocket so might survive another turn to finish the job. 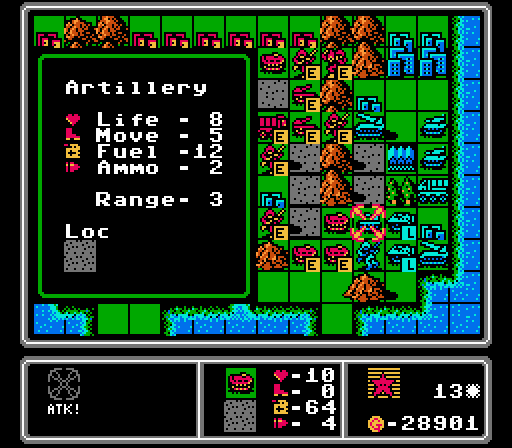 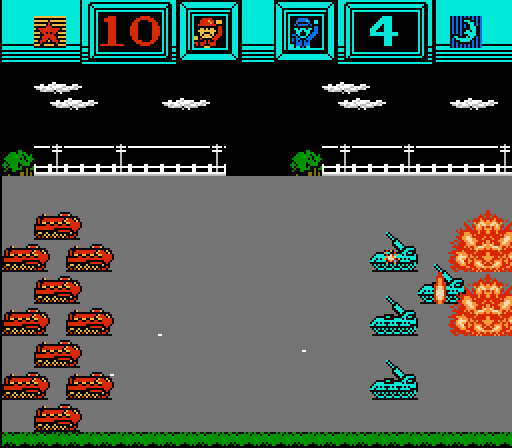 Another APC gets sent in to harass the artillery, and is a bit more productive at it.  The rockets can't reach anyone this turn so they all move forward, with the rear-most one nestled in the same corner. And I get us a new medium tank.   The enemy phase once again begins with the lower-right rocket taking a large chunk out of the APC blocking the road.   The other rocket doesn't like getting shot at and takes a big piece out of one of our artilleries. 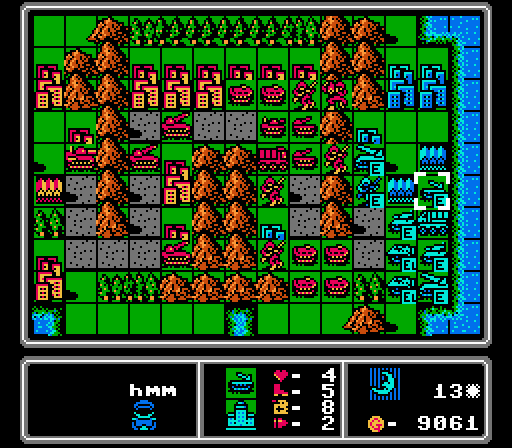 The enemy artillery retreats, but we still can't get to either rocket. At least the AI doesn't have enough funds to build anything threatening, choosing to stand pat this turn. Turn 14 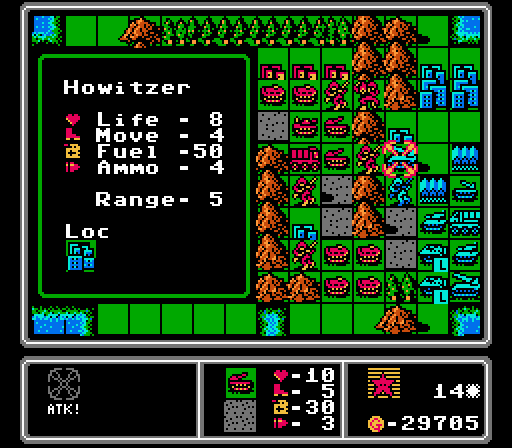 Both of our artilleries fire at the nearby rocket again. The full-life one does four damage this time, but the half-life one does just one damage. 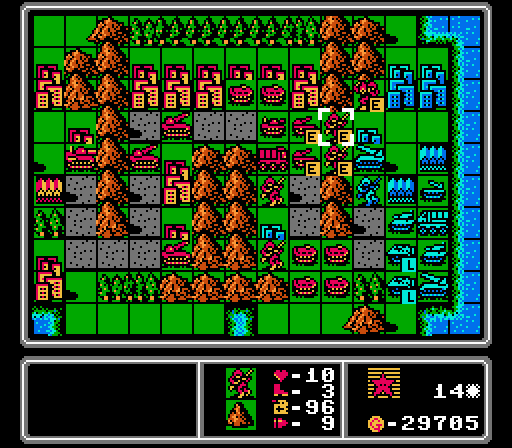 The mech and another infantry move through the mountains. I try firing on the rocket again with the infantry and again deal no damage, so it wasn't just a fluke. 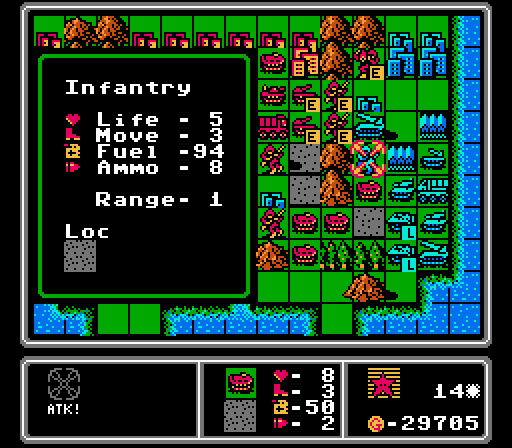 Good news is I have plenty of APCs to throw at the enemy. This one manages to eliminate the damaged infantry. 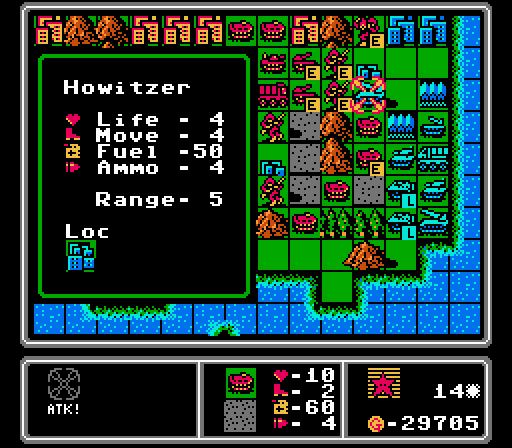  That opens up space for another APC to slip in and get at this rocket. So close!  Oh and we finished capturing that city in the corner.  We've still got twice the army and now more than double the income, too. Really as soon as our rockets get to the front, the map is over. 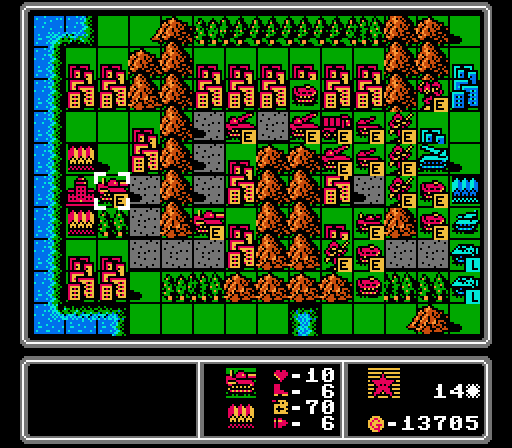 We merge together a couple of the damaged APCs, keep everyone else moving forward, and get another medium tank. 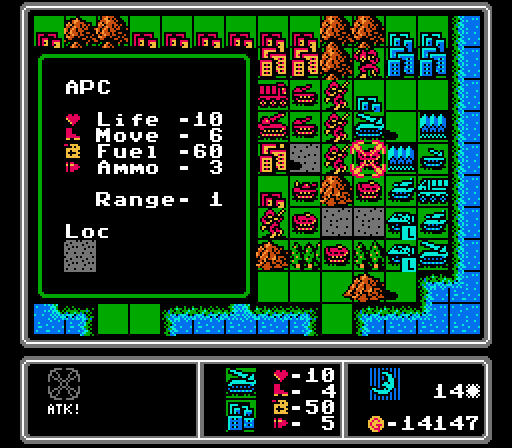 The lower enemy rocket, still at full health, continues its crusade against our APCs, doing six damage this time. 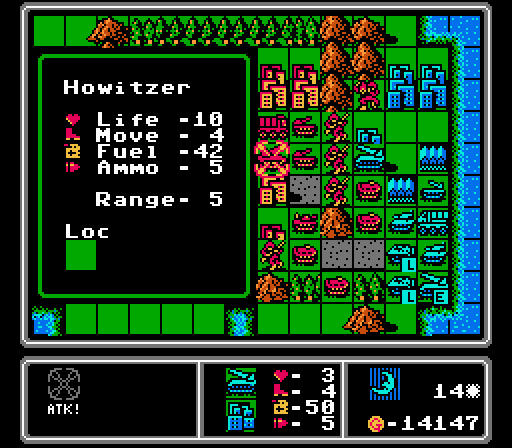 The other rocket tries to get in a pre-emptive strike on one of our rockets, but only does one damage. 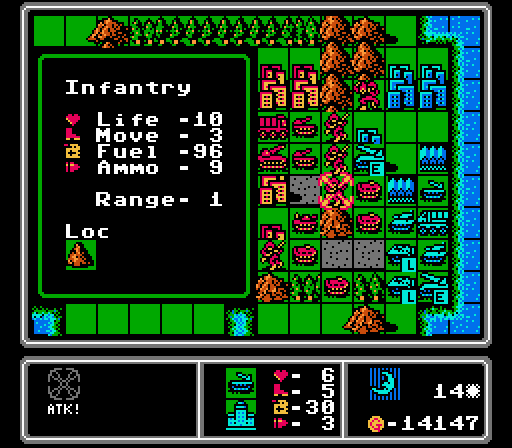 The artillery goes after the nearby infantry instead of one of the APCs, doing only one damage thanks to the defensive bonus from the mountain.  Some APC-on-APC action here, but our damaged unit doesn't even take a single life point away before it explodes. On the bright side, the lower rocket is now exposed.   The AI really doesn't like this infantry unit, going after it with a tank next for a bit more damage.   The other tank moves up to mostly wipe out another APC.   Another enemy APC moves all the way to the top of the map to harass our mech.  Blue Moon once again neglects to build anything. We've got an opportunity to strike at that lower rocket now! Turn 15   First step is finishing off the top rocket with our artillery.  One rocket advances while the other does six damage to this tank. 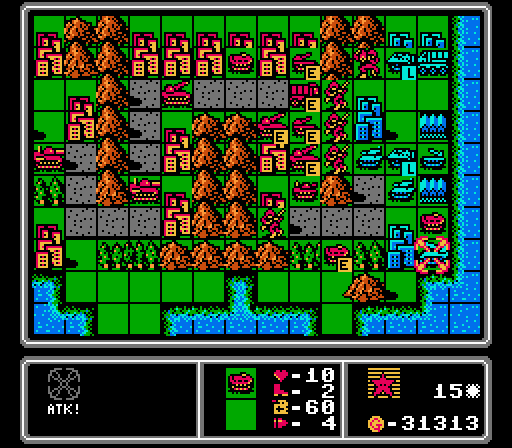 Two more damaged APCs merge together, while a third makes it to the rocket but does just two damage to it. 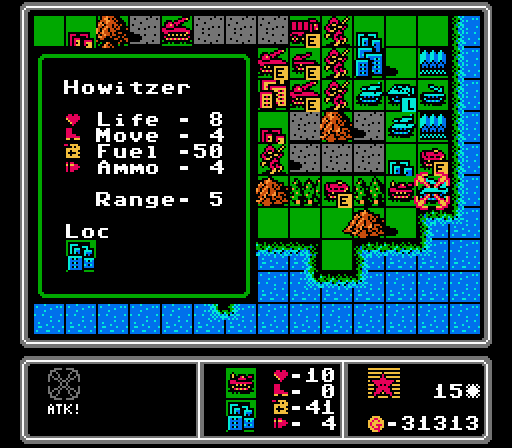 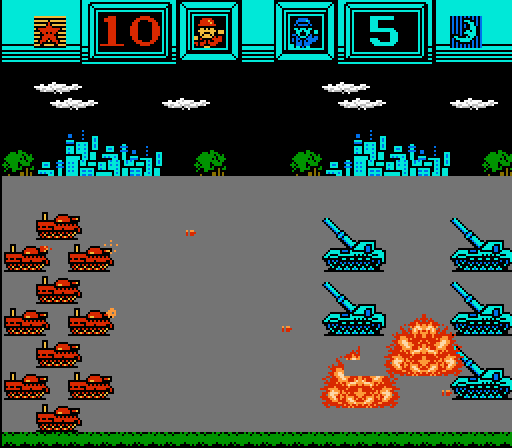 I'm hoping for a little more out of the fully-repaired tank that I finally got back up to the front, but it only does three damage. 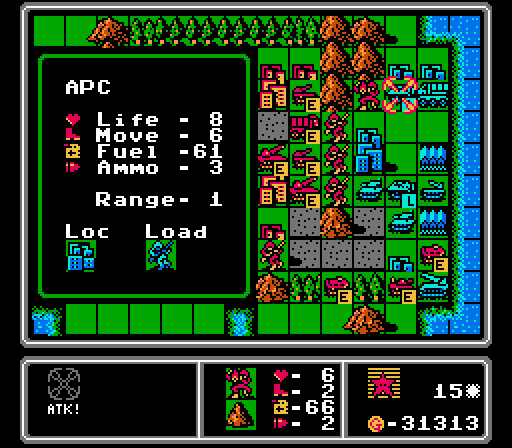  Mechs in later games usually do okay when attacking vehicles so I thought I'd try it out against an APC but instead the mech was cut down. 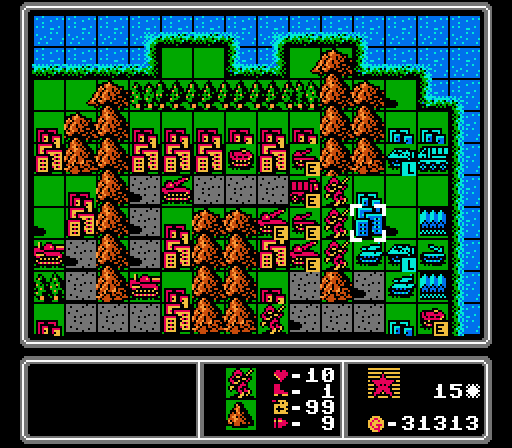 I sent an infantry in to start capturing this city, mostly as a distraction but also to block it as a build point. 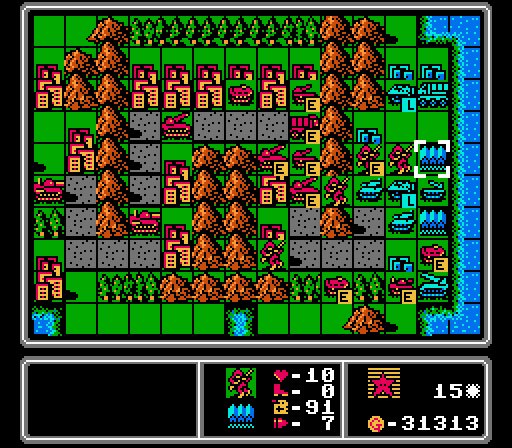 Then I do the same for this base. The bases and the HQ take the same amount of time to capture as cities. 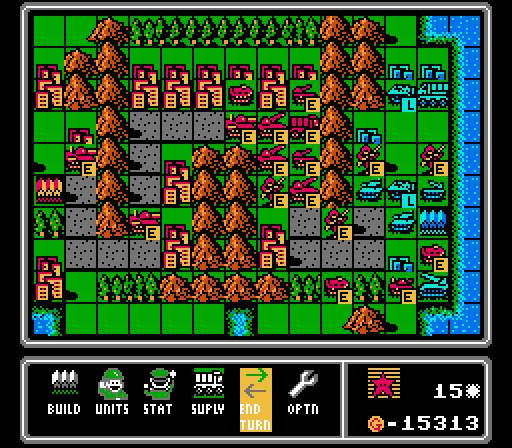 I build another medium tank, but I'm not sure it'll even get to the front in time to see any action. I've also got the supply truck nestled between two artilleries and a rocket, so it'll refill ammo at the start of next turn. I don't really point it out afterwards but you will continue to see the supply truck moving around to alternate which units it's resupplying.  The enemy rocket goes after the infantry that's capturing the upper base, but only does one damage. That's still enough to delay capture by a turn, even if no one else attacks the infantry further.  The artillery targets the other capturing infantry, doing two damage this time.   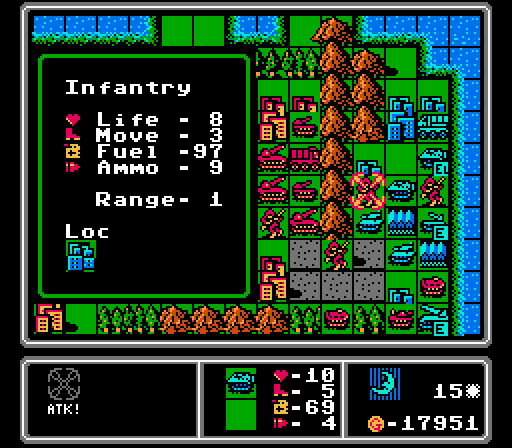 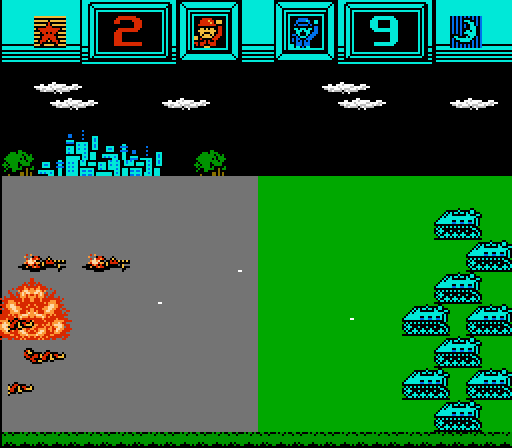 APCs are still solid against infantry, even with defensive bonuses. 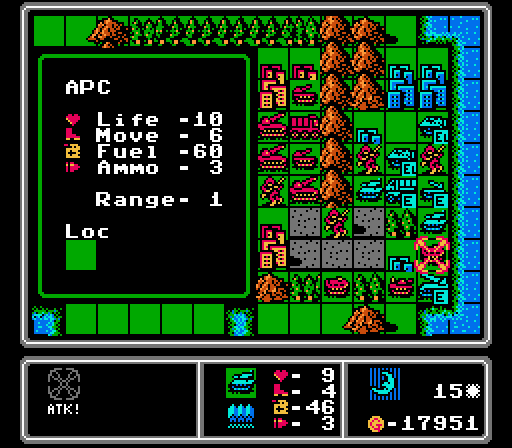 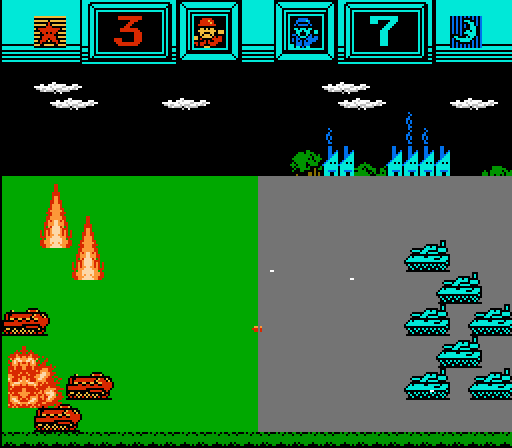 And tanks in turn can handle the APCs still.  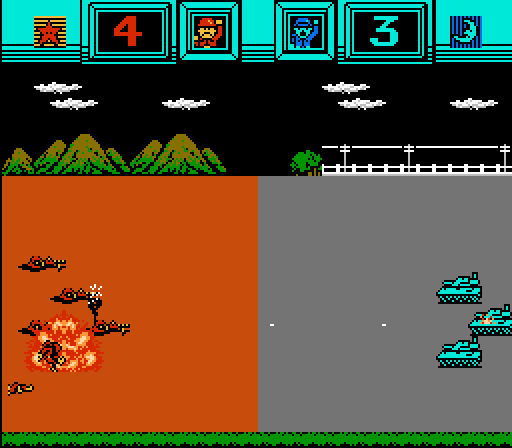 Thankfully the other tank is damaged enough that it can't really do much to the infantry in the mountain here. Also the AI blocked all of its deployment points so for the third straight turn doesn't build anything. Turn 16 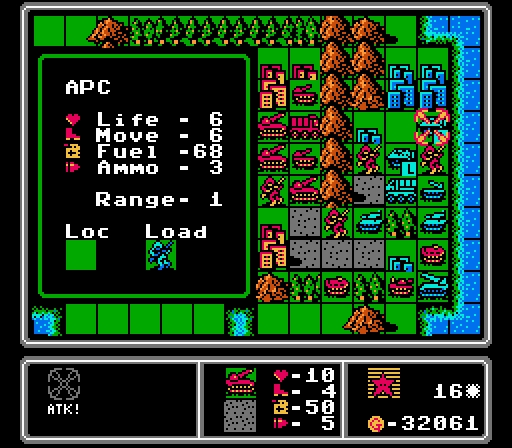 Rockets are also a good counter to unprotected APCs. This one is taken off the board. 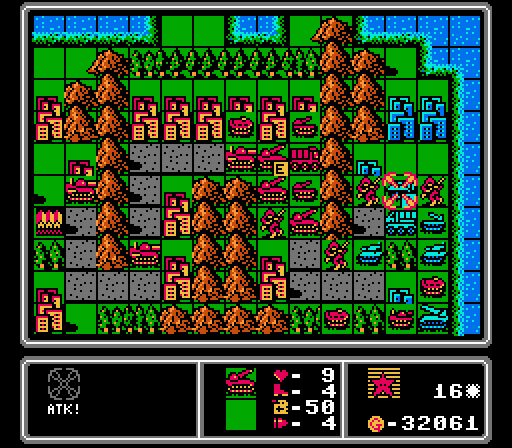 I waffle on where to have the next rocket attack, but eventually settle on the other APC. It only does five damage this time, though. 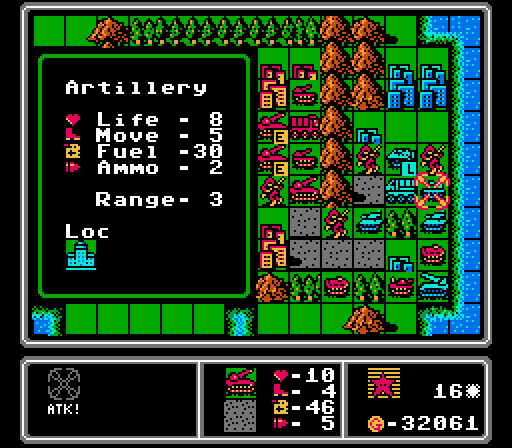 The enemy artillery is almost fully repaired so the last rocket attack knocks another four life off of it.  One of our artilleries is up top getting repaired. The other can only reach this APC so takes a shot at it and is able to destroy it.  The two damaged infantry near the enemy HQ merge together, and our damaged artillery moves down closer to the enemy. Then our tank takes another four life off of the last rocket.  I move the supply truck down, and figure I might as well supply the infantry unit to the right while its there.  Apparently the "fuel" for the infantry unit is actually food. Neat.  The APC here is pretty hurt but it's still able to do another one damage to the rocket.  At this point it was getting late and I forget that I could win by just wiping out the enemy army. I was worried I would lose all my infantry and not be able to capture the HQ, so made a couple more here as well as a couple of APCs to ferry them ahead. And another medium tank for the hell of it.  On to the enemy phase again. The rocket once again harasses the capturing infantry, but only does one damage.  The artillery likewise attacks an infantry, also doing just one damage. 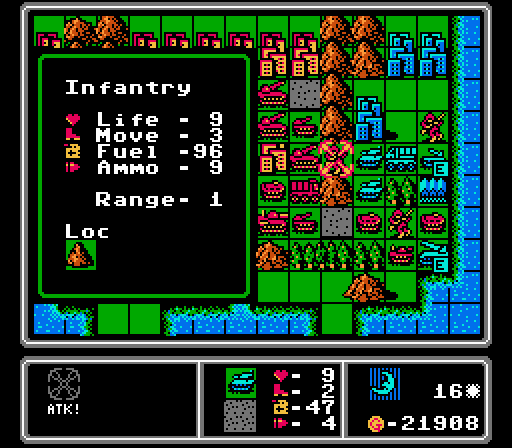 The tank is moderately more successful, doing three damage to the same infantry. 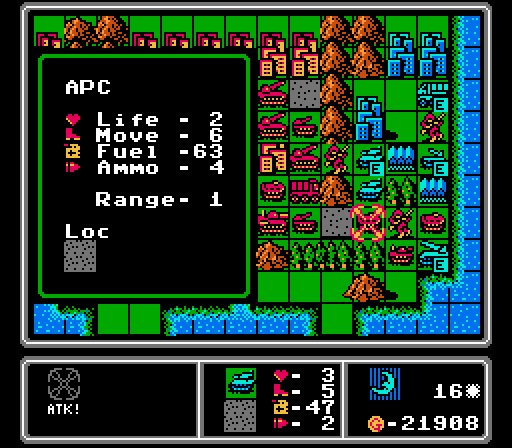 This damaged tank still has enough life left in it to finish off our crippled APC, but that's really all the fight that Blue Moon has left in them today. 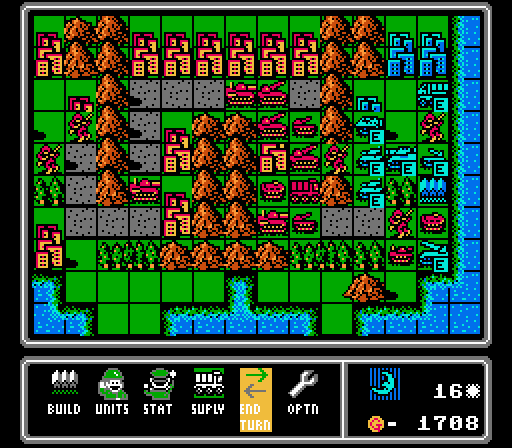 Well they do manage to add a medium tank and an APC, but there are three rockets ready to tear them apart already. Turn 17 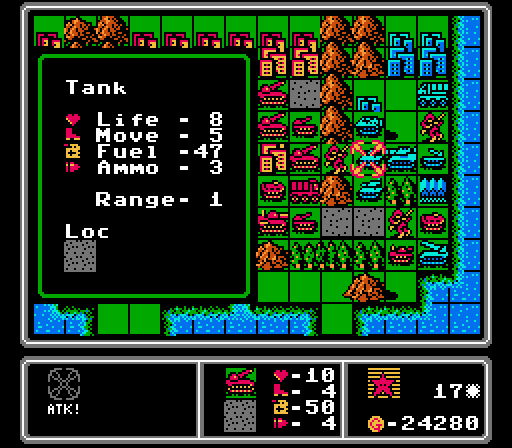 Rocket 1 is just barely unable to get rid of this tank, leaving it with one life.  Rockets 2 and 3 both go after the medium tank, collectively dealing six damage.   One artillery does three damage to this APC, while the other finishes off one of the tanks.  That attack frees up our medium tank to move in and finish off the enemy medium tank before it can even take a turn.   Finally, the rocket is eliminated by our tank, and an APC is able to get in to destroy the last enemy tank.  I sent in an infantry to try and do some damage to the artillery, but it just does nothing again. At least it's blocking a base I suppose.  For some reason I bother to load up the infantry into the APCs back at our HQ.  The enemy artillery is still being a nuisance and does three damage to our medium tank here. But that and an attack by the APC on one of our infantry is all of the attacks on the enemy phase.  I'm sure that new mech will really turn the tides. Turn 18 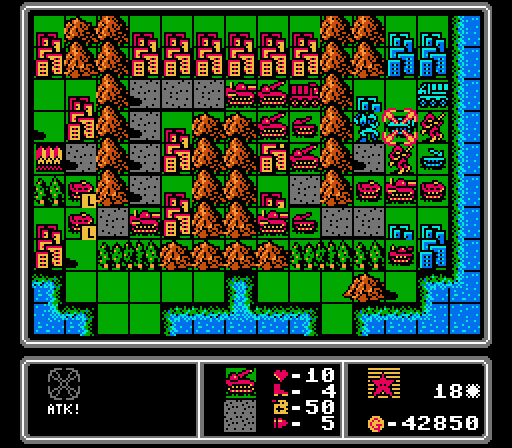 Let's see if we can wrap this map up here. First a rocket gets the APC down to just one life remaining. 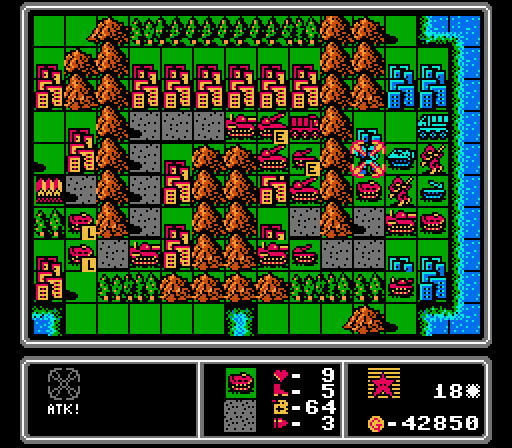 Then the artillery, a rocket, and an APC all team up to take out the mech. 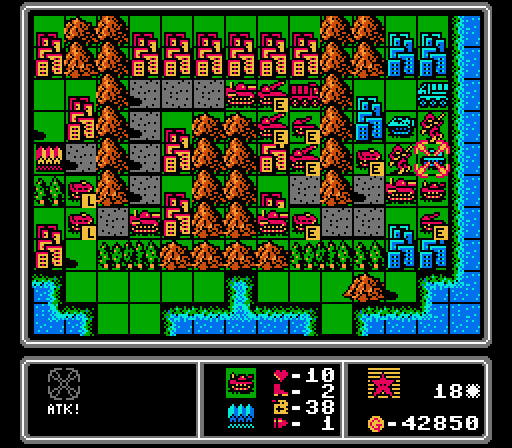 The last rocket strikes the enemy artillery, and after our APC moves out of the way, our tank gets in to finally finish off the pesky artillery.  I send in an infantry to capture the HQ mostly to get it out of the way, but I also just noticed that the animation is different. We aren't really capturing the HQ so much as blowing it up. 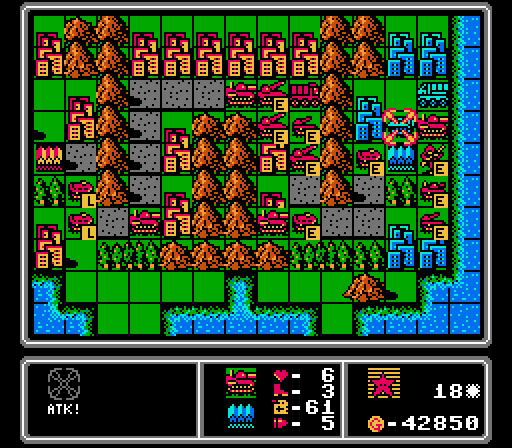 The medium tank gets rid of the APC here, but I've got no one left to go after the supply truck. At least it can't attack us. 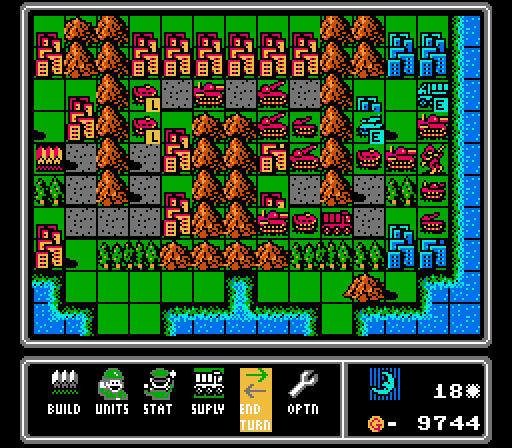 My punishment for being unable to finish the map this turn is getting another tank to play with. Yay. Turn 19  The rockets and artillery are enough to take care of the tank. 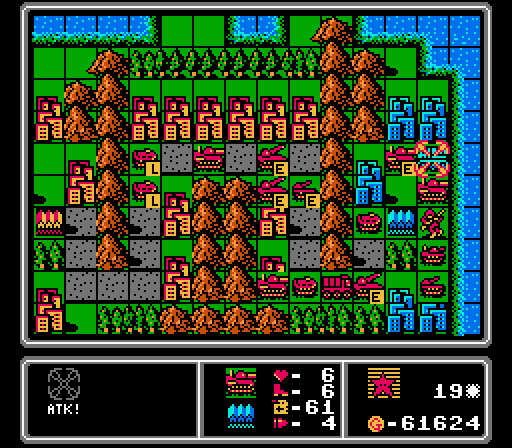 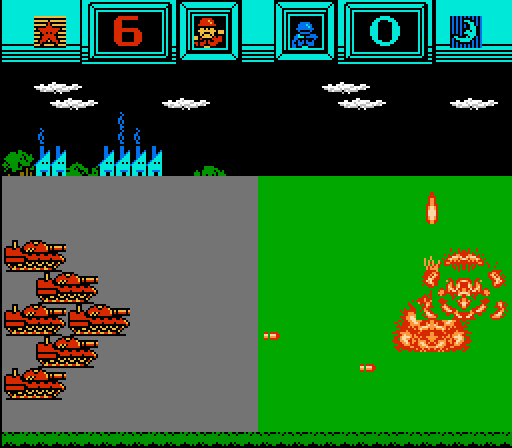 The first medium tank somehow only does seven damage to the supply truck, but luckily I have a second one available.  With that, Blue Moon is officially "Wiped Out", giving the victory to Red Star! Music: Stage Clear  I'm not sure if this animation is celebrating taking the enemy HQ or if everyone is partying back at our HQ.   Music: Battle Results  Finished in 19 turns, which is apparently slightly better than average. Given the new discoveries in the first map here, I suppose I'll take it. We also get to see who the commanders were for each army. 55-year-old Hatabo, who looks something like a Jawa, defeats 35-year-old pirate Jack. We can also see other information like final army and building counts, and how much gold was spent by each player. Oh hey it really is just called "gold". Edit: Blaze Dragon pointed out where Hatabo comes from: Blaze Dragon posted:Hatabo is a reference to Osomatsu-kun, an old manga that got several adaptations. Hatabo is a character there.  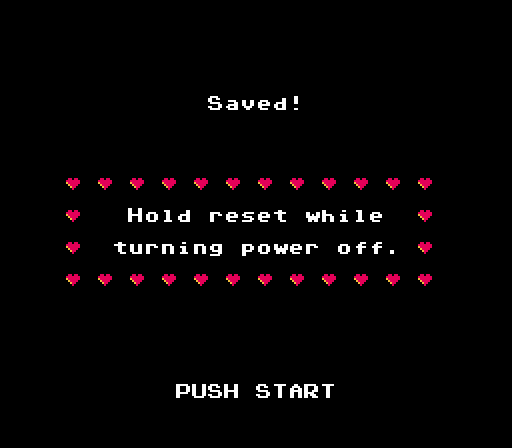 With one map cleared, we get prompted to save, but we don't actually have to power down this time.  Back on the map selection screen, a victory fanfare plays (not part of the playlist I found) as the map darkens and displays the winning army and how many turns were needed to win.  Next time we'll be taking on the "Crater" map. But first we have to decide on the next challenge! Feel free to offer your own ideas for future challenges, but for the next map we'll be doing a Permanent Lock challenge. One unit will be completely unavailable to us next map. Which one, you ask? Why, you get to pick! (Don't hold back!) DKII fucked around with this message at 00:01 on May 28, 2021 |
|
#
?
May 27, 2021 18:57
|
|
|
Hatabo is a reference to Osomatsu-kun, an old manga that got several adaptations. Hatabo is a character there.
|
|
#
?
May 27, 2021 21:05
|
|

|
Oh man, of all the units to ban. I apologize for our cruelty. I honestly didn't expect this many others to target the humble infantry.
|
|
#
?
May 27, 2021 22:39
|
|


|
FoolyCharged posted:Oh man, of all the units to ban. I apologize for our cruelty. I honestly didn't expect this many others to target the humble infantry. You lot are all too clever.
|
|
#
?
May 27, 2021 23:59
|
|
|
FoolyCharged posted:Oh man, of all the units to ban. I apologize for our cruelty. I honestly didn't expect this many others to target the humble infantry. I mean what they seem just useless and crap and just get mauled by everything else and clog up recruitment slots, who needs 'em (  ) )
|
|
#
?
May 28, 2021 03:17
|
|


|
It's actually still Red Star in Japan. It just got renamed outside of Japan because COMMUNISM is banned.
|
|
#
?
May 28, 2021 10:19
|
|
|
 I knew that outcome was a possibility but didn't really think you all would go for it. I'll put up a related bonus update in a minute.
|
|
#
?
May 28, 2021 19:26
|
|
|
Part 3: Unit Overview: Infantry I made up a spreadsheet with all the attack inputs and results on the last map, trying to figure out every unit's attack power against every other unit. Then I found a wiki that had already figured it all out, so I'll use that information to tease out some mechanics updates for you. (Warning that the wiki link will spoil you for this and other games in the series if you browse around.) Infantry   Basic Info: pre:Cost 1000 G Movement 3 Move Type Foot Fuel 99 Ammo 9 Ammo Cost 1 G Range 1 Special Can capture properties pre:Opposing Unit Damage Dealt Damage Taken Infantry 4.5 4.5 Mech 3.5 5.5 Medium Tank 0.5 8.5 Tank 1.5 5.5 APC 2.5 8.5 Rocket 0.5 4.5 Artillery 1.5 4.5 Supply 2.5 N/A The main purpose of the infantry unit is to go out and capture properties, particularly at the start of the map when funds are tight. Later on they can serve as cheap and disposable screening units, blocking off your more vulnerable and/or expensive units from the enemy. They can also cross rivers and mountains at double movement cost, an ability that would be more tactically interesting if they weren't so challenged by combat. Infantry will get pounded by anything they come across, and can only really hurt other cheap units. They are particularly vulnerable to APCs, but are relatively harder to damage by indirect fire. DKII fucked around with this message at 00:20 on Jun 28, 2021 |
|
#
?
May 28, 2021 19:33
|
|
|
Oh, this looks like it's going to be fun. It's super interesting to see the Famicom game when I'm only familiar with the GBA era of the series. Looking forward to seeing where this goes - and good luck beating the next map without infantry...
|
|
#
?
May 28, 2021 22:18
|
|

|
I sense a lot of apcs in your future if you want any property at all. Which given the shared damage is a lot scarier than in past games.cosmicPostman posted:Oh, this looks like it's going to be fun. It's super interesting to see the Famicom game when I'm only familiar with the GBA era of the series. Looking forward to seeing where this goes - and good luck beating the next map without infantry... I think the biggest shocker for me is artillery and rockets getting tank and MD tank level defense. I'm just imagining what grit would do with that kind of power.
|
|
#
?
May 28, 2021 22:24
|
|
|
Here I'm still trying to process APCs and Supply being different units, APCs being able to attack, and the units inside APCs taking damage when the APC does. This is all so weird. I'm weirdly impressed the game actually has a save system, though, when it looks like it's more or less just War Room maps with no in-battle saving. They could've cut a lot of corners by removing the save system and had it be fundamentally the same game, but they didn't. This is really interesting to see, although I definitely don't want to play it myself.
|
|
#
?
May 28, 2021 22:58
|
|
|
Huh, always heard that the old Famicom Wars games had some differences from the Advance Wars series but man, am I glad they changed a fair few of these mechanics up later on. Really neat to see.
|
|
#
?
May 28, 2021 23:52
|
|
|
Part 4: Crater (1 of 2) For the next map's challenge, we will not be allowed to use infantry units. That's going to slow down the start of the map a fair bit, as we'll have to capture with mechs - more expensive and less movement.  The second map is just called "Crater", presumedly for the small lake in the center. In the original Japanese, this map was appparently called "Donut Island", which is much more entertaining.  Typical setup so far, though the lake in the middle means we have both the road route and the forest route to attack/protect. Let's look at the full map:  Hmm. Something not quite right here. Why are all the cities near the Blue Moon HQ still neutral? The map is about even otherwise - the neutral cities along the road on the lower left and in and around the forest are equally far from both HQs. The cities near the Blue Moon HQ are a bit more densely packed and better positioned for defending along either front. But that's not nearly enough to offset the 7000 G income advantage we get from the start, or the several turns we don't have to spend capturing those cities from the start. Really I'm not sure if this map design is a bug or intentional design. I do know, however, that when this map appeared in later games, the cities near the Blue Moon HQ were still left as neutral. So if it was a bug, it's not one they bothered to fix later. I suppose this game does let you choose to play the blue side if you want some extra difficulty here. Maybe you can convince me to replay the asymmetric maps for the other team after we're done here. Turn 1 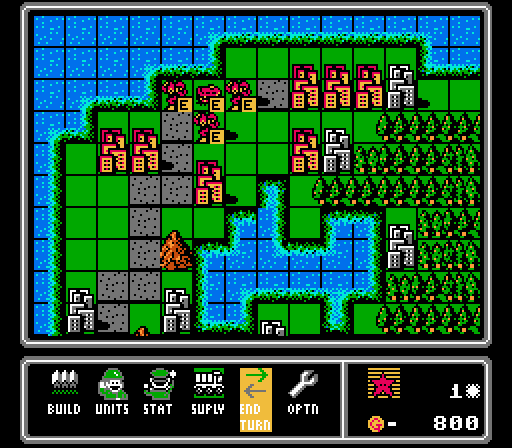 Our start advantage is offset somewhat by being stuck using mechs to capture. There are 23 cities on the map so our goal is to get to 12 (more than half) and then start pressing the advantage from there. We start with seven cities, so need to capture five more. To start, two mechs will capture the two neutral cities to the right, while another is going to get into the APC and head down the road. 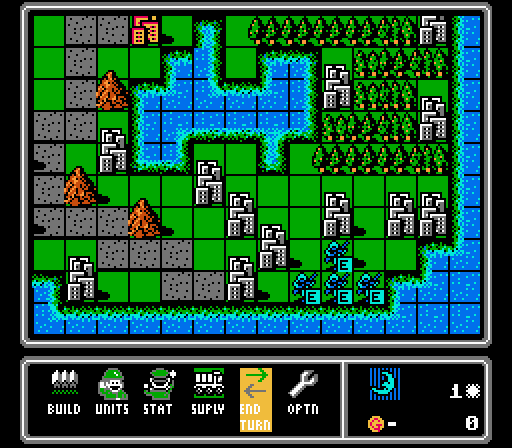 Blue Moon starts with just 4000 G and four deployment spots which happens to perfectly fit four infantry units. Turn 2 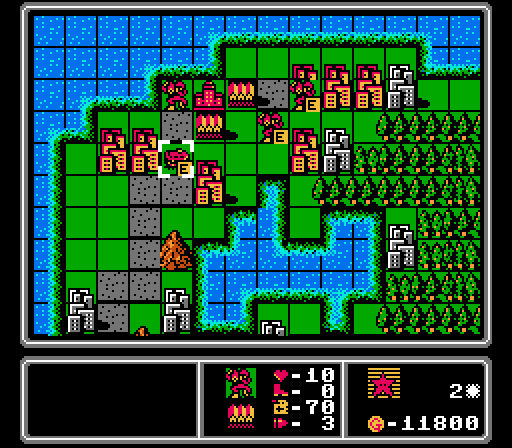 Two mechs head east, the other gets ready to get in the APC.  Like so. 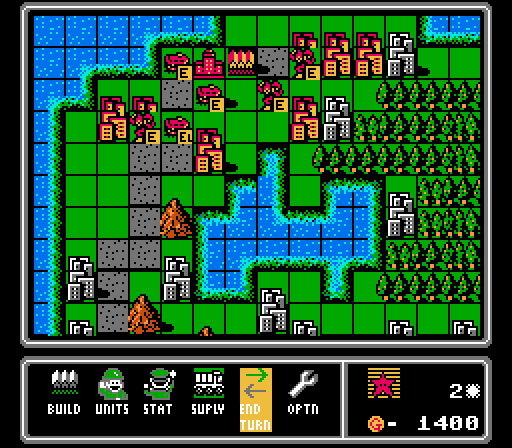 We round out the turn by buying two more APCs and another mech. These will all head south. The mech on the far left was recruited from another base disguised as a city. When this map appears again in later games, that tile is correctly shown as a base instead.  Blue starts capturing, though for some reason it didn't get all four infantry to a city in one turn. There was another one right there for it, too. 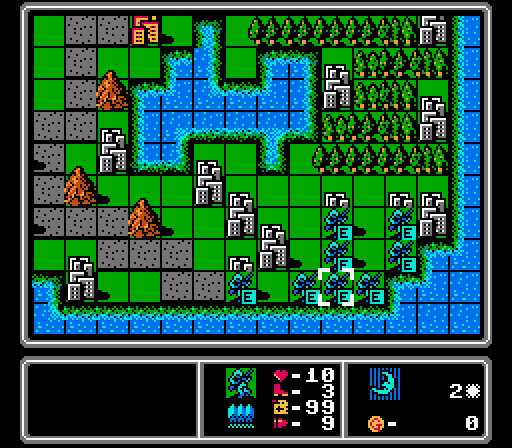 Still just 4000 G so we see another four infantry pop out. Turn 3 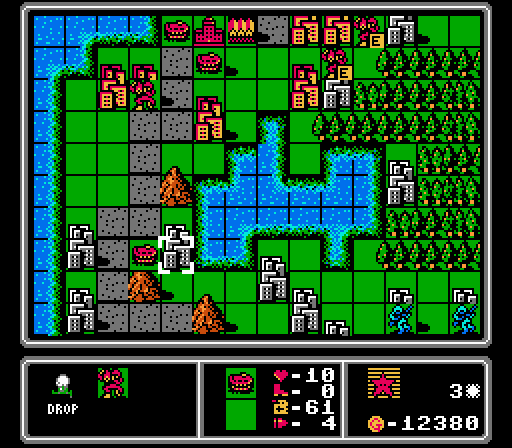 The first two mechs have almost reached their destination now (for the record two infantry would've gotten there this turn). The first APC unloads a mech onto the nearest city along the road. The three cities on the lower left here are the golden triangle - if we get and hold all three of these, we'll have a majority of the cities. 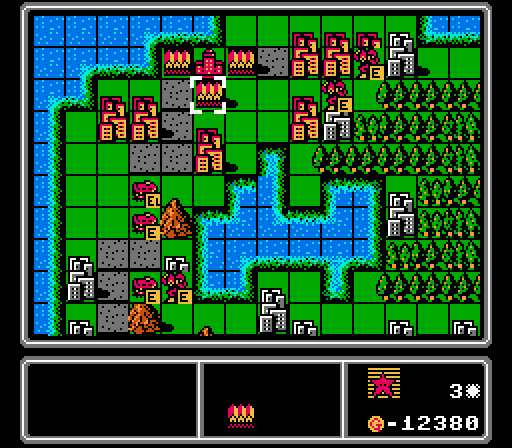 The secondary objective down south is to slow down the enemy infantry as much as possible. As I showed last update, APCs are an excellent hard counter to infantry, so an empty one moves down alongside the newly-loaded one. 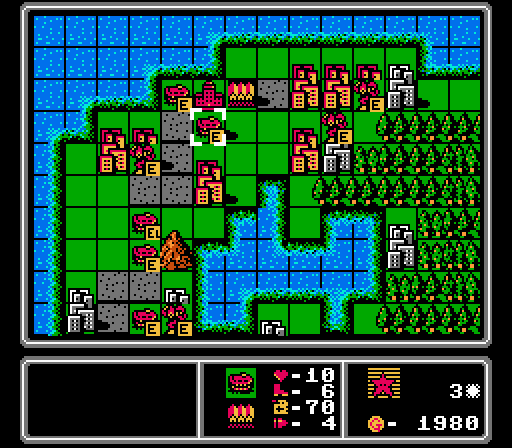 In fact I get two more APCs along with one mech, to continue the strategy.  Blue finishes capturing three cities and starts capturing a couple more, while other infantry head outward from there. No new units recruited this time, so with the 4000 G from this turn and next turn, plus another 3000 G from the new cities next turn, Blue will have 11000 G to play with next turn. Or, what we've gotten every turn so far already. Turn 4 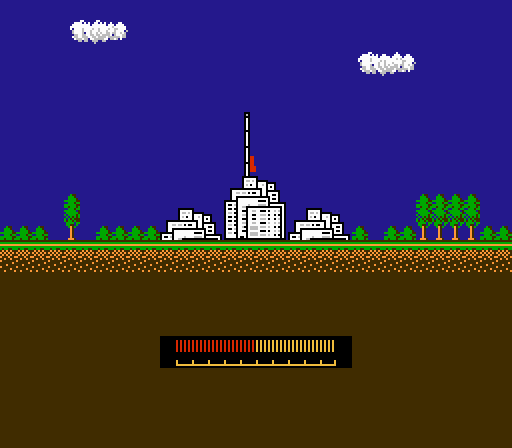 We've got three city captures in progress ourselves now. 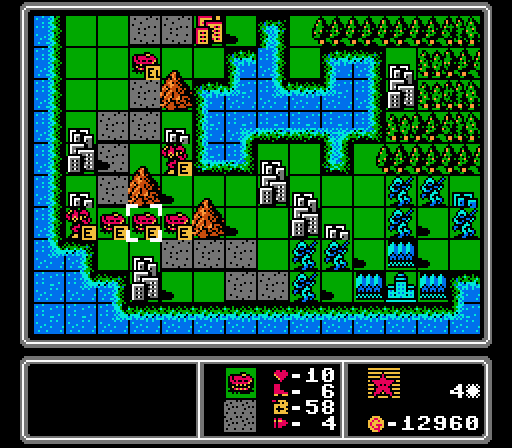 Another mech is in position to start capturing next turn, and I've not got three empty APCs down south that can harass the enemy infantry. 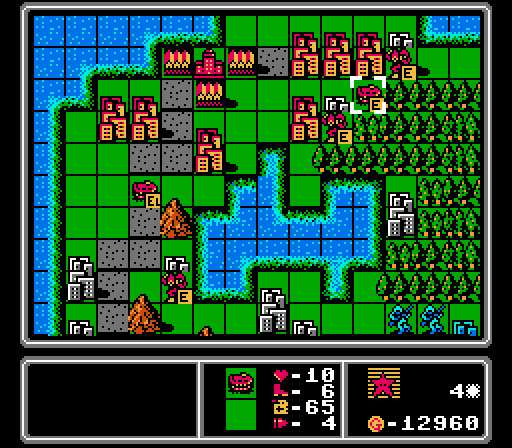 The last empty APC heads east to guard the forest against encroaching infantry. Vehicles like the APC only move half as fast through the forest, but that still means they can move three spaces through the forest. The mechs don't have any penalties in the forest but are still stuck at the max two movement. So the APC here can actually get through the forest better than the mechs can. And will do a much better job harassing the infantry as well. 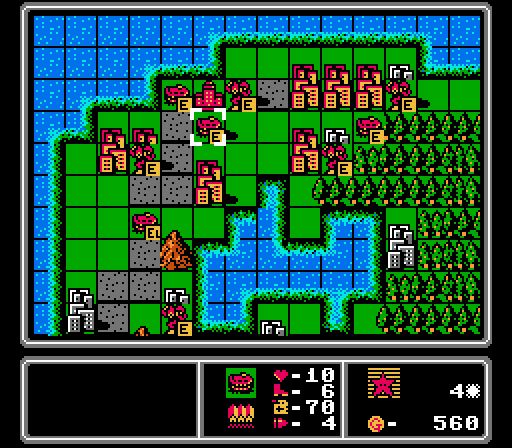 I may have gone overboard here, getting two more APCs and two more mechs. But all I know that's coming so far is eight infantry. 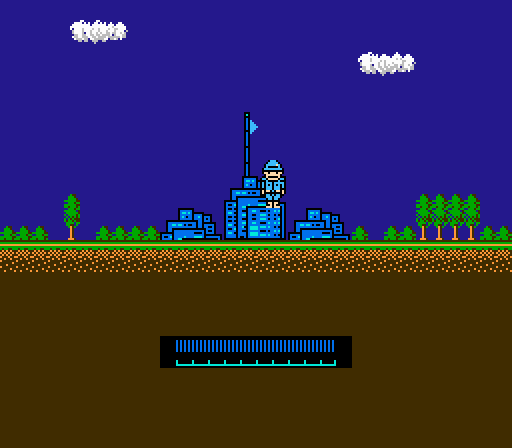  Blue gets two more cities and starts capturing two more, with other infantry continuing to advance towards more cities. 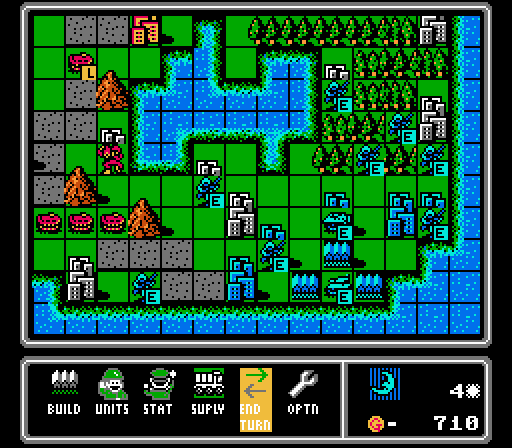 That tank there is going to make life hell for our APCs, but not before we shred their infantry first. Turn 5 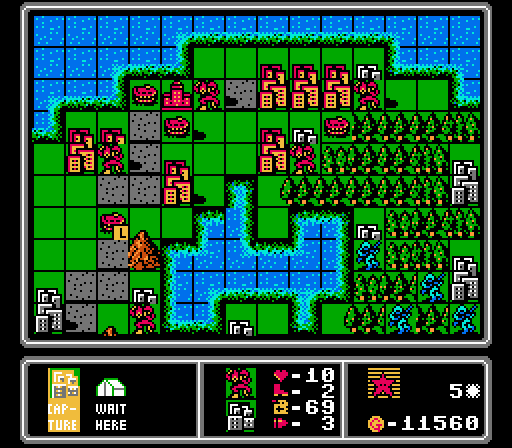  Before Blue can even catch up to our initial city advantage, we add three more to our total. 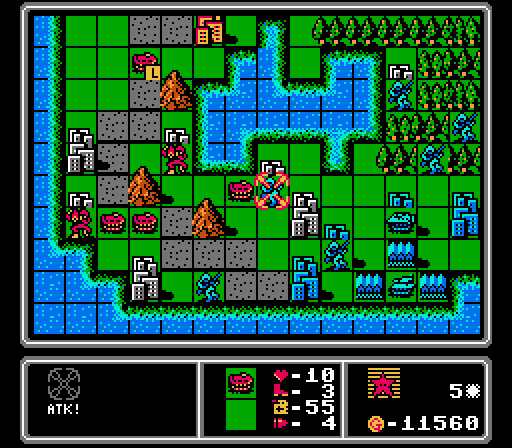 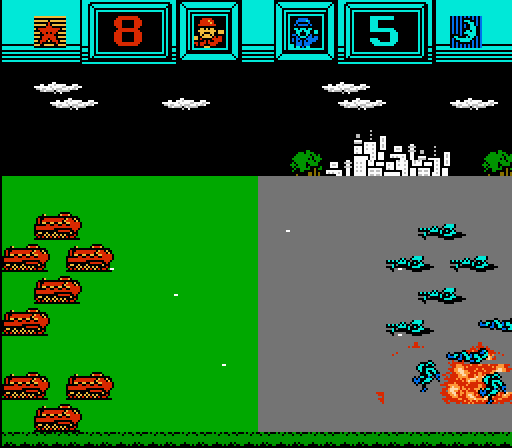 One of the APCs down south starts harassing a capturing infantry, delaying capture by a turn.  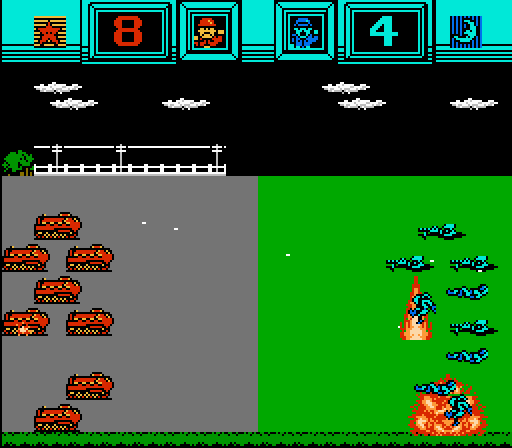 We get a slightly better result by intercepting this infantry before it can even reach the city. That APC is now in range of the enemy tank; it would've been better if I'd attacked from above instead. 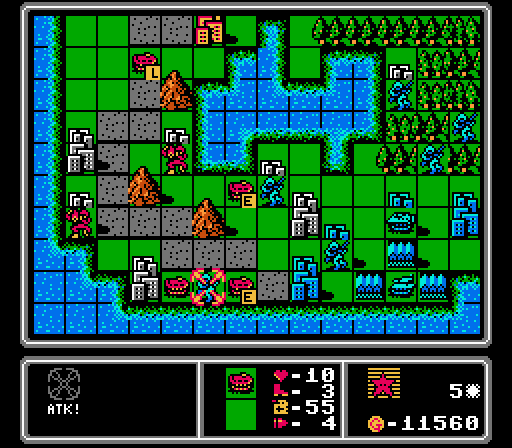 The third APC is able to finish off that infantry entirely. 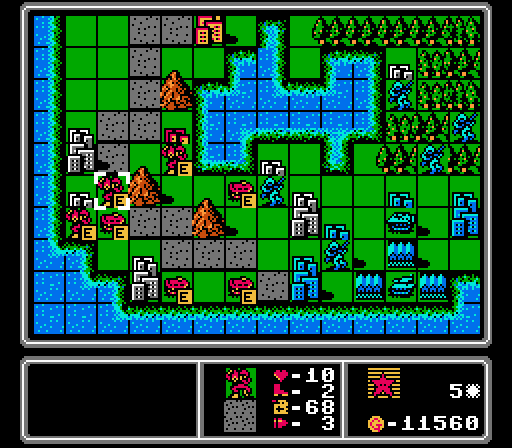 The second member of the golden triangle is now halfway captured, while the third will get started next turn with the mech that just got dropped off by the APC. 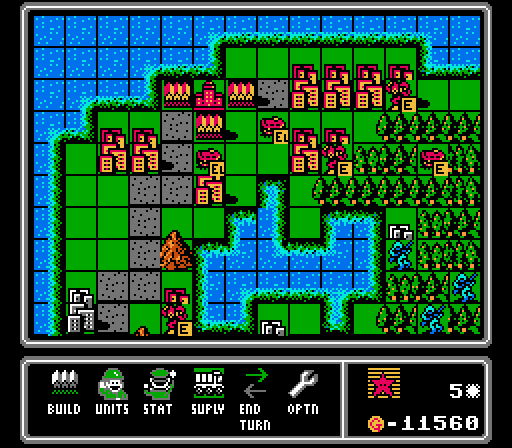 Up north we have one APC headed deeper into the forest, and two more loaded up with mechs right behind it. 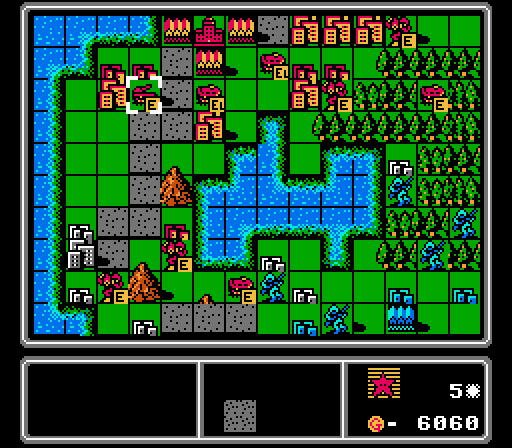 To counter the tank, we throw out an artillery. 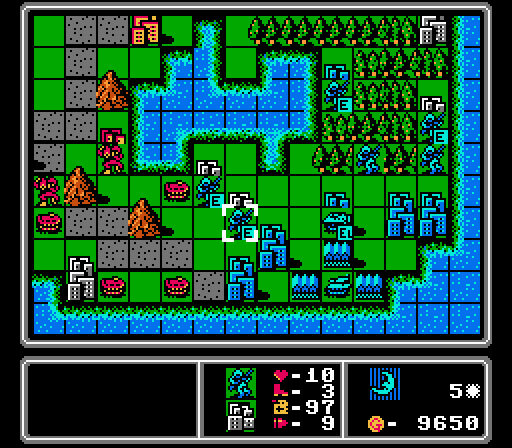 Blue is able to capture one city in the forest and start on another one. The infantry weakened by the APC continues its capture attempt but is only 75% of the way there. He's joined by another infantry starting a capture just below and to the right. 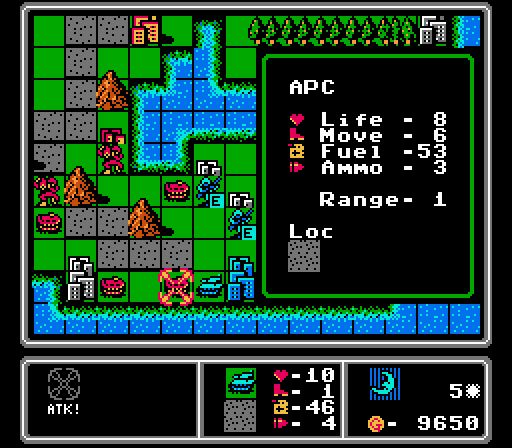 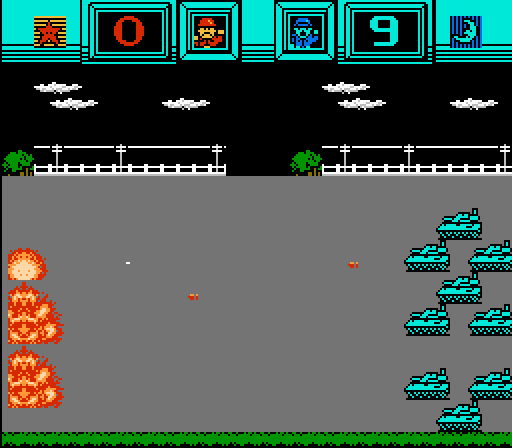 The tank is a hard counter to my APCs and shows why here. If I'd just attacked from a different position it would've been able to take another shot at an infantry first. Oh well. 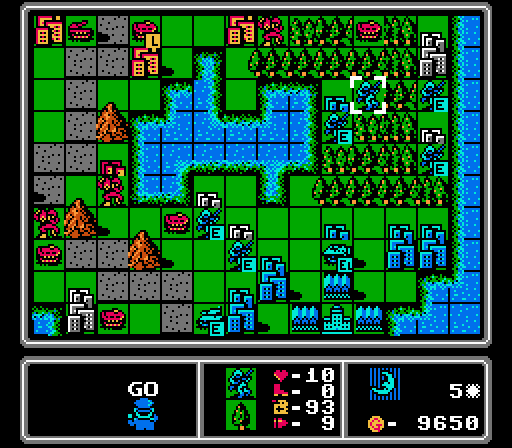 Two infantry have almost finished crossing the forest. We'll have to put a stop to that next turn. 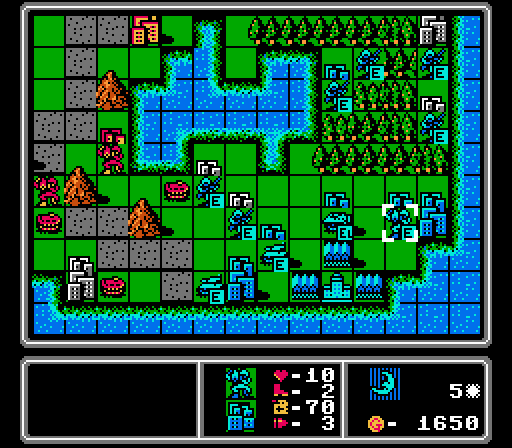 With all the APCs I have nearby, seeing another tank is no surprise. I'm not sure why they added in a mech though. You can see that the tank was recruited from another shadow-base hiding as a city; the Blue Moon territory actually has three of those. Turn 6  First action is to finish off one capture and start another. 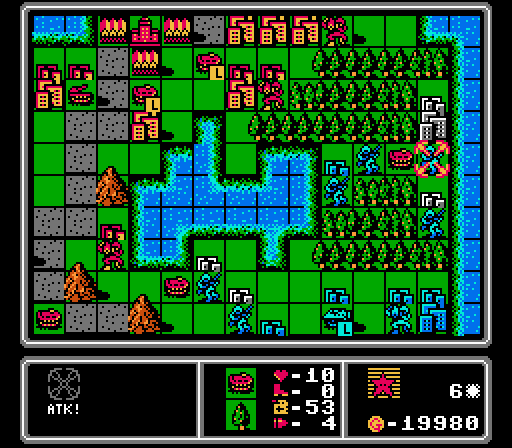 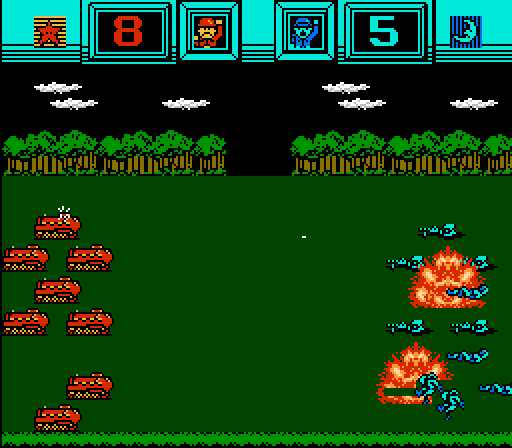 The lead APC in the forest makes sure that the infantry is going to take longer to try and capture that city. I'm not quite sure but it looks like the forest gives the same defensive bonuses as a city. Quick tangent on these defensive bonuses: In later games, each type of terrain will display a certain number of stars. Then for each star, a unit will see a 10% damage reduction for any attacks against it in that terrain. So a city for example would have three stars, and all attacks against a unit in a city would do 30% less damage. That reduction is applied after the initial damage calculation and then any fractions afterward get randomly rounded up or down from there. So sometimes you see a big effect, sometimes not so much. But in this case, we have a full-health APC that normally does 8-9 damage to an infantry. On the forest, only doing five damage indicates about a 30% damage reduction. Cities have a similar defensive bonus (about 30%, as far as I can tell). This game never tells you anything about terrain, you just have to learn it from observation and getting wrecked the first few times you attack a unit sitting on a city. 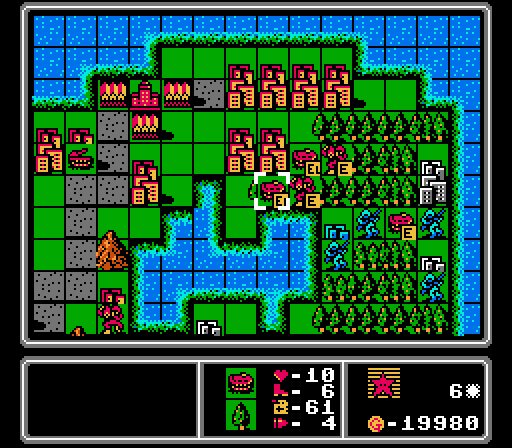 Anyway, having every forest tile give as strong a boost as a city is going to make fighting in here pretty drawn out. I've got two mechs and two loaded APCs on the way to help. 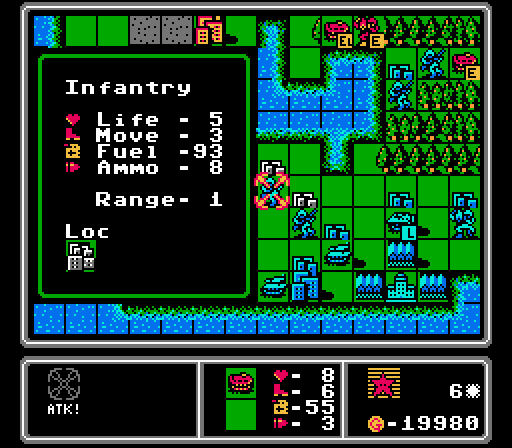  Down south we're able to finish off the wounded infantry with our APC, keeping that city neutral for a little while longer.   I'm basically sacrificing this APC to delay the enemy from capturing this city for another turn. Probably not a great trade.  The last APC retreats and loads up a mech. Maybe we can steal another city.    Blue continues its capturing efforts, gaining another city in the forest. Blue now finally has seven cities, or the same amount we started with on the first turn.  Well that's one APC down.  There's the other. We'll have to counter those tanks soon.  Good on this infantry, making a solo run into our territory. 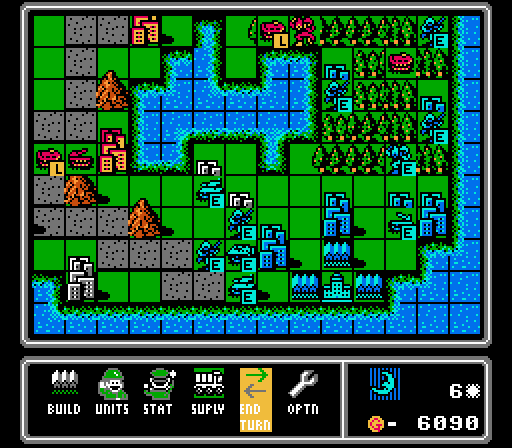 The enemy APC heads left and unloads its infantry. The mech moves up into the forest. And an artillery is built. Nothing too daunting. Turn 7  We start off by finishing up the capture of the last city in the golden triangle. We've now got the initial 12 cities we were pursuing. 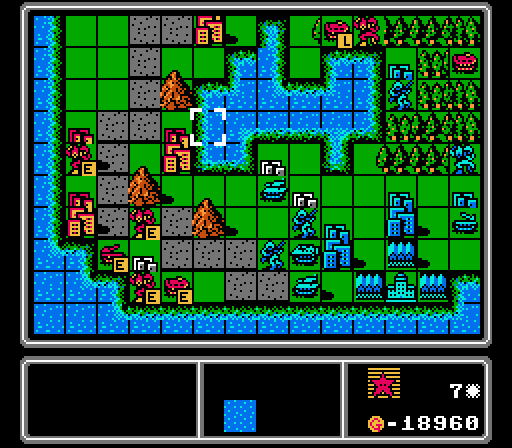 The last APC in this corner unloads a mech onto another neutral city. Neither tank can reach it but the enemy APC sure can. 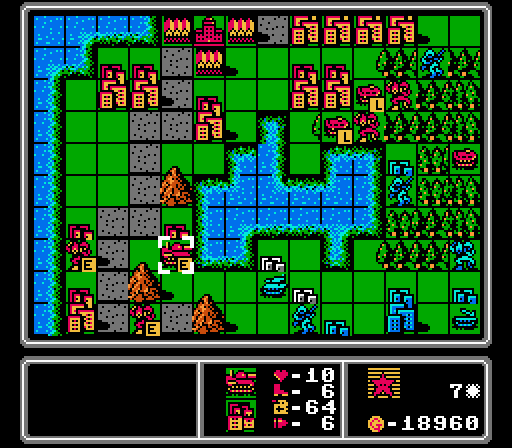 Whatever happens, we now have a medium tank in range to do some damage next turn. 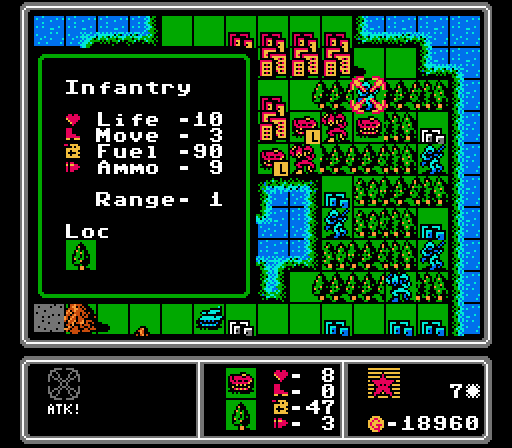 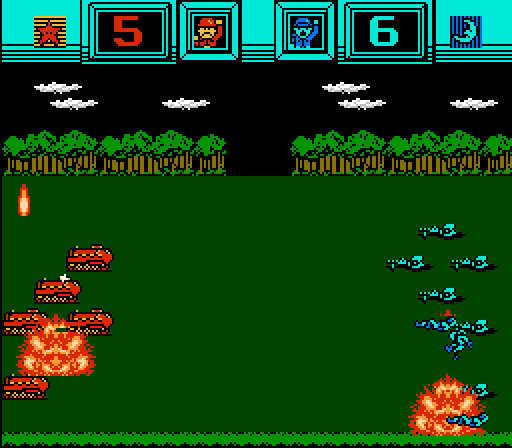 Up in the forest, we have an APC soften up the stupidly brave infantry. 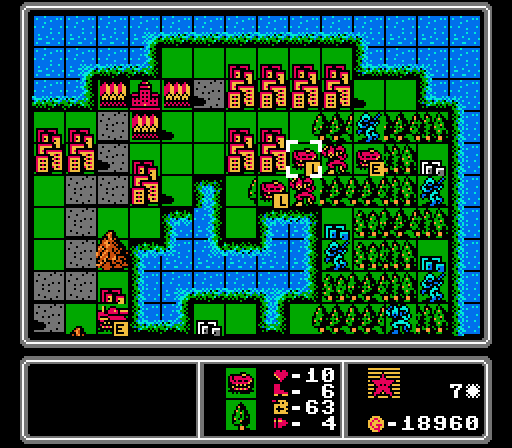 It's a little subtle, but can you spot the problem here? I move up a loaded APC into the forest and try to spit out the mech it's carrying. One problem - APCs apparently cannot unload into or from a forest tile. 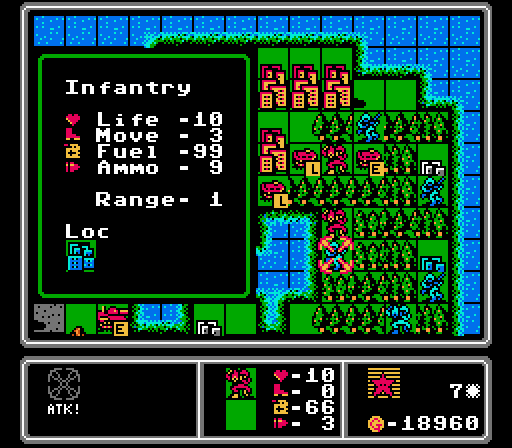  While I contemplate that unfortunate newly-discovered gameplay quirk, we send a mech up to harass this infantry. The infantry is just going to heal up most of the damage next turn so there wasn't really much point to this attack.  Ok, we wasted a bit of time loading up those APCs and then just dumping the mechs back out again. Oh well.   Anyway, we have a loose mech go work over this infantry again.  Well, that turn could've gone better. How about a second medium tank to make us feel better? 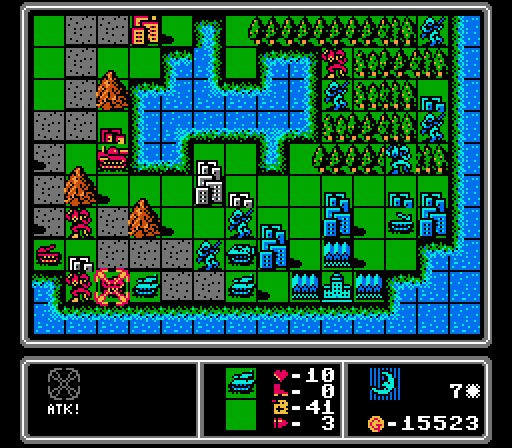 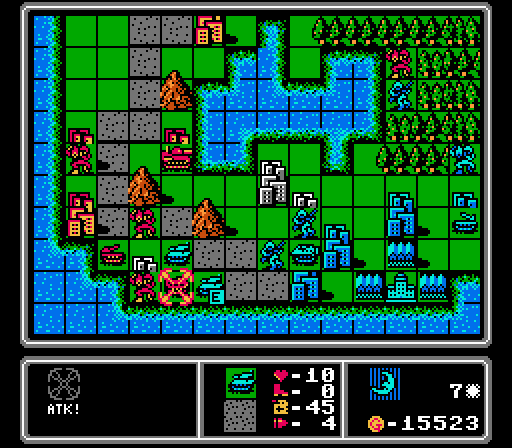 The APC here doesn't survive and frankly doesn't even bother the tanks much, but it does soak up both tank attacks and draw them into range of our artillery and medium tank. Sacrificing APCs as bait is a time-honored Advance Wars tradition, I guess I'm just giving it a little homage here.  The highlighted city gets captured, with a couple other captures still in progress. The one on the upper-right is at 50% but will still take two more turns, if we let it last that long.  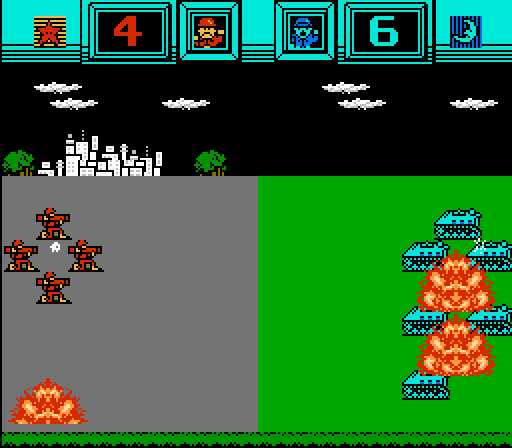 The enemy APC takes a big chunk out of our capturing mech. APCs actually do more damage to mechs than to infantry, go figure. 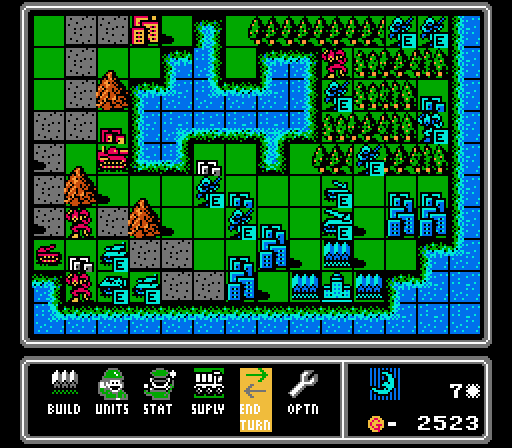 After some more moving around, Blue Moon finally puts out a threat. We've got our first enemy rocket. To Be Continued...
|
|
#
?
Jun 4, 2021 02:38
|
|
|
A map that gives you so much advantage is definitely weird to see, as is the fact that you get to basically choose Easy or Hard Mode in it. I'd be interested in seeing how the latter goes after the proper run is done.
|
|
#
?
Jun 4, 2021 04:12
|
|
|
Blue Moon Unlock Units run for this map some time later, please.
|
|
#
?
Jun 4, 2021 13:28
|
|

|
NHO posted:Blue Moon Unlock Units run for this map some time later, please. That actually wouldn't be much of an additional challenge, since I wouldn't be able to afford much until after Red would be able to build it anyway. Also it'd be like 20 turns of defensive fighting followed by slowly crawling forward. Maybe I'll do it at a higher summary level instead. Anyway we have a long way to go first.
|
|
#
?
Jun 4, 2021 15:51
|
|
|
Part 5 - Crater (2 of 2) Where were we? Oh right, a rocket at the enemy base. Fun fun. Turn 8 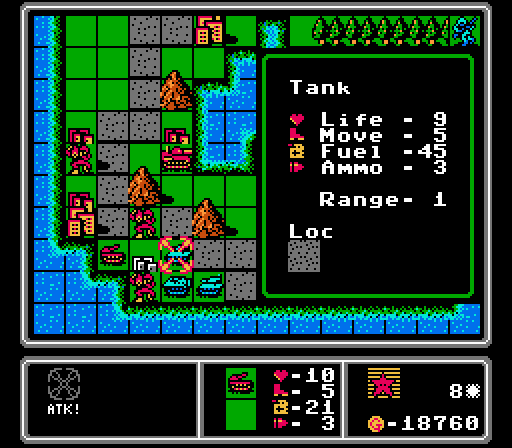 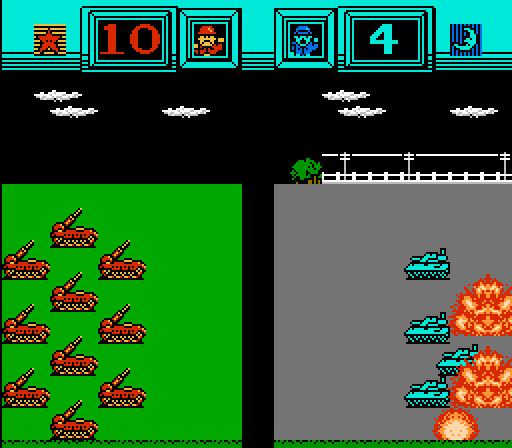 First our artillery takes a big chunk out of this tank. 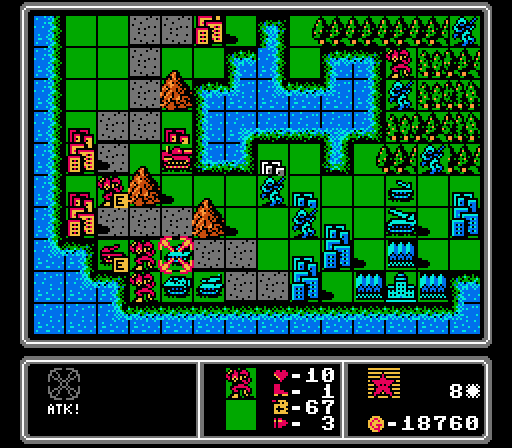 Let's see if the mech is any better at combat than the infantry, shall we? 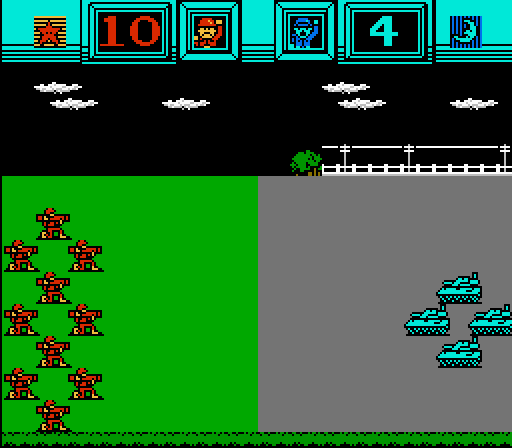 That's a pretty great result, actually. Not only finished off the tank, but also only took one damage in return.  With one tank down, we bring our first medium tank down to wipe out this APC. I'm targeting the APC first because it will do more damage to our mechs.  The 4-life mech on the lower-left city starts capturing. I'm not sure it'll actually live through the enemy phase, but I didn't really have anything better for it to do, anyway.  Looking a bit better at the roadside front now. Especially after we move the second medium tank down there.  I'm not really sure how to press ahead in the forest. One APC just stops in the middle of the map while a damaged one finishes off the enemy infantry here. 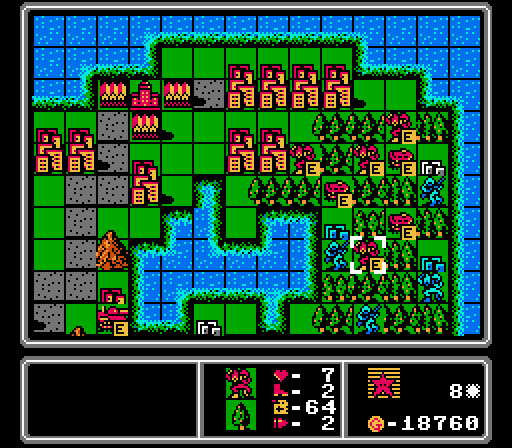 Attacking the infantry on the city with this mech would be pointless again, so everyone else just kind of slowly shuffles forward. 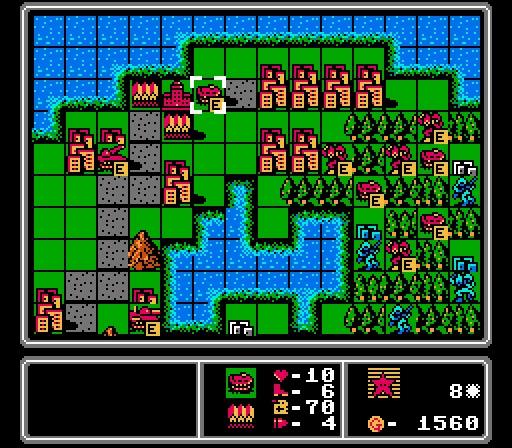 We wrap up the turn by getting a rocket of our own to send down the road, and another APC to hold the line in the woods. 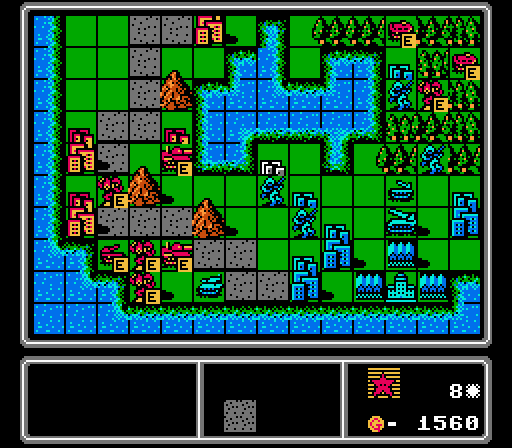 The state of the world at the end of the player phase. Can you spot the mistake? 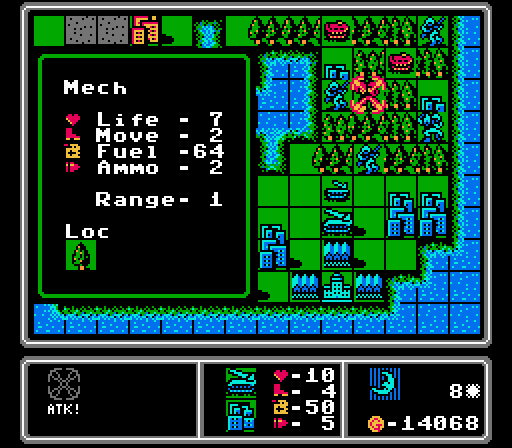 Yeah that mech is in range of the enemy rocket.  Luckily the forest and the rocket's relative weakness in attacking foot-soldiers combine to limit the damage. But still a pointless exposure there.  The enemy mech moves off of the nearby city and finishes off our mech.  Blue finally captures the last city near its HQ. The city on the far upper-right here is now 75% captured (the infantry has only 5 life).   The tank moves up to attack the mech, who barely survives.  The artillery and rocket don't move, but we do get another tank and APC to play with later. Turn 9  We finally get around to removing this infantry. I absolutely did not do this first only because I was afraid of forgetting again, no way.  Merging together these two mechs gets me back one at full health that can resume capturing next turn.   Our artillery goes after the remaining tank but can't quite kill it. 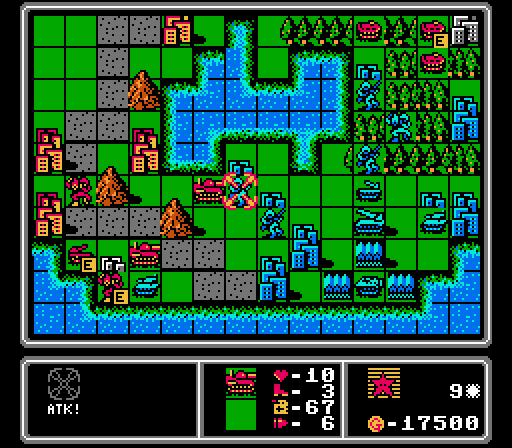 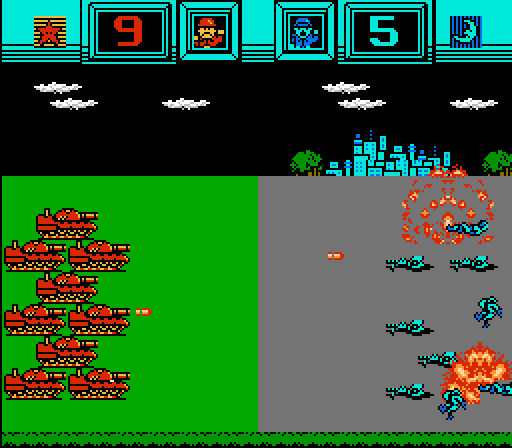 While I decide if it's worth wasting an attack from a medium tank on finishing off an almost-dead tank, our new arrival goes after an infantry instead. I checked about seven times to make sure it was out of range of the rocket first this time! 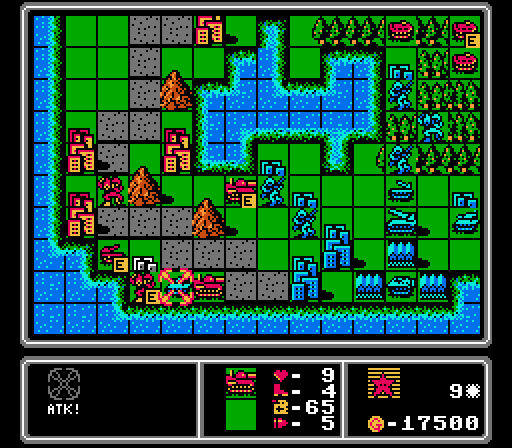 We can kill two birds with one medium tank with this attack. Not only is the tank gone, but the enemy APC can't reach our capturing mech, either. 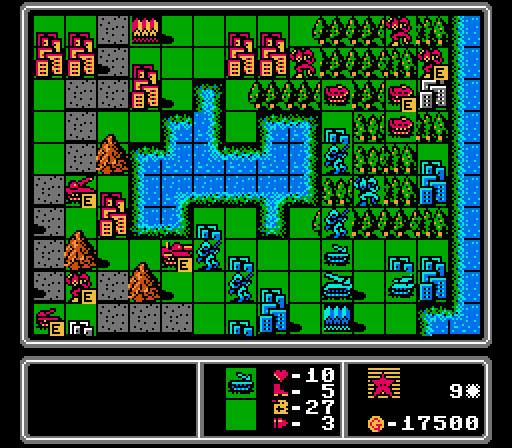 I can't do much about the city on the lake right now, since it's well-covered by the rocket. But I can get that upper-right city on our side soon. 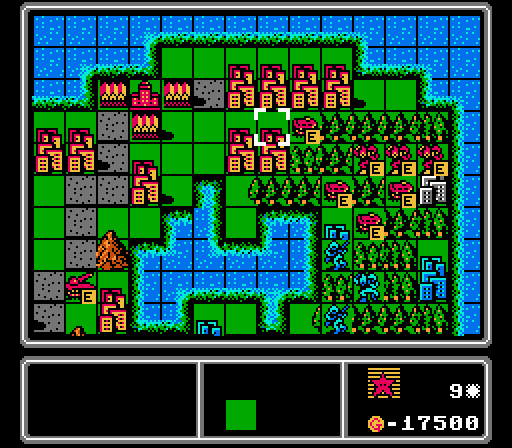 The forest crew here is mostly just bait for Blue reinforcements, to make life easier on the road crew. 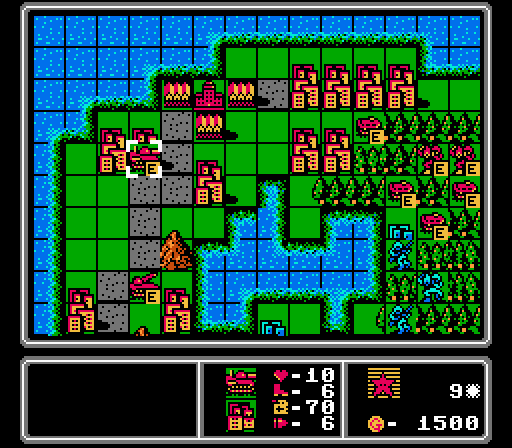 Rule #1 of Famicom Wars - you can never have too many medium tanks. 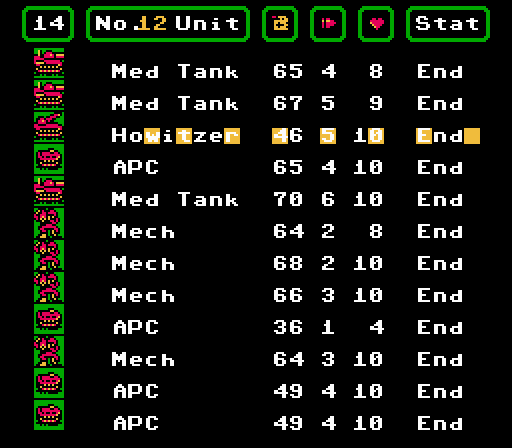 We've got a good-sized army now and only one of the APCs has taken significant damage.  Our initial advantage is down to just three cities, but those two neutral cities will be ours soon.  No attacks from Blue Moon this turn, since we didn't leave them an opening this time. Of the movements, note in particular the artillery and rocket moving all the way to the right side of the map. That rocket is now covering the neutral city on the upper-right that we want to capture. 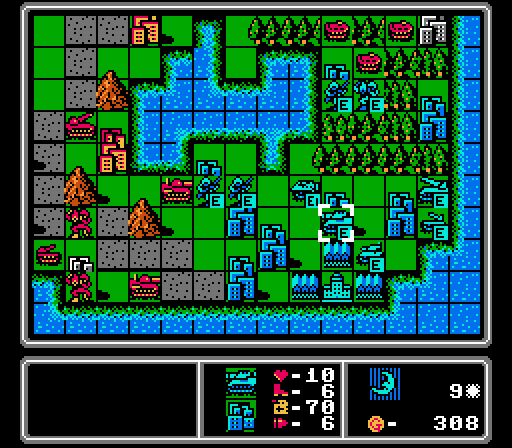 Oh and we now have an enemy medium tank to handle. Turn 10 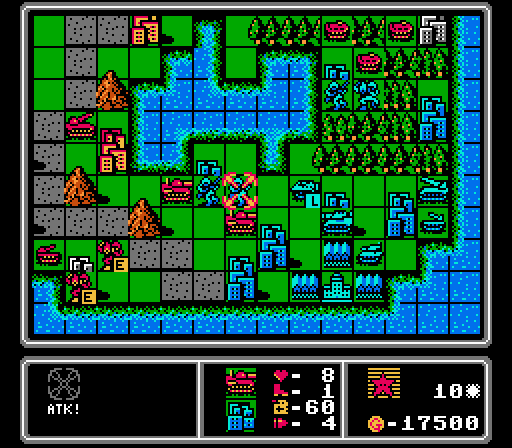 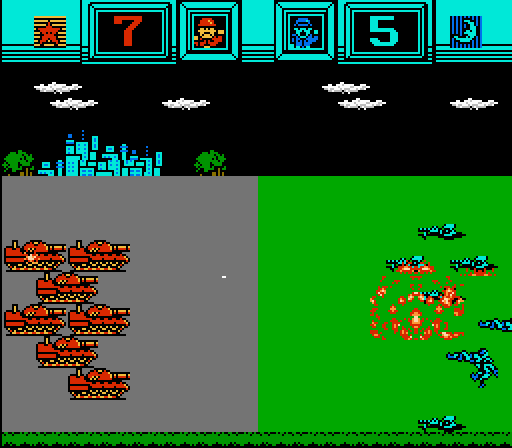 I get a little aggressive here, moving a medium tank onto a blue city to attack an unprotected infantry. I kind of forget that our unit wasn't at full health, but it'll be okay. 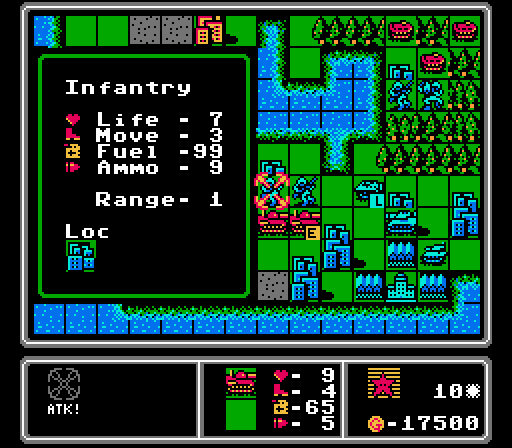 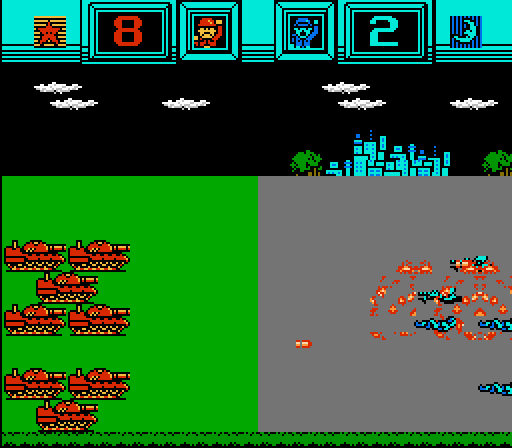 The other medium tank picks on the other infantry, with somewhat better results.  I spent way too much time figuring out where to best place our indirect units here. In the end I settled on exposing the rocket to infantry fire (the damaged infantry units won't be able to hurt it) and keeping the artillery just out of range of the enemy APC and medium tank.  A mech moves down to start capturing this city, and at this point I realize that it's going to get hit by the rocket.   The enemy rocket is already going to hit us so might as well move the APC down to work over the enemy mech. 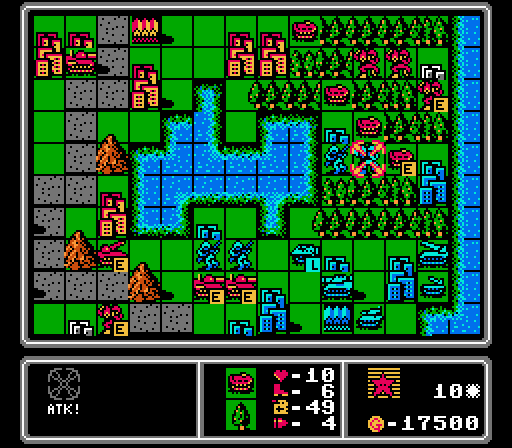 Another APC then finishes it off. 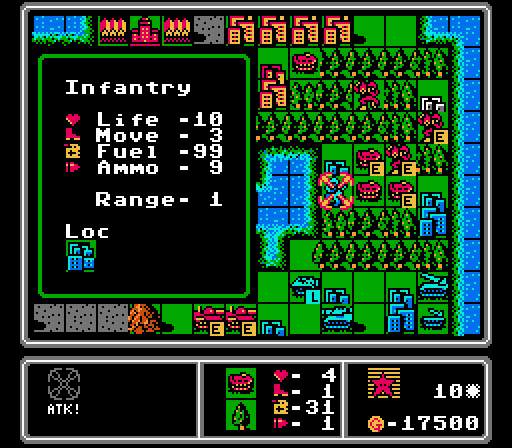 I don't really know why I did this attack here, nothing good can happen from it. Our already-weak APC just gets a little weaker. 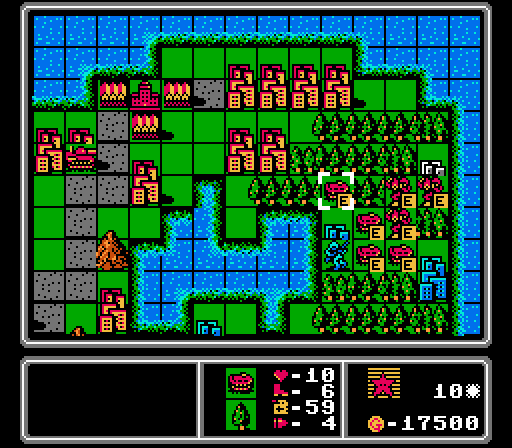 This formation probably looks more aggressive than it really is. We can't advance any further or the heavy enemy units will shred us. 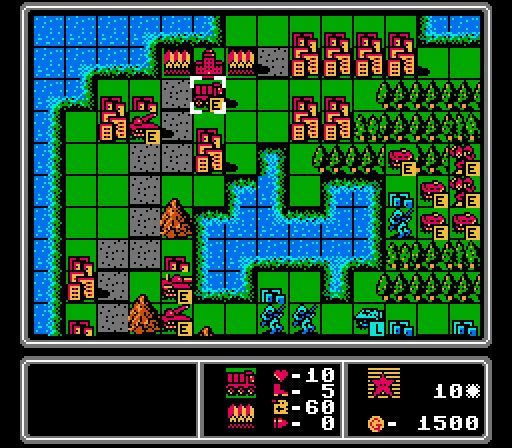 Another rocket will come in handy along the road, and we add in a supply to keep our indirect units full on ammo.  I'm not sure what the AI's targeting algorithm is, but it chooses to destroy this APC instead of trying to weaken our capturing mech. That's probably a decent trade for us.  The enemy medium tank has enough movement to get all the way to the troublesome lake city, and suddenly I realize I have nothing up there that can counter it. Needless to say the targeted APC here is wiped out.   That's not a terrible development, really, though. The only unit left that can really hurt us down by the enemy HQ is now this lonely tank.  The two infantry merged together, the APC moved up to block the rocket but didn't attack, and the artillery actually moved up into the forest. The enemy HQ is actually wide open but I won't be able to take advantage before it gets reinforced.  Blue doesn't have enough funds for a big unit so we get a tank and a mech instead. Turn 11   Our artillery can only reach the APC, so might as well take the shot. 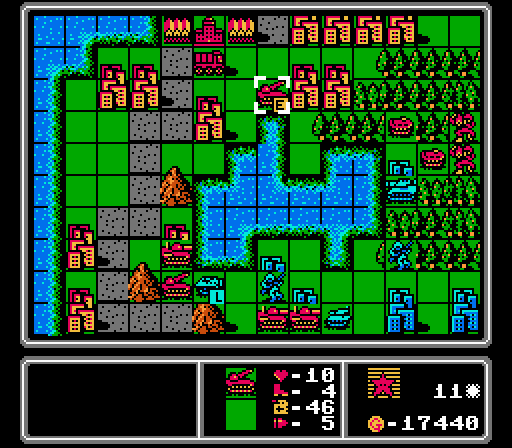 Worried about the medium tank, I decide our second rocket can be more useful in the forest. 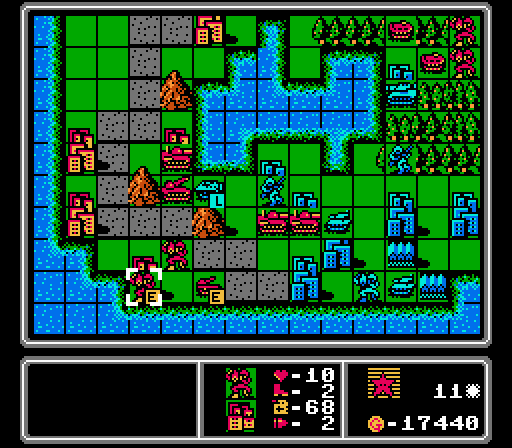 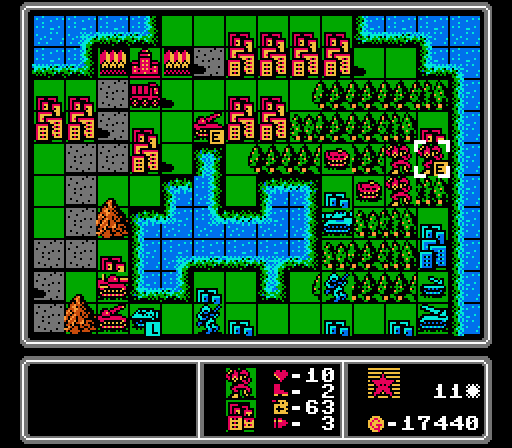 We finish capturing the last two neutral cities, cementing our lead. 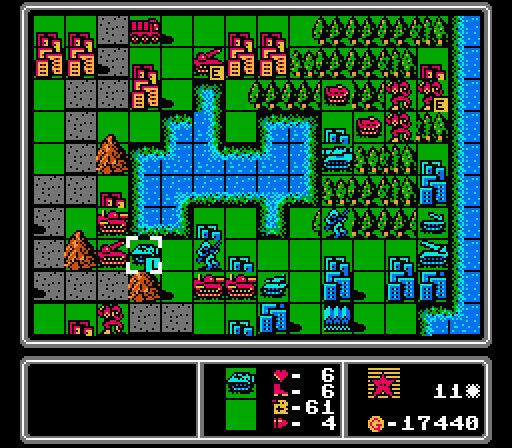 This APC is something of a problem. The fresh medium tank in the back can't attack it because the rocket is in the way, but also can't move past it.  I end up moving one of the front-line medium tanks back a bit to take care of the APC.   The other front-line medium tank retreats, and with the APC now gone our fresh medium tank can take its place and tear up this tank.  The rocket can only reach the infantry right now, and only deals two damage. I probably would have been better off moving it forward a bit instead.  The new enemy tank can reach our artillery, but that's about it.  Up in the forest, we mostly retreat to draw the medium tank further away from the enemy HQ. 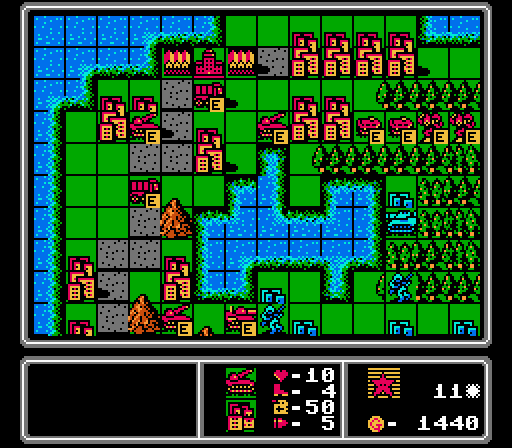 We get another rocket and another supply, so I can have one of each on each front. 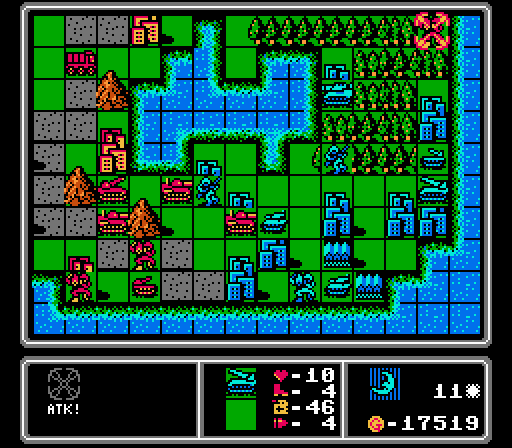 The enemy rocket fires on our mech, but it already finished capturing so will heal up the two damage next turn. 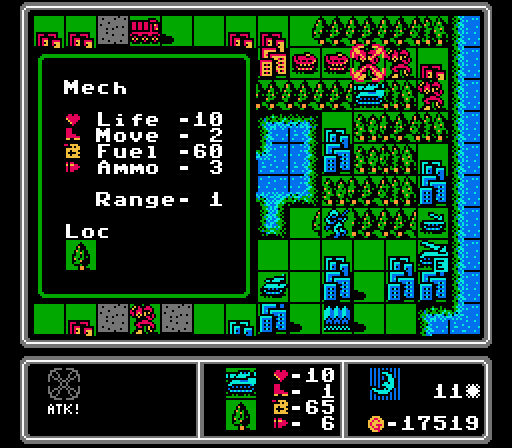 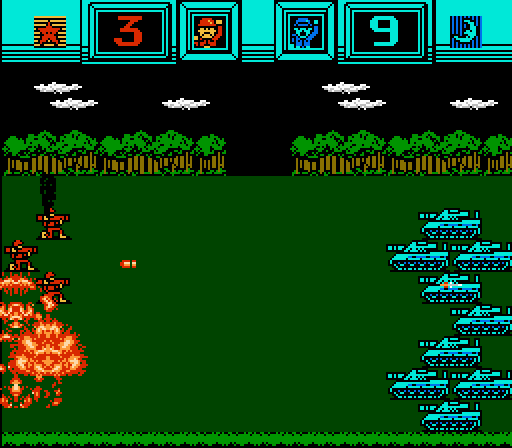 The medium tank does way more damage to our mech than I was expecting here, and also stays out of range of our rocket. So not going great up there. 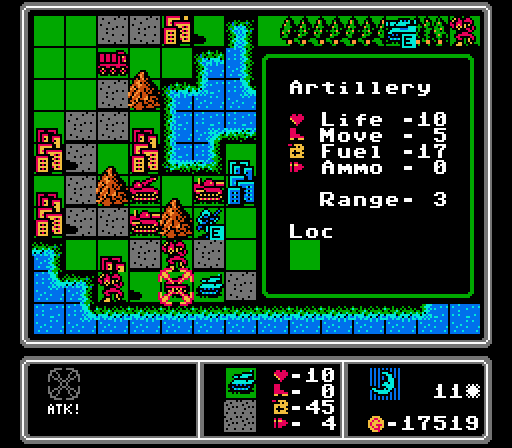 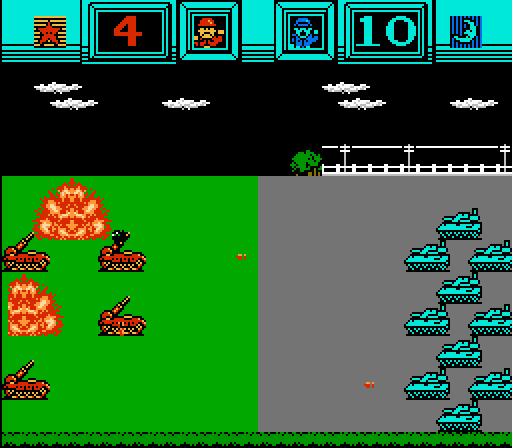 I wasn't expecting the tank to do quite that much damage to our artillery, either. Oh well. 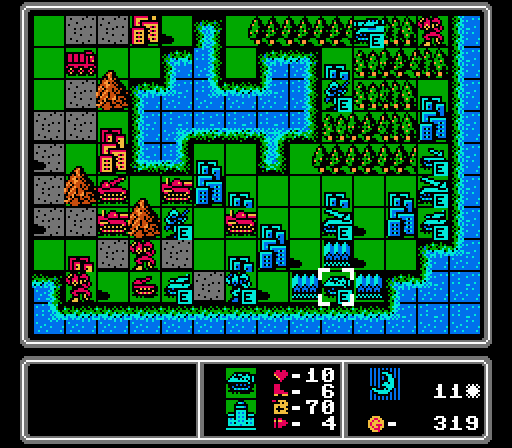 A new rocket is trouble, here. We can't attack it without exposing ourselves to the other rocket. Turn 12 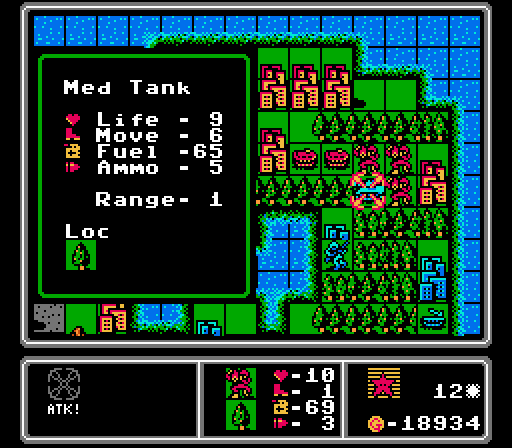 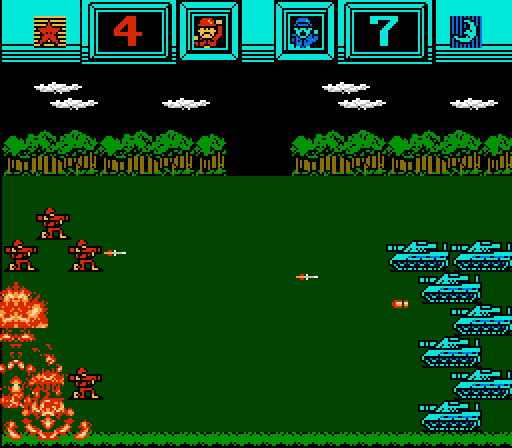 I really thought this attack would go better. 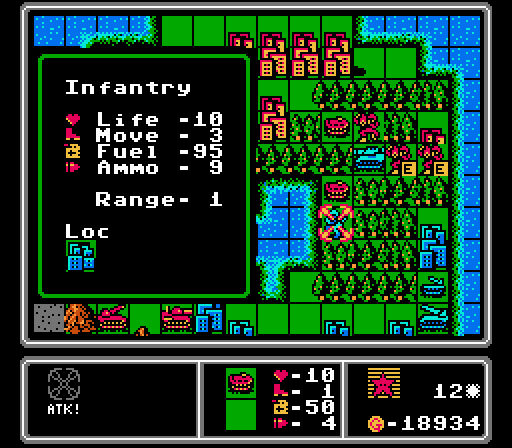 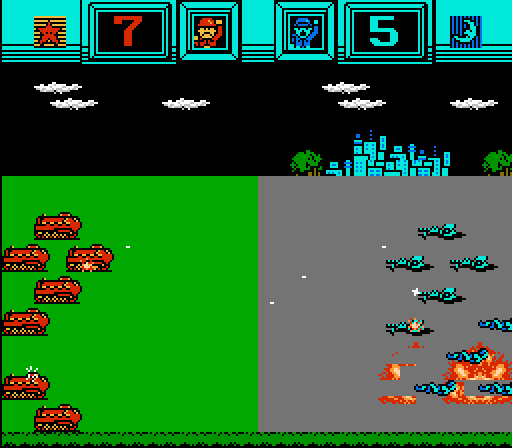 I'm not sure attacking the infantry on the city again will work out this time but it's not like I can have the APC attack the medium tank, right?  The forest rocket is tucked away on a little peninsula, out of the medium tank's range, but everyone else is pretty vulnerable. 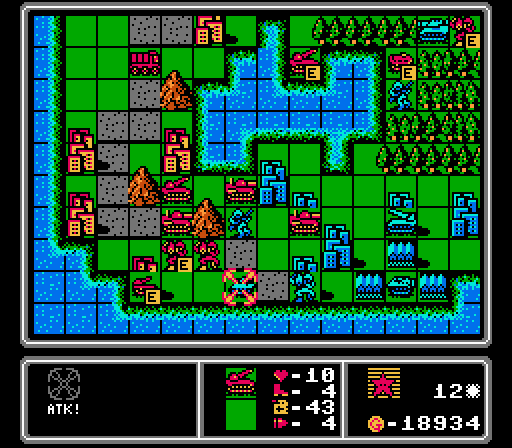 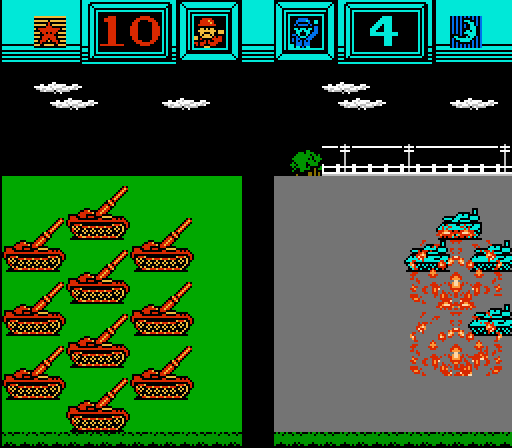 We do get in a rocket attack down by the road, hurting the enemy tank pretty badly. 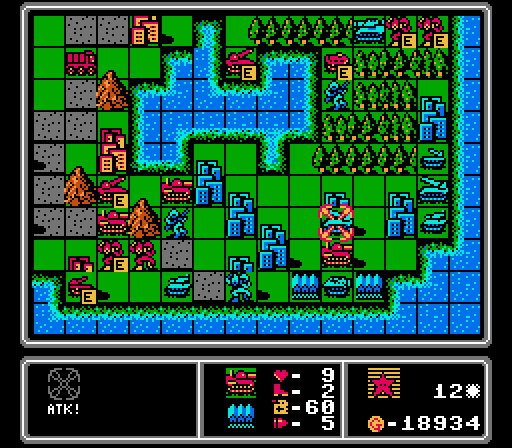 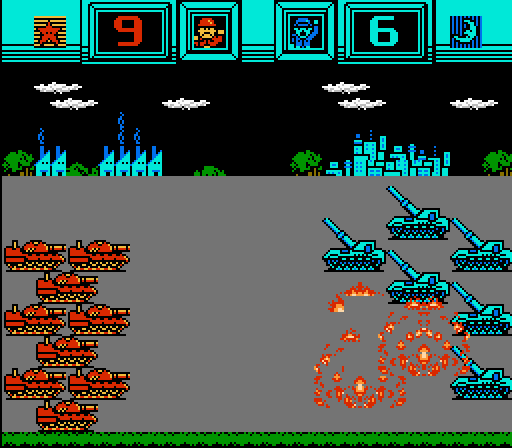 I try to get aggressive and go after the rocket, but half of that damage will just get healed up on the enemy phase and now the other rocket can put the hurt on us here. At least our medium tank is sitting on an enemy base and will get a defensive bonus. 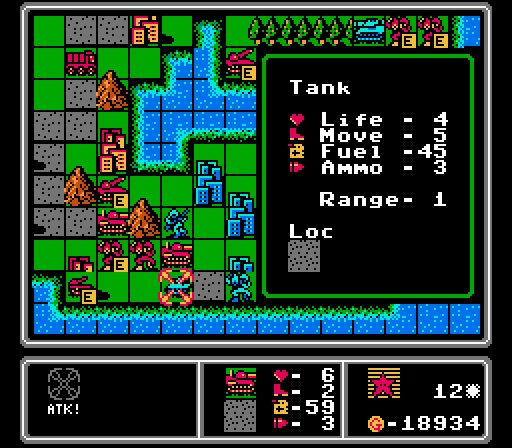 Our other medium tank gets out of rocket range and finishes off this tank. 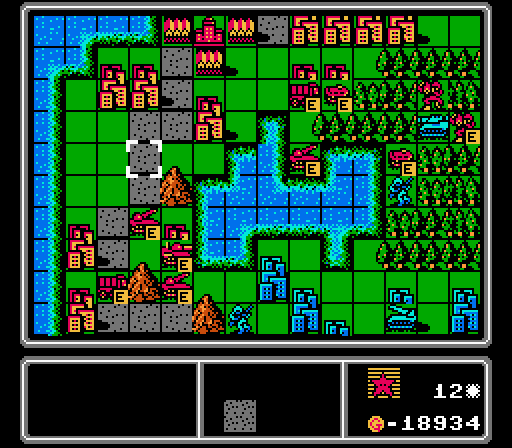 The last medium tank retreats to get some repairs in, and we get another rocket towards the front lines. 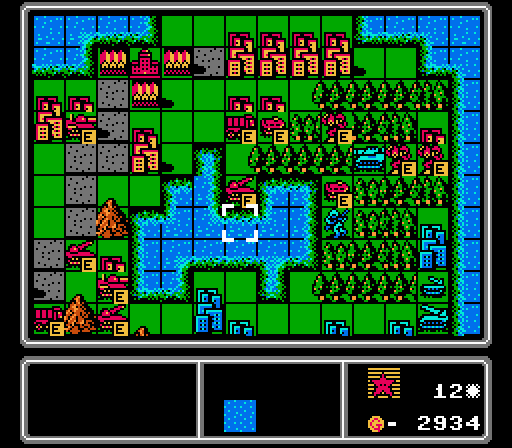 Since we're probably going to lose at least one medium tank soon, we queue up another one. 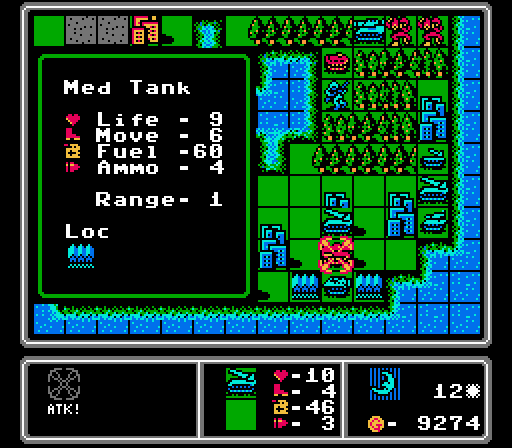 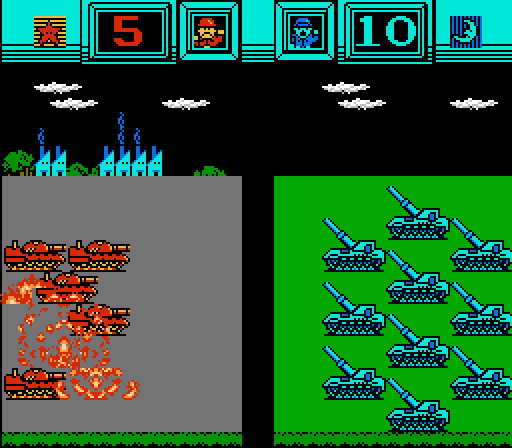 As expected, we immediately suffer a rocket attack, though it's not quite as bad as I feared.   I once again accidentally leave a forest unit in range of a rocket, and this APC pays the price.   Interestingly, a tank suicides to do a single point of damage to our medium tank here. 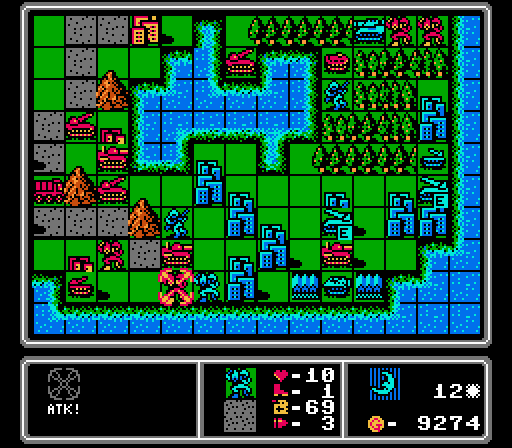  We luck out a bit here, because the enemy APC would have been way more effective but now the mech is blocking it. 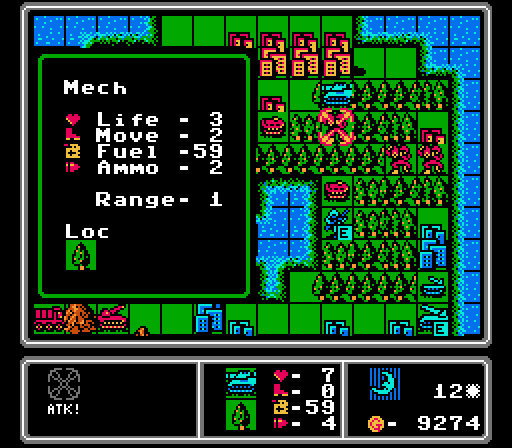 Meanwhile the enemy medium tank wipes out our mech and is now free to run amok at our HQ. Luckily it can't really do a whole lot by itself - it's not like it can capture properties or anything. 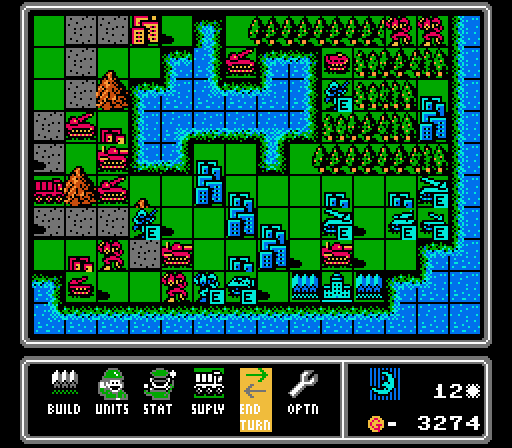 Upside of forcing the AI to spend funds on repairing its units, is that it can only afford a tank this turn. Turn 13 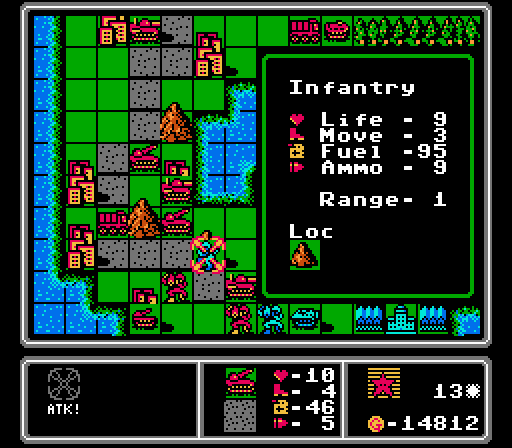 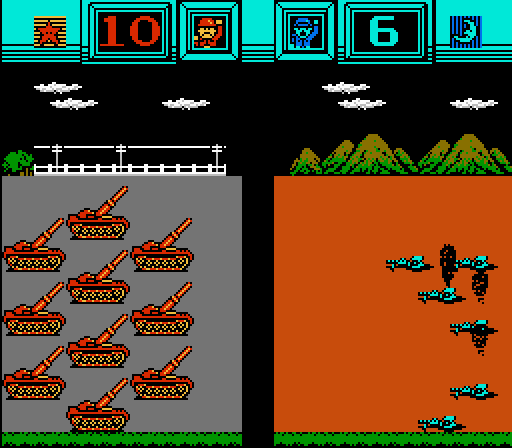 Our back-row rocket starts off with a little chip damage on this infantry, which parked itself on a mountain while I wasn't looking.  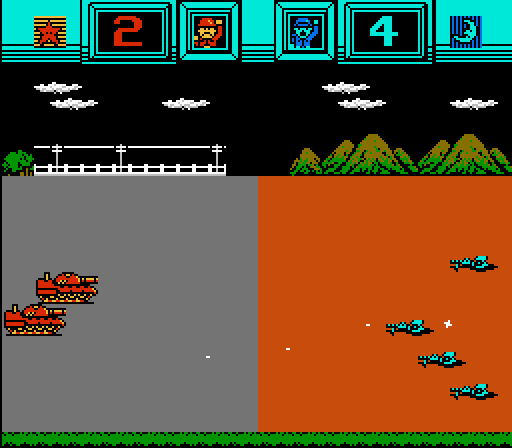 We pull back from the enemy HQ and take another shot at the infantry on the way by. It's not very effective. 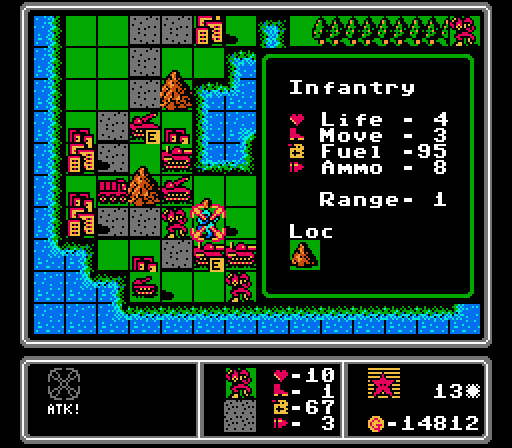 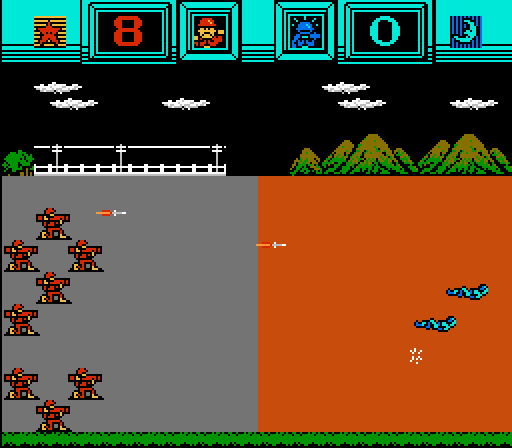 A full-life mech is still pretty effective against infantry, though, and is able to finish this one off.   We've got another damaged medium tank that is just barely unable to kill this weakened mech.  We're out of rocket range and have a decent line protecting our ranged units. Those medium tanks are hurting but nothing that can damage them can get close to them this turn.  Meanwhile this rocket hasn't used up anything but fuel yet but why not see what a supply of it looks like? 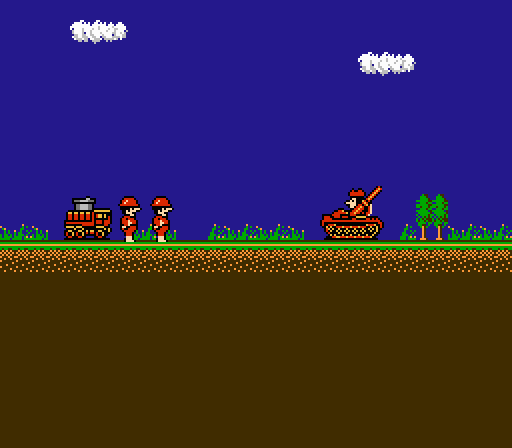 Yup, still adorable. 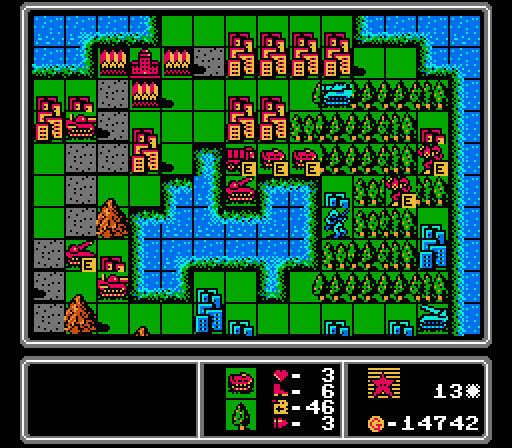 My only goal here is making sure that the only thing the enemy medium tank can reach, will draw it into range of our rocket. 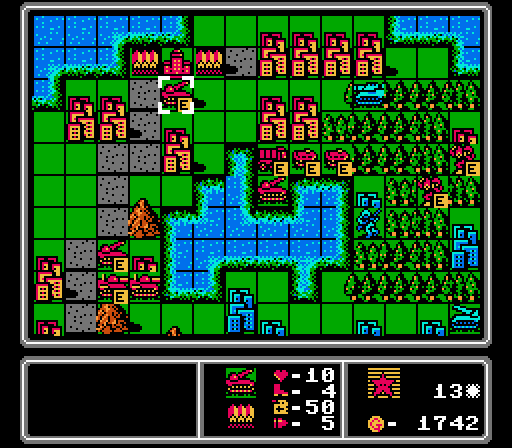 I slightly ruin that strategy by building a rocket that is in range of the medium tank, but our other rocket would still be able to cover it there. 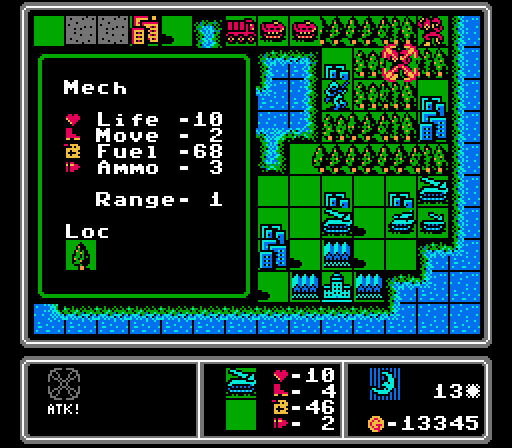 Avoiding the medium tank puts this mech in range of the rocket again, but it only takes three damage.  I suddenly remember there was an infantry parked on the lake city as it moves up close to our cities, while the medium tank wipes out one of our APCs. You know, the infantry-killers.  The enemy APC retreats instead of taking pot-shots at our damaged medium tanks. The new tank moves up into the forest to cause more havoc up there. The rocket near the enemy HQ actually moves left a space for some reason - it's now out of the other rocket's cover, and not getting any defensive terrain bonuses anymore, either.  For reinforcements, Blue rolls out a tank in the back corner again. Turn 14   The APC bait plan is successful and the medium tank here is neutralized.   This infantry isn't going to be capturing anything anytime soon either.  The mech pulls back out of rocket range and finishes off the medium tank.  Our mech on the city on the upper-right can be hit by both the tank and the rocket, but it should be fine while it's sitting on a city.  Not much I can do down by the road this turn, but I can at least remove this 1-life mech from the picture. I can't reach the rocket this turn with anything but severely-weakened medium tanks, and I don't really want to move anything into its firing range, either.  I end up merging the 2-life and 4-life medium tanks together here - they would just take too long to repair at this point.  Not really a great formation, but the medium tank and artillery that are just squatting on our cities are almost fully-repaired now. 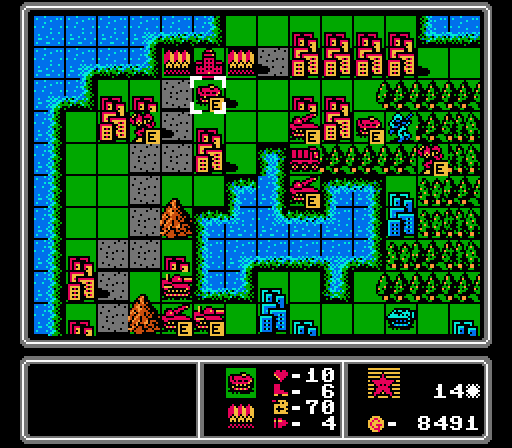 I thought we might need some more capturing power down at the enemy base so I picked up another mech and an APC to carry it along. 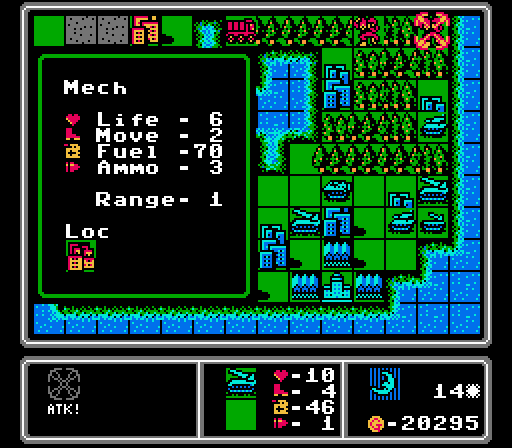 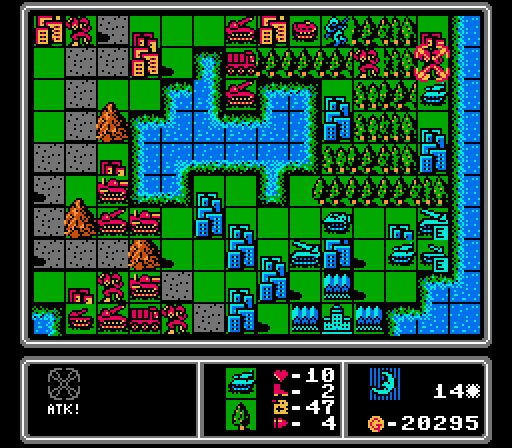 Remember how I thought this mech would be okay just sitting on the city? 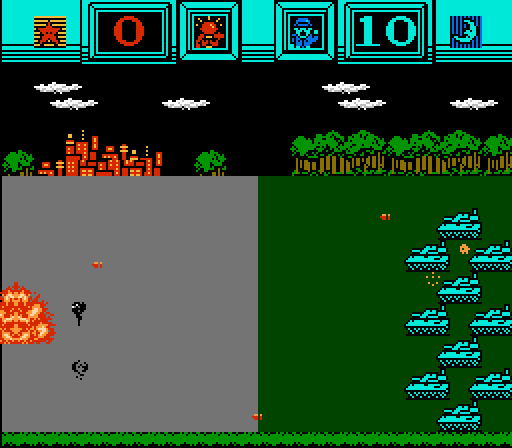 Yeah, way wrong there. Oops again.  The AI and I are doing some kind of weird defensive dance down at the bottom of the map, as all of the Blue units retreat into the corner. I guess they don't want to approach our rockets, either.  And Blue Moon builds a medium tank in the middle of that formation, on a city that I didn't even know could build things. There's a new mech, too. Also that damaged infantry way up top retreated back to the lake city. Turn 15  Rockets aren't very good against infantry, but that's only in comparison to everything else. They're still good enough to get the kill here.  For some reason I throw the mech into the APC here, even though it won't be able to unload anywhere useful.  The strange blue bunching in the far corner lets us set up a solid front line on top of their cities, backed up by rockets and artillery. In the upper corner there's another loaded APC headed down with a mech.  You really can't have too many medium tanks. And another mech, why not.   The weakened mech soaks up the attack from the enemy medium tank, who is now in range of all of our indirect units.  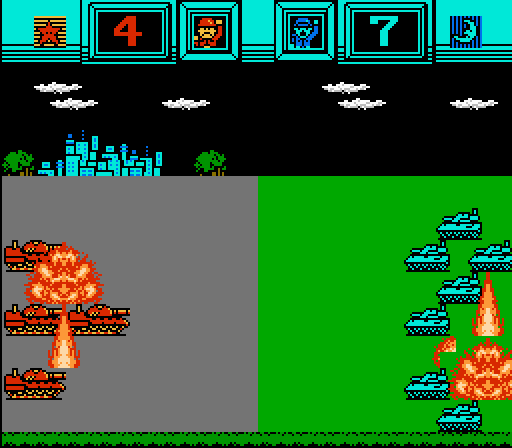 Meanwhile our damaged medium tank fends off the enemy tank. 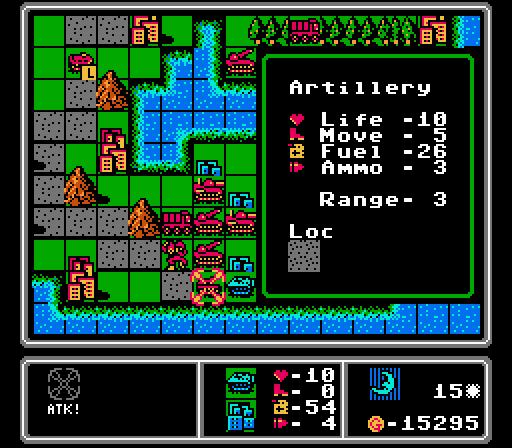 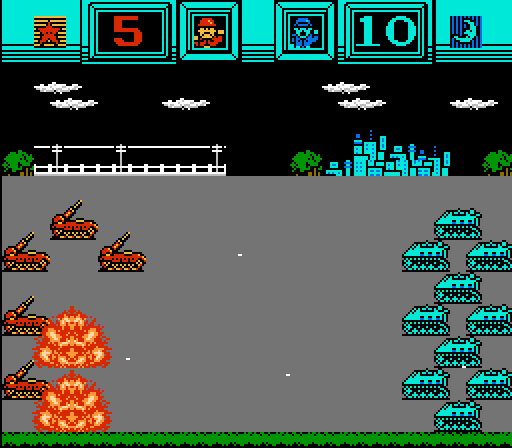 The APC sneaks into the spot where our mech used to be, and puts the hurt on our artillery. So the APC did 5 damage here. It's only supposed to be able to do 3-4. I think what happened is, when the artillery was damaged earlier, it didn't actually heal up all the way. Instead it was somewhere between 9 and 10 life, and just displayed as 10. And then this attack took off that extra bit of partial life. 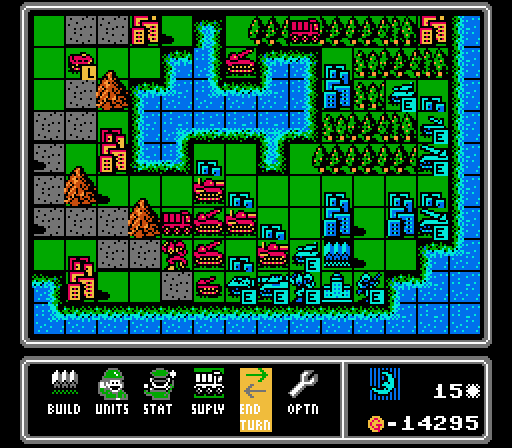 Blue's ranged units continue to move up into the forest, leaving the HQ all but abandoned. The only new unit is an infantry, despite plenty of funds. Turn 16 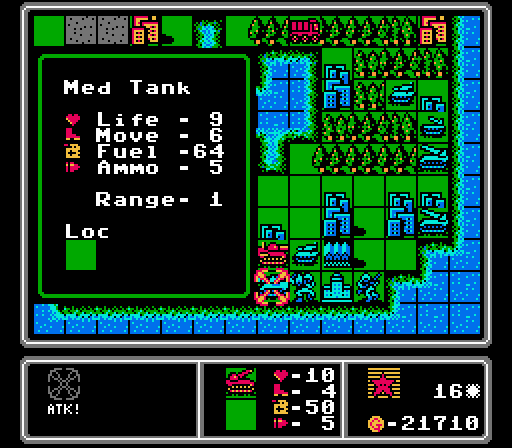 You can't tell which rocket is targeting the medium tank here, but it doesn't matter because they both do and the medium tank is quickly destroyed. 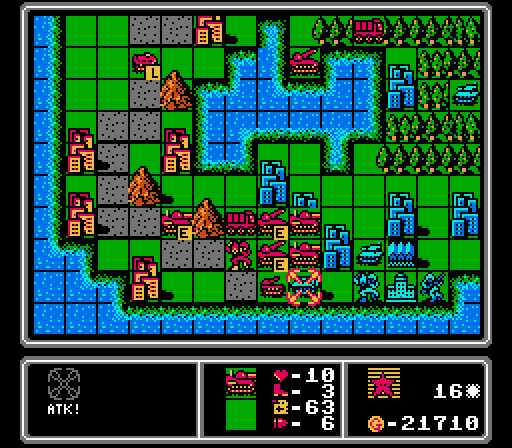 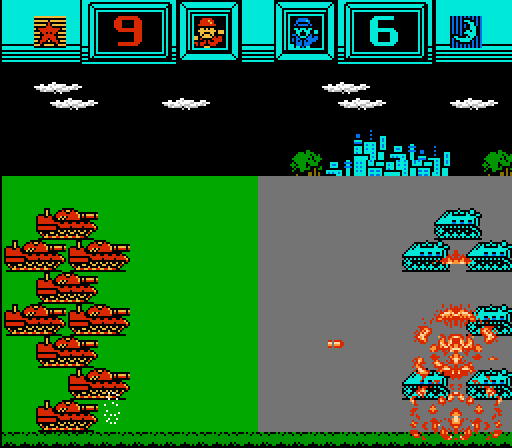 While one medium tank retreats, another goes after the APC.  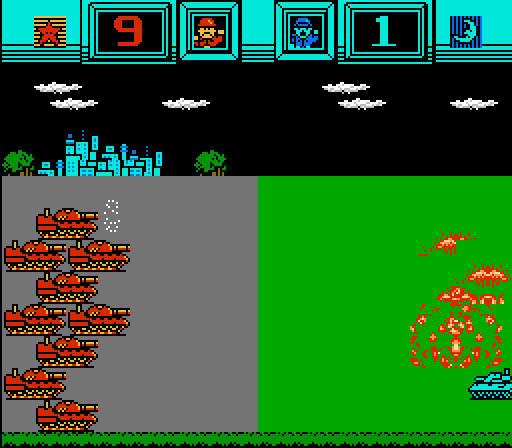 The third goes after the tank, leaving not much in our way down here.   I once again learn that footsoldiers shouldn't attack APCs. At least the artillery is safe now, I suppose.  Maybe loading up the mech in the forest wasn't a waste. It gets unloaded directly onto a city, and now they can both get healed next turn. Though I am kind of curious if the mech would have also been healed if it stayed inside the APC.  More mechs and APCs for another capturing rush. 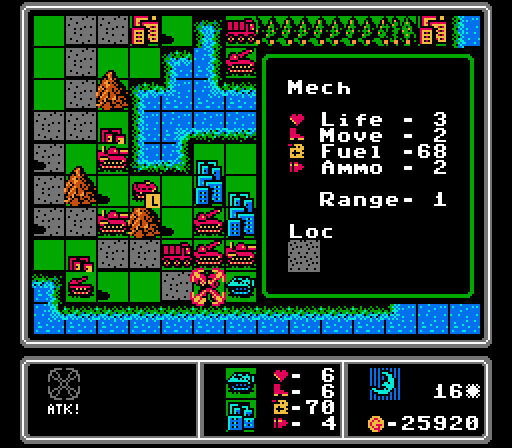 I figured I'd need them because this mech for sure got killed here. 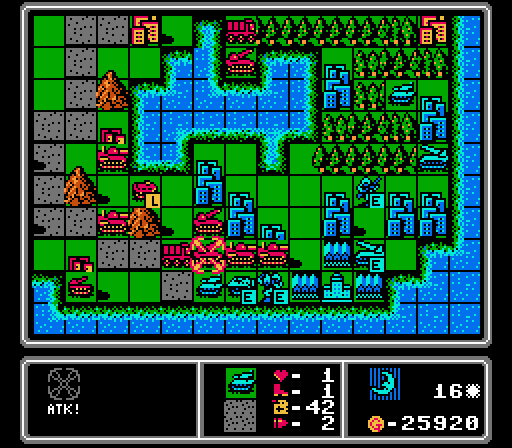 The tank sneaks through to our rocket this time, but it's too weak to do any damage. Literally none. 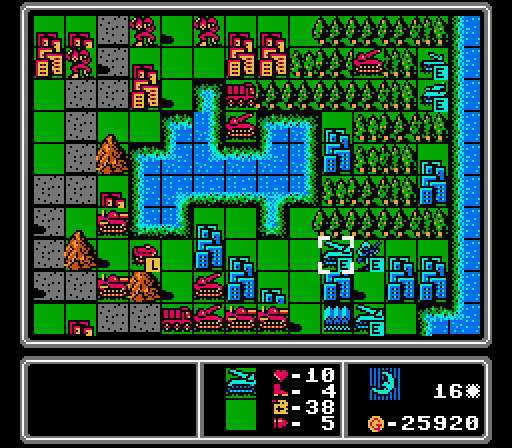 I'm not sure what happened here, but the enemy artillery moves up even further into the forest, close enough to attack our rocket without getting hit in return. The enemy rockets inexplicably move into range of both our medium tanks and our rockets, and don't even park on a city for extra defense. This one move basically ends the map. 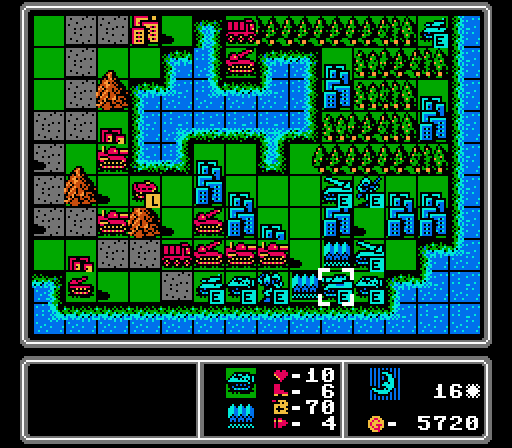 I maintain that last statement even with a new medium tank and APC in the way. Turn 17  Our biggest problem is going to be either wiping out the scattered enemy units in the forest or getting a healthy mech down to the enemy HQ for a capture.  Our mechs by our HQ show off Mario-level jumping skills to get into the APCs.   One rocket neutralized.   There goes the other one. Both of our medium tanks are also parked on enemy bases, which I believe gives them the same defensive bonus as cities.   Our rockets are in a target-rich environment, but in the end I go with finishing off one enemy rocket and then hurting the medium tank. 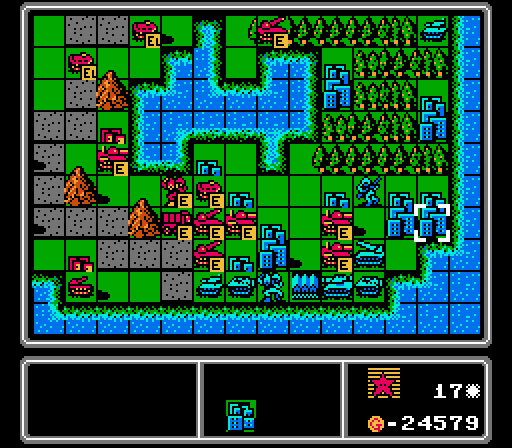 We've got a new mech down to start taking enemy cities, and possibly the HQ later. I've left one of our rockets pretty open though. 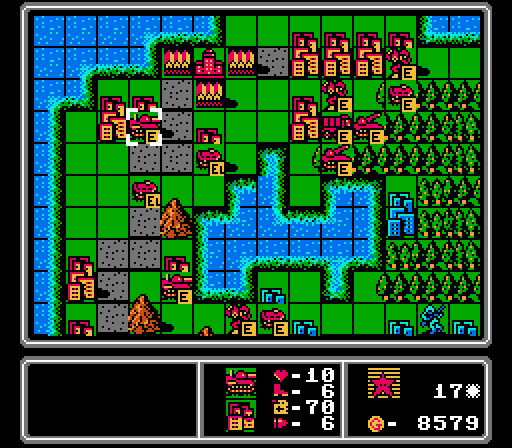 To deal with that possibility we buy another  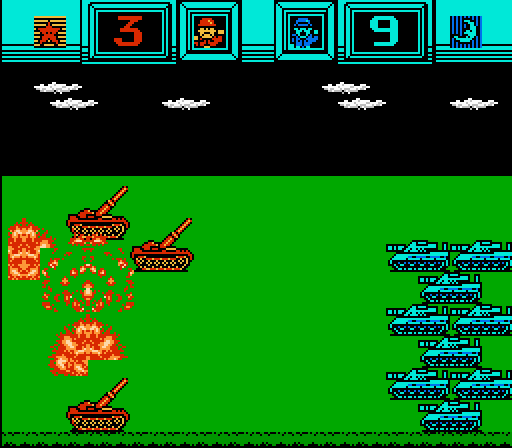 No surprise that the first thing the AI does is dish out some damage of its own against our rocket. 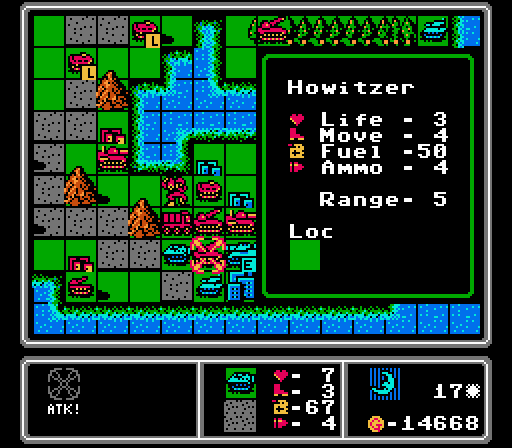 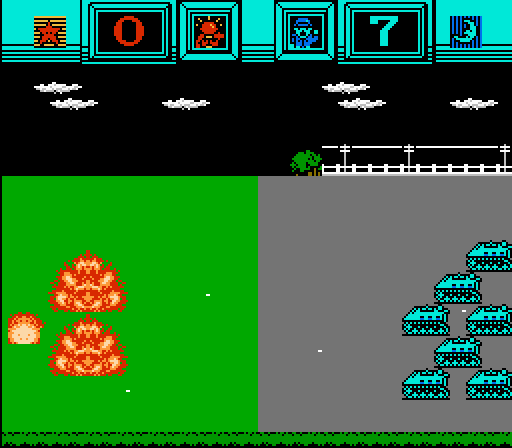 What I did not expect was the APC actually finishing it off, however. 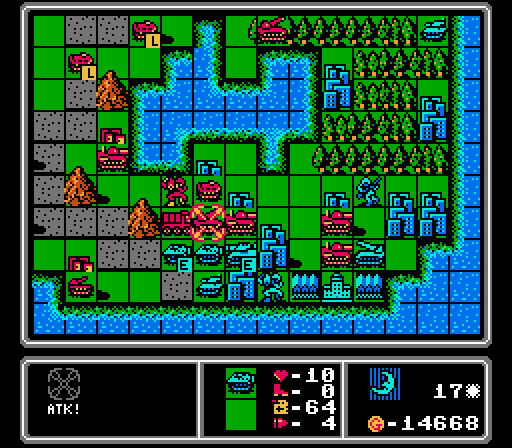 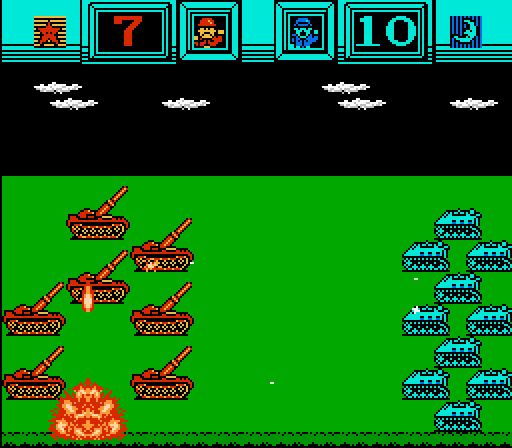 As result the new APC is able to move in and hurt the rocket that I thought was safe. 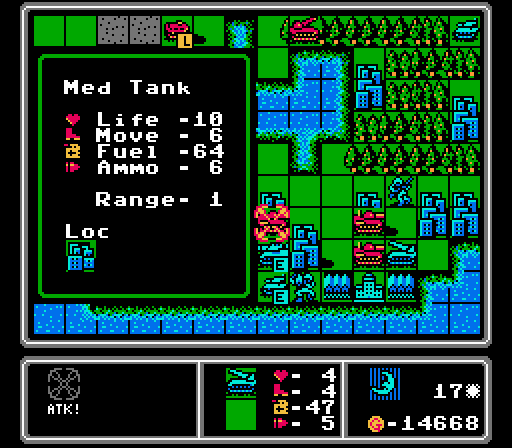 The remaining enemy rocket also gets in some chip damage on our fresh medium tank.  These forest vehicles can't catch our rockets so instead march right into their range.  I am not sure why, but the AI ended its turn without building anything here, despite having plenty of funds. Turn 18   The turn starts with attacks from our forest rockets.   Our APC follows up with three more damage on the artillery, and the newly-healed mech follows up to finish it off.   Both medium tanks are at 9 life and I'm attacking from a city, so I thought this battle would be less even than it turned out. 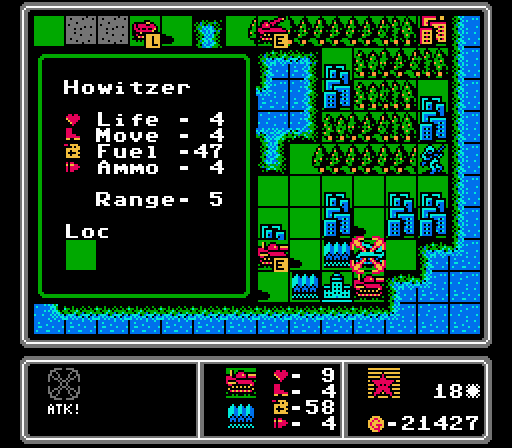 At least this rocket is gone now. 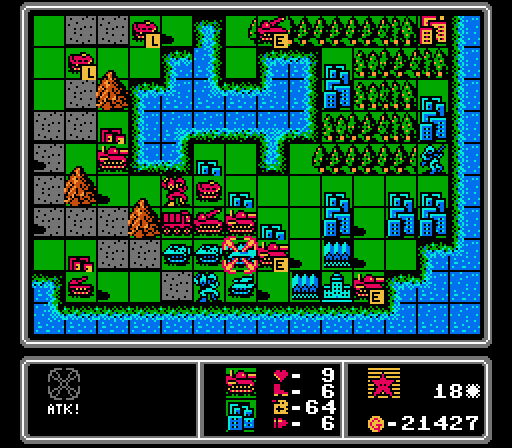 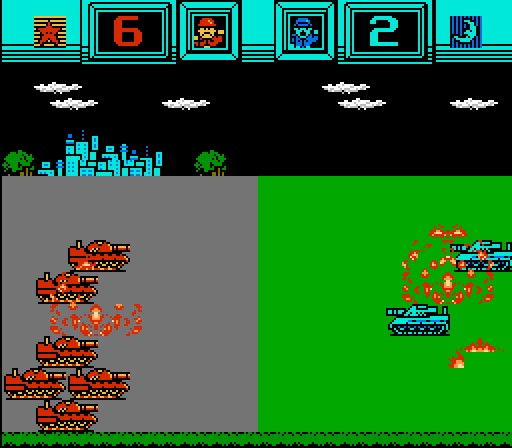 Still took more damage there than I expected.  An APC attacking a tank isn't the best option normally, but this tank still only had 1 life left so it worked out. 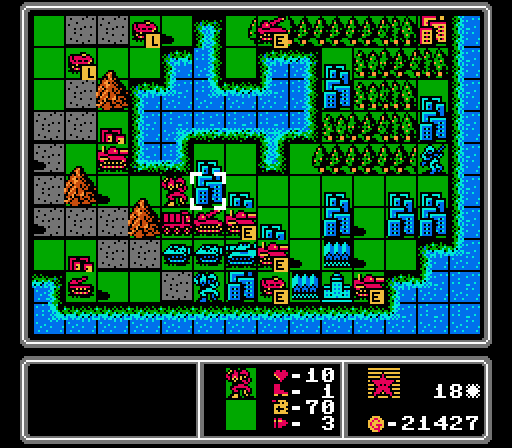 The mech starts capturing this city, though I'm not sure I can keep it protected.   What is wrong with our medium tanks this turn? APCs are only supposed to do 1-2 damage to medium tanks, but this one did three. Must've been another partial-life thing, like the medium tank was really at 5.2 life and not six.  Somehow sending our rocket down at the bottom further into enemy territory is the safest place for it. More reinforcments arrive along the road to try and finish off this map.  We add in another rocket and a tank just in case this map keeps dragging out.  Of course the enemy medium tank only takes one damage while attacking our APC. 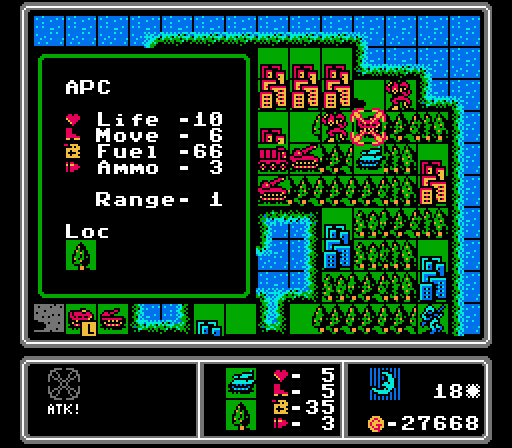 Kind of a futile gesture from this tank, who does five damage to the APC but takes three damage in return. 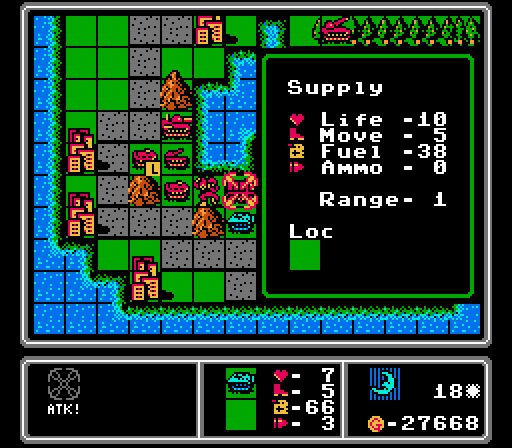 I don't remember if I showed a supply getting attacked before, so here you go: 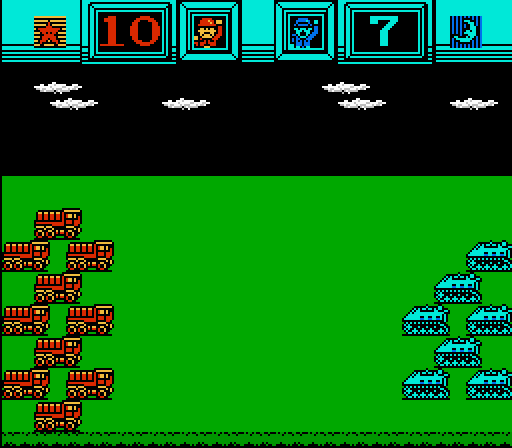 APCs aren't very good at it. 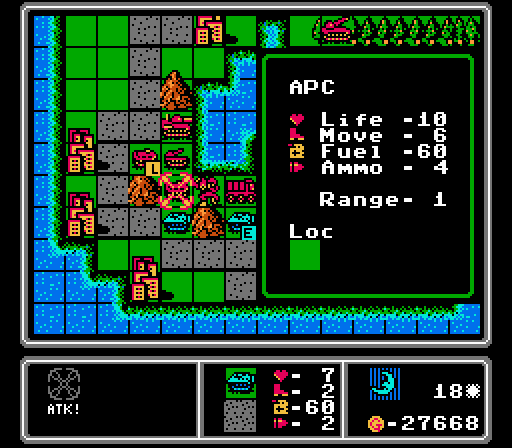  Some APC-on-APC crime here, but it works out in our favor. 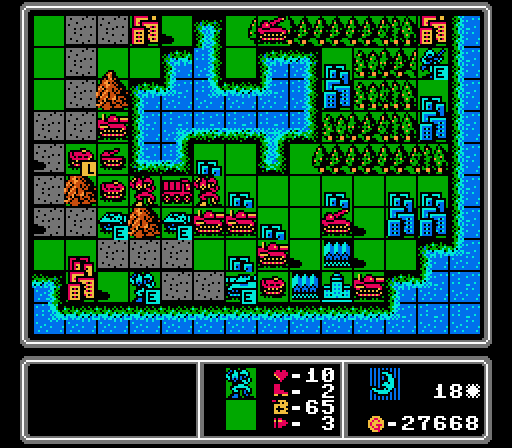 Those are all the attacks we had to face this turn. There are actually only six enemy units left, but they're sitting on a pile of cash for buying more. Let's see what they get... 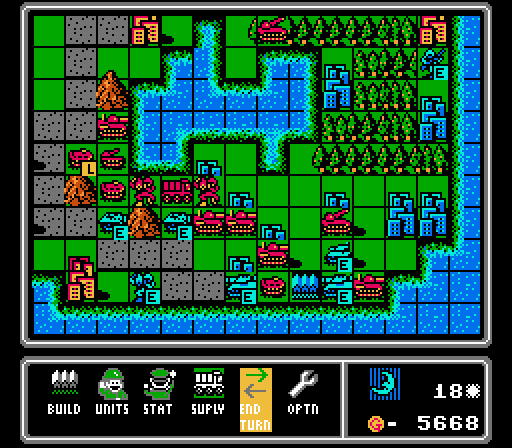 Ugh a tank and another medium tank. At least we're close enough to get first crack at them before they can hit us. Turn 19 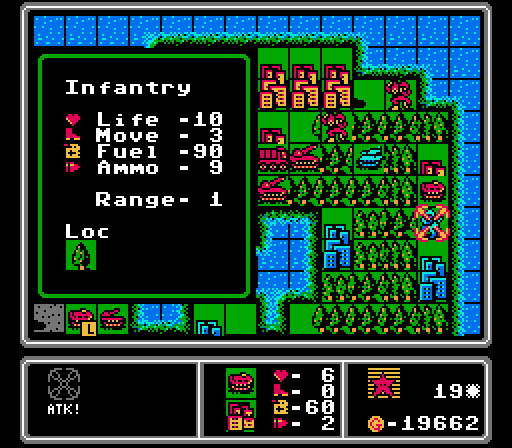 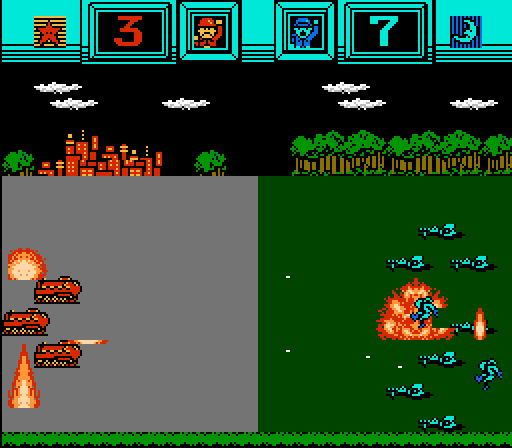 I really thought our APC would do better there. 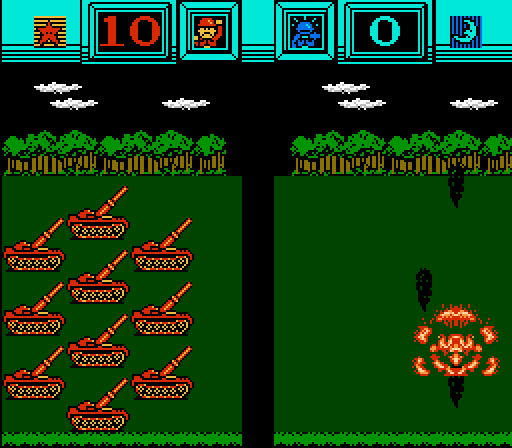 Anyway, here's a rocket blowing up a tank. 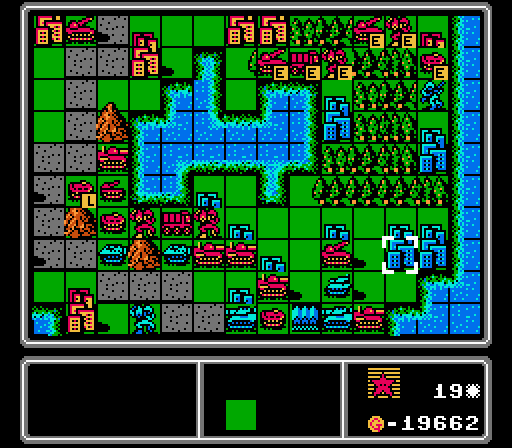 Suddenly we're pretty unopposed in the forest, though I don't think those units will matter much from here. 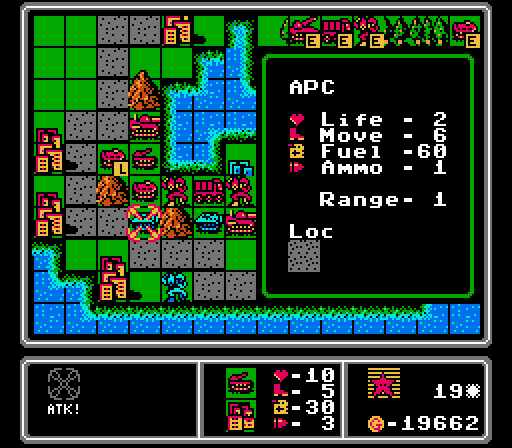 The once-again-repaired artillery finishes off this APC. 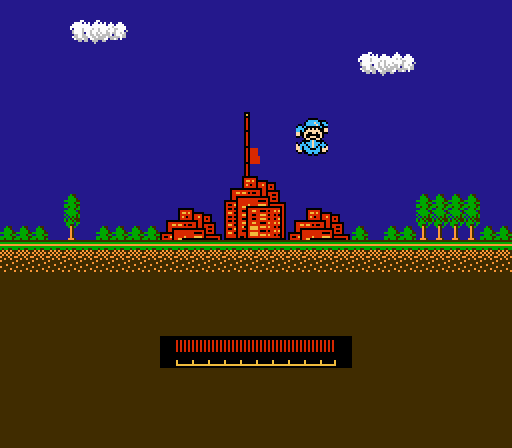 Oh and our mech was left unharmed and is able to finish capturing the enemy city.  Fresh medium tanks are always welcome, and this one moves up to get rid of another enemy APC. 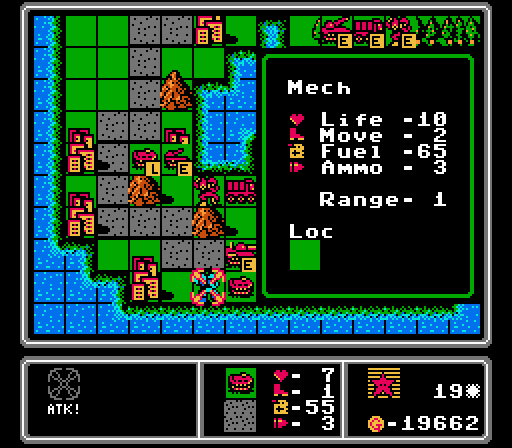  Our APC started off already damaged or this fight with the mech would've gone better. 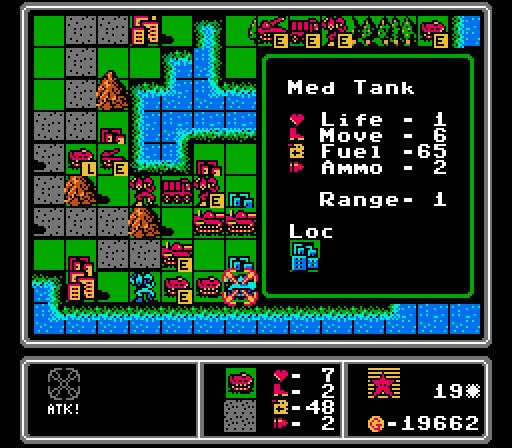 Always funny to see an APC kill a medium tank, so let's watch: 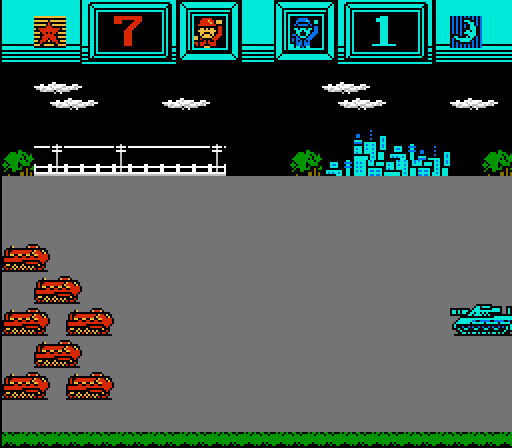 Somehow the medium tank was still firing and destroying individual APC icons even after it had been destroyed. 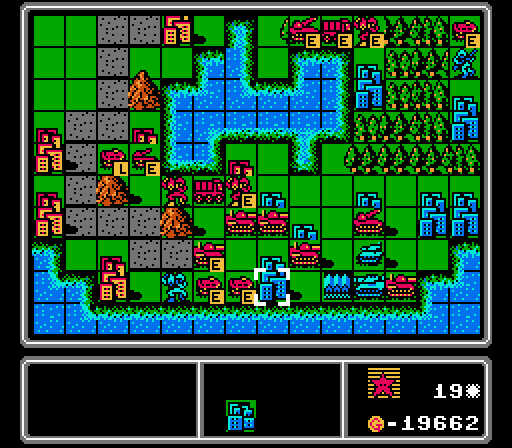 The only things Blue has left are the two new vehicles it just built and two weakened footsoldiers. And our own heavy hitters haven't even acted yet. 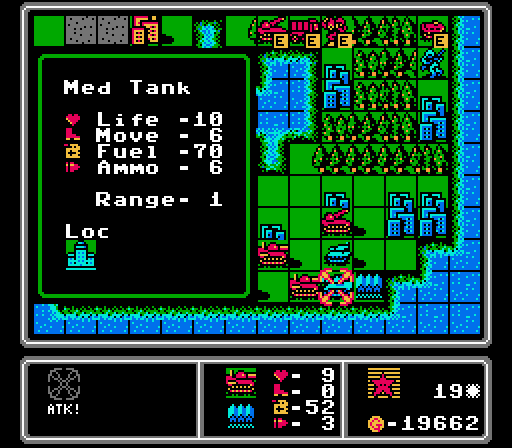 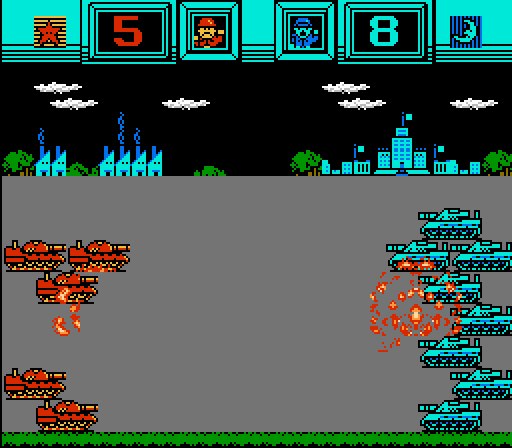 The first attack doesn't go great. 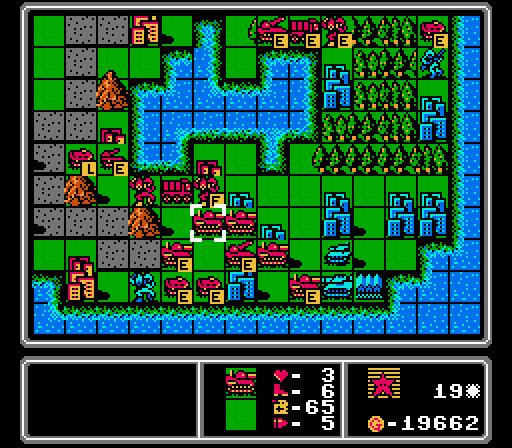 So I take this 3-life medium tank and merge it with the 5-life one that just attacked, to give it some more stopping power. 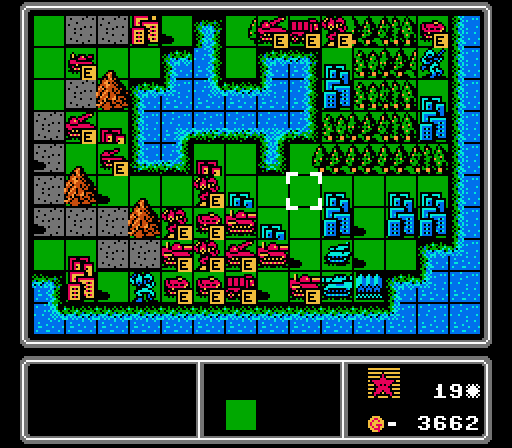 I stall for a couple minutes and then eventually decide that the other medium tanks are better off staying on the enemy cities to pull out the enemy units, instead of attacking them on the base and HQ. Really I should have done that with the first medium tank, too. 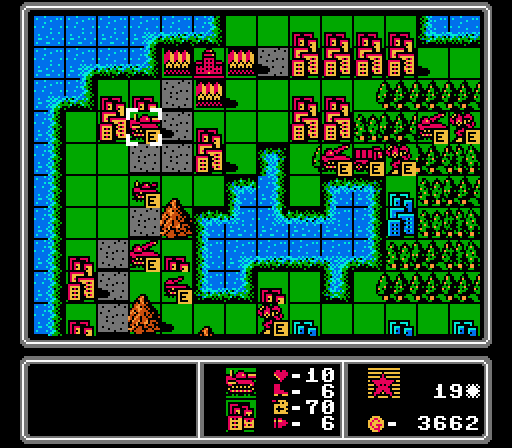 Yes, another medium tank.  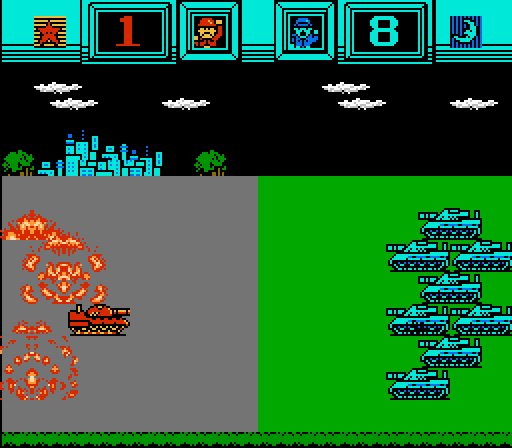 I swear my medium tanks are cursed. No way we should have taken five damage on a city there, and only done two damage in return. 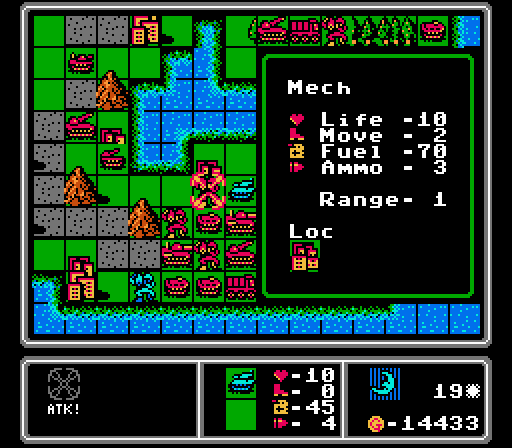 The tank for some reason decides to attack the mech instead of finishing off our medium tank. It only does two damage, which the mech will heal up next turn anyway. 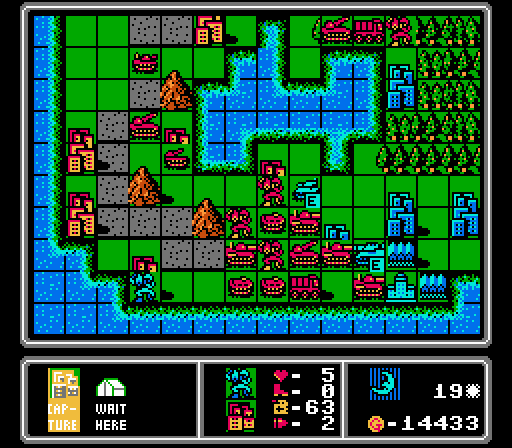 The mech on the lower-left tries capturing our city, but it's hurt and will take four turns to do so. We aren't going to give it that long. 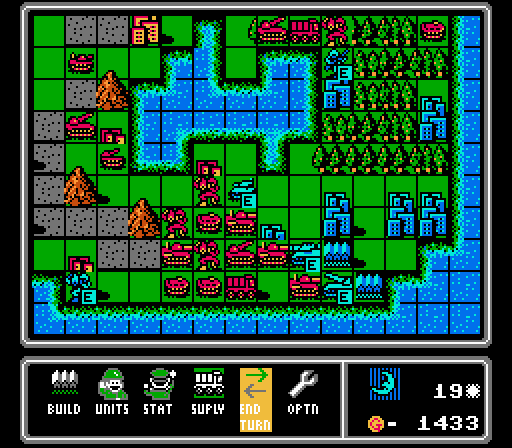 A new rocket, but I'm pretty sure we can handle it before it can hurt us this time. Turn 20  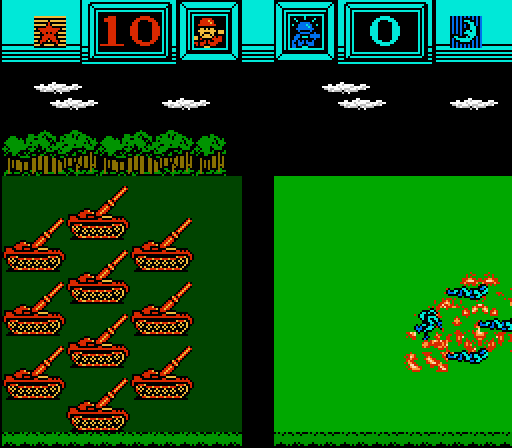 Two shots from our forest rockets finish off the infantry. 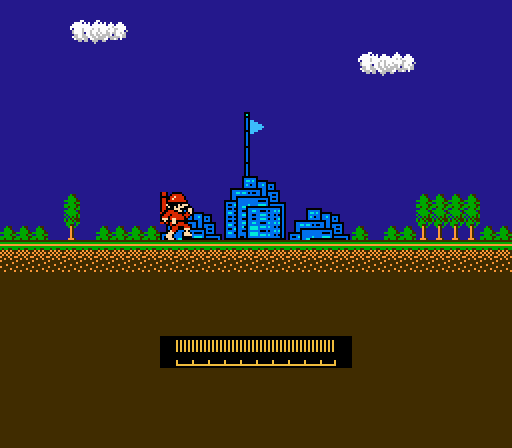 The nearby mech proceeds to start finally capturing the lake city. 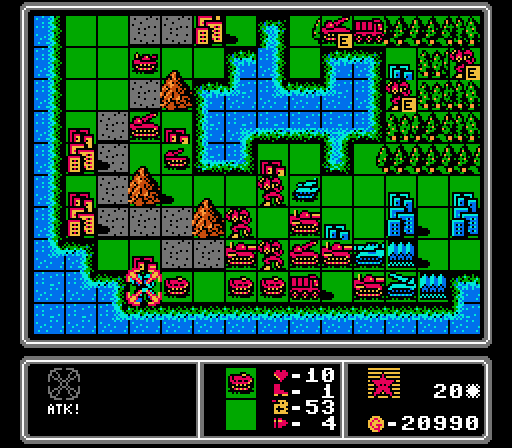 I told you that mech wouldn't last long. 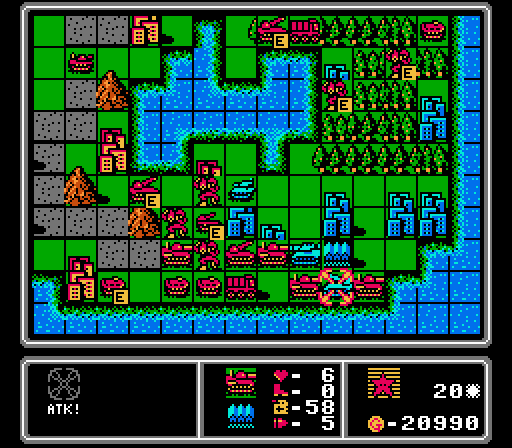 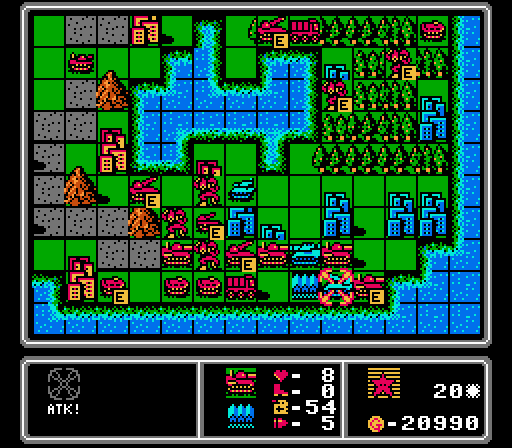 Our medium tanks are beat up but these two are able to take out the enemy rocket (along with a helpful salvo from our own rocket down there).   I'm going to be short on a wipeout again but we do get in some more damage on the medium tank, now that it's not on a tile where it can just repair the damage. 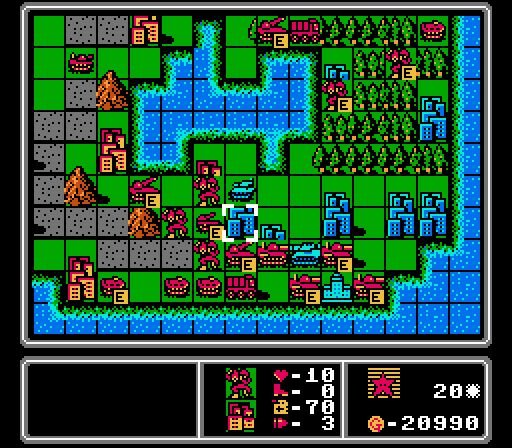 A mech moves up to start capturing another city. 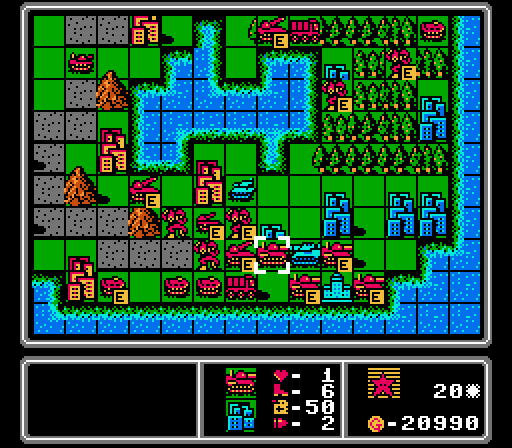 No point in having this medium tank retreat for repairs, so I just merge it with another one. Our two APCs down there also merge together. 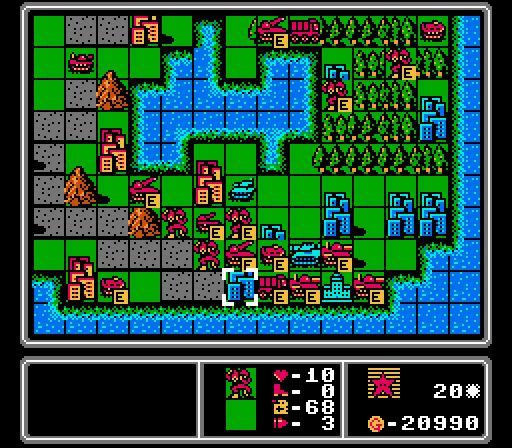 More capturing.   The remaining mech does a bit more damage to this tank.  I wasn't kidding, you can never have enough medium tanks.  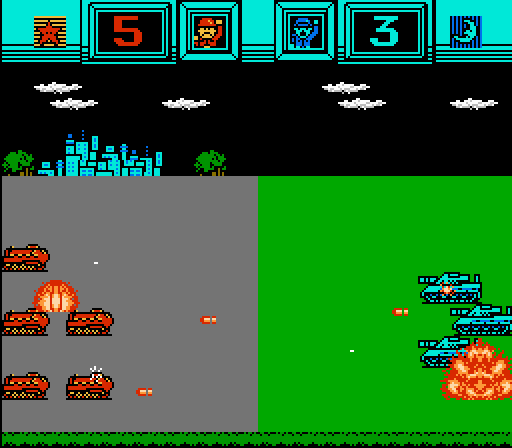 Blue only has two units left, and they're both too damaged to really hurt us. 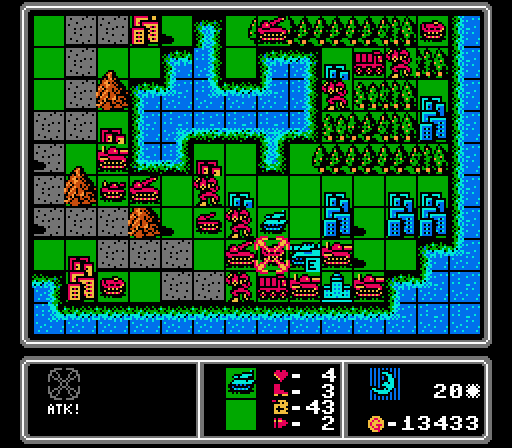 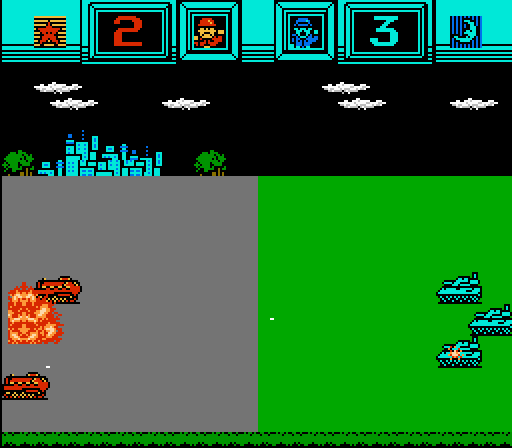 They gang up on our APC and can't even kill it. 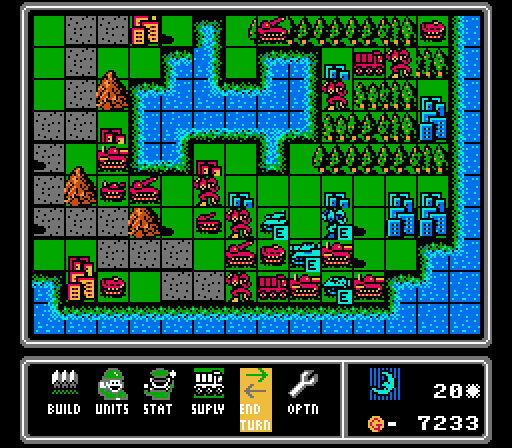 The AI had enough money for a rocket but that didn't work out for it last time, so instead we'll have to deal with an APC and a mech. Turn 21  First step is completing capturing the three cities we started taking last turn. That'll cut into how many and what type of units Blue can keep buying to get in our way.  The tank is blown up by our rocket reinforcements.  The medium tank falls to our medium tank. Just the two new units left now, but I leave them alone rather than weaken my other medium tanks further just yet.  I really hope I don't need this medium tank.  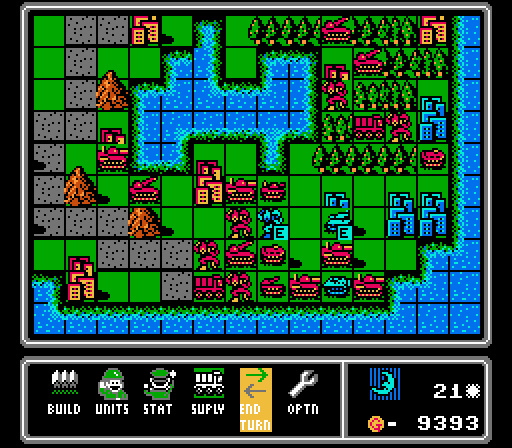 The mechs scratch each other, the APC doesn't even bother to attack, and Blue Moon thankfully can just barely not afford a medium tank, settling for a tank instead. Capturing those three cities this turn worked out here. Turn 22 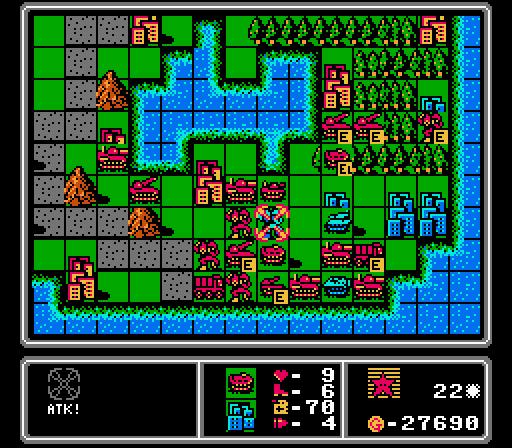 After the rocket and artillery soften up the enemy APC, our APC is able to finish off this mech. 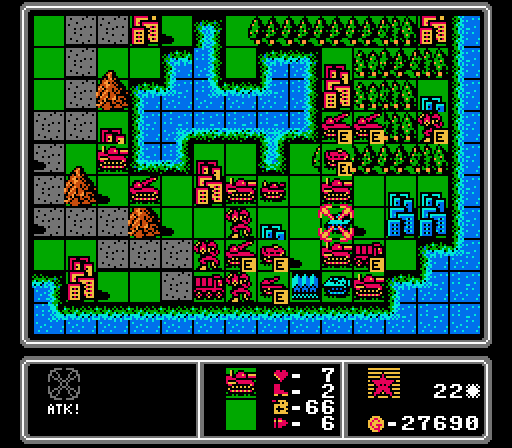 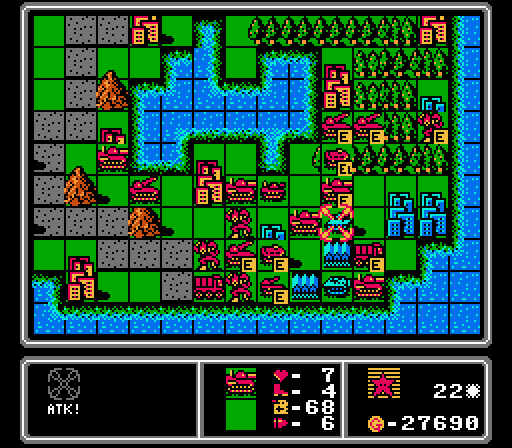 Finishing off our opponent via wipeout takes forever due to how hard it is to remove fresh units that come out sitting on bases. These two medium tanks combine for just five damage here.  I was mostly just getting them out of the way, though. Our little tank that we built four turns ago moves up to destroy the APC. 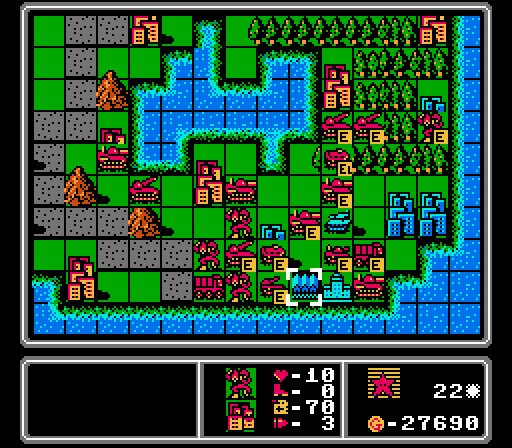 The mech can't reach the HQ, so I have it start capturing the base for no real reason.  Anyway, a fresh medium tank is just barely able to reach this last tank and mercifully end the map.  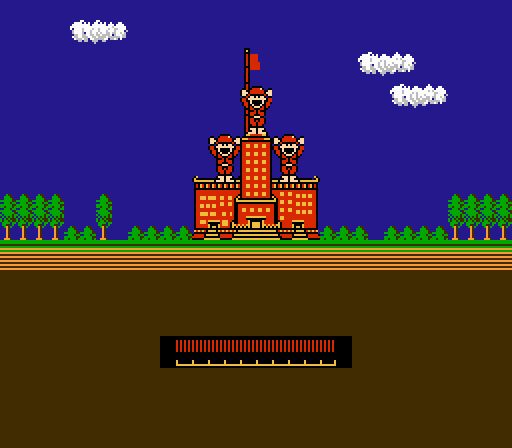 22 turns is a terrible score for this map. Not being able to use infantry definitely slowed us down, but I also got bogged down at the end just trying to get through the enemy reinforcements each turn.  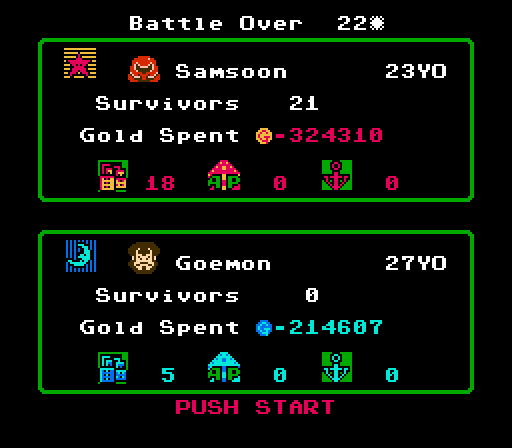 Our CO this time around is Samsoon, who looks a whole lot like Samus from the Metroid games. The enemy CO is Goemon, who seems to be a Japenese folklore reference of some kind similar to Robin Hood. We had a massive funds advantage but I can't say that we used it all that efficiently. 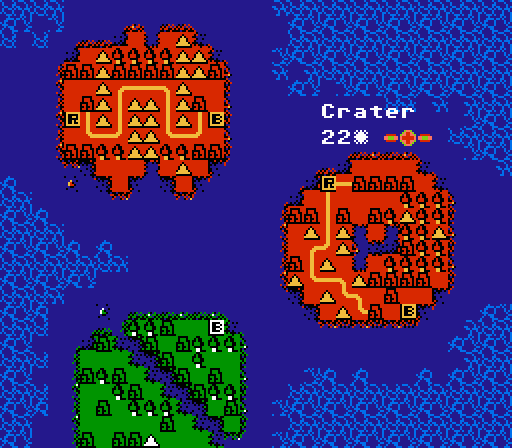 Ugh terrible score there. Sorry everyone.  Next up is "Triangle". I really don't like the look of that map - vehicles can't cross rivers, and I pretty much exclusively use vehicles. To add to the difficulty, the challenge for next map will be Limited Supply, where we can only deploy one of each unit type at a time. See you there!
|
|
#
?
Jun 11, 2021 06:04
|
|
|
Part 6: Bonus Update: Crater HQ Capture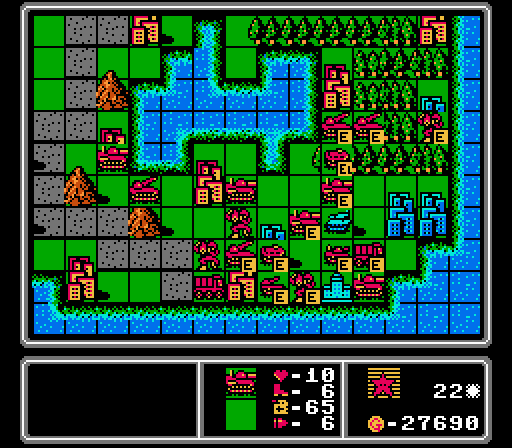 We ended the map within striking distance of the HQ. What if we went for the capture instead of the wipeout? 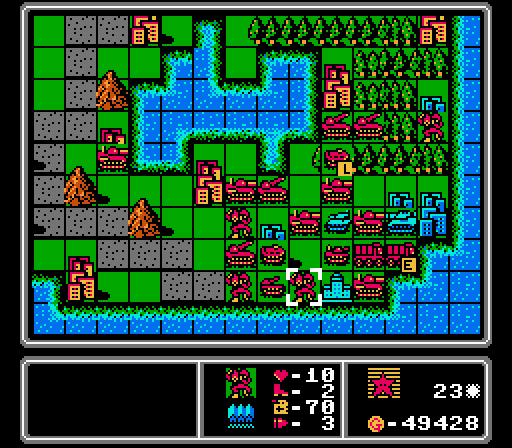 Little wrinkle in that plan. If you can't tell from the animation, the mech is missing the capture option when moving over the enemy HQ. Apparently mechs can't capture HQs, only infantry! Good thing I didn't end up relying on that option, what with not being allowed to use infantry on that map and all.  I was very confused at this point, and thought maybe I'd imagined being able to capture the HQ as a victory condition altogether. So I decided to keep experimenting. First I finished capturing the enemy base.  What I wanted to do was build an infantry here, so I could prove to myself that it was possible to do an HQ capture on this map.  Unfortunately, it's not possible to build on captured bases in this game. It makes sense from a realistic point of view - capturing enemy territory doesn't automatically mean you can recruit their citizens or re-tool their machines to produce your equipment, after all - but it was pretty jarring after getting used to having that ability in later games.  Here's another little quirk. The Blue Moon team is getting 7000 G in income each turn. We have 3000 G from captured cities, 3000 G from the three bases each player starts with, and 1000 G from the HQ. But wait - we just captured one of Blue's bases! Well apparently the bases and HQ don't actually provide income, the map is just hard-coded to give each player 4000 G on top of the amount from cities.  I kept playing around for a few more turns. There's a loaded APC in the upper-left that's bringing down an infantry to capture the HQ. But what we're seeing here is something you're not likely to experience in normal gameplay - there's a cap on funds at 99999 G. 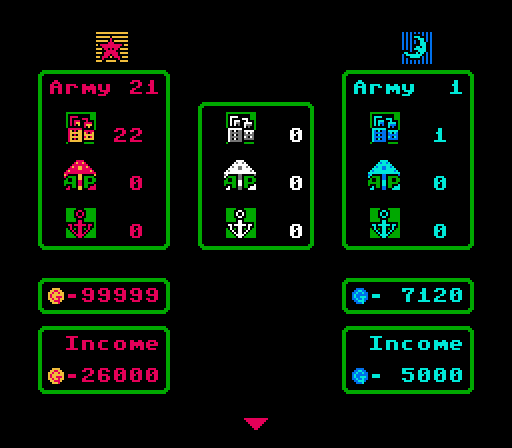 Later on I captured all three enemy bases, just to see if only one of them was glitched, but they're all still providing Blue income. 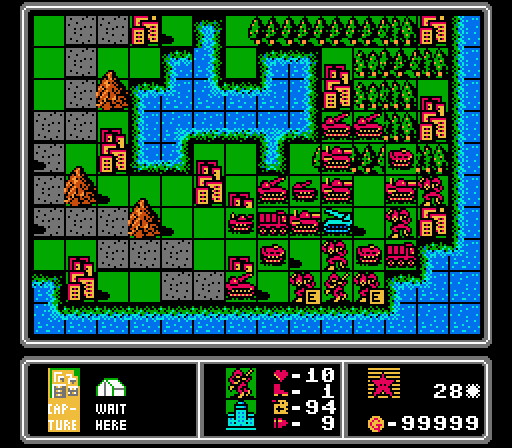 I did eventually get an infantry down to start capturing the HQ. Music: HQ Capture  Capturing the HQ plays a short sound effect and results in the enemy CO getting kicked out, rather than a single soldier. The CO even has the same face shown in the battle-summary screen at the end of the last update. 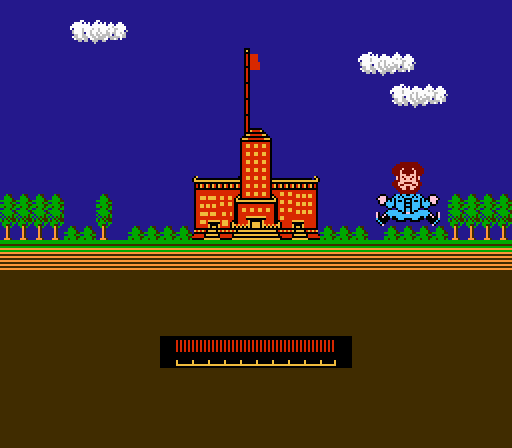 The CO then grows a surrender flag out of his head somehow, before we bomb him again to get rid of him for good. 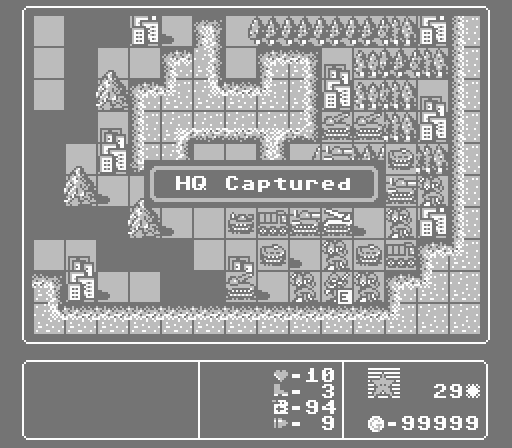 The map grays out again, but with the different victory condition. 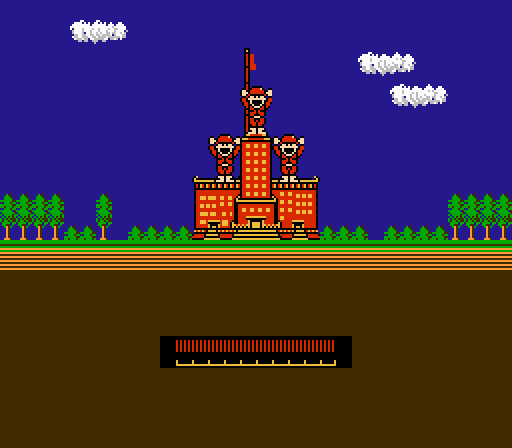 Everything else is the same from here. Of course while getting this extra footage, I screwed up my save states so our new score for this map is 29 turns. Oops again. ")
|
|
#
?
Jun 13, 2021 03:47
|
|
|
Bombing a person waving a white flag sounds like a war crime.
|
|
#
?
Jun 13, 2021 04:31
|
|
|
Only if you lose the war
|
|
#
?
Jun 13, 2021 05:08
|
|
|
By the way I'm still looking for new ideas for challenges so throw some out there and if it's workable and I use it I'll credit you in the update. There are 15 maps and I'm going to run out of ideas of my own pretty quickly. I don't want to spoil it but the next map is going to change things up from the last two so hopefully won't be a slog again.
|
|
#
?
Jun 13, 2021 18:14
|
|
|
Part 7: Unit Overview: Mech  Basic Info: pre:Cost 2000 G Movement 2 Move Type Foot Fuel 70 Ammo 3 Ammo Cost 3 G Range 1 Special Can capture properties (but not HQ) pre:Opposing Unit Damage Dealt Damage Taken Infantry 5.5 3.5 Mech 4.5 4.5 Medium Tank 2.5 9.5 Tank 3.5 4.5 APC 4.5 9.5 Rocket 3.5 3.5 Artillery 4.5 3.5 Supply 9.5 N/A The mech unit is twice as expensive as infantry, can't move as far, has less fuel, less ammo, and can't capture the enemy HQ. In exchange you will get marginally better damage out of the mech, particularly against vehicles, though still nowhere near as much as a tank would. One interesting advantage is that the mech will absolutely destroy supply units. The mech is actually more vulnerable to medium tanks and APCs as compared to infantry, but generally takes less damage against other units. They also take the least damage from rockets and artillery amongst any ground units. DKII fucked around with this message at 00:21 on Jun 28, 2021 |
|
#
?
Jun 15, 2021 03:16
|
|
|
I find mechs kind of dubious in later advanced wars games and they seem even worse in this one.
|
|
#
?
Jun 15, 2021 13:03
|
|
|
Yeah, watching this I'm struggling to figure out their intended purpose. They cost a ton more, have less movement, less ammo, and the damage boost is trivial. Even a basic tank doesn't take noticeable damage.
|
|
#
?
Jun 15, 2021 13:22
|
|
|
I feel like the intended purpose for mechs was on defense in contested territory. Since they have generally better defense than infantry, plus the resistance to rockets/artillery, they could be used to buy time while other (better) reinforcements catch up to the front lines. As for challenges, how about this: Fair Play - You are dedicated to the idea of a numerically fair battlefield, so you are only allowed to build units when the AI has more troops than you. You don't have to kill off your own units, but if you kill some enemy troops, you're stuck with what you have until such a time when the AI again has a numerical advantage (at which point you can build something again). Might make for some interesting early decisions, since you need to balance "I need help right now" versus "but then I'll have a bunch of crappy infantry while the AI starts deploying rockets and tanks".
|
|
#
?
Jun 15, 2021 13:52
|
|
|
MagusofStars posted:I feel like the intended purpose for mechs was on defense in contested territory. Since they have generally better defense than infantry, plus the resistance to rockets/artillery, they could be used to buy time while other (better) reinforcements catch up to the front lines. The only consideration for this rule would be that I'd recommend it not applying for the first turn of a map, as otherwise its essentially just giving the first turn over to the AI as well since neither side usually starts with troops.
|
|
#
?
Jun 15, 2021 15:32
|
|
|
Fighting smarter, not harder Keep a count of total money acquired by the enemy. Your total spending may not exceed that amount, even if you have more because you've gotten more properties
|
|
#
?
Jun 16, 2021 03:42
|
|

|
Both of those challenges sound excruciating, I'll see what I can do with them. There's a delicate balance between making the strategy interesting and dragging out the map to the point where it's tedious to read. Mechs can be useful as a defensive swarm - for 8000 G you can get four attacks to take out a medium tank that costs twice as much. But this game isn't really one you play defensively. I'm not going to have the first part of Triangle ready this week. I wish I had a better excuse but it's really just I started playing Xenoblade Chronicles for the first time recently, and that's a way better game than this one. On the good news front, Nintendo is remaking Advance Wars 1+2 for the Switch this year! DKII fucked around with this message at 04:12 on Jun 16, 2021 |
|
#
?
Jun 16, 2021 04:10
|
|
|
Part 8: Triangle (1 of 3) Sorry for the delay. This run did not go well. 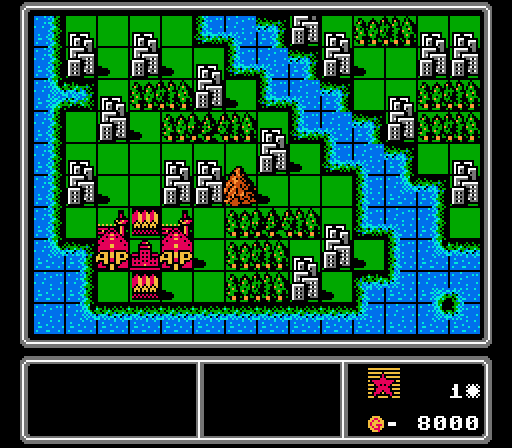 The challenge I set for myself was Limited Supply, only building one of each unit type, replacing it only when it was destroyed. I thought I was being real clever doing this challenge on a map that gives us some new unit types to use, but there were two major problems with the challenge on this map in particular. In fact, let's get a look at the whole thing: 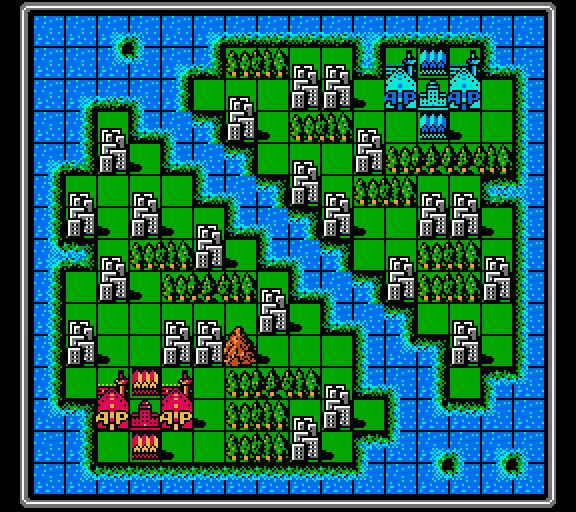 It's an even map this time. If you noticed the new property types with the glaring "AP" on the tile and didn't immediately figure out what they were, your name might be Andy.  I meant to do this last time, but I'm switching to the "B" tracks here to change up the music a bit. Turn 1 Music: Mission BGM Type B  Problem number one for this challenge on this map - we can only build one infantry and one mech for capturing. That limitation is going to put us severely behind in the early stages of the map.  Oh, right, that other unit. So the "AP" stands for airport, and with it we can build things that fly. Here we have a copter. It is in almost every way a flying APC. It costs just 4000 G to produce but is incredibly bad at fighting anything but infantry, mech, supply, and other copters. However it only takes significant damage from other flying units and a couple of specialty units we've yet to see. Like the APC, it can also transport a unit, which is our only way of crossing the river bisecting the map. Since it can fly, it crosses over any terrain at equal cost, but it also doesn't get any defensive bonuses from forests, mountains, cities, etc. Music: Enemy Turn Type B  Our mortal enemy builds three infantry and a copter, which is much closer to what I would have rather had built this turn. Turn 2 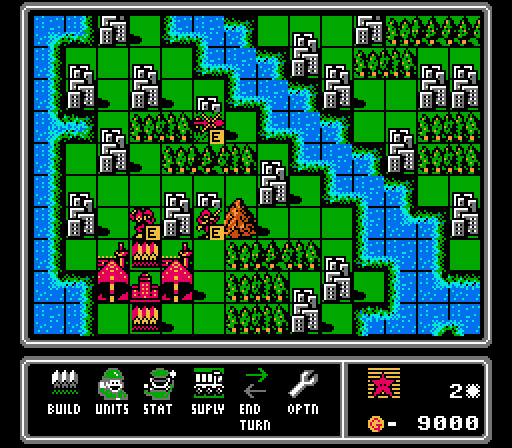 Our infantry starts capturing, our mech can't reach a city yet, and our copter starts wandering around. At this point I didn't really know what a copter could do yet, but I had a vague idea of harassing the enemy infantry. 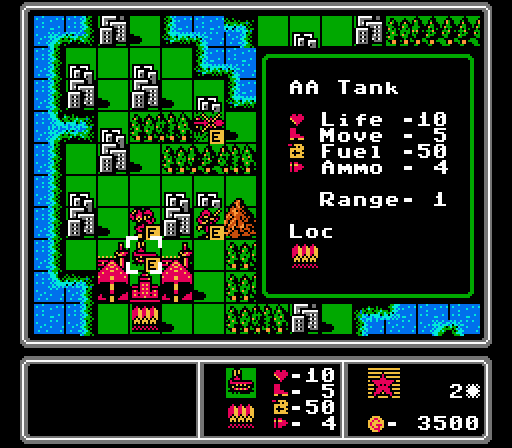 Here is the first of our new ground units, the AA Tank, more colloquially known as the Anti-Air in later games. Technically we could have built these in the earlier maps, but there was no reason to do so. They can only attack flying units. In later games they were also excellent anti-footsoldier units, but here they can't even attack anything that's not in the sky. It's a little cheaper than a tank at 5500 G, and an excellent cheap defense against flying units. 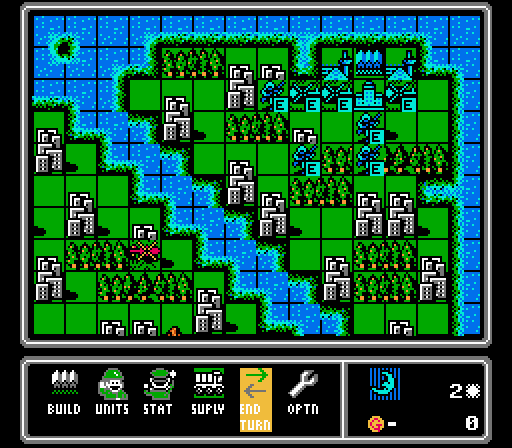 Blue also starts capturing, then builds another infantry and two more copters. We're already falling behind. Turn 3 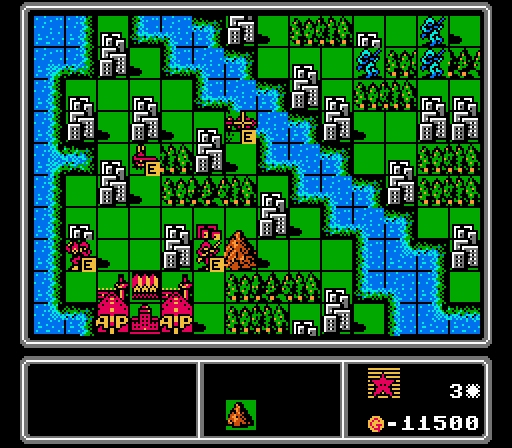 We finish capturing one city and start on another. Our AA tank moves up to vaguely warn off the enemy copters, while our own copter stays just outside their range. 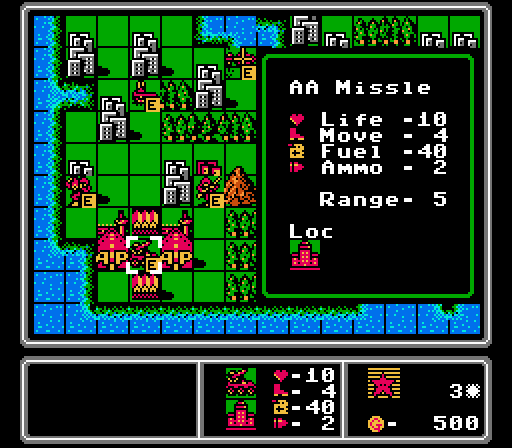 Meanwhile we've got enough cash on hand now for the other new ground unit - the AA Missile. It has the same targeting limitations as the AA tank, but is an indirect fire unit with the same range as a rocket. It's also a little cheaper than its counterpart, costing 11000 G, but it notably has just two ammo. Better park it defending a city or pair it up with a supply unit. 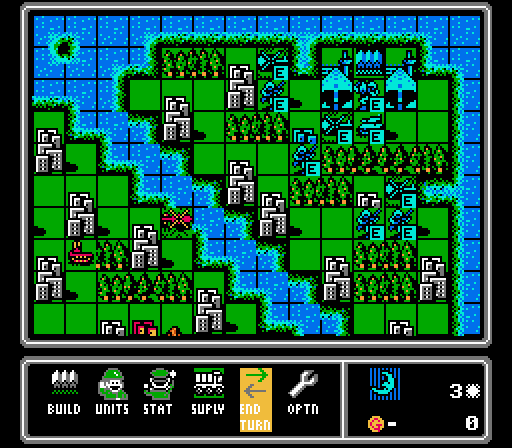 Our opponent finishes capturing two cities and starts capturing two more. You can see where we start to lose ground here. They also put out a mech and a tank, and continue to keep their copters back away from us. Turn 4  Our mech finishes its capture, while our infantry starts a new capture. Everyone else just kind of moves around near the river. 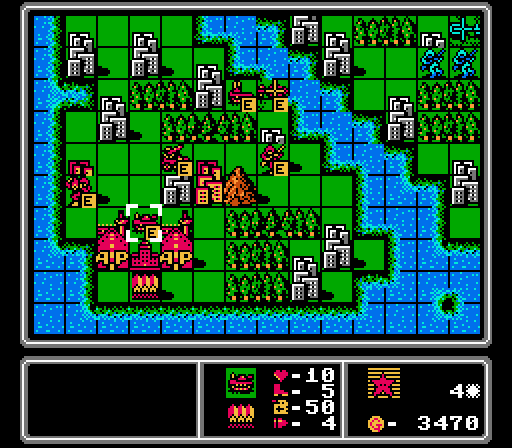 I build a tank for some reason. Strategically this unit is the second-least-useful on this map, though it'll be awhile before I figure out why. 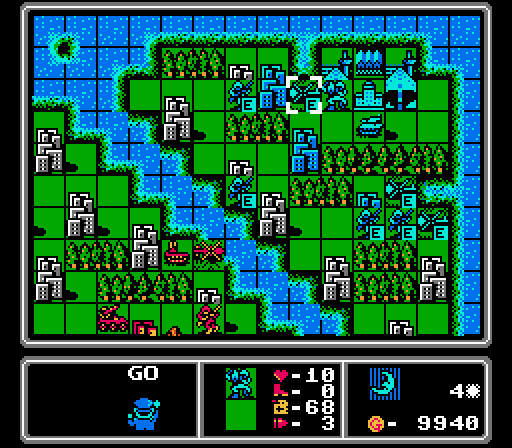 Blue captures another two cities, and starts on a different pair. Who cares about that, though, let's see the mech jump in the copter!  The same "Transport" theme plays here as when loading into an APC.  Terrified of our one copter, Blue builds an AA tank of its own. One of the newly-captured cities is also another secret base, and produces an APC. Turn 5  The infantry finishes its capture, and since we're limited to a mech for the second capturing unit, it can't reach another city this turn. Blech.  We build an APC, a much better choice for this map. Some of you may have already figured out why, but I won't spoil it just yet.  More capturing on the other side, I've lost track on how far behind we are now. But the AI is confident enough to send its copters forward now.  The enemy mech is dropped off by the upper-left city, an actual smart use of the copter's transport ability.  The AI builds an AA missile, giving its units cover from our lonely copter. Turn 6  I don't really have any idea how well copters do in a fight at this point, and I'll have plenty of cash to buy another one, so why not throw this one out here? Music: Air Unit Battle  The battle screen for air units is a little different. The terrain is on the bottom - the whale on the water tile is a cute touch - while the battle takes place over a sky backdrop in the middle. There is also a unique track for air battles. We're unlucky with the result, getting the worse of an even exchange.  Our mech starts capturing, while the infantry heads down to the two cities on the lower-right. The APC joins it to carry it back up to the rest of the map later.  We have enough funds now for a heavier air unit. Meet the Scout - look at that movement and fuel! Scouts are the counter to copters, though they also do somewhat well against infantry and mechs (as most units do). This unit would later be called a "Duster" in its only Advance Wars appearance (the fourth AW game, Days of Ruin / Dark Conflict, depending on your region). With all the enemy copters flying around, a scout will be useful here, even though it set us back 15000 G.  Two more cities captured by the enemy, with the mech starting another capture here. The enemy copter also strikes back against us.  We got even more unlucky in that fight. Might as well suicide next turn and build another one. 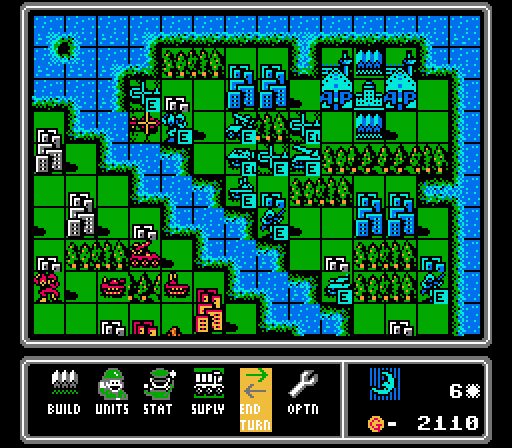 Yeah that's an enemy rocket that just showed up. Turn 7 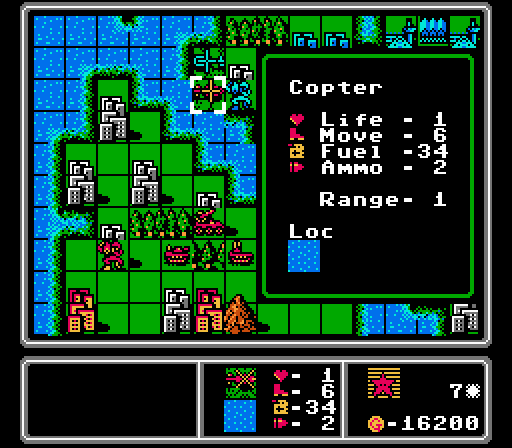 If you look at our copter's status compared to a few images ago, you should notice one unusual difference. It has two less fuel now. Each air unit consumes some fuel at the start of each turn - for copters, that's two fuel. I'm also pretty sure they explode violently if they run out, though I didn't manage to keep any alive long enough for that to matter in this run. 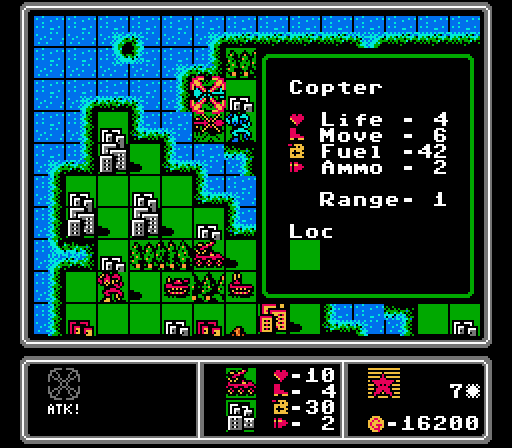 Our AA missile can go after the enemy copter, so let's see how this attack plays out:  Success! The air battle theme plays in mixed combat like this one.  I thought I was being clever here trying to keep the mech from completing the capture this turn, but....    Screw you I can build a new copter now. Our other units are just staring across the water at the enemy.  One enemy copter boldly moves into missile range, but the enemy rocket also moves up to threaten our AA missile. The other enemy copter flies south to harass our capturing infantry. Juggling our limited anti-air options across defending our triangle is a problem but not one of the big ones I mentioned. Turn 8  Our scout was at 92 fuel at the end of last turn, so it looks like they consume five fuel at the start of each turn. Makes sense that they'd use more, I guess, but I didn't even notice until capturing the screenshot just now.  The enemy copter has an infantry loaded inside to try and steal our stuff. Let's see how the scout fares against it.  Pretty good result, particularly with not taking any damage in return.  Our ground units move away from the enemy rocket. The infantry finishes its capture while the mech moves up to start on the upper group of cities, but has to stay clear of the enemy copter.  We've got the king of the skies on our side now. Meet the Fighter - like the scout, but stronger, and particularly good against all air units. It costs 22000 G, by far the most expensive unit we've seen so far. They also consume an extra five fuel per turn, like the scouts.  Here's an interesting glitch. I left our APC in range of the rocket. It's not visible on the map but you can see the cursor where the rocket is targeting it through the interface.  Approaching the enemy triangle is going to be impossible right now. There are two AA tanks and an AA missle guarding the center, and we have a new fighter to contend with as well. We're at a significant funding disadvantage already. Turn 9   Our scout is toast on the enemy phase, but I for some reason thought sacrificing a 15000 G unit to cripple a 4000 G unit was a good trade here. I think I was trying to show that the copter didn't get a defensive bonus from flying above the forest. 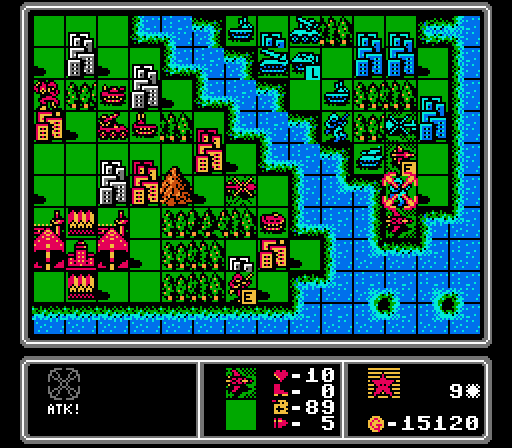 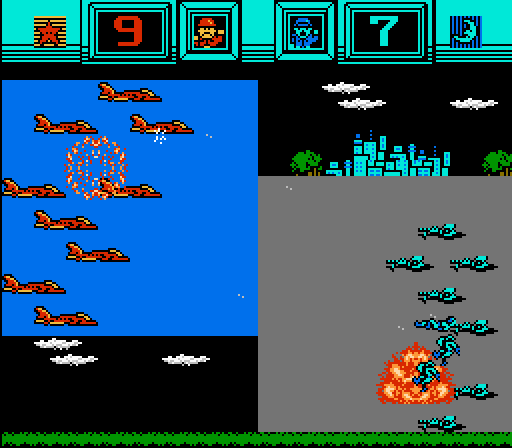 Fighters can also attack ground units, they just aren't very good at it. Like everything else, they can still do some damage to infantry and mechs, it's just not really a worthwhile trade. 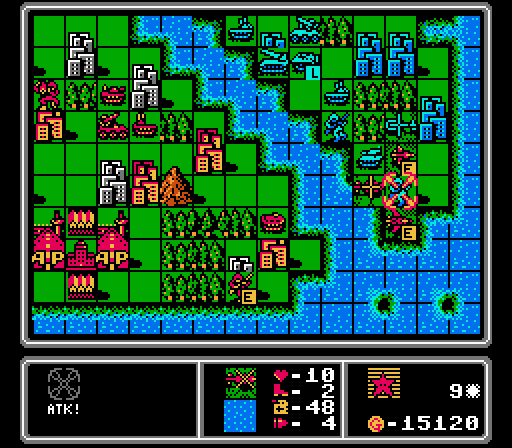 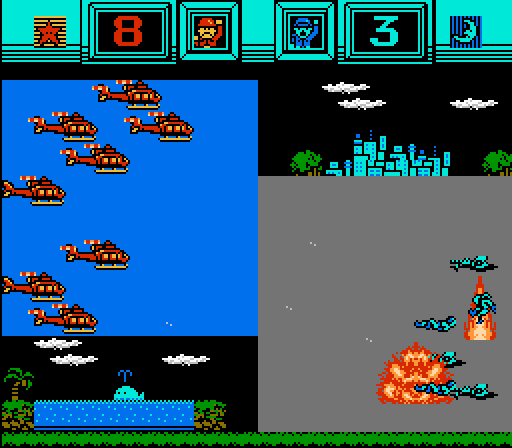 I'm not sure why I'm targeting this infantry so hard. It had already finished capturing the city it's on. 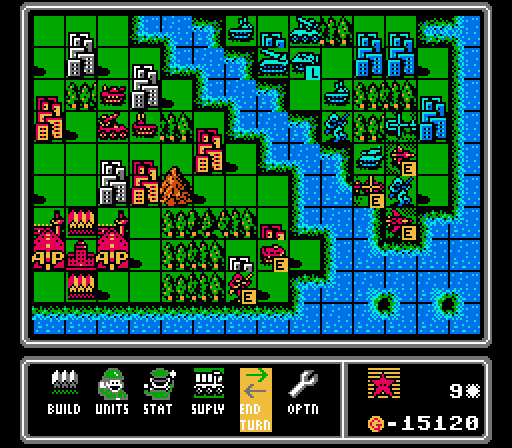 I'm saving up for the last new unit, so we don't buy anything here. 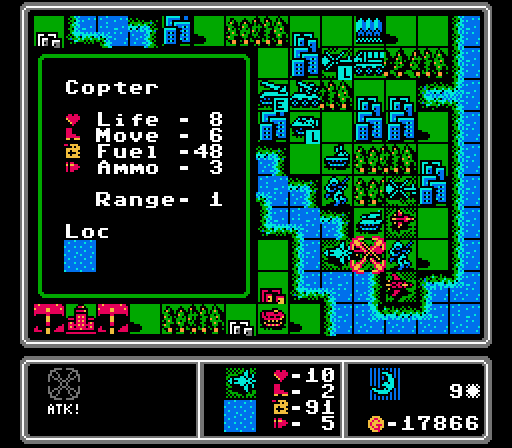 I totally missed that the enemy fighter could reach us down here.  Fighters really take it to other air units. 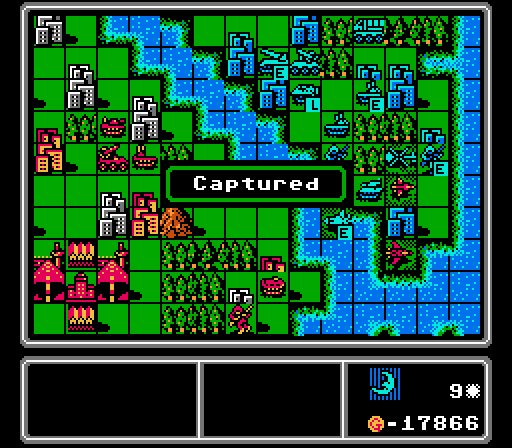 Here is Blue capturing the last city on its triangle. We still have more than half our cities still to go. Way behind.  Our opponent didn't even build anything. Probably knew it didn't have to. Turn 10  Time for some fighter-on-fighter action.  It's kind of silly to think of fighter jets just hovering around shooting at each other like that.  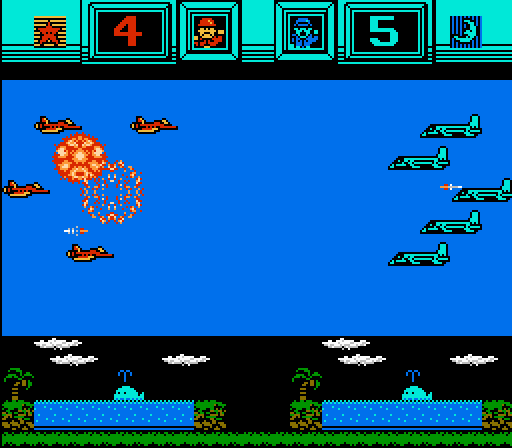 Right, don't send scouts against fighters, got it. 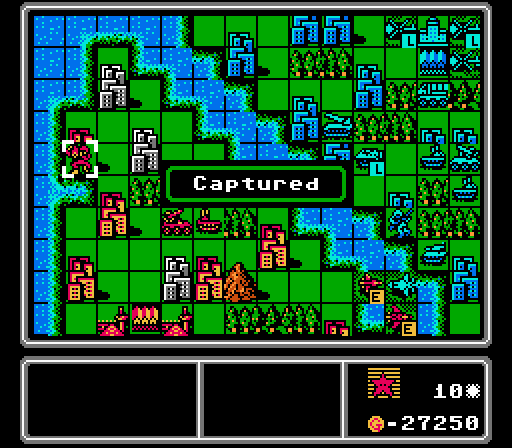 Two more cities captured, just four more to go. We're going to mostly hunker down until we get back to even. 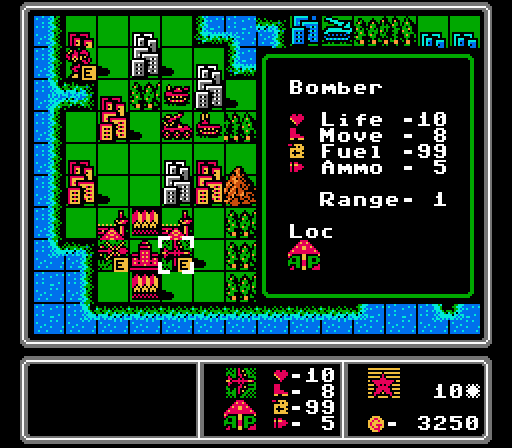 In addition to another copter, we also build the last new unit for the map. The bomber here has a bit less range than the fighter or scout, and can't attack other air units. In exchange it does great damage against all enemy ground units, though it'd be an even fight against an AA tank. The bomber also consumes five fuel at the start of each turn. 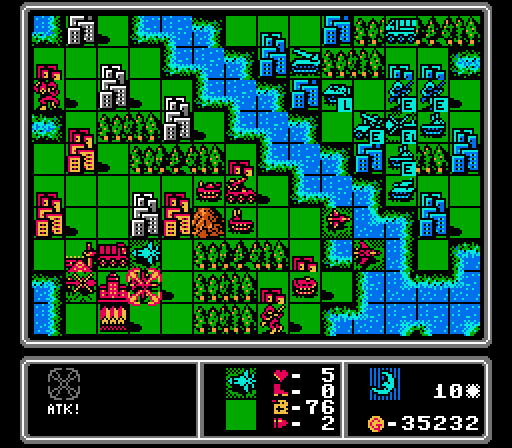 Enemy fighters are hard to track with how much movement they get. I had no idea this one could get all the way to our new bomber. 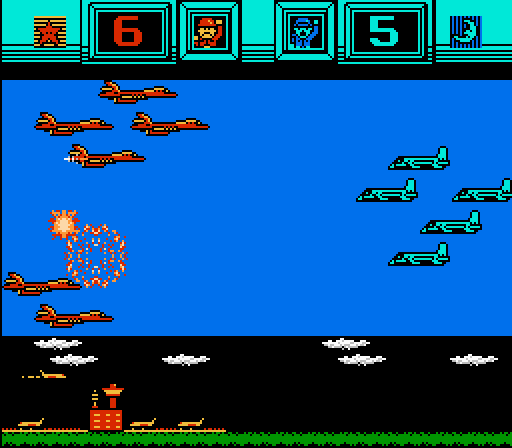 That's a lot of damage from a fighter that was at only half strength, too. Fighters do as much damage to bombers as APCs do to mechs, if you're keeping score. The only upside here is the bomber will heal up on the airport, while the enemy fighter is in range of our AA missile.  The AI also queues up a bomber for us. Turn 11 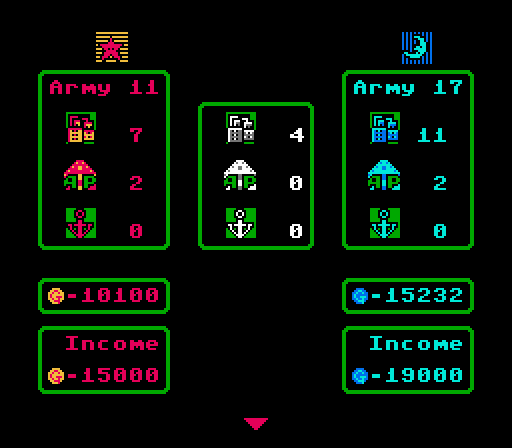 So as I said, we're still four cities behind, and our opponet has a much larger army already, too. I'm going to gloss over some of the details because we're really just playing defense until we can catch up here. 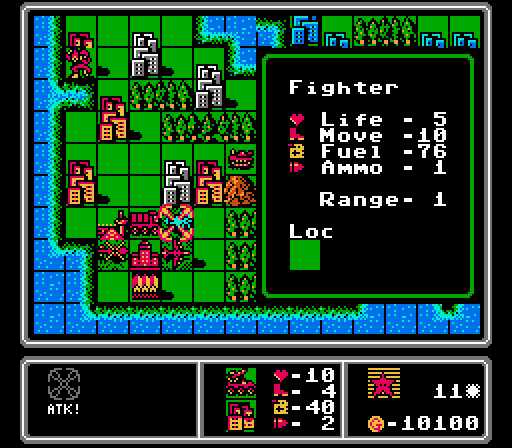 But first let's watch our AA missle shoot down this pesky fighter. 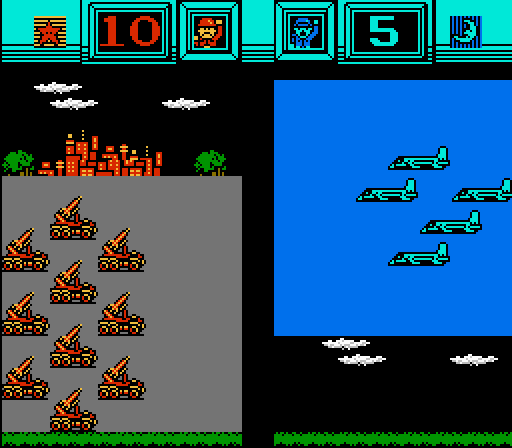 Well that's one threat removed. 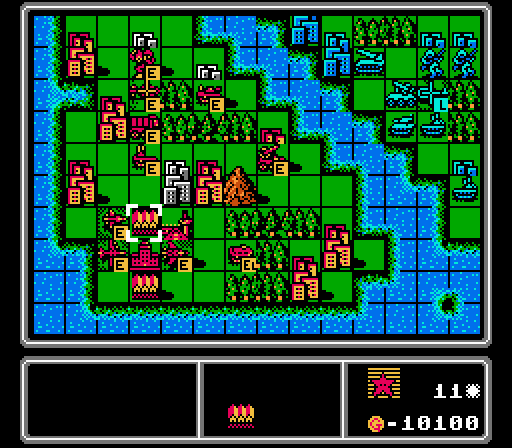 The infantry hitches a ride with the APC, the mech starts capturing another city, and a few other support units move up to help. Our fighter and scout retreat for repairs.  On the enemy phase, two copters off-load into our territory, the enemy bomber moves up to threaten most of our island, and the rockets move up to force our AA missile to choose between attacking a copter and getting out of the way. At the end the AI builds a new fighter, too. Turn 12 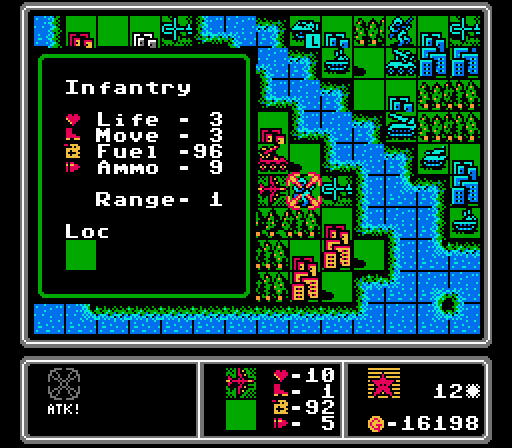 Our freshly-repaired bomber takes out the enemy infantry, who had been weakened when we attacked this copter several turns earlier. 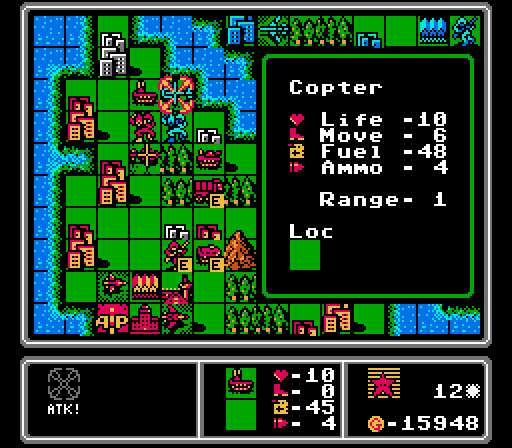 Our AA tank moves up to deal 7 damage to the other copter. 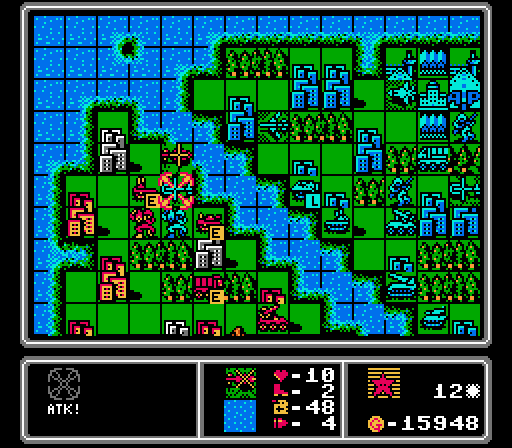 Our regular tank weakens the mech a bit, while our copter finishes off the enemy copter. It's in the enemy fighter's range now, though. At least our mech was able to finish capturing the city - just three more to go. 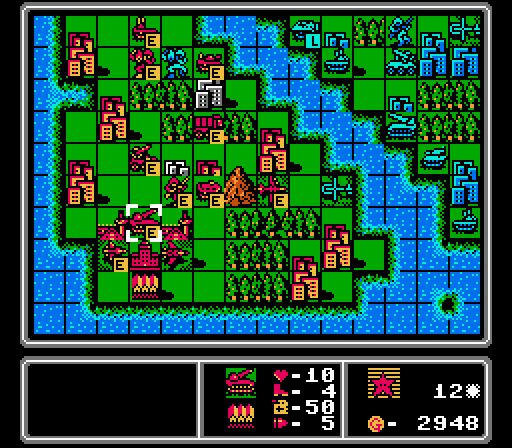 The AA missle retreats to safety, the scout and fighter continue to get repairs, and we throw out a rocket to help defend the island. 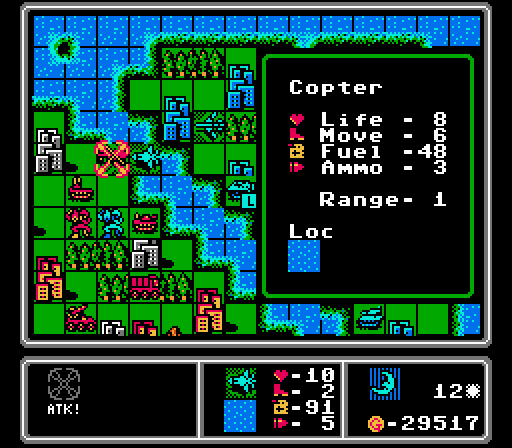 Surprisingly, our copter is able to just barely survive the fighter's attack here.  However our tank is completely destroyed by the bomber. Somehow I managed to pull the AA missile too far back, so it can't reach either enemy plane on the next turn. 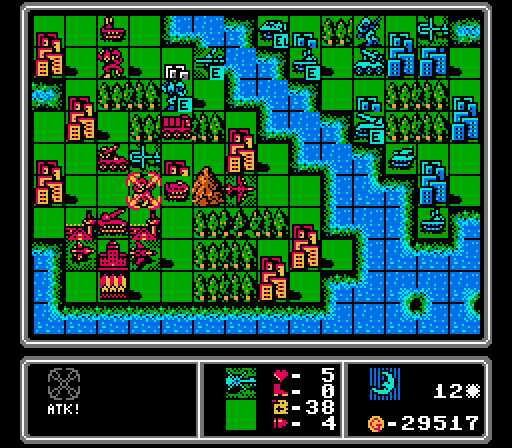 Annoyingly, the enemy copter is able to get in some chip damage on the infantry, which will make it slower to capture the city. I should've just left the AA missile exposed to the rocket and shot down the copter instead. 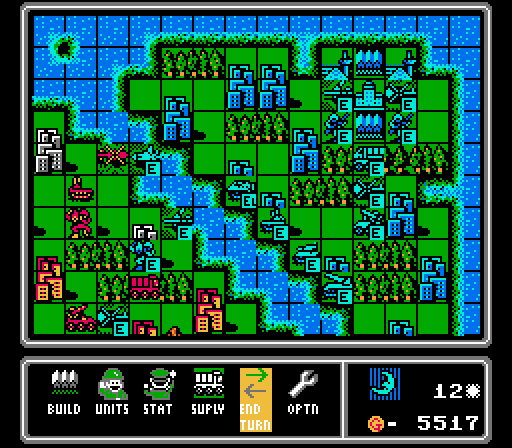 Another bomber and copter on the enemy airports. Turn 13   The AA gun and the bomber are evenly matched, but we start out with one less life so take the worst of the fight here.  The enemy mech tried to capture this neutral city but we wipe him out with our APC.  I decide to leave our scout and fighter on the airports to continue getting repairs, so I can't do anything to the enemy fighter or copter. There's only so much damage they can do, right? I do throw an artillery out there.  Yeah that extended fighter range got me again. Our scout is toast. I should've had it attack the copter on our phase instead. 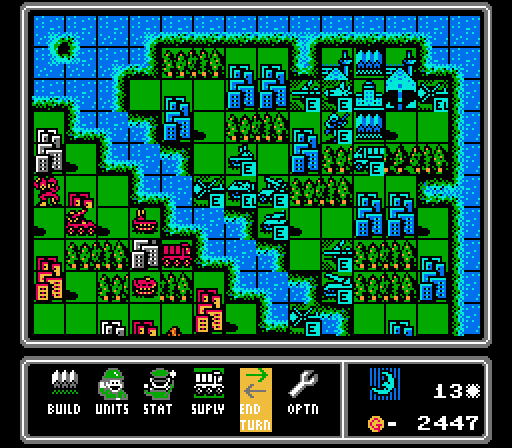 We've got another bomber on approach, and yet another fighter. Turn 14  The enemy copter tried to retreat but is still in range of our AA missile so we shoot it down. 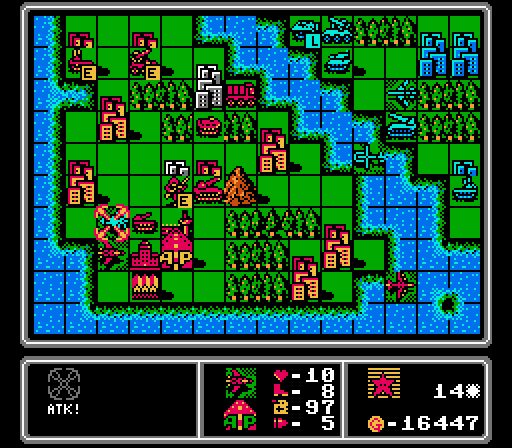 Our fighter is fully repaired so weakens the enemy fighter. 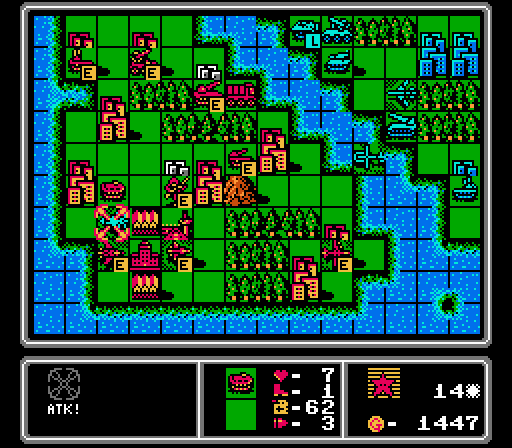 The APC wasn't doing anything useful so knocks another point of life off of the fighter. We also built a new scout. 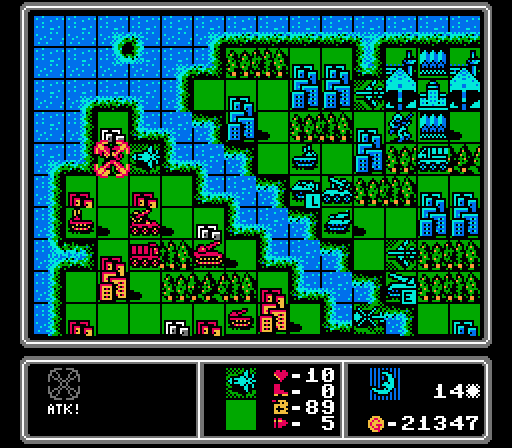 A fresh fighter flies in too close to the AA missile to get shot at next turn. It can't do a lot of damage to this mech, but it can do enough to keep it from completing the capture next turn.  A bomber comes in and damages our artillery, not that it was doing anything useful anyway.  The other fighter retreats down at the bottom of the map, and Blue builds a new bomber. Turn 15  The bomber is in range of our AA missile, and takes six damage. Our new scout then moves up to finish it off.  I once again send a less-than-full-strength fighter up to attack another fighter, and it works out even more poorly than last time as we take five damage while only dealing out three damage. 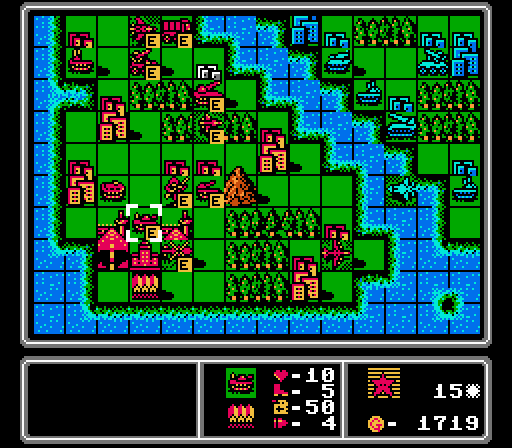 We replace the lost tank and copter. I think the only thing we're missing now is a medium tank, which wouldn't be very helpful right now anyway. 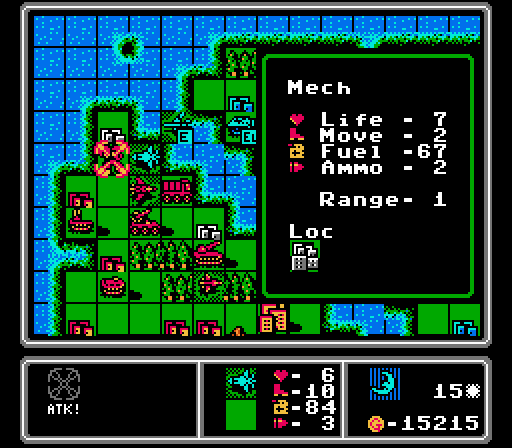 The fighter goes after our capturing mech again, but only does three damage so we'll still be able to complete the capture next turn. You can see the new bomber is nearby now, too. 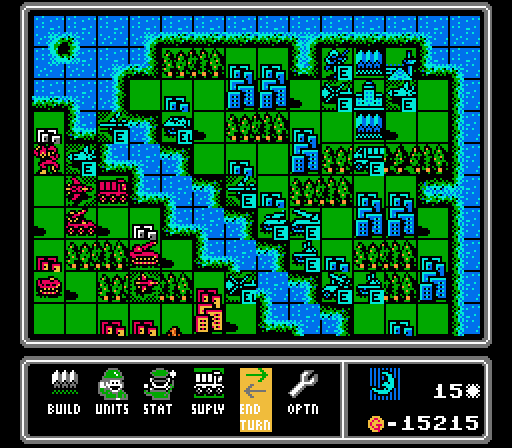 Luckily those aren't new air units, just damaged ones that headed back for repairs. Turn 16 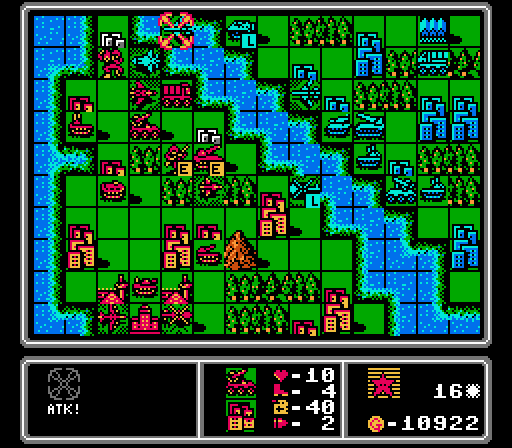 The new bomber takes six damage from our AA missile, then our mech completes the capture. Just one neutral city left! 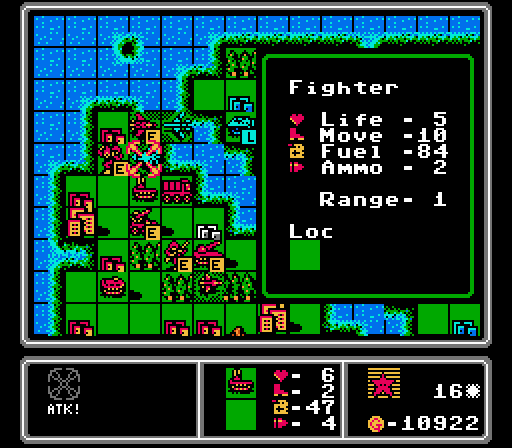 Our AA tank isn't back up to full strength yet, but it is able to dish out another four damage to this fighter. Our own damaged fighter took a bit more life off of the bomber. 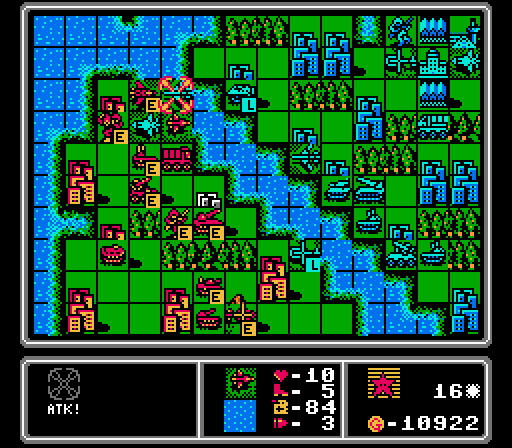 Our scout finishes off the bomber, and pins in the damaged fighter.  Blue pulled its repairing fighter off of the airport to do some damage to our scout, but nothing serious. 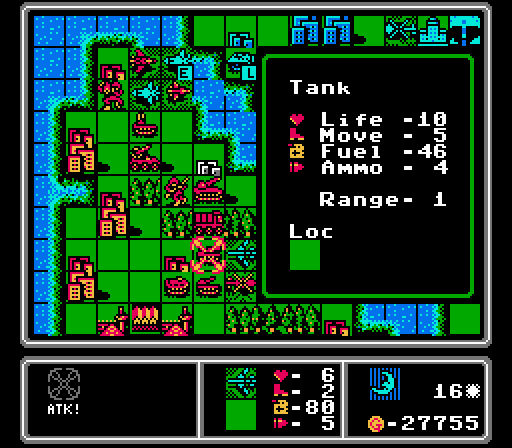 And a damaged bomber can't resist going after our tank again. 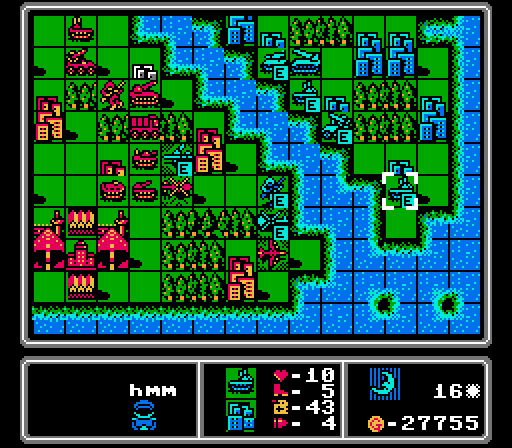 The copter brings down a fresh infantry while I only have a bomber in the way. There's an enemy AA missile protecting the infantry right now, too. The AI also builds yet another bomber, and a new copter. Turn 17  Our AA missile shoots down a fighter, while our scout is just barely unable to kill this copter.  Our rocket has been firing at an enemy AA tank the last couple turns, and finishes it off here. It's blocking the neutral city, but the enemy rocket is covering that at the moment anyway.  We've got some extra cash now, so I put out our last unit, the medium tank. According to the challenge rules, our army can't get any bigger than what we have right now.  Nothing much happened on the enemy phase, just another new bomber. Turn 18  We're close to parity now in both cities and units.  While our infantry starts capturing the last neutral city, I'm able to get an APC and a tank down to team up with the bomber to take out the enemy infantry.  Here's where I discover the second problem with this challenge on this map. With the capture of the last city underway and no enemy units in our territory, I figured now would be a good time to start carrying units over to the lower tip of the Blue triangle. For some reason I thought that copters could carry vehicles, but they can't. They can only carry infantry and mechs. Which is why that's all that Blue kept sending over to us. I'll play out the next few turns anyway, but I'm starting to wonder how possible it is to attack enemy territory with just one mech, one infantry, and one of each air unit. Also the fact that only infantry and mechs can invade our island makes tanks and medium tanks pretty useless; APCs are much more efficient for defending against those unit types.  Meanwhile I try to have a scout go after a copter and discover that it ran out of ammo and can't attack. An interesting strategy against air units is to swarm them with cheaper units to drain their ammo so they can't hurt your more valuable units on the enemy phase. Air units can only resupply at an airport (a supply unit won't help them, either), so running out of ammo will take an air unit out of the fight for a few turns.  On the enemy phase, our artillery got hit by a rocket and a bomber came in and finished off our tank again. 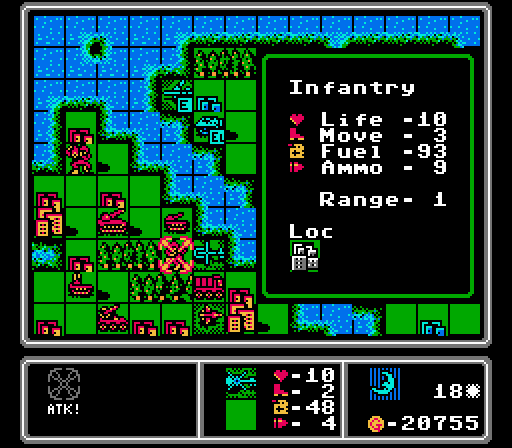 I thought distracting the enemy rocket might let the infantry complete its capture next turn, but another copter came in and dealt three damage to it. Turn 19 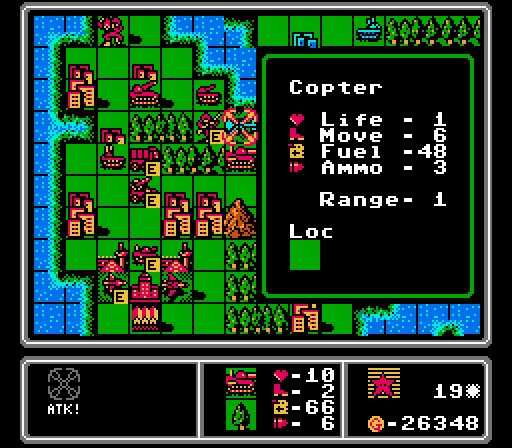 Our AA missile damaged the copter enough for our medium tank to get some action and finish it off. 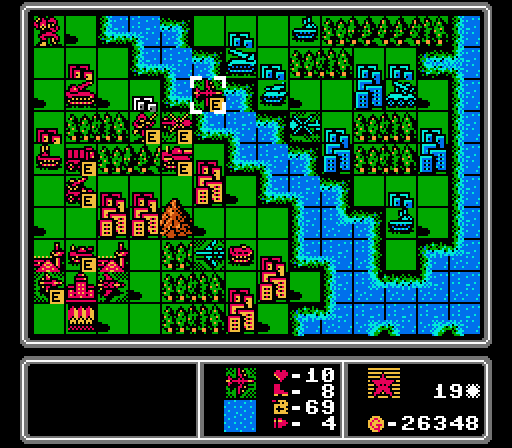 With no enemy fighters at the moment, our bomber takes up position in the center of the map, just out of range of the enemy anti-air units.  The enemy rocket attacked our medium tank, and the bomber here went after our rocket. That leaves our infantry free to complete the capture next turn. 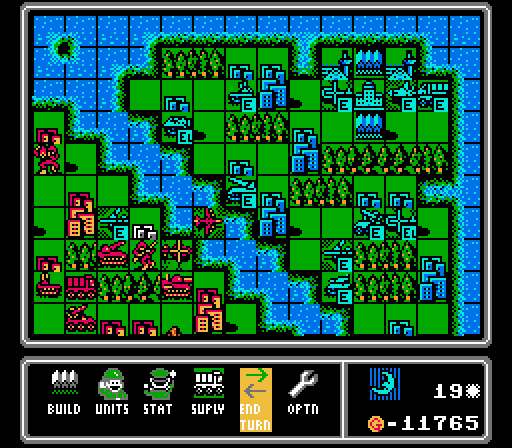 A new fighter appears. Turn 20  The AA missile and AA tank team up to take out the bomber.  And the last neutral city is finally captured!  The new fighter chases after our bomber. I don't have a lot nearby that can hurt it, but I also don't have a lot nearby that the fighter can do much against, either.  Yeah, another new bomber. Turn 21  Well, we've basically reached parity, at least once I build a new medium tank to replace the one that the rocket got off-screen last turn. We actually have more funds than we can spend at this point, thanks to the challenge limitations.  I figure I need to be more aggressive and once again send out a damaged fighter to take on a full-life fighter.  It really never works out well.  Our scout moves all the way to the top of the map to let the bomber back to our rear airport to get away from the fighter. Please note that the bomber is not actually out of range of the fighter.  So I throw some units to block off the fighter and get a new medium tank out there.  We're at something of a stalemate here. I can (barely) keep fending off the enemy air units and occassional infantry infiltration, but I am not sure I can muster up enough offense to really make any headway. That's two more bombers coming down (one new, one repaired), plus our fighter is down to one life, and another infantry just got dropped off. 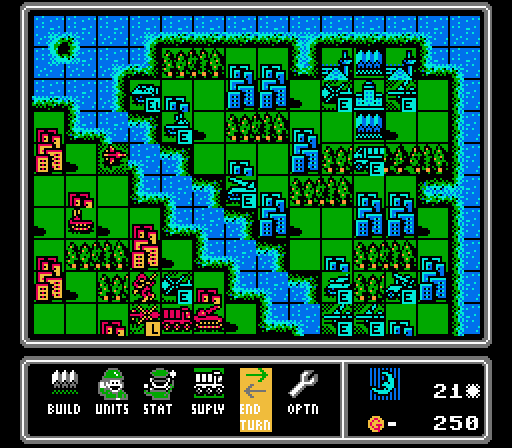 Oh and another new bomber, too. Turn 47 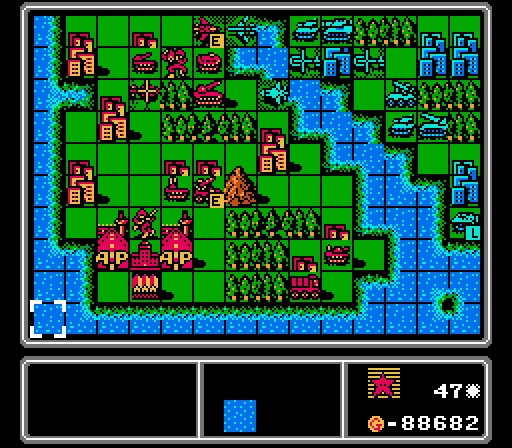 I made an honest attempt for the next 2.5 hours / 25 turns to make any kind of headway on taking the enemy triangle, but I just couldn't do it.  So, we officially give up. Music: Surrender Theme  Yeah, there's unique music for this screen, too. 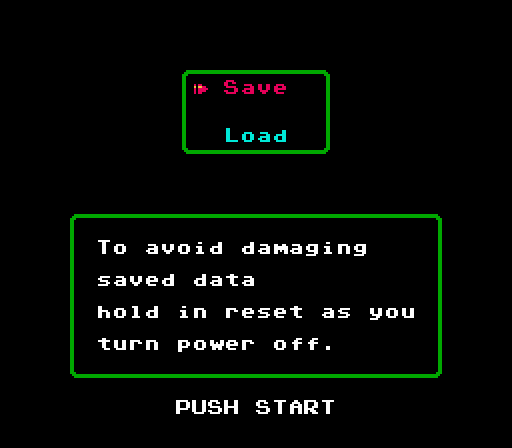 We're asked to save, for some reason. 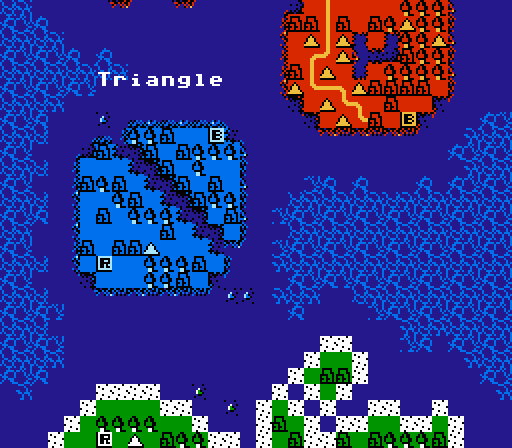 Ah, the map turns blue this time to indicate our loss. Guess we'll have to remedy that. Couple of options there. I can start from the beginning with a different challenge - either of the proposed Fair Play or Cash Match options might work - or resume from Turn 22 with a modified version of the original challenge. Narratively, taking full control over our triangle would expand our supply ability, so that the Limited Supply challenge eases up to allow two instances of each unique unit, instead of just one. I think either of those would be workable. No official vote, but let me know your thoughts; I'm going to need another break anyway. Edit: We'll go with the expanded version of the Limited Supply challenge, starting where we left off at Turn 22. See you there! DKII fucked around with this message at 05:57 on Jul 30, 2021 |
|
#
?
Jun 28, 2021 00:18
|
|
|
Optional new challenge option. No Fly Zone: Friendly aircraft are not allowed to end turn over you island, airports excepted. It would split ground/air into offense/defensive you to show off all the new stuff again, give you a mild handicap on income because you can't shuttle infantry to the farther cities on your island, only drop them offensively, and creates a logistics challenge of using your limited airports for production, loading transports, and supplying/repairing combat units.
|
|
#
?
Jun 28, 2021 02:12
|
|
|
FoolyCharged posted:Optional new challenge option. No Fly Zone: That's an interesting idea; even if I don't use it here I'll save it for later. I don't know if I mentioned it, but copters have the same limitations as APCs, in that they can only unload if both the copter and the drop zone are open terrain (plains/roads/buildings). That means copters can't hover over the water and unload onto land, for example.
|
|
#
?
Jun 28, 2021 03:28
|
|
|
How about No Land, Flyers Only, Final Destination You can only build infantry and flying units, no other units are allowed.
|
|
#
?
Jun 28, 2021 18:51
|
|

|
Damanation posted:How about No Land, Flyers Only, Final Destination I think this map in particular is just an awkward one for a lot of challenges because the river limits you so much - if there was even a single small bridge, you would have so much more flexibility in units to use, ways to advance, etc.
|
|
#
?
Jun 28, 2021 19:07
|
|
|

|
| # ? May 4, 2024 02:16 |
|
|
MagusofStars posted:I like this. I'd guess this would probably make the map feel really offensive - you gotta keep pushing forwards aggressively since you can't really turtle down without APC's to mow down landed infantry, AA guns to deter invading aircraft, etc. Yeah apparently the intended path to victory is pretty limited to a horde of infantry/mechs and copters, supported by the occasional bomber/fighter. My challenge in particular happened to be the exact opposite. I think I'll try out the loosened original challenge just so I don't have to replay the first half of the map again. A no ground units run is an interesting idea but there's no good counter for fighters that way - they're evenly matched against each other, and there's no first strike advantage in this game. I'd probably need fighters for the fighters, scouts for the bombers and copters, copters for the infantry/mechs, and bombers for everything else. I'll keep this on my challenge list for the future though (or if I fail even at the loosened challenge).
|
|
#
?
Jun 29, 2021 01:40
|
|