


|
Hadlock posted:Does there exist a blender config file for doing 3d printed stuff Hadlock posted:Yeah that's the video I watched, my eyes glazed over at about minute 8 of adjusting the 59th setting. Maybe I'm just getting too old for this poo poo. Babies are exhausting There are a lot of things that don't work like I want them to but for some things Blender is really awesome and you don't need to know a lot. However, you need to know specific things and I can't imagine learning those pieces from youtube videos. What's really easy is making parts from a model change in size or disappear. Some examples, I made this fridge handle from scratch using basic shapes and curves:  I often take parts from different models and weld them together, like this v-slot insert with a mounting part.  I edited the scale, made a recess into the stump so the owl doesn't fall off easily and made holes so the lightbulb and stuff could fit in:  I am not very good, but good enough to help with some basic questions. If someone has a concrete example of what they want to do I'm up for trying it out and then explain via streaming or whatever. Or give a basic overview about the functions I use all the time. And if I can't help, at least it won't take over 18 minutes to realize that. PM is also ok.
|
 #
¿
Jul 27, 2021 10:06
#
¿
Jul 27, 2021 10:06
|
|


|

|
| # ¿ May 9, 2024 08:41 |
|
|
Hadlock posted:Yeah mainly I just want to generate an STL, for example, a 2x2" square plate about 3mm thick, with a smaller 1/2" hollow square that's about 1" tall, in the middle of the plate, wall thickness also about 3mm, so I can glue that to the deck of the boat and stick the vertical mast in it, aka "mast step". Not much different from a patio umbrella stand. That's a 3 minute thing. I have to admit I don't know if Blender can work with inches, I use millimeters. Do you use Discord? I usually don't, but RabbitWizard#7565 Edit: Like this? https://www.thingiverse.com/thing:4918148 Edit2: Math is hard, I made a dumb. Fixed now, preview may show the wrong thing still. RabbitWizard fucked around with this message at 11:08 on Jul 27, 2021 |
|
#
¿
Jul 27, 2021 10:24
|
|
|
asterioth posted:Nope, seems to sill be doing the same thing I had this problem before, once it was a slight bend in the bowden tube which hindered filament passing. Disengage the extruder gear, push and pull some filament through. Use filament that has the gear marks from the extruder already! Try to turn the filament and push/pull again. It should be very easy to push through. If not, try another tube. Another time my ptfe tube was a bit "swollen" from to high temperatures at the hot end. New tube fixed that. If the printing errors are always at exactly the same place, you may have accumulated dust/dirt on your axis or roller wheels.
|
|
#
¿
Aug 3, 2021 10:15
|
|
|
Javid posted:I've got a print with a bunch of bridges. Cura's bridge settings
|
|
#
¿
Aug 14, 2021 10:53
|
|
|
insta posted:guys do not buy the cheap nozzles on amazon ffs Seriously. Use Aliexpress. I paid 4 bucks including postage for 20 nozzles months ago and still have 15 left.
|
|
#
¿
Aug 17, 2021 18:29
|
|
|
becoming posted:Not to be a "please do everything for me" sort of guy, but can you link the supplier? As I wrote in the post that sparked this discussion, I've heard good things about TriangleLab's nozzles but I seem to only be able to buy a max of three at a time. If I'm paying for shipping and waiting a month, I'd like to get a dozen or more. Or just order from a reputable US-based supplier so it only takes a few days. https://www.aliexpress.com/store/1504095/search?SearchText=nozzle https://www.aliexpress.com/store/1905393/search?SearchText=nozzle
|
|
#
¿
Aug 19, 2021 10:10
|
|
|
Show and tell! Small thing: I printed these https://www.thingiverse.com/thing:2833822 and they are strong and amazing and if you need some clamps I can recommend them. I have no idea how to measure pressure-weight-newtons, but I used both of them at the same time on wooden bars around a scale and got up to 60kg before I was afraid for the threads.  Now something bigger. I like making lamps, but so far they were kinda unsafe and it would have been a lot of work to change the light element if it broke. So I decided I need to put the parts of an official E27 socket into them.  I designed these:  Which I can put onto everything:  (That (mostly) isn't stringing, it is car hair!) Perfect:  Also reprinted my owl I posted in the last thread (had to upscale the stump a bit) and put a socket in there:  I broke one of the LED boards out of the bulb (the 5W version is using just 5V, so they can be powered with USB) and made a socket for them.   And here are the results. The model for the lamp on the right can be found here: https://www.prusaprinters.org/prints/41633-hex-table-lamp    I'd love to see more cool things you made itt. I feel like it is mostly "this is my first print" and benchys.
|
|
#
¿
Aug 30, 2021 21:14
|
|
|
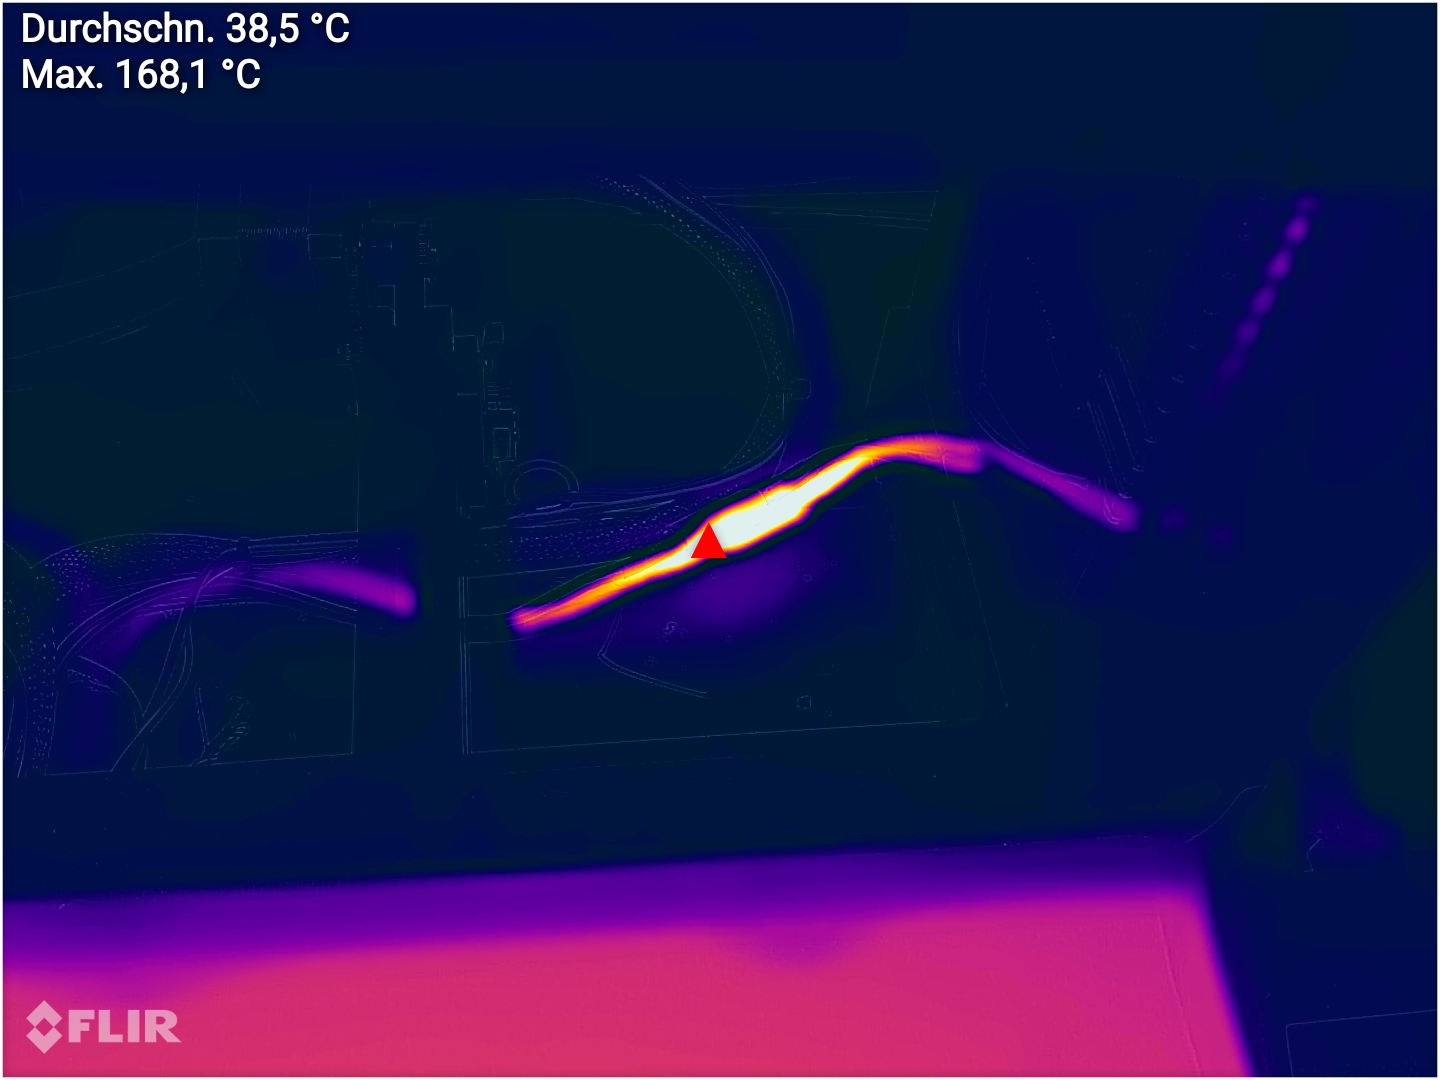
SEKCobra posted:I really don't know what to make of this, my printer's cables really get hot during heatup, maybe I should just rework the connector at some point. SEKCobra posted:While I agree that this is poor design, the connector is rated to 120°C, SEKCobra posted:I don't know why you guys assume anything is gonna catch fire spontaneously SEKCobra posted:these aren't unheard of operating temps, just far out of an ideal spec.
|
|
#
¿
Sep 8, 2021 10:50
|
|
|
Elder Postsman posted:Last few prints I've done have had this bulge about 10mm up from the bottom: Dirt/Dust/Dents/Boogers on your Z-rails or rollers.
|
|
#
¿
Sep 8, 2021 15:26
|
|

|
armorer posted:Any ender 3 owners have the stock hotend fail on them by claiming to be at temp but actually being low?
|
|
#
¿
Sep 10, 2021 00:45
|
|
|
armorer posted:I also replaced the capricorn tubing with a new piece when I swapped the nozzle, so that's not it either. It's a weird failure but the only thing I have to go on is that it prints of I set the temp high. I'd assume I was using the wrong filament or something, but I opened a new roll of grey Hatchbox PLA which is what I typically print with and it behaves the same as the black I had in when it first clogged up. Serenade posted:Doing it in the slicer doesn't work because the inserts might poke out below the outer base. Serenade posted:I've tried Blender, using boolean transformations. This has been the best solution I've found but centering the inserts is weirdly finicky and the boolean operators sometimes just don't work. This may all be wrong as I don't understand what/why you're using the boolean operator. I sometimes had problems with that one too. Most times it was because I forgot to click "Include -> Selection Only" when exporting the STL ") But sometimes it only works for me if I apply the modifier (Ctrl+A). But sometimes it only works for me if I apply the modifier (Ctrl+A).
|
|
#
¿
Sep 10, 2021 14:08
|
|
|
Baconroll posted:Any tips on storing the PLA reel I'm actively using on a day-to-day basis ? I've read its best to keep an opened but current unused spool in a vacuum bag with a desiccant pack, but whats recommended for a spool I'm using for few hours every day ? I bought 1kg of silica pearls - the orange ones, not the blue ones because cancer - for ~15 bucks. They get a much darker color when they are full with water and can be regenerated in an oven or your filament dryer. Also bought these bags: https://www.amazon.com/Hopttreely-Premium-Drawstring-Festival-Bathroom/dp/B078249Y7C Then took some plastic boxes and put rubber seals into the lid. Walla, drybox.
|
|
#
¿
Sep 12, 2021 14:56
|
|
|
Hadlock posted:Presumably I can sand these edges down to a flat "machined" surface
|
|
#
¿
Oct 18, 2021 19:10
|
|
|
MJP posted:If it's kosher to request edits, would anyone be willing to change this Thingiverse spool holder design to use 608ZZ bearings instead of 6004 bearings? Basically I just need the pegs, holes, and washers to be 8mm instead of 12mm. I don't trust my absolute lack of F360 skills and am not yet at the spot to learn 'em. Maybe over Thanksgiving. Problem is the part which is holding the pegs. To get the bearings over it, the pegs can't be bigger than 8mm, that part is 9.8mm. Which means you would have to adjust the parts that hold them too.  Not sure, can the pegs be split in the middle? Then it would be easy to adjust just the middle part.
|
|
#
¿
Oct 25, 2021 14:00
|
|
|
Paradoxish posted:how are you guys clogging your nozzles so much  The secret to avoid that may be extremely good hardware. For example I replaced my tube fittings because I hosed up the old one with pliers. https://de.aliexpress.com/item/33026236542.html?spm=a2g0s.9042311.0.0.27424c4dRB8Gii Each one of those bad boys costs close to 20 cents including postage, but I feel my printer is worth it. With these fittings I use this handcrafted PTFE-tube which is like 110 cents per meter. https://de.aliexpress.com/item/1005002604077322.html?spm=a2g0s.9042311.0.0.27424c4dRB8Gii I'm not sure which nozzles I'm using right now, maybe the expensive ones for 34cents a piece or the more reasonable priced ones from my favorite seller - Shop3033013 - for 18 cents a piece. The secret to avoid that may be extremely good hardware. For example I replaced my tube fittings because I hosed up the old one with pliers. https://de.aliexpress.com/item/33026236542.html?spm=a2g0s.9042311.0.0.27424c4dRB8Gii Each one of those bad boys costs close to 20 cents including postage, but I feel my printer is worth it. With these fittings I use this handcrafted PTFE-tube which is like 110 cents per meter. https://de.aliexpress.com/item/1005002604077322.html?spm=a2g0s.9042311.0.0.27424c4dRB8Gii I'm not sure which nozzles I'm using right now, maybe the expensive ones for 34cents a piece or the more reasonable priced ones from my favorite seller - Shop3033013 - for 18 cents a piece.
|
|
#
¿
Oct 30, 2021 21:38
|
|
|
Here is my special tool I use for nozzle changes. For building it I used a hammer. 
|
|
#
¿
Nov 6, 2021 13:11
|
|
|
SEKCobra posted:No change
|
|
#
¿
Dec 3, 2021 11:43
|
|
|
MJP posted:A PTFE tube has to go past the fitting, all the way through the heat sink and heat break, right up to the nozzle, right? MJP posted:If it doesn't go past the fitting - literally, the metal part of the fitting is too narrow - am I supposed to drill or file it out or something? Is it the "official" PTFE tube? Anyway, I'd suggest ordering another tube or another fitting, one of them has to be the wrong size. Edit: I mean you probably "can" file or drill it, but you're not supposed to. Edit2: vvvvv yeah other hotends than mine may exist.... RabbitWizard fucked around with this message at 18:19 on Dec 4, 2021 |
|
#
¿
Dec 4, 2021 18:08
|
|
|
biracial bear for uncut posted:Anybody gonna print this? I have never tried to print anything with that much fine detail, but wanted to give it a try for a while. I think it came out ok-ish but I probably won't go into the minifig market with my Ender3. Original stl size, ~40mm high, 0.1mm layers, 0.4mm nozzle    
|
|
#
¿
Dec 5, 2021 19:33
|
|
|
Jaded Burnout posted:Alright cheers. Sounds like I�ll need to take apart the extruded somewhat to do that? I'd check the temperatures first. I once had my cooling fan blowing on the nozzle when there were flat parts below it which cooled it down enough to not being able to melt filament fast enough. (Un)Loading would fix temperature issues because your heating block is able to regain temperature.
|
|
#
¿
Dec 6, 2021 12:58
|
|
|
Jaded Burnout posted:Okay. Is it adequate to check the numbers on the display? Or do I need to get out the IR thermometer? The drop-off was over 10� for me when the fan started, that's definitely noticeable on the display. I also think you'd want the temperature inside the hearing block anyway, not the outside. Or just set your print temperature higher and try to print again, as it may be any of the other possible problems mentioned. This is just the most easy one before taking anything apart.
|
|
#
¿
Dec 6, 2021 13:23
|
|
|
Ugh, I thought I knew how to fix the lovely lines, but cleaning the z-spindle and the rails/rollers doesn't seem to work anymore. The lines next to the "A" seem like the printer isn't even trying any more  Any ideas? 
|
|
#
¿
Dec 29, 2021 20:29
|
|
|
Rexxed posted:That could be more of an extrusion issue than the z axis? Inconsistent heating or slipping/skipping on the extruder can cause weird layers. It might be worth checking that the extruder gear(s) aren't full of chewed up plastic and that everything is feeding well. Also watch the temps while it's printing, I know when I put a new heater on one of my printers I had to do a PID tune since the temperatures were oscillating but a few degrees up and down while I watched the temps through Octoprint.  Cory Parsnipson posted:The bed adhesion just doesn't seem to be cutting it with this roll. 
|
|
#
¿
Dec 30, 2021 11:48
|
|
|
Rexxed posted:Maybe try a different model and see if the issues happen at the same height, just a test cylinder or something. That would definitely let you know if it's a problem with the Z axis threaded rod or brass carriage insert (whatever it's called) versus extrusion at those heights. The main thing that made me consider extrusion was the poorly filled out layers under the A. It's possible that with the same model slicing that underextrusion is happening in the same places due to the conditions of heat and amount of plastic, but another model would be a more definitive test. It's also worth checking your belt tension for X and Y if the layers aren't stacking up nicely, but it doesn't really seem like that in this case. Argh urrrrh sonofabitch poo poo.  I printed this after cleaning the z-spindle a while ago. I was so proud how nice it looked, that's why I was extra pissed about the lines appearing again. Your post helped me to remember something. Here's the sliced model with invisible outer perimeters, showing extrusion width.  I'm so mad at myself right now. 
RabbitWizard fucked around with this message at 15:19 on Dec 31, 2021 |
|
#
¿
Dec 31, 2021 15:03
|
|
|
RabbitWizard posted:
Not sure if I can fix this with the overlap setting or something, for now I'll just check the widths in the sliced model and change infill or perimeter settings for the parts where this poo poo appears until it doesn't. I get why PrusaSlicer does it but I don't understand why I can't disable the variable infill width. I'd rather have no infill than the lovely adjusted infill.
|
|
#
¿
Jan 8, 2022 17:50
|
|
|
snail posted:Have you tried it in Superslicer? Almost identical UX wise, uses the same profiles, and I know Remi has put a lot of work into extrusion width and infill management. Tried it - it seems much better than PrusaSlicer regarding settings - and it also does it.   Not at the same places, but that may be because of the default settings in SuperSlicer. Wait a minute! Why didn't I notice that before? It seems to apply primarily to gap fill. Which makes sense because gaps are different sizes. Let's just turn gap fill off aaaaand....   Edit: I printed this bird house. More useful than the other thing and no lovely lines in the print. 
RabbitWizard fucked around with this message at 11:29 on Jan 9, 2022 |
|
#
¿
Jan 9, 2022 11:24
|
|
|
Mindless posted:The first time I thought it just came unstuck from the baseplate, so I guessed cold basement was the problem and set the base plate temp to 62c for this try. This time it just seems to have globbed. Looks like it came unstuck from the plate and moved around with the nozzle. Does that happen when it is starting to print the table legs? Then it might help to set this to *at least* layer height.  If you change it, also check if this is set to No.  Those setting will move the nozzle a bit upwards any time it needs to be moved around. It helped when I had a filament that barely adhered to the bed, the nozzle should stop pulling the filament sideways or at least with less force. A photo from the other side of the print might help checking if your nozzle height for the first layer is alright.
|
|
#
¿
Jan 16, 2022 22:50
|
|
|
I have this in "End G-Code" in PrusaSlicercode:
|
|
#
¿
Jan 19, 2022 18:51
|
|
|
crime fighting hog posted:Will it be too complicated for my dumb rear end to use? I was wondering if it is better to pick up a used printer than getting a new one as a beginner. I got mine used and I didn't have any problems where I needed to figure out if a part was borked (Creality QA) because the previous owner checked everything for me. I also couldn't gently caress up the build. I feel like lovely parts and tiny errors while building were mentioned a lot in this thread. But maybe I just remember it different because it felt really good that I had spent less money for my printer and didn't have to deal with all of that 
|
|
#
¿
Jan 20, 2022 00:02
|
|
|
I want to reduce fan noise on my Ender3 and think I'm going with buck converters and 12V fans (except if someone can recommend a better way). What I haven't figured out yet is the cooling fan. The speed is variable, is that done in a way that will work with any buck converter? Or does the converter need to be special in any way to do that?
|
|
#
¿
Apr 14, 2022 09:09
|
|
|
Hadlock posted:I think the fans are controlled via PWM can you just modify it in firmware? Might even be dynamic based on gcode criteria and machine state Bondematt posted:Best to get queiter 24v fans for part cooling. As Hadlock mentioned above you cannot use a buck converter on a PWM line.
|
|
#
¿
Apr 15, 2022 21:13
|
|
|
Aurium posted:Because n channel MOSFETs are so much better, the negative pin is what's controlled. Oh, so in theory I can use one 12V module (adequately sized for consumption, of course) for all fans?
|
|
#
¿
Apr 16, 2022 16:39
|
|
|
I moved my printer and now I can use it while NOT being hunched over because it isn't directly under the sloping roof. Also won't burn the house down any more if something happens, or at least not instantly. I'm not afraid any more to let it run through the night which finally allowed me to print a bigger slug. Like, 6 months after it was popular here? Also this one is very awesome and I can highly recommend it: https://www.thingiverse.com/thing:2738211  Here's my setup with very serious prints running, being able to stand in front of your printer is amazing. 
|
|
#
¿
Apr 25, 2022 20:32
|
|
|
bird food bathtub posted:I want to print a slug too at some point. Is there a specific search term on a specific site to look for the file for that one? Yeah I'm behind the times too but it's neat. Curled up version so you can print it bigger https://www.thingiverse.com/thing:5091680 Roundboy posted:If you follow the improved flexi rex page it takes you to his GitHub, which has separate stls for each segment in a top and bottom half to assemble it. It also allows you to print it HUGE.
|
|
#
¿
Apr 26, 2022 09:31
|
|
|
Hey RabbitWizard, can you print a holder for a Bosch Zamo? -Sure! Won't take long. 10 minutes later sliced, 2 hours later printed:  Wait, wouldn't it be funny if there was like a Bosch logo but it is wrong like a cheap knockoff? 3 loving hours later I sliced the final version. Just needed to learn using svg-files in Blender and oh god was it a fiddly process altogether. I needed to print it on the bottom, so i cut the logo 0.4mm out of the original model, sliced one 0.2mm layer of the full model, printed it. Printed 2 layers @0.2mm each of the logo. Then printed the remaining model. Sadly I got a tiny error in there but it is the best thing I ever printed. The print got done an hour ago but I'm still laughing every time I look at it. Worth it. 
RabbitWizard fucked around with this message at 13:31 on Apr 26, 2022 |
|
#
¿
Apr 26, 2022 13:28
|
|
|
Doctor Zero posted:Get quieter fans too. They do make a ton of difference. When the servo whines stops, I guarantee you�ll start hearing the fans. cruft posted:This is awesome. You are awesome. drat. Any idea how much filament it will cost?
|
|
#
¿
Apr 27, 2022 11:31
|
|

|
Roundboy posted:All of it.  Printing articulated/flexi animals is my life now. What a floppy guy! https://www.thingiverse.com/thing:3495390 https://i.imgur.com/OL9CGRW.mp4
|
|
#
¿
Apr 29, 2022 01:58
|
|
|
Grey Hunter posted:Basically at some point my extruder stops pushing out filament I find temp towers bothersome, I use pronterface to extrude 20-80mm filament with a speed of 400mm/min. If it comes out without the gear jumping, I reduce the temperature 2-3�. When it starts jumping current temp +10� is my printing temperature. (Edit: This may only work with PLA) Not sure how bothersome it would be for you to set up something like pronterface, but it makes diagnosing such problems much easier and faster. Can't imagine to figure something like this out with printing whole prints. In other news, I think I have too much time on my hands. 
RabbitWizard fucked around with this message at 19:19 on May 2, 2022 |
|
#
¿
May 2, 2022 12:43
|
|
|
Ughhhhhhhhhh. I rebuilt it. Quiet 12V fans and external electronics case. Shopping List: 1x Noctua NF-F12 PWM 2x Noctua NF-A4x10 PWM 1x 7� generic Step Down Converter - Only the best DC for my 45� fans  2x PWM Module  I started with printing the Ender 3 Quiet Control Box https://www.thingiverse.com/thing:3689568. I spent 20 minutes to edit the middle layer which was made to hold a RaspberryPi to fit my other electronics. After printing and correcting the x-th hole with a drill I spent 2 more hours editing and printed a working version. Beautiful:  For the new fan shroud I decided on the Ender 3 silent fang noctua V2 https://www.thingiverse.com/thing:4223929  First I tried to leave the fan plugs intact so I could quickly change the fans if they broke. Which is dumb as hell. The cable connection looked like someone forgot a Bratwurst in there. Removed it all again, tried it with some other type of small connector, reduced it to vienna sausage size. So I took it all out again and just hand-twisted the cables together and put some shrink tubing on there. It's below one Watt per fan, I don't even know any more why I tried to make a better connection. Aurium posted:Any controlled fans use the negative on the respective fan header. Always on fans just use ground. Either on the buck regulator itself or elsewhere. All wired up!  That's a lot of wires so I redid the part with the fan on top to make more space for wires.   One of the PWM controllers is for the big fan on top of the case because it is too much fan anyway and I can. The other one I used for light. I took one of the generic ball joints from tinkercad and adjusted a thing here and there to make these:  Installed and wired up they look like tiny spotlights, which amuses me more than it should.  Finally, making new prints and enjoying how silent everything is. But oh no, they all suck!  After playing around with fan voltage (not enough airflow?) and trying other print settings and other filament for ~5 hours I noticed that I may have moved the bowden tube a little bit upwards and filament got stuck in the print head/was flowing out of the top  Having lost all patience a day ago I ripped out the whole hotend and installed a new one. Everything's fine now Having lost all patience a day ago I ripped out the whole hotend and installed a new one. Everything's fine now ") Here it is now in all its glory:  If I had to do it all over again I would buy another printer which is silent by default.
|
|
#
¿
May 14, 2022 12:04
|
|
|

|
| # ¿ May 9, 2024 08:41 |
|
|
Commodore_64 posted:YAHOO!  I really like that if you have a thermal runaway it'll melt the cooling loop above the heating element, that's smart design. I really like that if you have a thermal runaway it'll melt the cooling loop above the heating element, that's smart design.Today I found a quick project, inspired by a comment on discord about 3D printing and unnecessary plastic in general.  I responded with  but then decided to give it a little effort. but then decided to give it a little effort. (Edit: Non-gif version https://imgur.com/a/MxDq1c4)  It's on my shelf with other prints now, of course RabbitWizard fucked around with this message at 18:21 on May 15, 2022 |
|
#
¿
May 15, 2022 01:42
|
|