


|
Lawnie posted:
If this is an option, do it. I think it might be a wash in terms of effort compared to cutting & pouring, as you�ll have to dig pretty big holes on either side of the pad to get under the concrete and have room for the auger but you won�t have to rent a concrete saw and you won�t have to risk messing up w the concrete pour. The downside is, you won�t be able to use a concrete saw and work w concrete which I think is pretty cool in general
|
 #
?
Jun 15, 2022 13:38
#
?
Jun 15, 2022 13:38
|
|


|

|
| # ? May 28, 2024 20:18 |
|
|
Thanks for all the advice everybody. I hate to start a project and then find that every assumption I made was wrong, so I appreciate the explanations. Much more confident in getting under the concrete around my house in general.
|
|
#
?
Jun 15, 2022 13:53
|
|

|
floWenoL posted:So I have a vent outside my house that should look like this: Remove soffit vent. Fasten strips of wood to the perimeter of the opening FROM ABOVE. Use (flush-mount) screws, nails, glue, whatever will hold the strips in place that are used wherever the vent screw holes aren't, preserving the flush surface on the underside. Now you have a new, beefier backing to screw into. OR: Slugworth posted:... drill new holes in the vent for screws in different locations.
|
|
#
?
Jun 15, 2022 15:05
|
|


|
Or use toggle bolts and don't rely on the drywall to support the longevity of the hole.
|
|
#
?
Jun 15, 2022 15:16
|
|

|
If you have space behind, can you glue or screw a few pieces of 1x1 material on the inside of the hole to use as the new mounting? Basically put some material on the backside to give the screws more to grab? It looks like you could manage that from the outside without actually getting full access to the back of the hole.
|
|
#
?
Jun 15, 2022 15:27
|
|
|
Are you going to still need to remove it periodically? Because any fix you do now will just be a bandaid situation. Screwing and unscrewing any wood is going to destroy the hole eventually. If you're going to periodically need access what you need are some threaded inserts. Screw those into the current holes, they tend to be oversized enough that they'll bite, and then attach the actual vent cover with appropriate machine screws. edit: something like this: https://www.toolstoday.com/v-16062-threadedinsert-mm.html
|
|
#
?
Jun 15, 2022 15:57
|
|


|
Cyrano4747 posted:Are you going to still need to remove it periodically? Because any fix you do now will just be a bandaid situation. Screwing and unscrewing any wood is going to destroy the hole eventually. Yes you can even find these at the home centers as drywall anchors. 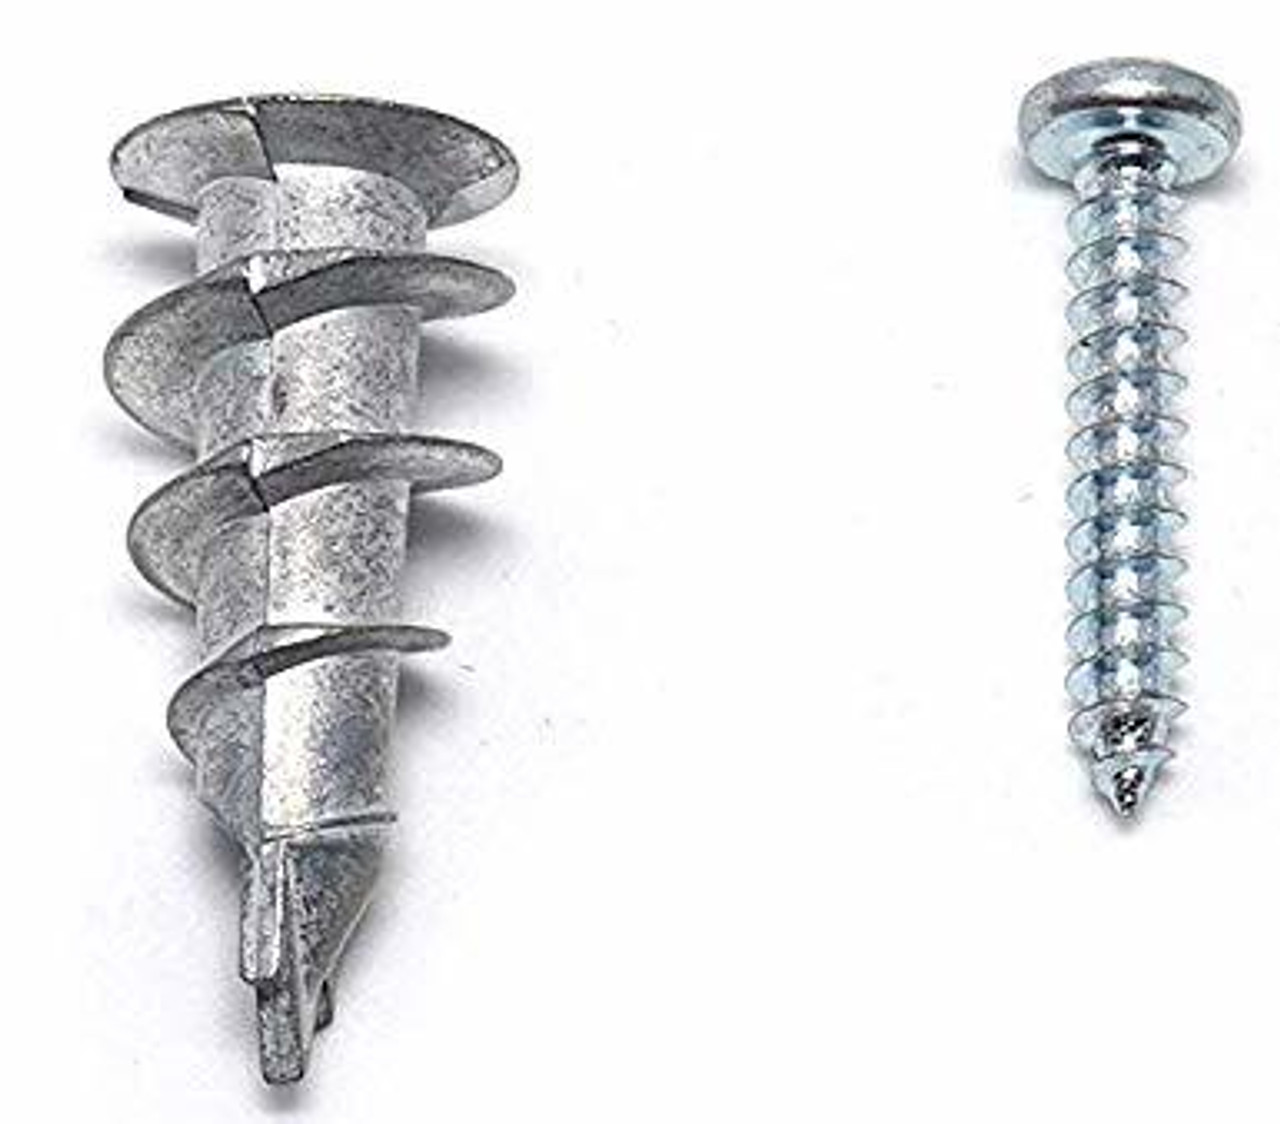 I�d honestly glue the metal insert in place to ensure it doesn�t come loose or enlarge the hole. Provided you are careful unscrewing the vent cover (ie: screw/unscrew by hand) it should be fine. I�ve used these for access panels that get opened a couple times a year w no issues.
|
|
#
?
Jun 15, 2022 16:14
|
|
|
Fix It Fast: Screwing and unscrewing any wood is going to destroy the hole eventually.
|
|
#
?
Jun 15, 2022 16:14
|
|

|
I think given the wood is so thin, toggle bolts are the fastest easiest solution. Several of the suggested ones will be better/more permanent, but also take more time and effort and may be impossible depending on whether you can actually access that soffit area from above. Can you tell us why you're having to open that vent repeatedly?
|
|
#
?
Jun 15, 2022 18:00
|
|

|
If you need to be in there frequently, rework it to have a hinge and a couple of magnets to keep it closed.
|
|
#
?
Jun 15, 2022 18:08
|
|


|
I've got a can of spray on lithium grease here and I'm wondering if that would be a good thing to lubricate my roll up garage door with? The repair man that came a good while ago was very cagey about what the right product would be. Like, ok, not too thin and oily, not too thick and sticky, then what.
|
|
#
?
Jun 15, 2022 20:28
|
|
|
Flipperwaldt posted:I've got a can of spray on lithium grease here and I'm wondering if that would be a good thing to lubricate my roll up garage door with? The repair man that came a good while ago was very cagey about what the right product would be. Like, ok, not too thin and oily, not too thick and sticky, then what. It's what I use and it's what the guy who installed my last garage door said I should use. 
|
|
#
?
Jun 15, 2022 20:31
|
|
|
Good. Excellent. Thanks.
|
|
#
?
Jun 15, 2022 20:37
|
|
|
DaveSauce posted:Fix It Fast: Screwing and unscrewing any wood is going to destroy the hole eventually. My ex proved you can't unscrew any wood.
|
|
#
?
Jun 15, 2022 20:53
|
|

|
Issue: Delta table saw 36-6023, approximately 2 years old. Bought used with a failure mode. Failure mode: Unit works fine when pushing power button, but electromagnet does not keep power engaged, so the unit only runs as long as you're physically holding the power button down. Orginal and replacement switches:  I got the replacement switch today and it gives the same result. I've tried both switches today, and they both act the same. What are the chances of two switches with the same failure mode (one being brand new)? Is there anything I'm missing? There is literally 4 wires, black/white from wall, black/white to motor. It's not complicated, but it's loving me. Edit: The only difference I see between the switches is the new one is rated 16A versus 18A, and the new one has a ground where the original was ungrounded. Edit2: What I thought was a ground on the new one is actually "A1" and from what I see, A1 needs to be jumpered to 24 in this case. Maybe I'm close... Edit3: Bingo. Jumpering those two terminals and the electromagnet kicks in and holds contact. Thanks thread, I guess I just needed to type my thoughts out. meatpimp fucked around with this message at 21:48 on Jun 15, 2022 |
|
#
?
Jun 15, 2022 21:34
|
|

") EVERYWHERE
EVERYWHERE 

|
meatpimp posted:Edit3: Bingo. Jumpering those two terminals and the electromagnet kicks in and holds contact. Thanks thread, I guess I just needed to type my thoughts out. Rubber ducking at its finest.
|
|
#
?
Jun 15, 2022 22:52
|
|


|
withak posted:Jam a bunch of toothpicks into the existing holes, trim flush, reinstall screws. Ah, it might not have been clear, but I think the screws go in a relatively thin piece of board, I'd say 5mm or so. Leperflesh posted:Can you tell us why you're having to open that vent repeatedly? Maybe frequently is the wrong word, but there are some cords behind that I was trying to get at before. I'd say I'd only need to open it up a couple of times a year. TacoHavoc posted:If you have space behind, can you glue or screw a few pieces of 1x1 material on the inside of the hole to use as the new mounting? Basically put some material on the backside to give the screws more to grab? It looks like you could manage that from the outside without actually getting full access to the back of the hole. Yeah, I've got some scrap wood so, this might work actually! I'll try that this weekend and if not, I'll probably try some toggle bolts. Thanks all!
|
|
#
?
Jun 16, 2022 10:14
|
|

|
LTLFTP, love this thread. What the gently caress is going on with this door frame? It was installed "professionally" about a year ago. We haven't had any fires and it doesn't smell burnt. We were told we were sold a door frame made of pressure-treated wood and it would not rot. Am I to presume the simplest answer - we got duped by some south florida scumbag and got sold a lovely cheap door - to be the answer here?  
|
|
#
?
Jun 16, 2022 13:45
|
|

|
Water is sitting in/under that tread area and the wood is wicking it up because the cut ends you can't see, are exposed to standing water. You need to solve that drainage issue. It's not an install issue, although if the old door had a similar water/rot issue it should've tipped the contractor off & resolving it should have been discussed with you first & foremost. "Pressure-treated door frame" sounds to me like the rough opening had rotted out & the contractor replaced it with PTL. The door install & trim cover the rough opening. The pre-hung door units (door & frame sold as a piece) themselves are typically straight pine, not PTL. What is rotting is the door casing (the actual opening that you can see, which is installed over the frame) not the frame itself. If this door unit & the opening were replaced a year ago because of rot, then you have a long-standing issue with water collecting at the doorway. PainterofCrap fucked around with this message at 14:28 on Jun 16, 2022 |
|
#
?
Jun 16, 2022 14:23
|
|
|
All of that makes sense, given that it's the location where the annual hurricane gangbang takes place. Now to figure out if we have to fight with the landlord or the landlord has to fight with the association. Thanks!
|
|
#
?
Jun 16, 2022 15:28
|
|
|
...landlord? This is entirely your landlord's problem, yeah. Just send them pics and let them figure it out. "I think there's water pooling and soaking up there" is a nice thing to tell them if you're feeling nice. ..did you actually pay for that door a year ago? Why?
|
|
#
?
Jun 16, 2022 21:45
|
|
|
It's...complicated. My in-laws own the condo, our rent is basically condo fees + a small supplement to their insufficient social security payments and this isn't an e/n thread so I won't dump the whole mess here; short version is electric, cooling, and plumbing they take care of, everything else we negotiate some kind of split on. The invoices all get written out to them but we work it out on the back end. We're considering just cohabitation given their age and declining health but he doesn't like that idea because independence but...not e/n again but hey there's a little context for ya eta: the "fighting" is usually done during the part of the process where we're figuring out who to hire and involves a lot of reasons why we're not hiring certain people involving a lot of charged, bigoted languages from my MAGA in laws. Lib and let die fucked around with this message at 00:03 on Jun 17, 2022 |
|
#
?
Jun 17, 2022 00:00
|
|
|
Yikes. OK, I understand, family situations can be really complicated. You are making fixes and improvements that they should be paying for and which affect the value of their property, but, you're getting deeply discounted rent, so maybe it comes out ahead for you in the end. Especially if you're going to inherit this property eventually. The advice about figuring out the water issue stands, in that case.
|
|
#
?
Jun 17, 2022 02:25
|
|
|
Yeah, we're good with just a general idea what's going on so we can let them know what we need and come up with a plan and knowing for sure that it's not same crazy...phantom...wire...burning...phenomenon we have to immediately freak out about is gonna let me sleep tonight I really can't stress enough just how dumb about home poo poo I am because my first thought was the whole "something in the wall is electrified or on fire" thing.
|
|
#
?
Jun 17, 2022 02:59
|
|
|
Our interior walls are 90-year-old redwood. Driving screws in them is a pain in the butt. Even after I drive pilot holes, it's hard to get the screw to drive. I have heard that masonry screws might work better; do you folks have any thoughts?
|
|
#
?
Jun 17, 2022 04:11
|
|


|
Redwood is extremely soft. Are you having a hard time getting the screws to bite?
|
|
#
?
Jun 17, 2022 04:22
|
|
|
Leperflesh posted:Redwood is extremely soft. Are you having a hard time getting the screws to bite? Old-growth redwood can be a lot denser, if I recall correctly. Larger pilot holes might be a solution. Another thing you can do is use square- or star-drive screws and an impact driver. Those types of drives won't cam out (a.k.a. slip), and the impact driver can provide a lot more torque.
|
|
#
?
Jun 17, 2022 04:54
|
|

|
Square drive would be my first choice, then Torx. If those don't do the trick, you could try something more uncommon like Pozidriv (like Philips, but can't cam out) or Torq (more material on the removal side than the drive side, so if the bit cams out or strips you should still have enough contact and material behind it to back it out without needing an extractor.
|
|
#
?
Jun 17, 2022 05:10
|
|


|
TooMuchAbstraction posted:Old-growth redwood can be a lot denser, if I recall correctly. Bingo. Old growth wood that has compressed over decades is dense and hard AF. It�s a proper PIA to drill through. The new lumber that they grow and harvest as quickly as possible doesn�t really compare. OP - if you�re not using an impact driver, see if you can get one�(lightly) used if need be. Masonry screws won�t really offer an advantage over a good construction screw, and will cost much more. Get SPAX or GRK screws in a t25 torx bit. Robertson/square drive is better than Phillips but less convenient than torx bc you have to line the bit up right, and they�re also less forgiving when driving from less-than-perpendicular angles.
|
|
#
?
Jun 17, 2022 17:02
|
|
|
Arsenic Lupin posted:Our interior walls are 90-year-old redwood. Driving screws in them is a pain in the butt. Even after I drive pilot holes, it's hard to get the screw to drive. I have heard that masonry screws might work better; do you folks have any thoughts? Rake the screw across a bar of soap.
|
|
#
?
Jun 17, 2022 19:48
|
|
|
We've put together a buffet from ikea but one of the drawers won't fit on the sliders. It's like the drawer is too narrow. The other drawer slot has no issues fits fine. Even this drawer fits fine in that spot. Would getting a piece of plywood to attach the slider too work or is there some other obvious solution? The size of the gap. 
|
|
#
?
Jun 18, 2022 15:04
|
|


|
I don't mean to be rude but maybe you have put it together incorrectly.
|
|
#
?
Jun 18, 2022 15:09
|
|
 Associate Christ
|
I agree, the first thing to do to fix "this doesn't fit" for Ikea furniture is to double check all the instructions.
|
|
#
?
Jun 18, 2022 15:35
|
|


|
corgski posted:I agree, the first thing to do to fix "this doesn't fit" for Ikea furniture is to double check all the instructions. Have lived this. Despite being certain that all instructions were followed correctly and no, Mildred, I'm not on the sauce again, the instructions were inscrutable to the point of requiring pagan sacrifices and a windchime to decipher. Thus, I was relegated to a realization, much later and with much wailing and gnashing of teeth, that I hosed up one of the steps and had to take everything apart again. This is the way.
|
|
#
?
Jun 18, 2022 15:40
|
|

|
That's totally fair and what I suspect even though we seemingly followed to a T the instructions. Everything else fits fine. The thought of starting to dismantle... Better start chilling drinks for later. Many thanks all!
|
|
#
?
Jun 18, 2022 15:53
|
|
|
There is also the outside possibility that the one drawer frame doesn't go with that unit.
|
|
#
?
Jun 18, 2022 15:59
|
|
|
I ordered an impact driver, and I'm taking your advice. I was using star drive screws and screwdriver bit; I'll look for square drive. Along these lines does anybody have tips about finding a wooden stud behind wooden walls?
|
|
#
?
Jun 18, 2022 16:27
|
|
|
Look for nails? Use a flashlight at a low angle to highlight the surface. You'd be amazed what you can see.
|
|
#
?
Jun 18, 2022 16:28
|
|
|
Strong magnet as well. Find the nail lines.
|
|
#
?
Jun 18, 2022 16:41
|
|

|

|
| # ? May 28, 2024 20:18 |
|
|
Yeah, I like using a rare earth magnet for finding studs (or rather, drywall screws/nails, which ideally are on top of studs). They give a very clear "I've found something" signal, and you can just leave the magnet sitting on the wall as a temporary marker.
|
|
#
?
Jun 18, 2022 16:49
|
|