


|
If it were me personally for the whole I would put some thick interfacing around the inside then fold in the edges of each circle for them to lay flat you will want to do some triangular snipping, iron it all flat then stitch around the edge of the circle.
|
 #
?
Apr 9, 2013 19:43
#
?
Apr 9, 2013 19:43
|
|

|

|
| # ? May 15, 2024 03:19 |
|
|
Ashcans posted:How big are those rings (as in, how thick is the wire, not the diameter of the loop)? If possible, I would recommend not cutting a hole, but using something pokey like an awl to push through the fabric and then progressively widen it to fit. You can still reinforce this like you would a buttonhole, but by pushing the threads rather than cutting them, you reduce the risks of fraying and increase the overall strength of the area. One of the reasons I would suggest grommets is that you can often install them without punching holes in the fabric, but by pushing them into the weave. The diameter of the wire is about half a cm (not home at the moment so I can't confirm). They may be curtain rings, though they came in a pack of two. Grommets are definitely something I will look at next time I'm in the store though, they're probably lighter than I'm thinking. LadyRavenWaves posted:If it were me personally for the whole I would put some thick interfacing around the inside then fold in the edges of each circle for them to lay flat you will want to do some triangular snipping, iron it all flat then stitch around the edge of the circle. Not sure what you mean by this, do you mean interfacing the back, then poking a hole in the center of the circle, then cutting lines out (like a pizza) and then folding the, uh, 'slices', back behind the fabric to iron and stitch?
|
|
#
?
Apr 9, 2013 20:37
|
|
|
My first thought was "I bet you could get big, cheap hoop earrings and just push the backs through the fabric" but if you need a thicker hoop then grommets will be just fine and won't add any weight. Clinking may be inevitable depending on what the hoops are made from. Or LadyRavenWaves' suggestion if you don't want to drop cash on a grommet punch, which is really just a specialized hole punch that also mashes rings around its holes. Was this the general idea? 
|
|
#
?
Apr 9, 2013 21:41
|
|

|
Morpheus posted:Not sure what you mean by this, do you mean interfacing the back, then poking a hole in the center of the circle, then cutting lines out (like a pizza) and then folding the, uh, 'slices', back behind the fabric to iron and stitch? I think you get the jist but let me go ahead and post this just in case. It's a crappy quick sketch so please excuse it.  You will want the snips/slices to go over the interfacing you could just leave it like this but I recommend a lining of some sort in which you would snip it the same way and place it against the other fabric with the snips already folded (folded side in). You will want to sew as close to the edge of the circle as possible. I feel like this would give you the cleanest and lightest look/feel.
|
|
#
?
Apr 9, 2013 21:43
|
|
|
If you're worried about it clinking too much you could always cover the grommet with embroidery floss. It would give you the stability of the grommet but it would cut down on the noise.
|
|
#
?
Apr 9, 2013 22:31
|
|

|
Grommet punches are poo poo. Don't waste your money. Just get a grommet kit from WalMart or something - it comes with the mandrel, anvil and the grommets/collars and it's like $3. Use small pointed scissors or an awl to start the hole, and widen slowly as you fit the grommet. If the clinking really is a concern I'd worry more about the rings smacking together as you walk and not how the rings are going to react with the grommets.  If you want to go the more natural route, here's a decent tutorial on hand binding eyelets. http://www.curiousfrau.com/tutorials/88-how-to-make-beautiful-hand-bound-eyelets If you want to go the more natural route, here's a decent tutorial on hand binding eyelets. http://www.curiousfrau.com/tutorials/88-how-to-make-beautiful-hand-bound-eyeletsHonestly, though, I think doing the grommets would result in a cleaner look and it takes like five seconds. ETA: The grommets weigh practically nothing. Rufus En Fuego fucked around with this message at 22:54 on Apr 9, 2013 |
|
#
?
Apr 9, 2013 22:39
|
|

|
Reformed Tomboy posted:How do people weather fabric to make it look dirty and used without using dirt and messing up the piece? I also kind of like this look, are the black details drawn on with sharpie? There's dozens of ways. Super watered down cheapass acrylic is very good, because they pack that stuff with paper fibres which collect like grime rather than paint. You can get splattering effects by dunking a toothbrush in paint and using it to spatter paint. Airbrushes are AMAZING at making faux patinas on anything from fabric to armour, and doing good multilayering distress effects. When you're weathering, think about how stains happen in the real world, then emulate that. Wearing the garment while you're distressing it is very good because you can do naturalistic thing like smears that look like you've wiped away fresh grime. Other stuff that you can use is pretty much to your imagination. If you're careful, you can do amazing wear and tear effects with a blowtorch. One thing I will say though is if you're making something look like it's been through hell, don't just paint it, actually damage it too, and damage it before painting so you can blend the skunge in.
|
|
#
?
Apr 10, 2013 01:32
|
|


|
Squarely Circle posted:Watered-down acrylic paint is great for this. Xaerael posted:There's dozens of ways. Thanks for the help. I've got to alter the piece a bit first, but I think I'll be on the right track after that. I finally found my camera charger, so hopefully I'll get some progress pictures up in this thread soon.
|
|
#
?
Apr 10, 2013 02:56
|
|

|
Reformed Tomboy posted:Thanks for the help. I've got to alter the piece a bit first, but I think I'll be on the right track after that. My favorite way was a buddy who took his jacket for something to the gun range and shot at it. He needed bullet holes, so he made bullet holes. This is also the guy who ran over a piece with a dirt bike over and over in a mud puddle in his back yard. He usually just goes for the actual stain rather than faking it. Lol
|
|
#
?
Apr 10, 2013 06:07
|
|
|
Killer_Frost posted:My favorite way was a buddy who took his jacket for something to the gun range and shot at it. He needed bullet holes, so he made bullet holes. One of my friends dragged a pair of heavy canvas trousers down unpaved country roads behind a car on a chain once to get the appropriate level of weathering. 
|
|
#
?
Apr 10, 2013 09:04
|
|


|
RazorBunny posted:One of my friends dragged a pair of heavy canvas trousers down unpaved country roads behind a car on a chain once to get the appropriate level of weathering. That's more or less how they did the weathering in Evil dead 3. They took Ash's clothes out to the studio parking lot and let cars drive over them for a month.
|
|
#
?
Apr 10, 2013 14:29
|
|
|
I read this thread a couple of months ago and decided that it would be a pretty fun hobby. I've been working on my first project on and off (winter weather + no appropriate heated workspace was difficult for productivity) and have finished the bulk of my Mass Effect Blood Dragon Armor! The body is made with EVA foam and I used a pep file with fiberglass/bondo for the helmet. This thread has been very helpful and I hope to one day be as good as some of the other posters here. I have a few questions for finishing touches though: 1 - Visor: I am kind of stumped as to what I should do about the visor on my helmet. I want it to be similar to a polarized lens effect, but of course I need to be able to see out of it. I was thinking a red transparency? Like the ones used on projectors, but I don't think it's tinted enough/might look tacky. 2 - Lights: I have no experience with electronics (or anything else I've done on this project, really) but I want the shield generator to light up. I have looked into EL tape and LEDs but don't really know how either of them work (can I hook up 3 strings to one battery?). This is what I am referencing:  Any suggestions or things I can work on to be better are appreciated.
|
|
#
?
Apr 11, 2013 02:51
|
|

|
SunSickOkra posted:I read this thread a couple of months ago and decided that it would be a pretty fun hobby. I've been working on my first project on and off (winter weather + no appropriate heated workspace was difficult for productivity) and have finished the bulk of my Mass Effect Blood Dragon Armor! Visor - I guess you can try taking a clear spherical ornament and cut it to the shape you need. Then use RIT dye of your choice in hot water (not boiling)to give it color while remaining visible. Idea from here -> http://blindsquirrelprops.com/daft-punk-interstella-5555-helmet/ this blindsquirrel is like my current con-safe prop god. Lights - I have some EL wire that came with a battery pack and switch that I purchased from ebay. Can't say it's the most durable thing, but it does give a nice glow effect. Purchased from -> [I'm a long url so please click me instead] I haven't actually sewn anything for a couple of years, so I decided to go with something easy. I was too poor to afford brocade and decided to paint my own design. In the actual game there is a faint pattern on the fabric but there's no clear images of it online. It just needs some touch ups and ironing, but I'm glad it's 98% finished. Original design:  My version: 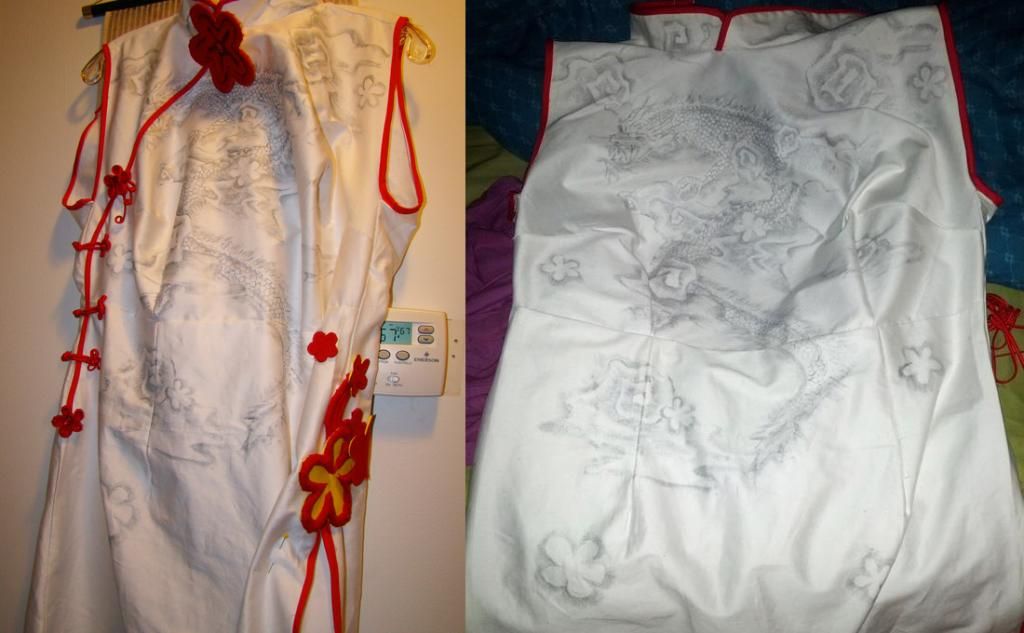
|
|
#
?
Apr 11, 2013 06:09
|
|
|
SunSickOkra posted:
That looks amazing. I know you can purchase glass "tint" in both a stick-on film as well as a spray from e.g. automotive places. I haven't personally used the spray but a fellow who made Daft Punk helmets had the visors in clear plastic sprayed from the inside a light coat at a time until suitably dark. What I *do* have experience with is the fact that if the inside of the helmet is enclosed and dark (which it looks like is the case with yours), then the tint on the visor can be very light indeed and still appear opaque from the outside while being very see-through from the inside. How dark it looks is all relative with regards to what the ambient light levels on each side are. Dark inside of helmet vs. bright ambient light outside means easy to see out of and hard if not impossible to see in. quote:2 - Lights: I have no experience with electronics (or anything else I've done on this project, really) but I want the shield generator to light up. I have looked into EL tape and LEDs but don't really know how either of them work (can I hook up 3 strings to one battery?). This is what I am referencing: EL panels need a special power supply to work. You can't just plug in a battery. EL would be easiest to get those effects by masking the panel (EL gives an even, flat lighting -- put a "cutout" pattern over the EL and done) but EL is really not very bright. The effect would only be good in dim surroundings. EL you'd need something like this https://www.sparkfun.com/products/11222 mixed with this https://www.sparkfun.com/products/10801 and/or this https://www.sparkfun.com/products/10796 or something similar from ebay or dealextreme or wherever. The little AA battery pack things like I linked might not light up all the EL you want - the more you light up and the smaller the battery pack, the dimmer the panel(s). LEDs can be very bright but they are like little lightbulbs - not flat illuminated panels - so they are harder to get flat evenly lit effects like the ones shown in that picture. If you can cast some clear plastic or something into the right shapes, LEDs could be effectively used backlight them up. (LEDs are not *quite* as simple as just plugging into a battery either, and in some ways EL is easier in the sense you can just buy an EL panel with a connector, a battery EL power pack, and stick them together and you're done.)
|
|
#
?
Apr 11, 2013 17:51
|
|

|
I'm almost done with the 'under layer' of my costume. I need to make sock garters (or find black socks with gold stripes), finish the boot cuffs, and weather the blue skirt (thanks for the ideas, folks). The boot cuffs in the picture were a test; I've remade them, but haven't attached or painted them yet. I've also made the brown leg harnesses, but I totally forgot to put them on. Making the scrolls.  Testing how to make the design on the boots.  Gold and red fabric. Haven't decided on black fabric yet.  What I've got so far.  What I'm doing. (Or hoping I can pull off...) 
|
|
#
?
Apr 13, 2013 01:37
|
|
|
Reformed Tomboy posted:
This is pretty sweet concept art! D3, I assume? Also for the boot details maybe you could try cutting out the pattern in gold lam�/vinyl and sew them on like in the last picture.
|
|
#
?
Apr 15, 2013 02:34
|
|

|
Started work on a new mask today. Decided to custom form this one to my face since it is more intricate. No idea when I'll get it finished or even get time to do anything with it right now though.
|
|
#
?
Apr 15, 2013 03:00
|
|

|
Oh my god, I've been working on my breastplate for Nightmare Moon and it's so booby.   I realized that I have a tough time conceptualizing my boob size when working on my 40k costume (I tried to buy this smallish ball for an armor form and my friend was like .............no.) but I'm still freaked out by how gigantic the cups look in my breastplate even though it definitely fits me. I don't know. I realized that I have a tough time conceptualizing my boob size when working on my 40k costume (I tried to buy this smallish ball for an armor form and my friend was like .............no.) but I'm still freaked out by how gigantic the cups look in my breastplate even though it definitely fits me. I don't know.Also, in the most awesome move ever, my husband agreed to build a mace for my costume since I won't have time. I really wanted a big, awesome weapon to go with the armor but with 3 weeks left of grad school and 4 weeks left before the convention, it just wasn't going to happen along with finishing the armor. I almost cried, it meant so much to me. 
|
|
#
?
Apr 15, 2013 03:08
|
|

|
McPantserton posted:Oh my god, I've been working on my breastplate for Nightmare Moon and it's so booby. What is this composed of? Really curious.
|
|
#
?
Apr 15, 2013 03:11
|
|

|
Funhilde posted:What is this composed of? Really curious. It's a worbla-craft foam-worbla sandwich. For the cups, I got a styrofoam ball (and subsequently cancer, I'm sure) and made a double-thick sheet of worbla by heating it and mashing it together, then shaping both pieces over the balls. Worbla is cool in that it will bond to itself when hot so you can just kind of jam pieces together when they're hot. I made the pattern by wrapping myself in saran wrap and masking tape around my underbust torso, then cut it off in the properish shapes.
|
|
#
?
Apr 15, 2013 03:14
|
|
|
McPantserton posted:It's a worbla-craft foam-worbla sandwich. For the cups, I got a styrofoam ball (and subsequently cancer, I'm sure) and made a double-thick sheet of worbla by heating it and mashing it together, then shaping both pieces over the balls. Worbla is cool in that it will bond to itself when hot so you can just kind of jam pieces together when they're hot. I made the pattern by wrapping myself in saran wrap and masking tape around my underbust torso, then cut it off in the properish shapes. Sweet. Is there a better place to get it from than another?
|
|
#
?
Apr 15, 2013 03:22
|
|
|
Funhilde posted:Sweet. Is there a better place to get it from than another? I got mine from Yaya Han's store, I'm actually not sure if you can get sheets from anywhere else in the US. It ended up being about ~$80 for a large sheet with shipping, pricey for sure but I've got quite a bit of it left still after doing the majority of my breastplate. Time to crack into foot armor!
|
|
#
?
Apr 15, 2013 03:25
|
|
|
This is kind of weird question but how do you start to do cosplay? I've never really done a big art and craft thing before and I'm kinda of at a loss on where to begin. I'm thinking of doing Isaac from Dead Space. How do you guys figure out what you're going to need?
|
|
#
?
Apr 15, 2013 04:33
|
|
|
Learning from threads like this an others around is really a great place to start. If you look through the past couple of pages you will see many goons asking what material should be used, how to do this or that, etc. Hang out at conventions and try to get in touch with some of the cosplayers there.
|
|
#
?
Apr 15, 2013 04:36
|
|


|
The next convention here is at the end if June so I wanted to get something ready for that. And I missed the one earlier in the year (there are only 2 conventions that I know of here in Perth...) I have one friend who is into cosplay but everytime I show off cool cosplay dudes, they are always pretty harsh in their criticism and I lose the nerve to bring it up 
|
|
#
?
Apr 15, 2013 05:06
|
|
|
Jehuti posted:The next convention here is at the end if June so I wanted to get something ready for that. And I missed the one earlier in the year (there are only 2 conventions that I know of here in Perth...) There's 5 cons in Perth although obviously the target market differs and Supanova is the biggest and broadest. -Waicon -Oz Comiccon -Genghiscon -Swancon -Supanova Your harsh friend isn't Jen is she...
|
|
#
?
Apr 15, 2013 05:17
|
|

|
Angstronaut posted:This is pretty sweet concept art! D3, I assume? Yeah, it's from the art book. Good idea. I wasn't sold on any of the results of my test. Jehuti posted:This is kind of weird question but how do you start to do cosplay? I've never really done a big art and craft thing before and I'm kinda of at a loss on where to begin. I'm thinking of doing Isaac from Dead Space. How do you guys figure out what you're going to need? I make it up as I go along. Tutorials and forums are great for research, but there's nothing like just diving in. The only other advice I have is to break everything down layer by layer. Start with the base-most layer and work outward. Works for me, anyway.
|
|
#
?
Apr 15, 2013 06:18
|
|
|
Reformed Tomboy posted:I make it up as I go along. Tutorials and forums are great for research, but there's nothing like just diving in. The only other advice I have is to break everything down layer by layer. Start with the base-most layer and work outward. Works for me, anyway. Actually that's a really good way for me to visualise it. Once I figure out how to attach armour and stuff to my clothes I'll get right to it. Hopefully I can make it all work. quote:Your harsh friends isn't Jen is she... Nah not her. I'd rather not say who, don't wanna start anything. Never heard of Swancon or Ghengiscon I'll check em out.
|
|
#
?
Apr 15, 2013 07:22
|
|
|
The Replica Prop Forum is an amazing place to find inspiration, advice, etc. I would try there as well.
|
|
#
?
Apr 15, 2013 07:33
|
|

|
Yeah, for our first big costume (a Big Daddy suit, good jumping-in point, herp derp) we just kind of decided to build it out of insulation foam and bought a ton of supplies. After we'd spent money on it, it felt like we had to finish it. There's been a lot of experimenting with materials and reading other people's builds and tutorials to determine what works best since then.
|
|
#
?
Apr 15, 2013 14:24
|
|
|
For a new person, I would definitely recommend finding a project that is manageable for skill and materials. It's easy to be like 'gently caress yea I want to be Iron man!' but that can be a seriously tough project and you can burn out working on it or just get frustrated and walk away. It's easier to start with, say, a costume of Tony Stark with the arc reactor and the one skeletal Iron Man hand+ repulsor; it's a simpler goal and will let you work on the skills you need for the larger projects. You should also think about the skills that you have and try to work out what works best for you. Like I had been sewing for years before I did any cosplay, so fabric stuff is much easier for me to on than, say, making stuff out of craft foam and bondo. If you do metalwork, you might find armor easier to work on. If you can tap into existing skills, it makes it much easier. You can always learn new stuff on the job, but it helps if you're not totally lost. Even if you want to jump straight to a crazy big costume, I would recommend picking an element of it to work on and focusing on that first. It helps you perfect techniques, and avoids a situation where you get halfway through a costume and realize you have hosed up something in the underlying construction and you need to start over.
|
|
#
?
Apr 15, 2013 14:40
|
|


|
Jehuti posted:Actually that's a really good way for me to visualise it. Once I figure out how to attach armour and stuff to my clothes I'll get right to it. Hopefully I can make it all work. Attaching is sometimes the easy part, Velcro, glue, etc. I agree though to start with something that plays to the skills you already have. I wanted to start with a fully armored Wonder Woman. Tried talking to a few of the "best costumers" and got completely ignored. I got really discouraged and almost gave up altogether because I figured all of them were like that. And I'll be honest, a lot of the ones I've met still are like that, but I'm glad I didn't give up. I've made some great friends and had a ton of fun.... Once I started making costumes that weren't out of my skills too much and once I found people who were willing to share their knowledge. If you're looking to make Isaac's armor you might check out other tutorials, the guys and gals who do the Mass Effect costumes from EVA foam are always really willing to share info and answer questions. You might check out their forum, n7elite.net Good luck to you. I hope your first costuming experience is a positive one. ")
|
|
#
?
Apr 15, 2013 15:29
|
|
|
Main advice is do your research. If your sewing, a good fat book of basic dressmaking techniques is a great investment, and something that tells you about making and adjusting patterns is priceless too. Commercial patterns come with comprehensive if slightly arcane sounding instructions, that's a good place to start too. For hard props and such like there are some good online guides, forums and blogs that take you through the process. If you're looking at advanced sculpting, casting and finishing, Stan Winston Studios (the SFX people who did the Jurassic park dinosaurs) have a bunch of online streaming videos/DVDs that you can buy, they're not cheap but totally worth it and really comprehensive, and I think they're in the middle of a half price sale right now. Measure twice, cut once. In general, if you can learn from *other peoples* mistakes it's usually cheaper, easier and less frustrating than diving in with no idea what you're doing. People have been making costumes and clothes for hundreds of years, and written down pretty much all of it, take advantage of this fact. Also, if you're doing anything with resins, fibreglass, solvent based glues or heavy sanding, make sure you read all the safety info and have the right PPE (personal protective equipment), a $20 mask with replaceable filters can make the difference between healthy lungs and serious illness in the long run.
|
|
#
?
Apr 15, 2013 19:37
|
|

|
Mister Sinewave posted:
Thanks for the suggestions. I don't know why my mind jumped to 2 strips and a circle instead of one big panel with an overlay. Sometimes the simplest solutions are the best solutions. Jehuti posted:This is kind of weird question but how do you start to do cosplay? I've never really done a big art and craft thing before and I'm kinda of at a loss on where to begin. I'm thinking of doing Isaac from Dead Space. How do you guys figure out what you're going to need? I don't have a lot of experience with costuming, but as someone that has just made their first costume I might be able to add some insight. I found something that I really liked and thought to myself, "I can probably do that." And then I did it. - The first step is to watch videos. I watched a ton of youtube videos (from "how to use sand paper" to "how to paint without brush strokes" to "how to bend EVA foam with a heat gun." - Decide on how it will be constructed and choose a medium. Are there pepakura files out there for that armor? Or are you just going to wing it? - Gather your materials (I had to buy everything from a hot glue gun to a dremmel for my project and made more trips to home depot/AC Moore than I could keep track of). - Make a mannequin (for your torso at least). There are plenty of youtube videos on that as well. - Go for it. The great part about this process is that for every problem there are several different solutions. For me it was about being creative and figuring it out on my own.
|
|
#
?
Apr 15, 2013 21:46
|
|
|
So the group order I recently did of worbla is here, there are like a bazillion sheets (15) I want to roll around in them, I must resist the urge.
|
|
#
?
Apr 16, 2013 01:07
|
|
|
Made some progress on my Beta Ray Bill mask today I think I'm going to reduce the jaw to just the 'bone'. Ignore the derpy teeth they are temporary. I'm either going to block out the eyes with reflective lenses or get those white out blind dude contact lenses. Next step will coating the mask in caulking or something to muffle the ridges of the wonderflex. Any suggestions?
|
|
#
?
Apr 16, 2013 07:09
|
|

|
I definitely wouldn't use actual caulk, it's really hard to smooth and a lot of it won't take any kinds of paint whatsoever, can't be sanded, etc. I'd probably go with filler putty or apoxiesculpt so you can sand it once it's cured. I hear 100 layers of gesso is also a go-to for smoothing out wonderflex.
|
|
#
?
Apr 16, 2013 13:50
|
|
|
Flanker posted:
What's your plan for finishing it? Just paint whatever you end up covering it with? fabric covering? Some kind of fake skin?
|
|
#
?
Apr 16, 2013 16:53
|
|
|
Fatkraken posted:What's your plan for finishing it? Just paint whatever you end up covering it with? fabric covering? Some kind of fake skin? Yeah paint, but tell me about fake skin I'm all ears
|
|
#
?
Apr 16, 2013 19:24
|
|
|
|
| # ? May 15, 2024 03:19 |
|
|
Flanker posted:Yeah paint, but tell me about fake skin I'm all ears There's a lot of different approaches you can use. The best ones are a hell of a lot of work and quite expensive unfortunately, as they'd involve sculpting the skin in a temporary material (something like Roma or Chavant, non drying oil based clays), taking a cast in plaster and making a latex (cheaper) or silicone (more expensive but more flexible) skin. I'm also not sure how you'd go about casting them onto the skull, since in the pro methods, you sculpt the whole thing first including the skin, take a cast and the skull comes AFTER the skin sculpt The way you've approached the project isn't something I've really tried so take this with a pinch of salt, but something you could try is covering it in a thick stretchy fabric like polar fleece to cover the lumps and bumps, then creating a textured skin on top of that with liquid latex, which you can thicken with a special additive so it gains a consistency more like emulsion paint (regular latex is something like single cream in texture). The first coat or two of latex will soak into the fleece, but once it's dry, later layers will sit on top quite happily, and you can get a reasonably smooth texture this way, or make it more bobbly and grungy looking if you prefer. An advantage of latex is it's flexible and has a slight stretch. I'd worry that gesso or Apoxie might crack and flake on a wonderflex base since Apoxie sculpt at least is very rigid and quite brittle. You won't run into this problem with latex, but then again as I said it's not something I've tried in this context so it might not work well. If you do decide to try it, do some tests first.
|
|
#
?
Apr 16, 2013 22:09
|
|