


|
john mayer posted:I'm driving about two hours to a comic con in a couple weeks, and I decided to do a last minute Walking Dead costume. Any advice for dirt/blood makeup that won't stain my car upholstery? Should I just accept that I'll be dirty and sit on a towel both ways? You may be able to dirty your cloths by throwing some dirt on them and driving over them with your car a few times until you get the right...patina? Unless you are going for fresh blood, just pre-blood and pre-dirt some cloths you can live without. Thrift store cloths would be great for ruining. For blood maybe try WikiHow? Always test things on small patches to make sure you get the right look you want. http://www.wikihow.com/Make-Fake-Blood If I were you, I would just put a towel down on the seats.
|
 #
?
May 17, 2014 02:12
#
?
May 17, 2014 02:12
|
|


|

|
| # ? May 9, 2024 18:54 |
|
|
john mayer posted:I'm driving about two hours to a comic con in a couple weeks, and I decided to do a last minute Walking Dead costume. Any advice for dirt/blood makeup that won't stain my car upholstery? Should I just accept that I'll be dirty and sit on a towel both ways? I posted in here a while back about dirtying/bloodying up a shirt with tea bags and craft paint... lemme dig it up real quick. Squarely Circle posted:Watered-down acrylic paint is great for this. Here's a shirt I recently made to look old and nasty, it started out as plain white canvas. I just laid it down in the bathtub and dribbled watery black/brown paint over it, let that dry, then added more layers. I stained it with some tea, too, though I think that may have mostly come out when I washed the shirt after wearing it. For the bloody bits I didn't use straight red, I used a dark red mixed with brown and a bit of black. You can hit up Michaels/Joanns/whatever craft store and get all kinds of colors for like $1 each. It works on skin too and you can just scrub it off later, it's kinda itchy though. Squarely Circle fucked around with this message at 03:16 on May 17, 2014 |
|
#
?
May 17, 2014 03:14
|
|


|
Spent the past 2 days on the roof of my building sanding down everything, removing as many drips and evening out the polyurethane as best I could. There's a layer of fine, white powder suffusing the whole area now. On to spraypaint!   Helmet is looking boss as hell now that it's all black. Since this is corrupted artorias, I'm priming everything with black first before I go in with silver, which hopefully means I won't need as much silver spraypaint in the end, and it'll be easier to knock areas back to black when I want something darker. Getting paint sucks in korea. The stuff is like $7 for 200ml, there's no equivalent to Loews or Home Depot where I could get it at a decent price. Still looking for some way to make the ponytail. I know of a place that does hair extensions, maybe I'll ask how much for a lock of hair... McKilligan fucked around with this message at 12:53 on May 18, 2014 |
|
#
?
May 18, 2014 08:54
|
|
|
Okay, so. If I wanted to organize a photoshoot meet up at DragonCon, what do I do? (I'm talking about the big ones, like the Marvel or the Mass Effect ones.) I know Cosplay.com keeps lists, is that the most official one? How do I get on that list?
|
|
#
?
May 19, 2014 00:55
|
|

|
 Cannot wait to see it with paint. Cannot wait to see it with paint.I just got back from a hectic but awesome Anime Central! After this con we're planning on shelving our StarCraft marines for awhile because they're such a pain to wrangle, which makes it even nicer to have won best walk-on in ACEN's masquerade. Our 10-person Valkyria Chronicles squad came out really well, I'm planning on having some tailoring done on my outfit before I do a lot of individual shots but on the whole I think the group looks pretty great. 
|
|
#
?
May 19, 2014 01:04
|
|
|
McPantserton posted:Awesome Valkyria Chronicles Group McPantserson, looks like everything came out well! Any details on how you guys built the Lances? They look massive (and gorgeous)
|
|
#
?
May 19, 2014 02:30
|
|


|
TheTofuShop posted:
Thank you! I mostly did the painting on all the armor plating and all the embroidery and didn't have a direct hand in the lances since that was the half of the group that's a few states away but from what I know: It was a combo of slotting pvc pipe and wood for the shaft (  ). The very top cone was carved from wood. For the side flanges and lower cones the guys told me they made the shapes out of heavy paper and built up coats of resin until they were nice and durable. The whole thing ended up being surprisingly light and easy to carry despite the fact that it came apart as well. ). The very top cone was carved from wood. For the side flanges and lower cones the guys told me they made the shapes out of heavy paper and built up coats of resin until they were nice and durable. The whole thing ended up being surprisingly light and easy to carry despite the fact that it came apart as well.
|
|
#
?
May 19, 2014 03:02
|
|
|
  Everything primed! Honestly a little temped to leave it like this, but sadly it doesn't quite match the cape. I started on the arms and hips with the silver - priming everything black first was definitely the right move - I might even knock some of the silver back a little more with a few spritzes of black once everything is painted. I think I'll also have to slop some black paint onto the cloak as well. Not to mention everything else, but one step at a time. my cat is norris posted:Considering how hosed his cloak and chainmail looks, seeing some additional distress on the silver armor would make sense. Weathering comes next! It's gonna be distressed at gently caress in the end. McKilligan fucked around with this message at 13:46 on May 20, 2014 |
|
#
?
May 20, 2014 12:18
|
|
|
Considering how hosed his cloak and chainmail looks, seeing some additional distress on the silver armor would make sense. Still looking great!
|
|
#
?
May 20, 2014 13:39
|
|


|
On my end, i've finally found a way to cut those stainless steel rings. I'm using bolt cutters, cut isn't so good though, but it'll work for a first chainmail experience. Its surprisingly relaxing to just sit, watch tv and bend rings.
|
|
#
?
May 20, 2014 14:17
|
|

|
Re: hair for the helmet -- http://www.ebay.com/sch/i.html?_trksid=p2050601.m570.l1313.TR5.TRC1.A0.H0.Xblack+horse+tai&_nkw=black+horse+tail&_sacat=0&_from=R40 Have you considered anything like actual horse tail extensions?
|
|
#
?
May 20, 2014 19:41
|
|
|
my cat is norris posted:Re: hair for the helmet -- I'll consider anything, but it all depends on what I can get my hands on - I don't think I'm willing to order anything more than $10, but alot of those look like they'd be perfect! I'll see what I can find around my area - there's a few options that might pan out, if I don't have any luck then I'll see about ordering online - but still, a cheap black wig can't be THAT hard to track down.
|
|
#
?
May 21, 2014 03:29
|
|
|
If you have a Sally Beauty or something similar nearby, they'll usually have a pretty wide variety of hair pieces for sale in a range of prices.
|
|
#
?
May 21, 2014 04:25
|
|


|
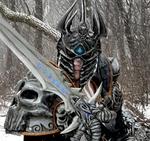
I feel like I'm overrunning the thread, but gently caress it, now I know what it's like to give birth.  The silver spraypaint covered things a little faster than I anticipated - there isn't as much black left as I might have liked, but that's easily fixed later on. The helmet came out especially well. I'll be getting into the detail work on that one real soon, darkenning recesses and adding highlighting with bright silver.    ...And the rest    I tried keeping the sides of the cuirass a little darker, to help give the illusion that it's slimmer than it usually is. I think I'll knock them back a little further with some black paint, spraypaint is not exactly a precision tool. Still to do: The detail on the aforementioned helmet, the detailed filigree / designwork on the cuirass, and adding generous goops and gobs of black paint as though it were seeping between the plates of the arms and legs, the left arm particularly. my cat is norris posted:This is...waaay late to be sharing, considering the point you're at, but there are some really, really high-res images of Artorias on Dead End Thrills. Since not everybody knows about the blog, here's a direct link to the Dark Souls gallery, in case anything proves helpful to you: Thanks! I've got a massive folder of reference material already, but there's definitely a few there I didn't have that will be useful. McKilligan fucked around with this message at 13:50 on May 21, 2014 |
|
#
?
May 21, 2014 12:21
|
|
|
This is...waaay late to be sharing, considering the point you're at, but there are some really, really high-res images of Artorias on Dead End Thrills. Since not everybody knows about the blog, here's a direct link to the Dark Souls gallery, in case anything proves helpful to you: http://deadendthrills.com/gallery/?gid=100
|
|
#
?
May 21, 2014 13:44
|
|
|
I'd recommend throwing in some blue/green and brown on the weathering, not to mention some highlights for blending/texture purposes. I like champagne metallic and pearl paints to make the layers thin and controllable. Costume weathering usually has to be way more extreme than you'd think would look good because character modeling is often so exaggerated. Example: http://instagram.com/p/kQXZ_VHQgG/ Battered Worbla/EVA foam pauldron I made. Base coats of black, then bronze spraypaint, then sponged alternating layers of black, brown, dark gray, and blue acrylics, finally highlighted with dark gold and the aforementioned champagne metallic. Any cuts had black in the trough and a highlight line right next to it [a slash would expose new metal]. This close it looks a tad overdone, but if you pay attention to where the light falls on a piece, you quickly get a sense of where to put your highlights. During the shoot, it just looked like well-beaten bronze. Excited to see how this is shaping up.
|
|
#
?
May 21, 2014 14:30
|
|

|
That's ridiculously good McKillian. Are you posting a complete "look how I made this poo poo" anywhere? It'd be good for anyone aspiring to make badass armour.
|
|
#
?
May 21, 2014 16:40
|
|
|
Bag of Hamsters posted:Weathering drat - that brass looks great! I've got a bunch of acrylics lying around that I was planning on using just that for. The palette for Artorias is a little weird - it shifts depending on the picture, sometimes it's mostly blues, grays and blacks, but sometimes there's also a few rusty browns snuck in there. I'll be experimenting with it for the next couple days. What did you use to apply the paint? Just an ordinary sponge? dogstile posted:That's ridiculously good McKillian. Are you posting a complete "look how I made this poo poo" anywhere? It'd be good for anyone aspiring to make badass armour. I've been taking pictures throughout, so I'll post a build log when everything is finished. Not too many action shots though, more the end results of each step. McKilligan fucked around with this message at 06:54 on May 22, 2014 |
|
#
?
May 22, 2014 00:42
|
|
|
I like having an array of old (or soon to become old) brushes around and a shitton of paper towels for dabbing/wiping grime, personally. I loving love doing weathered painting.
|
|
#
?
May 22, 2014 05:09
|
|
|
Adam Savage has a few videos about weathering on the Tested YouTube channel I think. It seems like most of you actually know how to weather metal already though... I'm absolutely terrible at painting, and no amount of practice has ever helped me. I usually end up having to rely on someone else. It's something with how I see colors and shapes that screws me over in the end.
|
|
#
?
May 22, 2014 06:12
|
|
|
Somewhat on the weathering topic, what's the best way to replicate dirt, dust, and grease on skin? I have a fallout costume for PAX, and I want my face and arms to be properly dirty.
|
|
#
?
May 22, 2014 09:47
|
|


|
Hi thread! I've read it start to finish and the poo poo on here blows my mind. I'm inspired, want to see if I can make something cool myself. I've done some research and would like to know what you experienced folks think of this plan: I want to make one of these guys from Time Bandits...  Pretty involved but hopefully not too daunting for a first pass. Working on the bone structures (head/horns/hooky hand things) here's what I think I should be doing, based on the tutorials and what not I've seen 1) Plan it on paper 2) Create 2-D cardboard template at full size (in this case, a front view of the head, holes where the eyes would be) 3) Spray template with a good bit of expanding foam - keep place ventilated, use gloves, don't get on you, mask necessary? 4) After a day of drying, carve into foam with x-acto knives to shape final form 5) Cover entirely with masking tape 6) Cover with newspaper dipped in wallpaper paste 7) Dry again, then cover with fast mache powder mixed with h20 to form goop 8) Dry again, then cover with gesso primer, several layers 9) Paint base in acrylic, then details in acrylic 10) Weathering effects - done before sealing? 11) Seal with plasti-dip - matte in this case cause I don't want a sheen 12) Add attachments for putting it on - velcro, buckles, what have you The way I see it, there's a number of steps that are irreversable, so, is this basically correct? I don't imagine I'll get it right the first time, but I figure what the heck, dive in, try one or two, and see how it goes. Again, your stuff collectively kicks some rear end 
|
|
#
?
May 22, 2014 14:44
|
|

|
hhhat posted:
That's one way - You should also consider Paper Mache with a resin finish - far less toxic, expensive, easier. Paper mache tends to make people thing about elementary school projects, but it's remarkably versatile and if you take your time, you can make a drat good skull out of it, certainly one comparable with the other process. And I've never used it, but I hear good things about Worbla too. Here's a video I came across of someone using it to make the skull of Cubone, which is pretty similar to your design. No idea where / how much or any other details like that. https://www.youtube.com/watch?v=pDkhM-oHUtQ
|
|
#
?
May 23, 2014 05:11
|
|
|
You could do all that, or you could build a basic mask shape out of cardboard and fast-mache over it and skip all the template and expanding foam and newspaper poo poo. I've built about eight animal masks out of cardboard and Celluclay and never bothered to do like half the steps you're describing. I'd start with a basic mask shape to fit directly on my face. Some of mine are made completely from scratch with cardboard; a few have premade plastic masks from the craft store as a foundation. Build on that with carved white Styrofoam cones (NOT the green floral foam, which is brittle and toxic and awful) until it looks roughly like a snout/horns. Fill nooks and crannies with foam scraps, tinfoil, tape, whatever, it's gonna be covered shortly anyway. Go over the whole thing with mache paste, try to get it as smooth as possible while it's still wet. Sand the poo poo out of it. Add paint and weathering effects. Seal for moisture protection. Fasten to face. Papier mache is durable as gently caress as long as you don't get it soaking wet, it really is great stuff. Cheap, too. Unfortunately I don't have any in-progress photos of my stuff to help with the explanation, but this guide is pretty close as far as the underlying structure goes. Same materials for the most part. http://creepypasta.wordpress.com/2009/05/28/plague-doctor/
|
|
#
?
May 23, 2014 05:55
|
|
|
McKilligan posted:
It feels so weird but coming down from Valkyria Chronicles and getting ready to jump back into my Warhammer stuff this week, I can't seem to stop looking at ideas for smaller side projects. I really don't have time to do random Final Fantasy stuff but I can't stop thinking that maybe I do, aaargh.
|
|
#
?
May 23, 2014 15:36
|
|
|
McKilligan posted:That's one way - You should also consider Paper Mache with a resin finish - far less toxic, expensive, easier. Paper mache tends to make people thing about elementary school projects, but it's remarkably versatile and if you take your time, you can make a drat good skull out of it, certainly one comparable with the other process. Thanks - good information. I'd rather stay cheap and non-toxic. Resin instead of plasti-dip spray then? So, mache, primer, paint, detail, and then resin? Any specific type I should be scouting for? Cubone mask video drat cool, I might end up trying that method if this fails out. Squarely Circle posted:You could do all that, or you could build a basic mask shape out of cardboard and fast-mache over it and skip all the template and expanding foam and newspaper poo poo. I've built about eight animal masks out of cardboard and Celluclay and never bothered to do like half the steps you're describing. Gonna try that, and use foam as the base structure - will see how I do! Thanks for the Plague Doctor pages, saved them, the method looks like a good match for what I need for the horns.
|
|
#
?
May 23, 2014 18:08
|
|
|
I make a lot of paper m�ch� masks for my work and I just apply two coats of Elmer's glue if I want to add a little strength. Also a later of muslin instead of paper adds a lot of strength. Even a ring of soft wire around the edge.
|
|
#
?
May 23, 2014 21:30
|
|
|
Finally took some proper photos. Except I couldn't see anything so most of the photos have my lapel not folded right    
|
|
#
?
May 24, 2014 09:06
|
|


|
I, too, finally had someone take some photos - no more Artorias selfies. Still haven't got around to properly weathering or detailing everything yet - did some corrective spraypainting on the legs and chainmail. Apparently spraypaint doesn't really take to the mail well - leaving black dust all over the drat place, but somehow that's kind of fitting. Please ignore my shamefully disarrayed apartment.     I think my cape was a little skew, but I'm pretty much deaf, dumb and blind when all suited up, so I wouldn't know. Will have helpers prep me properly when I bring it out. Annoyingly, the rather badass effect rather falls apart when viewed from behind, and it becomes apparent it's more a costume than anything. Still, not too bad! McKilligan fucked around with this message at 16:33 on May 24, 2014 |
|
#
?
May 24, 2014 16:21
|
|
|

|
|
#
?
May 24, 2014 17:25
|
|

|
^^ those both look amazing.  Here's a couple days of forming and (traditional) paper mache. I'll be punching through the eye holes when its dried, and then I'll be going over it with celluclay and see how that all works out. Enjoying the process so far-
|
|
#
?
May 24, 2014 20:47
|
|
|
Check out bogus paper for paper mache. It takes the glue really well and once it dries a little you can burnish it with the back of a spoon and get a very smooth texture. Also, mix in a little sawdust and wood glue into the celluclay.
|
|
#
?
May 24, 2014 21:26
|
|
|
Good lord, McKilligan. I am in awe.
|
|
#
?
May 24, 2014 22:32
|
|
|
Even without weathering, that's still the best Artorias I've seen. One thing I would like to see someone do with it is hide their left arm in the costume, and use a fake arm to get the full broken appendage thing going on. It would be hard since Artorias is using form fitting armor. Now had it been a Knight of Catarina...that would be easy.
|
|
#
?
May 25, 2014 01:23
|
|
|
The Repo Man posted:Even without weathering, that's still the best Artorias I've seen. By far.
|
|
#
?
May 25, 2014 03:11
|
|
|
 Took some time to start the detailing on the helmet - so far I've just added the blacks, I'll be making a second pass with silver to bring out the highlights more.
|
|
#
?
May 26, 2014 15:36
|
|
|
Glob drat, that helmet is sick. Every time you post a picture of it, I have that same thought. gently caress.
|
|
#
?
May 26, 2014 17:21
|
|
|
If you hadn't posted the WIP shots I'd never believe that all started as plain craft foam.  How much stronger/stiffer does it get with the resin coating? Does it flex at all? That shape is looking really nice so far!
|
|
#
?
May 26, 2014 17:44
|
|
|
That is some Good poo poo right there, McKilligan.
|
|
#
?
May 26, 2014 19:49
|
|

|

|
| # ? May 9, 2024 18:54 |
|
|
Squarely Circle posted:That shape is looking really nice so far! Thanks! After about a pound of celluclay I was able to get the bony ridges built up to make it look more like a skull and cover over the spots that the paper just didn't quite do right... but the celluclay seemed to get rougher as it got drier overnight. I'm sure that's on me, maybe I needed to put it on wetter or something. Learning experience. Here's hoping the sand-ability of the stuff isn't oversold, It's going to take me some time to wear it back down to a smooth surface. Won't be able to find out until maybe next weekend, anywho.
|
|
#
?
May 26, 2014 23:16
|
|