


|
Worbla is ~magicallll~ stuff.
|
 #
?
Aug 21, 2014 17:30
#
?
Aug 21, 2014 17:30
|
|


|

|
| # ? May 9, 2024 17:44 |
|
|
Pile of Kittens posted:Worbla is ~magicallll~ stuff. In fact, if anybody happens to be going to GeekKon this weekend I'll be running a class about it on Saturday at 3! Join me and I will teach you my secret ways. And thanks, guys, for all the compliments on the finished 40k stuff ") This thread is a really good motivator for me and I love each and every one of you. I'm so excited to be moving on to some easier/dumber costumes (including a Magikarp swimsuit outfit, hell yes) for a few months though! This thread is a really good motivator for me and I love each and every one of you. I'm so excited to be moving on to some easier/dumber costumes (including a Magikarp swimsuit outfit, hell yes) for a few months though! 
|
|
#
?
Aug 21, 2014 17:57
|
|
|
roobots posted:Looking for a little LED wiring advice! LED strips are usually really power hungry and typically require a wall outlet. First you would have to find out how much power you need to run one, which you can do here: http://www.superbrightleds.com/power_supply_calculator.php. You would probably need 12V power supply and an AC to DC converter with an LED strip. If you can bend some acrylic into a band and leave an open space at the ends, you can put two LEDs on each end in the center and that would light the band up pretty good. It's like those awful light up rave visors you see at every convention now. I've never used them before, but some 5050 SMD LEDs can get pretty bright and don't use too much power, I think. But that's the harder way of doing it. Easier way: http://www.amazon.com/CoolGlow-LED-Bangle-Bracelets-White/dp/B00KLMX4NW. I don't know what color the bracelet you want lights up to, but since this is white it's easy to get whatever color you want. Cover the areas you need to light up in a specific color with contact paper, then use a colored sharpie to get the color you want. I did that to make a pair of red glowing eyes before, and it works really well. You can paint over the rest of the bracelet to make it look however you want.
|
|
#
?
Aug 21, 2014 18:07
|
|


|
Honestly, you shouldn't need to use an entire pre-made LED strip depending on how simple you're willing to go. Let's say you just want something that turns on when you flip a switch. This guy's tutorial is pretty good: http://www.instructables.com/id/Simple-Light-Circuits-on-the-Cheap/ But you want a bunch of lights, right? That means you should hook them up in parallel, so your wiring diagram is going to look more like this:  You need to calculate the resistor based on that equation at the bottom. There's an electronics thread in this subforum (and probably others) where you can ask about how to do that. It's not as complicated as it sounds, I promise! It's just a matter of "balancing" the circuit so all the juice doesn't go tearing through your LEDs at once and burn them out too fast. The two vertical lines on the diagram that carry the electricity are called "rails" - I would carve two parallel channels on the inside of the bangle to carry these rails, then drill pairs of holes for the LEDs legs to stick through from the top. Then once you have all those junctions soldered up, you can coat the inside of the bangle with a nice layer of hot glue or sculpey or whatever to keep the wires in place and not shocking you. Connect the negative and positive rails to a little battery holder with one of these: http://www.amazon.com/CR2032-Lithium-Battery-Package-Batteries/dp/B000RAWGIW This is a great little project to get the hang of the basics of making your own circuits, which can lead to more interesting projects, like this frozen stripper phylactery I made:  It's ugly, but it has LEDs inside that blink along with any sound the little circuit board on top hears. I made it with a random perfume bottle I found lying in an alley and one of these guys: http://tanjent.com/bliplace.html I know it's not a costume from a specific anime or something, but honestly I have nowhere else to post these weird little projects I do.
|
|
#
?
Aug 21, 2014 18:28
|
|
|
A friend is having a superhero/supervillain themed Stag and Doe on Saturday and I was hoping to go as Danny Devito's Penjuin since he is probably the closest to my body top. I was thinking of making a prosthetic nose, but as I've never do something like that I'm afraid I may have put it off for too long, as the Stag and Doe is Saturday night. How long would one usually take to make/paint/whatever? Also...does anyone know of a good tutorial or website that goes over the steps for a beginner? I didn't find anything on The RPF and I wasn't sure which youtube video to follow.
|
|
#
?
Aug 21, 2014 21:10
|
|

|
The Repo Man posted:LED strips are usually really power hungry and typically require a wall outlet. First you would have to find out how much power you need to run one, which you can do here: http://www.superbrightleds.com/power_supply_calculator.php. You would probably need 12V power supply and an AC to DC converter with an LED strip. If you can bend some acrylic into a band and leave an open space at the ends, you can put two LEDs on each end in the center and that would light the band up pretty good. It's like those awful light up rave visors you see at every convention now. I've never used them before, but some 5050 SMD LEDs can get pretty bright and don't use too much power, I think. But that's the harder way of doing it. Awesome advice! Right now I'm looking at going with using one of those pre-made LED bracelets and then just building the rest of the bangle around it with foam. I think that'd be the easiest thing at this point.
|
|
#
?
Aug 21, 2014 22:46
|
|
|
I need advice! I'm working on a Star Lord costume for New York Comic Con 2014, which is, I think, in 48 days. I have everything sorted for the costume except the pants. I've assembled an imgur album of reference material for the pants so I can go all Rain Man about the details: http://imgur.com/a/q7kw0     I have no idea how to sew, and even if I did, these look complicated. I spent hours poring the internet yesterday looking through motorcycle pants that might be a suitable base and found some options [1] [2] [3] [4], but nothing seems like the ideal base, yet. I'm willing to spend a few hundred bucks to get someone to make these from scratch for me just to get the details right, because I'm that degree of 'spergin, but I can't seem to find anyone. I've contacted a few custom tailor places near where I live in NJ and they all say it's not their wheelhouse. You guys got any ideas as to how I can go about this?
|
|
#
?
Aug 22, 2014 16:09
|
|


|
I do an awful lot of blinky things these days, and looking at the bracelet Dandy wears, it's definitely chunky enough to hide all kinds of mechanics. How much time do you have? My suggestion: Make the bracelet out of EVA foam so you can make it hollow. 2) get the following (all from AdaFruit, shipping is a bit much, but getting it in two days is awesome) Micro Lipo charger - https://www.adafruit.com/products/1304 500mAh LiPo battery ( it's about 1.25" square) - https://www.adafruit.com/products/1578 3.3v GEMMA - https://www.adafruit.com/product/1222 30 LED/Meter LED strip (1M long) - https://www.adafruit.com/products/1376 If you want it sound activated, you need this as well: Mic board with amp - https://www.adafruit.com/product/1063 The rest of it is pretty simple. The LED strip gets wired to power, ground, and D1. The mic would go to power, ground, and A1. Plug in the battery to the connector, and the hardware is done. For the software part, you can go with this: https://learn.adafruit.com/led-ampli-tie/the-code (note: written for the Flora, which is the "big brother" of the Gemma, so it needs minor changes - Mic Pin is A1, LED pin is 1) ... Heck, I can write you up some code for that if you want, make some changes to it so it fits better. Now, I do have a small chunk of high-density LED strip leftover from my UberLED Tie. It's 6" long, and has 22 LEDs. If you want it, PM me and I'll drop it in the mail.
|
|
#
?
Aug 22, 2014 17:38
|
|

|
TwystNeko posted:I do an awful lot of blinky things these days, and looking at the bracelet Dandy wears, it's definitely chunky enough to hide all kinds of mechanics. Given my time constraint (Dragon*Con in just under a week oh my gawwwdd...) I'm gonna make the cuff out of EVA foam and just rig it on top of a green light up bracelet. Not the nicest or most elegant, but it'll do the trick for now. I'll definitely keep this in mind for making a nicer one in the future though!
|
|
#
?
Aug 22, 2014 18:04
|
|
|
I've decided I'm going to start posting the poo poo I'm working on in here so you can all suffer along with me. It's a lot of  but I just get excited about this stuff, so gently caress you. but I just get excited about this stuff, so gently caress you. I'm going as Star Lord for NYCC 2014 in October, as I posted a bit previously. I loved the daylights out of the Guardians of the Galaxy movie, and the wonderful community at TheRPF has been releasing some great 3d files for me to play around with on my 3d printers. I'm an attorney by day, so my time to do prop-making is kind of limited, but I do have two 3d printers to help churn stuff out while I'm otherwise busy, so I'm hoping my progress will be quick enough to actually get done by NYCC. I'll start with the mask, since it's the part I expect most of you have seen a lot of. I found files for this on TheRPF and decided to give printing them a try. Before I did that, I used a Kinect and my laptop to 3d scan my head so I had a rough volumetric approximation, and then pieced the parts together in 3d Studio Max to make sure it'd fit:  It should be an okay fit. It looks like it has a bit of extra room at the front and back, and might be a little tight on the sides, but I figure I'll get it assembled and if I need to, I will use a heat gun to gently flex the curvature on the sides out a bit more, which should also result in bringing the front and back a bit closer together.   The material they are made of is PLA, because I find ABS prints to be a bit cagey to work with without warping. If everything goes well, I'm anticipating making a mold and resin cast of the thing down the line for proper wear. I've been using ApoxieSculpt to join the back seams of the parts after I superglue bits together. Apoxiesculpt is also my go-to touchup putty of choice for work on props, since I find Bondo messy.   That'll come along on its own. More interesting might be the blasters. I started with a pair of the Nerf blasters, as many people have. I looked at 'em and considered how I wanted to handle it, since a simple repaint seemed like it wasn't enough. In my past experience at conventions, they frowned on working dart blasters, so right away I decided I could gut the guns and remove the firing mechanisms to buy a bit of space on the insides for me to play around with. To be more screen-accurate, the front and back sections of the outer shells of the gun should be connected, whereas the Nerf gun has a space in between with a bunch of plastic molded wiring detail. I will say I really liked the physicality of how the blasters opened up when you pulled the secondary trigger - the top and bottom guards on the gun fan out. This is a detail that never, ever happens during the movie, as far as I can tell, but it is really cool, and I liked the explanation in my head that maybe they would open up in such a fashion if they overheated from too much firing. This was the first change - making it so that the tops and bottoms of the guns would be one piece, while still retaining the ability to open up. The concept:      Removing the actual nerf-dart firing pieces bought me a decent amount of space inside the guns, so I decided I wanted to add lights and sound to the blasters. The lights are simple enough - tuck some batteries in, and put an LED on a switch. The sound is a bit more complicated. The solution I've decided to go with are BigDawgs USB Multipush circuits.  They have an eBay account where you can get their product slightly cheaper - I bought three units because I figured I'd use them on something. They're designed for greeting cards and hobby applications, and they looked small enough that I could probably get away with fitting one inside the guns. The fact that they have the ability to play 5 sounds on 5 different buttons is not lost on me - I'm going to hopefully design these so that pulling the trigger plays blaster audio, and the secondary trigger that fans the gun open will play an 'overheating' sound. I might go for a third, if I can figure out how, that will play when the gun closes back up.   I figured out the points to jump power across and used 3xAA batteries to replace the 3 1.5v coin cells, just to test. Still works.  Once I figured out where to attach power to, the problem was figuring out what I could get away with inside the guns. I contemplated buying a rechargeable battery and putting it in a permanent position inside the gun with a plug somewhere on the outside that I could charge it at. Ultimately, though, I opted to go for disposable batteries for this one for two reasons: size concerns, and the ability to keep the guns working on the move at a convention. Last time I brought something with a powered element to the con, I used hard-to-source 12v batteries, and when they died on me mid-show it was a huge bummer. I want something I can easily find, replace, and continue on with my way with. Which is why, when I noticed one spot fit a 9v battery rather cozily, my work was done:    I had to pad the inside sides of the gun to keep the battery from jigglin' left and right, and while I was at it, I felt like putting a bit of extra detail in those capsule-shaped holes by the battery was a good start. I scoured my workshed for something that would work as a detail piece, looking in particular for mesh, until I found this instead:   For the rest of the gun, I filled in the remainder of the gap between front and back halves with plastic and then bondo'd roughly over it just to get that process started. I'm letting it dry for now, eating lunch, and then going back into the breach to see how much more I can get done today. I also printed myself an Infinity Orb.  It's hollow, so I can put a glowing Infinity Gem inside! But that'll come after cleanup. I figure I'll magnetize the two halves next.
|
|
#
?
Aug 23, 2014 18:06
|
|
|
Funky Bunch Wikia posted:
This all looks super-cool! 3D printing owns. A suggestion: attach the Infinity Gem to at least one half of the sphere with, like, fishing wire or something. Keeps it from getting lost.
|
|
#
?
Aug 23, 2014 18:09
|
|

|
DoctorWhat posted:This all looks super-cool! 3D printing owns. Yep! There's actually a lot of room inside these things. My current thinking right now is that I can carve an Infinity stone out of something, make a mold of it, and cast it in clear resin with a purple LED inside and wire leads sticking out. Then build some clear plastic support structures to make it look 'suspended' in the air between the two halves when I take them apart. Fishing wire would also work, but I don't want it rattling around inside the orb the rest of the time.
|
|
#
?
Aug 23, 2014 18:15
|
|
|
Funky Bunch Wikia posted:Yep! There's actually a lot of room inside these things. My current thinking right now is that I can carve an Infinity stone out of something, make a mold of it, and cast it in clear resin with a purple LED inside and wire leads sticking out. Then build some clear plastic support structures to make it look 'suspended' in the air between the two halves when I take them apart. Fishing wire would also work, but I don't want it rattling around inside the orb the rest of the time. You could make some sort of ratcheting winch(es), like one of those retractable USB cords on cheap mice. Inset them into each half of the cube. As you pull them apart, the line unspools and stays taut, the gem suspended in midair by the fishing wire; when you close it up, do it carefully and the gem will remain "suspended" inside by the now-wound wire!
|
|
#
?
Aug 23, 2014 18:20
|
|
|
DoctorWhat posted:You could make some sort of ratcheting winch(es), like one of those retractable USB cords on cheap mice. Inset them into each half of the cube. As you pull them apart, the line unspools and stays taut, the gem suspended in midair by the fishing wire; when you close it up, do it carefully and the gem will remain "suspended" inside by the now-wound wire! I imagine he could repurpose some of those plastic retractable badge holders pretty easily. They only cost a few bucks and replacing the line would be a lot easier than fabricating something outright. They might even have enough tension that closing it up could go pretty quick.
|
|
#
?
Aug 23, 2014 22:27
|
|


|
Yond Cassius posted:I imagine he could repurpose some of those plastic retractable badge holders pretty easily. They only cost a few bucks and replacing the line would be a lot easier than fabricating something outright. They might even have enough tension that closing it up could go pretty quick. That would work even better, but the principal is the same!
|
|
#
?
Aug 23, 2014 22:29
|
|
|
The whole idea is badass.
|
|
#
?
Aug 24, 2014 17:21
|
|

|
Started rough assembly of the Star Lord helmet print and I've encountered some issues. I may have made it a bit too big, but I usually have trouble getting my giant noggin' into things. Side-to-side, it fits snugly, no issues; the problem is front to back, where I have way too much room.   I'm thinking the best course of action is to use my heat gun to flex the sides out a little bit so it's not as miserably snug on me side-to-side, and then to cut both sides of the mask in front of the earpiece and remove an inch or two of material, then stick it back together and resculpt the hell out of the seam. Not thrilled that I have to do this - I could just reprint the helmet - but that'd be like 10+ days of printing just to get back to where I'm at. In the mean time, I fashioned a more screen-accurate tip for the quad blaster that plugs into the old nerf gun barrel. Printing it now to check for scale! 
|
|
#
?
Aug 24, 2014 20:47
|
|
|
Why not use foam to pad out the interior to make it more cody and have a more snug fit? I assume it doesn't look too ridiculously large right now?
|
|
#
?
Aug 25, 2014 01:01
|
|

|
Funky Bunch Wikia posted:I've decided I'm going to start posting the poo poo I'm working on in here so you can all suffer along with me. It's a lot of If you ever, EVER work towards selling Star Lord helmet/orb parts, I will pay in Kidneys, Children and Nazi gold.
|
|
#
?
Aug 25, 2014 01:17
|
|


|
Yeah, I'd want a glowing orb. You know, for my kid. As a nightlight. Totally not for me.
|
|
#
?
Aug 25, 2014 02:26
|
|
|
Funky Bunch Wikia posted:Started rough assembly of the Star Lord helmet print and I've encountered some issues. I may have made it a bit too big, but I usually have trouble getting my giant noggin' into things. Side-to-side, it fits snugly, no issues; the problem is front to back, where I have way too much room. The way its done you could probably get away with just making a different set of side pieces that are shorter. That print would probably take a lot less time than redoing it all.
|
|
#
?
Aug 25, 2014 02:28
|
|
|
Funky Bunch Wikia posted:Started rough assembly of the Star Lord helmet print and I've encountered some issues. I may have made it a bit too big, but I usually have trouble getting my giant noggin' into things. Side-to-side, it fits snugly, no issues; the problem is front to back, where I have way too much room. Size notwithstanding, that is looking so nice. I think your plan is solid, I might try and avoid having to heat it and make it wider if I thought I could deal with the lateral tightness for ease of resizing but either way that earpuck thing is going to make it a lot easier to cut down. I think you'll be good. So I uhh definitely made real-life claims that I was going to take a break from cosplay after the 40k push and I made it until about 12 hours after GenCon was done before I started scouting materials/planning/buying poo poo for new costumes  Gonna start doing some test parts for a Final Fantasy 8 Sorceress Edea backplate this week, I have some combo wood/worbla plans that I think is going to be fun, light, durable, and economic! Also planning on doing a swimsuit cosplay of the noble pokemon Magikarp for a convention at the Kalahari Resort in Wisconsin Dells and a drunk comfy lazy Rocket Raccoon setup. And lastly, despite the fact that it was like 88 degrees and 95% humidity yesterday I was persuaded to do a 40k photoshoot outdoors with some photog friends because there were 3 interested photographers and they wanted to light off smokebombs behind us. Fine. OK. I'm convinced. Gonna start doing some test parts for a Final Fantasy 8 Sorceress Edea backplate this week, I have some combo wood/worbla plans that I think is going to be fun, light, durable, and economic! Also planning on doing a swimsuit cosplay of the noble pokemon Magikarp for a convention at the Kalahari Resort in Wisconsin Dells and a drunk comfy lazy Rocket Raccoon setup. And lastly, despite the fact that it was like 88 degrees and 95% humidity yesterday I was persuaded to do a 40k photoshoot outdoors with some photog friends because there were 3 interested photographers and they wanted to light off smokebombs behind us. Fine. OK. I'm convinced.Preview shots so far:  
|
|
#
?
Aug 25, 2014 02:34
|
|
|
annnnddd... done. See you all at PAX (come look for me ) 
|
|
#
?
Aug 25, 2014 06:53
|
|
|
duros posted:annnnddd... done. See you all at PAX (come look for me Will do. I won't be wearing anything fancy, just regular civies. Or an Enforcer shirt if I'm on duty. Any other goons heading to PAX? As for me, my costume has been scrapped for this year, I need a hell of a lot of power tools to finish this year's additions, as well as an old beater leather jacket, a rivet gun, access to whatever it is that makes shrink wrap labels for soda bottles, non drying polymer clay in absurd quantities, a couple motorcycle tires, and a handful of military patches. Maybe I'll have it presentable in time for Halloween...
|
|
#
?
Aug 25, 2014 07:04
|
|


|
a cock shaped fruit posted:If you ever, EVER work towards selling Star Lord helmet/orb parts, I will pay in Kidneys, Children and Nazi gold. I got your PM and I'll respond to it properly later once I get home from work, but I'm sure we can figure something out.    First test of the gun barrel looks okay. It's a hair shorter than I intended, and I noticed a couple things that could be improved, so I went back into 3d Studio and just tweaked some of the dimensions - added a tiny bit of length to the end, moved the ribbing down, and resized the holes in the bottom to take LEDs properly. The ribbing on it is a detail I've kind of abstracted from the reference images marvel has made available. It seems to only be on the right gun, and on the barrel shroud instead of the barrel itself, but whatever, I'm working a tiny bit loosely with the visuals to get the same effect across.    I think this is the final version of the barrel plug I'll need, so I figured I'd make it available for anyone else trying to do the same thing to their nerf guns. Note they only fit if you drill out the front of the top barrel cover like I have on mine! http://www.fusedcreations.com/adam/s..._extension.STL
|
|
#
?
Aug 25, 2014 12:35
|
|
|
I lied about being done with the part. I'm remodelling the part to replace the orange piece, too. Hopefully it should be a 100% replacement, screws and all, assuming I've measured it right. I bought calipers off Amazon today, but I'm eyeballing things with a millimeter ruler right now. If I'm lucky, it'll work! I have to add the hinge part to the top of the barrel still. Any thoughts on details that should be added prior to test printing? I'm debating imprinting a little star lord logo on the side of the barrel, though whether or not that would print cleanly is another question entirely. Also thinking I need to move that ribbing further down the barrel in light of recent changes. Edit: I've thrown the final piece to the printer before going to sleep. We'll see how well I did at eyeballing dimensions come morning!    If it works, I'll share the file. There's some parts on there that might not be super clear as to their function yet inside the barrel, but I'm toying with an idea of frosted acrylic to diffuse the LED lights, because the LEDs I have chosen are blindingly bright and I don't want to be hurtin' people, now do I? Harvey Baldman fucked around with this message at 05:20 on Aug 26, 2014 |
|
#
?
Aug 26, 2014 02:28
|
|
|
Got my jacket.   Seems like a pretty good fit! It's the real leather version from fjackets. A few points on it to anyone interested in buying from them - if you go directly to their web site, the only version they have available is a synthetic leather one for $149. They don't list the real leather version on there for some reason! But, if you go on Amazon, they have both listed - real leather and synthetic - at different price points. Since I occasionally take the motorcycle out for a spin, I figured having a real leather jacket for me to be a high-speed nerd in would be a plus, so I opted for the slightly more expensive material. Feels good! Here's a link to the Amazon listing. I did a lot of looking around before I pulled the trigger, but I get the impression pretty much all of these jacket providers are using exactly the same patterns and producing exactly the same jackets - that is, if they're not all coming from one place and just named differently! My jacket, in case of point, came addressed to me from Pakistan. I have a 42" chest, and decided to go for a Large in their sizing. Glad I did - any smaller would have been too small. Sleeves are the right length, and it's a little snug when I zip it up, I will confess, but I've also put on a bit of weight lately from being a lazy piece of garbage. I don't think I'd trade it in for an XL at this point - the fit is supposed to be pretty much as it is on me, as far as I can tell. A final note on why I ordered from Amazon is I figured having the extra buyer protection would be decent when dealing with international vendors like this... and also my rewards card gives me 5% cash back on 'book store' purchases, which ironically enough this falls into. Been idly working on cleaning up the Infinity Orb and it's coming along. I took the opportunity to magnetize it together, and added plastic posts so that it would firmly lock shut without any lateral sliding.     Still needs a lot more work and sanding, but it's a start! I'm going to fashion an interior piece and hopefully 3d print that in the next few days to cradle the electronics and gem. Haven't figured out what I'm going to do for the infinity gem just yet, but I'm honestly thinking I'll just go outside, find an appropriate-looking rock, make a silicon mold of it, and then cast it up in clear resin with a purple LED or two embedded inside. Last but not least, I think I've got the 3d-printed nerf barrel replacement piece sorted. I was just testing the hinge and I think I need to move it about .5mm to get a better spring-loaded opening movement, but that shouldn't be too difficult to do. Printing a second piece now with those slight changes. Here's a test:   11th Hour Edit: I'll be honest, I might not have thought this through super well.  It works with zero issues. The opening effect of the original toy is still intact. I thought it'd be a neat gimmick to do when showing off at a convention or something - 'fire' it a bunch of times at viewers, and then have it 'overheat' and spring open with an accompanying sound and light show. I mean, it's entirely still possible! But here's the problem.  The gun... looks pretty stupid in this position. That barrel is way too long. If I could somehow engineer a way to make it retract backwards towards the handle when the cover went up, that'd be snazzy as hell, but I don't know how I'd possibly, possibly do that. I'm starting to think maybe I've taken a wrong turn with this idea - the opening effect was simply something Nerf designed so the darts could still shoot, after all. I'm pretty sure in the movie the front end of the barrel moved forward and back as the gun fired, rather than any movement like what I have going on right now. I'm not sure what I'm going to do with this yet. Might have to sit on the idea for a bit. Maybe I'm blowing it out of proportion, but I don't really like how it looks in the open position at the moment. I might end up going with a fixed-in-place top barrel after all. Harvey Baldman fucked around with this message at 03:50 on Aug 27, 2014 |
|
#
?
Aug 26, 2014 23:19
|
|
|
After getting bitten by a squirrel and then loving up my wrist, I haven't sewn anything in weeks and I'm so excited to get back to it. Have to finish Ryuko for an NYC photoshoot [I'm so glad I no longer go to cons often because costuming deadlines and my day job/other hobbies don't mesh well] and then, because I shaved most of my head, two costumes to get started on! Tank Girl:  Wanted to make this one for forever even with as stupid as it is. Gonna make a bunch of fake guns and probably save it to shoot somewhere in the salt flats or the Badlands since my photographer is nuts and likes to travel. Or find somewhere with a tank I can crawl on. Angel from BL2:  Still not sure how I'm doing the wings [thinking super thin acrylic or hard plastic with stenciled frosted glass paint and channeled LEDs along the edge] and I'll have to shell out for a full-lace wig to destroy [because otherwise I'd have to dye my blue and get serious extensions and gently caress THAT], but man oh man, I am excited.
|
|
#
?
Aug 27, 2014 16:54
|
|

|
Bag of Hamsters posted:
My favorite wings I saw at comic con were made out of packing foam sheets. Like this stuff. http://www.amazon.com/Foam-Wrap-feet-inches-wide/dp/B005K0A9WY/ref=sr_1_3?ie=UTF8&qid=1409161080&sr=8-3&keywords=foam+packing+roll They did individual feathers out of it and put it on some sort of frame. 
|
|
#
?
Aug 27, 2014 18:49
|
|
|
So we're off and running again with the Star Lord accoutrements. My bag came from China in about a week, which I thought was impressive.  I happened to be in Manhattan yesterday and I tried to find a matching fabric to the screen bag:   ... nobody had anything close, which is not a surprise, because the bag is probably screenprinted just for the movie. Whatever. I found a brocade that might work, and it was cheap, so I bought half a yard of it and brought it home with me. The colors are... kind of right? And it's squares, not circles, but come on, I'm trying here. We'll see if I have the time and inclination to do anything with that. Worst case, the bag is good by itself. The helmet gave me, appropriately enough, quite a logistical headache for a couple days. I just did not like the fit on my big, dumb lightbulb-shaped head.     I could barely even get my head in there because it was too narrow side-to-side, even after removing a lot of material inside. I tried using a heat gun to flex the sides out, which helped a bit, but overall I just was not happy with it. So, back to the drawing board I went. I spent 4-5 hours remodelling a large section of the mask and re-proportioning features.  I flattened out the front of the face a bit (although, in hindsight, maybe not as much as I wanted). I also bulged the back of the helmet out to give me a bit more room to work with, and brought the edge by the nape of the neck up substantially so I could fit the thing over my head easier. It's wider than the original model, but that's what I need to wear it comfortably. I'm probably going to have to carve a section out of the underside of the chin to give me the clearance to get my nose through, but the fit on this one should be a lot better. A lot of time was spent looking at the guns and trying to figure out what I was doing. I finally refined the model for the barrel down to the point where I'm happy with it.   It's available for download here. Should work with minimal effort. In the mean time, progress has been made on the interior, mostly around the battery area, which I had to rejigger a little bit:   It looks a little messy, but this thing is actually engineered very tightly, and I'm kind of proud of it. The battery can be pushed straight into the slot, and will snap into battery connectors snugly without moving around. A ribbon is in place at the moment to help me pop the battery out.   I spent a couple days toying around with my greeting card circuit before I decided I wanted to do better. I took a dive into the strange and exciting world of arduinos and breakout boards, and have been working on some solutions that I think will do the trick:  I'm going to be using an Arduino Pro Mini to control each gun and I'm embedding an Audio-sound Breakout that will have all the sounds I need on a microSD card. I'm still waiting on a parts order at the moment to get everything wired up. This is also my first endeavor into anything involving arduinos, but oh my god they are so much easier to use than I first thought. Like, I can't see ever not using one of these in a project in the future. They are dirt cheap, smart, adaptable, and small. Here's what I'm thinking, as far as ultimate functionality on the guns: An on-off switch hidden somewhere on the body of the gun to isolate the 9V from the rest of the circuits, including the arduino. When powered on, the gun will make a 'power up' noise as it comes to life. A standby LED will slowly pulse once 'ready'. When the trigger is pulled, it will turn on blue LEDs in the barrel at full intensity, then quickly fade them out over the next second and a half. One of half a dozen blaster sound effects will play from the speaker, chosen at random. When I hit the secondary trigger on the gun, it will 'overheat'. The speakers will play a winding-down sound, the physical movement of the gun will open up the two slides, exposing the interior barrels. A red LED will come on in the barrel shroud. When the gun is closed back up, it will re-engage the same 'power up' sound as when initially powered on. Red LEDs will turn off. Thankfully, I know Java, and these arduinos seem like a snap to program up, so with a bit of trial and error I'm confident I'll be able to come up with something cool. I was also going to show off the boot rockets, but right before I was taking the pictures I managed to mistakenly hook up the wrong power source to one of them and burned out the electronics I had embedded (I was working with 5v for the arduino, and the poor LED in the boot rocket didn't know what hit it). Woops. As a consolation prize, here's a completed strut, while I figure out how to fix my boo-boos:  I'm currently printing out a copy of the orb interior - I may be making a cold-cast aluminum version for myself once I'm done cleaning the Infinity Orb up, and depending on the designer's disposition, I may be able to offer a run of these things! We'll see. Harvey Baldman fucked around with this message at 18:29 on Aug 31, 2014 |
|
#
?
Aug 31, 2014 17:24
|
|
|
I am so excited to see this all together.  Would you be interested in offloading your rejected helmet? Would you be interested in offloading your rejected helmet?
|
|
#
?
Sep 1, 2014 02:19
|
|
|
 
duros fucked around with this message at 03:05 on Sep 1, 2014 |
|
#
?
Sep 1, 2014 02:42
|
|
|
This is fantastic. McPantserton posted:I am so excited to see this all together. I asked the same question!
|
|
#
?
Sep 1, 2014 05:00
|
|
|
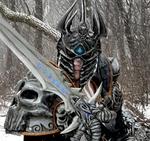
a cock shaped fruit posted:I asked the same question! You did, and you asked it first in PMs, so I need to get back to you about it. :V Tomorrow morning, maybe. Too tired today. duros posted:HARDER BETTER FASTER STRONGER What is the visibility like inside this thing?
|
|
#
?
Sep 1, 2014 05:31
|
|
|
Funky Bunch Wikia posted:What is the visibility like inside this thing? I can approximate something close to this: 
|
|
#
?
Sep 1, 2014 07:56
|
|
|
Funky Bunch Wikia posted:What is the visibility like inside this thing? Outdoors in sun/bright indoor light I can actually see well enough with the LEDs on and basically like wearing (super) sunglasses with them off. In the dark of the expo hall it is almost impossible to see with the LEDs on OR off  - I had my gf lead me around in the dark to navigate spaces. - I had my gf lead me around in the dark to navigate spaces.
|
|
#
?
Sep 1, 2014 09:41
|
|
|
Photos do not do it justice. I tried to say hi, but you couldn't see a goddamn thing. Also, love the custom CAH card. I just made mine an Enforcer in-joke.
|
|
#
?
Sep 1, 2014 10:21
|
|
|
So the voice mod speaker I have in my scarecrow mask doesn't seem to be loud enough to hear it over my own voice, anyone have an idea on how I can increase the volume running to the speaker? I've contemplated trying to find a circuit board amplifier or some sort of volume control know to the assembly.
|
|
#
?
Sep 1, 2014 17:39
|
|

|
fallin1 posted:So the voice mod speaker I have in my scarecrow mask doesn't seem to be loud enough to hear it over my own voice, anyone have an idea on how I can increase the volume running to the speaker? I've contemplated trying to find a circuit board amplifier or some sort of volume control know to the assembly. Adafruit has a couple small amplifier boards that would probably work for you, but read up on the one you buy, some need a microcontroller to control volume, while others are adjustable via jumpers or a pot. http://www.adafruit.com/categories/42
|
|
#
?
Sep 1, 2014 20:20
|
|

|

|
| # ? May 9, 2024 17:44 |
|
|
one more (from Astro Gaming's Facebook page):
|
|
#
?
Sep 2, 2014 06:55
|
|