

|
I make a long cut using an Xacto blade (whatever the width of the sheet is,) then use scissors to snip the short cut. Honestly, it isn't much work at all, and you can knock out a lot of bases while watching TV or something. Unless you're super busy or have kids, the savings is worth the mindless activity. But that's up to you. As for cases, you can use anything that will hold your models. I use either Battlefoam or Army Transport with the center of the tray removed (so it looks like an frame with a back, or a box.) In the past, I've put in foamcore that was cut to size with the adhesive steel paper attached and set the tray into the foam. The foamcore adds a bit of rigidity. Going forward through, I am using magnetic whiteboards cut to fit my foam trays - the material is about the same weight, more rigid, and winds up being cheaper than steel paper. You have to cut it with a boxcutter and you're all set. You can get the whiteboards cheap with a coupon at Michaels or AC Moore.
|
 #
?
Feb 18, 2015 17:57
#
?
Feb 18, 2015 17:57
|
|

|

|
| # ? Jun 8, 2024 06:33 |
|
|
In regards to miniature storage, I took a page out of Doctor Faust's Painting Clinic's book, and bought some cheap steel cake baking pans (the ones that come with plastic covers that have handles on 'em, for transporting cakes) and some rare earth magnets. After super-gluing the magnets to the underside of the bases (I'm using the Warmachine style round lip bases; I started out with 4mm x 2mm magnets, but the next batch I ordered is gonna be 6mm x 2mm), I now have an easy-to-carry storage solution.  Doc Faust's got a few vids on how to do this sort of magnetized miniature storage, with the aforementioned cake pans, as well as doing stuff like putting sheet steel at the bottom of Snapware plastic containers, and so on. I decided to go the quick & dirty route with the cake pans. 
|
|
#
?
Feb 18, 2015 19:37
|
|

|
Sydney Bottocks posted:In regards to miniature storage, I took a page out of Doctor Faust's Painting Clinic's book, and bought some cheap steel cake baking pans (the ones that come with plastic covers that have handles on 'em, for transporting cakes) and some rare earth magnets. After super-gluing the magnets to the underside of the bases (I'm using the Warmachine style round lip bases; I started out with 4mm x 2mm magnets, but the next batch I ordered is gonna be 6mm x 2mm), I now have an easy-to-carry storage solution. This video? https://www.youtube.com/watch?v=e3TvgzBQtZ0 That looks like a great solution. I like the idea of using magnetic whiteboard in the bottom of an Army Transport style pluck foam sheet, berzerkermonkey, but those transport cases are always so pricey to grab. They're nice, for sure, but I could never get over the cases being more than $100 for ones of a decent size. nesbit37 fucked around with this message at 20:31 on Feb 18, 2015 |
|
#
?
Feb 18, 2015 20:07
|
|
|
nesbit37 posted:This video? https://www.youtube.com/watch?v=e3TvgzBQtZ0 Yep, that's the one! The only things I didn't do that Doc Faust did here is make the cake pan a "dual-layer" storage case (don't have any armies big enough currently to justify the extra effort), and I didn't need to add any gaffers tape/scrub out the "non-stick surface" like he did. The cake pans I bought (I forget the brand name, but I found them at a Big Lots store, so if you're in the USA and have one nearby, you should be able to find them for around $10 or so) are supposed to be non-stick, but the magnetized minis I have done so far don't slide around in the pan at all, so I haven't had to do any extra work. Just magnetize the little bastards, pop 'em in the pan, put the cover back on, and my work's done. 
|
|
#
?
Feb 18, 2015 20:20
|
|
|
nesbit37 posted:This video? https://www.youtube.com/watch?v=e3TvgzBQtZ0 Yeah, they are pricey up front, but you really only need one. I swap out trays depending on the game I'm playing. The downside of something like cheap cake pans is that if you drop one, I don't care how strong your magnets are, poo poo is going to break. With a foam case, whether you go Battlefoam, Army Transport, or K&R (which I cannot personally vouch for, but people seem to like them) you'll at least have some level of protection. There are cheaper alternatives - Battlefoam always has a 25% off sale at least twice a year, and they offer free shipping if you order at a convention. They have a canvas-type bag that uses Army Transport size trays loaded with pluck foam for $62. If you really hate Romeo from BF, you can get an AT bag for $90. Here's my argument - we spend thousands of dollars on minis, but cheap out on storage and protection. It's like buying a car and then skimping on oil changes because it's "too expensive."
|
|
#
?
Feb 19, 2015 00:19
|
|
|
Also, having a good bag which is always packed with your stuff makes it way easier to get games in at random because you don't have to spend half an hour getting your figs together.
|
|
#
?
Feb 19, 2015 01:01
|
|

|
As an experiment, I just now dropped the cake pan that currently holds my minis (some Khador for Warmachine, plus some various Reaper fantasy figures), some of which required pinning to hold arms and such in place, from a height of about three feet. The minis inside bounced a bit, but nothing broke or chipped or whatnot. So I would say that if you're uncertain of your minis' safety inside such a container when traveling, then definitely buy a transport case with some foam (or maybe figure out a way to line the sides of the cake pan with foam perhaps). For just pure storage purposes (meaning, you either just buy figures to collect and paint, or you never plan to game outside the confines of your home), the cake pan+magnets route should still be a perfectly acceptable alternative.
|
|
#
?
Feb 19, 2015 01:04
|
|
|
I'm trying to figure out the best way to paint some engine glow on an A-wing model, does anyone have any guides or recommendations? I assume airbrush is the best method? Here's a pic for reference:
Commissar Canuck fucked around with this message at 04:46 on Feb 19, 2015 |
|
#
?
Feb 19, 2015 04:41
|
|


|
Commissar Canuck posted:I'm trying to figure out the best way to paint some engine glow on an A-wing model, does anyone have any guides or recommendations? I assume airbrush is the best method? Here's a pic for reference: http://chestofcolors.com/how-to-paint-osl-effect-jump-pack/ Adapt this, maybe?
|
|
#
?
Feb 19, 2015 05:21
|
|

|
Been working on a magnetized wolf lord on a thunderwolf that my girlfriend has nicknamed Conan.  
|
|
#
?
Feb 19, 2015 10:22
|
|

|
I can see why.
|
|
#
?
Feb 19, 2015 13:40
|
|
|
The Sisko posted:Been working on a magnetized wolf lord on a thunderwolf that my girlfriend has nicknamed Conan. That dudes really at the mercy of that wolf behaving. But, seeing as he is equipped with lightning claws, the wolf's best interesting is making certain he doesn't have to hang on
|
|
#
?
Feb 19, 2015 16:56
|
|

|
Looking at doing a gold-armored model soon and I'd like to forego my usual go-to of brown ink, as I'd like to make the gold pop a little more and be less muted than the brown usually makes it. Which colors would work best to accomplish this?
|
|
#
?
Feb 19, 2015 17:29
|
|

|
PantsOptional posted:Looking at doing a gold-armored model soon and I'd like to forego my usual go-to of brown ink, as I'd like to make the gold pop a little more and be less muted than the brown usually makes it. Which colors would work best to accomplish this? This is how I usually do it: Reaper: Ancient Bronze > brown wash > Antique Gold > New Gold > GW Mithril Silver > brown wash > purple wash in recesses > sparse highlights with silver. This nets you a pretty rich gold that also pops out more. Silver is pretty important for a highlight stage, provided it's used sparingly and for edge highlights.
|
|
#
?
Feb 19, 2015 17:34
|
|
|
What's a good process for Tau skin? I've got Vallejo paints and GW washes.
|
|
#
?
Feb 19, 2015 17:35
|
|
|
Slimnoid posted:This is how I usually do it: That's actually pretty close to how I'm doing most of my gold already, sans the purple wash, so this is excellent.
|
|
#
?
Feb 19, 2015 17:38
|
|
|
berzerkmonkey posted:Yeah - here is a good deal: http://www.ebay.com/itm/Magnetic-sh...=item2a3d9c9088 FYI, just found that Hurlbat has sheets of it (though they are temporarily out of stock), same size as Litko, for �1.25 a sheet. I had problems ordering multiple things of bases from their ebay store so they directed me to their webstore and I ran into it there.
|
|
#
?
Feb 19, 2015 21:48
|
|
|
nesbit37 posted:FYI, just found that Hurlbat has sheets of it (though they are temporarily out of stock), same size as Litko, for �1.25 a sheet. I had problems ordering multiple things of bases from their ebay store so they directed me to their webstore and I ran into it there. Sigh - and after I received my base order from them. Of course. Thanks for the heads up though.
|
|
#
?
Feb 19, 2015 21:54
|
|
|
There's also Magnetic Display, dunno how the prices compare though - http://www.magneticdisplays.co.uk/magnetic-displays/lightweight-range
|
|
#
?
Feb 20, 2015 01:33
|
|

|
Commissar Canuck posted:I'm trying to figure out the best way to paint some engine glow on an A-wing model, does anyone have any guides or recommendations? I assume airbrush is the best method? Here's a pic for reference: https://www.youtube.com/watch?v=DBiwFjluDu0
|
|
#
?
Feb 20, 2015 03:05
|
|

|
Grey Hunter posted:
Confucius say: Tripod with four balls cannot walk.  Ever thought about putting some scale items on a base like that? Houses, cars, and such could emphasize its scale. PierreTheMime posted:Crossposting a finished Canoptek Wraith: Not a fan of the lenses on the head, (primary red next to primary yellow often looks quirky to me) but the rest is buttah, pure buttah. I really like the subtle lighting on the back.
|
|
#
?
Feb 20, 2015 03:48
|
|


|
Progress, I'm nearly done but I need to gloss varnish and do some oils, decals and weathering powder. Still had to share. 
|
|
#
?
Feb 20, 2015 07:42
|
|

|
Looks cool, side note, the unfortunate shadow and angle makes it look like the marine has a candle on his head.
|
|
#
?
Feb 20, 2015 10:20
|
|
 will blow your mind.
|
Bavius posted:Progress, I'm nearly done but I need to gloss varnish and do some oils, decals and weathering powder. Still had to share. Basius pad bro   I just used the same pad for my rebs deadzone team
|
|
#
?
Feb 20, 2015 12:14
|
|


|
WhiteOutMouse posted:Looks cool, side note, the unfortunate shadow and angle makes it look like the marine has a candle on his head. I really thought he did and it was just some 40k thing I don't know about like an order of marines that take a sacred oath to keep spread the emperor's light but of course the oath is taken very literally and all their candles are lit by one candle the emperor lit long ago.
|
|
#
?
Feb 20, 2015 13:59
|
|

|
Thanks for those guides, I'm pretty happy with how this first attempt turned out     I tried airbrushing in some carbon buildup by the guns, but one side is a little thicker than I'd like. Since this is paint over gloss coat, can I just take a paper towel with airbrush cleaner or something and wipe it off or will that just make things worse?
|
|
#
?
Feb 20, 2015 15:41
|
|
|
WhiteOutMouse posted:Looks cool, side note, the unfortunate shadow and angle makes it look like the marine has a candle on his head. Haha, fantastic. NTRabbit, it's a solid basing pad. I want to get the clean version for more variety though. e: wip for illumination 
Bavius fucked around with this message at 20:11 on Feb 20, 2015 |
|
#
?
Feb 20, 2015 16:12
|
|
|
Commissar Canuck posted:Thanks for those guides, I'm pretty happy with how this first attempt turned out I'd go brighter in the middle. OSL looks better when the light source (the jet flame in this case) is the brightest thing in the area by far. The flame area (not that it is a flame but w/e) actually looks if anything a little darker, which it shouldn't; it's emitting the light that is reflecting from everything else.
|
|
#
?
Feb 20, 2015 20:02
|
|

|
That's the most inventive use of the Marine casualty model I have seen. The Dreadnaught moving to protect him is ... is ... forging the narrative aauugh!  Maybe he just wants to stand by him so he can eject and that poor guy can replace him for the next millennium. If any newer painters are still watching this thread: models you paint look awful at first and it takes time! I was a teenager when I started, it's easy to be blown away by the work of professionals then be stunned when I ended up with yellow and black bumblebee space elves (I don't even remember what I painted their weapons like, I have photos... somewhere). Stuff looks even worse when painting a light color over a dark one. Not only does it take multiple coats, but after you thin your paints you must thin your paints- really. When applying multiple coats if there are any wrinkles in the first coat, the second coat will be even more wrinkled, then the third coat will be downright lumpy. Even base coating sucks! Unless you take the extra effort to mount each model on a stick or a thin strip of Whatever, the models must be re-positioned several times to ensure that the color and sheen are even, and that the entire surface is coated with paint. Left: One coat of thin bone-colored paint. "Oh gently caress, this looks like poo poo!" Don't worry. Right: Two coats of thin bone-colored paint. Almost there, a third coat should do it.  1) Watery paint tends to form bubbles, pop them with your brush before the paint dries. 2) Watery paint tends to pool around the edges of raised edges or into the recesses. With a dry brush, suck up this excess before it dries and drowns out detail (no pun intended). I really don't get Citadel painting guides. Had I used a base paint of some shade of brown it would merely be a different color that I must completely cover. I spray painted the weapons white but that just hides the imperfections in the brushed on layers easier to hide or less noticeable.
|
|
#
?
Feb 20, 2015 20:15
|
|
|
Post 9-11 User posted:That's the most inventive use of the Marine casualty model I have seen. The Dreadnaught moving to protect him is ... is ... forging the narrative aauugh! Thank you very much! My Minotaurs are the first army where I've considered the narrative from inception. Great message for newer painters, the biggest thing that helped me was practice and I still think I'm learning quite a bit. Oh and that's a helmet crest. Not a candle, but I can't unsee it now. 
|
|
#
?
Feb 20, 2015 20:32
|
|
|
I've been working on an overcomplicated, yet cunning plan to make true-scale Grey Knights. For this I'm going to 3D print and cast Storm Bolters and backpacks. Here's the Storm Bolter and a scale comparison with a normal bolter:    Any suggestions or comments before I send this off the the printers?
|
|
#
?
Feb 20, 2015 20:47
|
|

|
Are you sure you don't want to do side-by-side barrels?
|
|
#
?
Feb 20, 2015 20:49
|
|


|
Yup, that's one of the big reasons for doing this whole thing in the first place 
|
|
#
?
Feb 20, 2015 20:52
|
|
|
Is there another ejector port higher up on the right side?
|
|
#
?
Feb 21, 2015 00:03
|
|

|
On the subject of new painters(myself included) Dan Harmon gave some really good advice on writer's block that could be applied to any creative endeavor. So here's basically what he said, just change "write" to "paint": Prove that you're a bad writer. You're trying to prove that you're a good writer and that's what's blocking you. No matter how good you get, you're always going to think you should be better than you are because you want to be a good writer and you will be by thinking that but it's not going to get you writing right now. The only thing that's going to make you better is practicing. The only thing you're going to be able to write right now is something worse than what you think you should be writing. So you have to stop thinking about the thing that you're going to eventually be able to do and you have to start thinking about the thing that you are terrified you will do because that will go by very quickly.
|
|
#
?
Feb 21, 2015 04:02
|
|
|
HardCoil posted:Any suggestions or comments before I send this off the the printers? Well 2 things stick out to me about storm bolters; one is that they have a thick cowling over the barrels, and the other is that their rear end-end is bigger so that it fits a terminator hand. Also, most storm bolters have this flat iron thing sticking forward from under the barrel. I think this is either a track for the ammo box, or a mount for a chainthing. I would just beef it up a little more. The basic size difference is there, but parts of it should be heaftier IMO. Here's what I mean:
|
|
#
?
Feb 21, 2015 05:51
|
|
|
HardCoil posted:I've been working on an overcomplicated, yet cunning plan to make true-scale Grey Knights. So what is so cunning about your plan ?
|
|
#
?
Feb 21, 2015 05:56
|
|
|
Has anyone ever dealt with or painted with "holographic" paint , it's the kind that gives the prismatic rainbow colours that you'd see one some cars and vehicles. I ask because I found a company that sells a pearlescent coat that supposedly works, but am really apprehensive.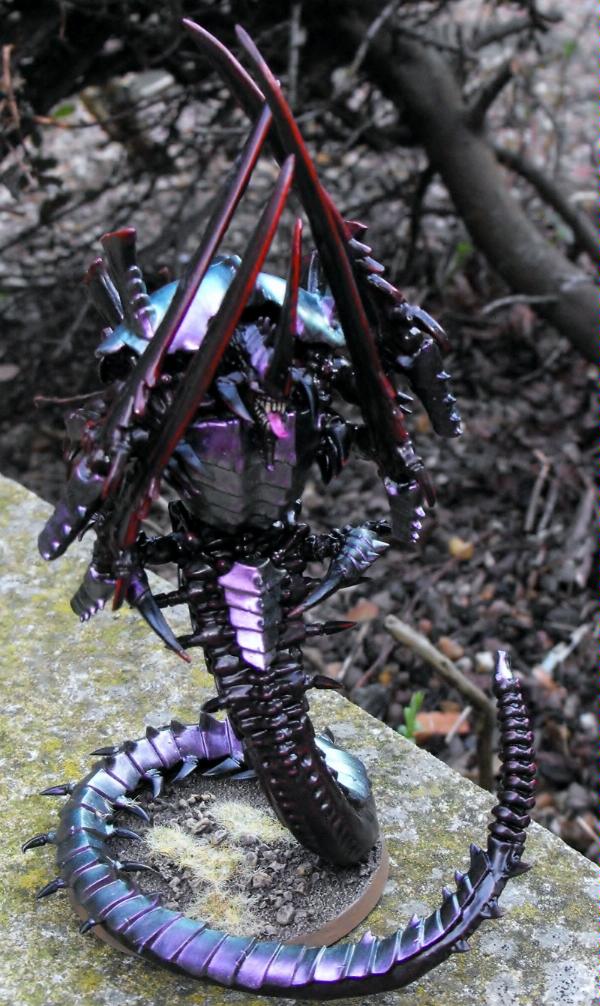 This is kind of the effect I'm going for. http://www.thecustompaintshop.com/
|
|
#
?
Feb 21, 2015 08:13
|
|
|
I haven't had much time to work on my UCM lately but i might get some prototypes for light dropship clamps done today. I also had some ideas for scratchbuilt shaltari rolling around in the back of my head. I might never get around to building them but i made a test piece for the teleport gates today. It's six layers of 0.5mm acrylic with various test patterns engraved and lit from the side by a tiny LED. It does have more depth irl than shows up in in the photo. 
|
|
#
?
Feb 21, 2015 15:03
|
|
|

|
| # ? Jun 8, 2024 06:33 |
|
|
Bistromatic posted:I haven't had much time to work on my UCM lately but i might get some prototypes for light dropship clamps done today. That is some really amazing poo poo right there. You need to start making kits of it ASAP. All the Infinity nerds are going to have an orgasm for it.
|
|
#
?
Feb 21, 2015 15:36
|
|
