


|
Mr. Mambold posted:Plywood doesn't expand/contract seasonally unless you hose it down or run a heater next to it. The stove is two feet away, both are possibilities 
|
 #
?
Nov 1, 2015 21:29
#
?
Nov 1, 2015 21:29
|
|


|

|
| # ? May 16, 2024 19:07 |
|
|
Got all the cedar stringing glued in, it went alright, had to re-do a few spots, but nothing too crazy. Still need to do some scraping to clean the surface and put in some plugs at strategic points to hide some blemishes.
|
|
#
?
Nov 1, 2015 22:10
|
|
|
froward posted:this was made for a charity auction and is drying in the kitchen: The glass topped table is ghastly, but this stool is pretty awesome.
|
|
#
?
Nov 2, 2015 01:14
|
|

|
I live in a place where I have very little space for a shop/tools. I came across the Shopsmith. Do any of you have experience with a Shopsmith? I'm hoping that might resolve my space issue, as it's only got a 2'x6' footprint. There's a few out here used that I wouldn't mind grabbing. C'mon goons, let's hear some brutal tool honesty before I impulse buy another mistake (gently caress you Habor Freight planer).
|
|
#
?
Nov 2, 2015 16:16
|
|


|
This looks great, awesome job!
|
|
#
?
Nov 2, 2015 16:32
|
|


|
Cannon_Fodder posted:I live in a place where I have very little space for a shop/tools. I had friends who went that route, but usually buying it at or close to retail. They ended up regretting that and either selling at a loss, or just pushing into a corner.
|
|
#
?
Nov 2, 2015 16:37
|
|


|
Mr. Mambold posted:or just pushing into a corner. But on the plus side, it only takes up 6'x2' of that corner!
|
|
#
?
Nov 2, 2015 16:39
|
|


|
Cannon_Fodder posted:I live in a place where I have very little space for a shop/tools. I looked at them years ago and realized they are quality machines that are divisive, people either love or hate them. They aren't for me, I don't even like changing saw blades.
|
|
#
?
Nov 2, 2015 17:26
|
|

|
Changing saw blades is the worst. I almost never do it and just try and work around what blade I have in there, regardless of the task. I think my mitre saw still has the lovely blade it came with. Probably not the smartest thing, but laziness manifests itself in weird ways. I really should get some new blades...
|
|
#
?
Nov 2, 2015 17:31
|
|
|
BUGS OF SPRING posted:Changing saw blades is the worst. I almost never do it and just try and work around what blade I have in there, regardless of the task. I think my mitre saw still has the lovely blade it came with. I'm OCD about my blades. If I have a blade on my 12" Dewalt that has some wobble, I get all bent out of shape over it. Dull blades, don't come around here. Which reminds me of a guy named Chuck who used to go around jobsites with a portable sharpening shop in a step van....sometimes he'd do a great job. Sometimes, he'd put the exact opposite rake on a whole pile of blades and ruin them all. He pissed off a few old boys.
|
|
#
?
Nov 2, 2015 18:15
|
|
|
There is a guy on youtube I follow who has a shopsmith. He seems to like it. You might think about contacting him to get an opinion. In this video he is making a project but shows more the usage of the shopsmith and radial arm saw rather than the project itself. https://www.youtube.com/watch?v=cFQUgNaJQ7o For me they seem like an interesting idea. You're making compromises but if you only have a certain amount of room... The dvr motor on the modern ones is p.nice too
|
|
#
?
Nov 2, 2015 23:53
|
|

|
I own one. They're really neat machines if you're willing to accept the compromises that have to be made to make the form work. I love using it as either a lathe or drill press. I think that's where it really shines. It's less awesome as a tablesaw. You have to get used to planning out every project in such a way as to minimize tool changes. If you don't, you can waste half the day going from one form to another. If it's an older one with the "speed dial," for the love of all that is holy, never monkey with the dial when the motor's off. You'll break it. Edit: I will say, if I ever get a larger shop space, I would probably augment the SS with a traditional table saw, but keep using it for lathe/drill press work.
|
|
#
?
Nov 3, 2015 00:32
|
|
|
The headstock turned out great, if I say so myself. One tiny little slip up on the badge, it felt like crushing defeat but just gotta move on. I went through everything, she's as good as new, maybe a touch better. Now I have to decide whether to toss it back on ebay and try to make a quick profit or actually use it to make a medium size bowl lathe. 
|
|
#
?
Nov 3, 2015 05:55
|
|
|
wormil posted:The headstock turned out great, if I say so myself. One tiny little slip up on the badge, it felt like crushing defeat but just gotta move on. I went through everything, she's as good as new, maybe a touch better. Now I have to decide whether to toss it back on ebay and try to make a quick profit or actually use it to make a medium size bowl lathe. Bowls can be sold for money, right? Obviously it'd be irresponsible to value short-term Seriously, you did a great job on that. I don't think I could give it up if I'd done it.
|
|
#
?
Nov 3, 2015 18:26
|
|
|
Did a quick glue up for a longboard skateboard deck. Ended up with a small ugly spot in one of the glue joints. Sanded pretty aggressively but it just keeps on coming. This was a quick rip and glue, so i'm thinking maybe a burn mark from the saw? Anything else that would cause something like this?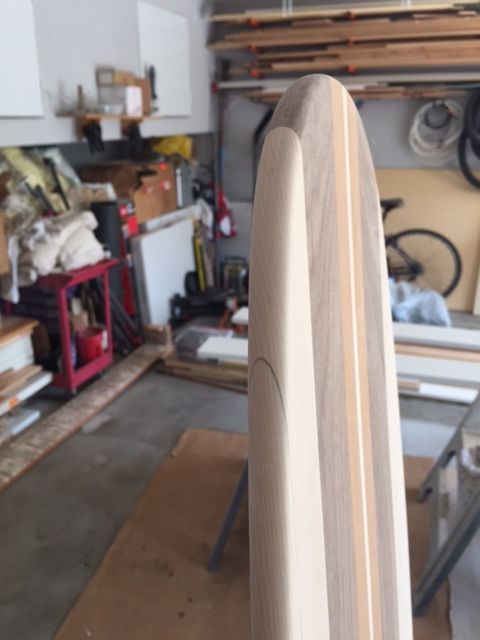 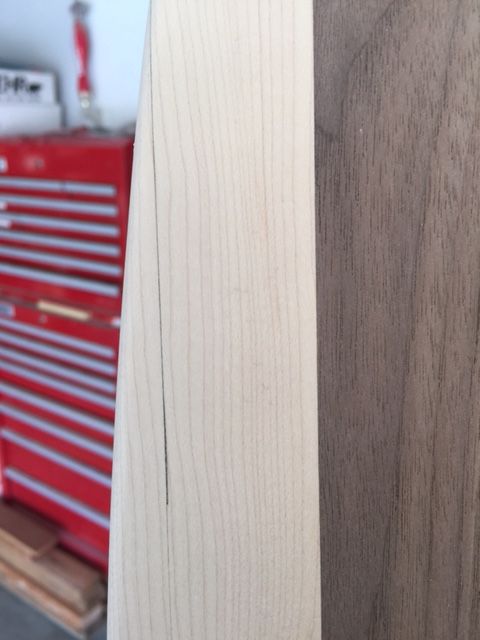 Still pretty happy with the finished product, some Danish oil and a clear silica sand grit yet to come. 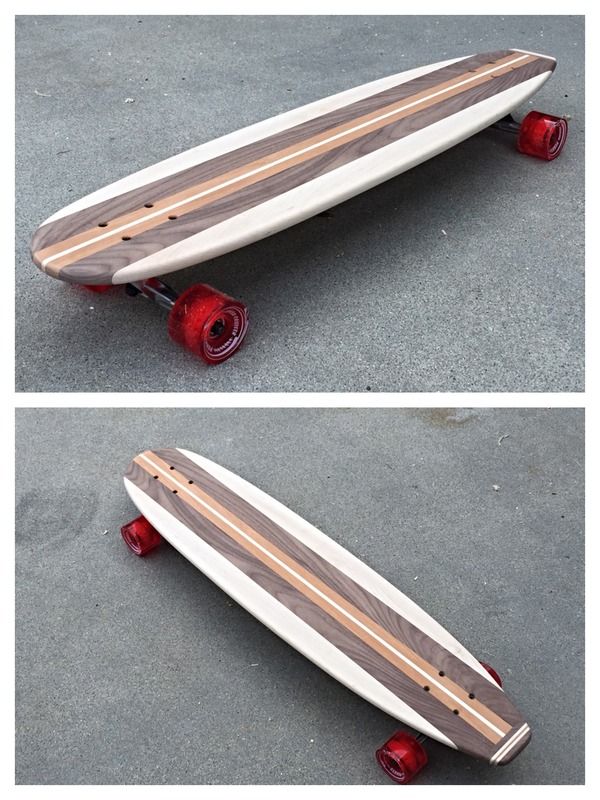
|
|
#
?
Nov 3, 2015 22:48
|
|
|
Dunno about your mark, but that's a nice-looking board. Is that bookmatched walnut?
|
|
#
?
Nov 3, 2015 22:51
|
|

|
TooMuchAbstraction posted:Dunno about your mark, but that's a nice-looking board. Is that bookmatched walnut? I wish i could say i put that much effort into it, but just ripped from opposite ends of a nice short i had laying around. Sidenote, this project made me angry at Hard Maple.
|
|
#
?
Nov 3, 2015 23:17
|
|
|
Sointenly posted:I wish i could say i put that much effort into it, but just ripped from opposite ends of a nice short i had laying around. That closeup looks like soft southern maple to me, but hell, getting angry at Hard Maple is always justified.
|
|
#
?
Nov 3, 2015 23:23
|
|
|
Sointenly posted:Did a quick glue up for a longboard skateboard deck. Ended up with a small ugly spot in one of the glue joints. Sanded pretty aggressively but it just keeps on coming. This was a quick rip and glue, so i'm thinking maybe a burn mark from the saw? Anything else that would cause something like this? I may be wrong but I suspect your problem is that there was a slight gap in that area (maybe planer snipe or something), and the colour you're seeing is the colour of the glue that is filling it. You probably won't be able to sand it away.
|
|
#
?
Nov 3, 2015 23:56
|
|

|
Free Market Mambo posted:It was a small family bondg�rd in Veikars, the father had run a small sawmill and after he passed away the son took over. I don't think lumber is their primary operation, but they had a good stock and were very friendly and accommodating. I heard about these last night from my woodworking buddy as I went there to pick up my lathe. The old owner supposedly fell down and died on the spot, his son, not knowing birch from pine at the time, opted to restart the family business and has supposedly picked up the trade well enough. They're supposed to have real quality timber for woodworking. And now I have my lathe home too. It took a while as I found a broken part on the cast iron tailstock, fortunately the guy I picked it up from has machining skills and tools and we made up a new threaded insert to replace the broken part, good as new again. Photo mid repair, the drill press is an Arboga, in a totally different class than my woodworking drill press. 
|
|
#
?
Nov 4, 2015 09:31
|
|


|
thespaceinvader posted:I may be wrong but I suspect your problem is that there was a slight gap in that area (maybe planer snipe or something), and the colour you're seeing is the colour of the glue that is filling it. You probably won't be able to sand it away. Possibly, but it's an awfully dark line. I think either way, the lesson learned here is that I need a jointer.
|
|
#
?
Nov 4, 2015 18:06
|
|
|
I agree with spaceinvader. Its too late now, but one thing you can do to fill gaps like that is to put a little bit of wood glue on the surface, then sand the area. This creates a wood filler the same exact color as the wood you are using. Its a great tip for hiding small gaps. Great looking skateboard!
|
|
#
?
Nov 4, 2015 19:08
|
|

|
Thanks to everyone that threw in their 2c about the ShopSmith. I'm pretty convinced the formfactor would work for me, as I'm just starting out and not ready to do anything too complicated. Much appreciated!
|
|
#
?
Nov 4, 2015 19:41
|
|
|
So I have started making a bar stool. I've never made any sort of chair before, but I figured I should make a jig to make everything consistent. It is made of solid walnut and I am going to half-blind all of the cross pieces. I really want to post real time build pics to my instagram, but my mother follows me and this is her xmas present. I'm not quite certain how I will shape the legs yet. 
|
|
#
?
Nov 4, 2015 21:36
|
|
|
Sointenly posted:Possibly, but it's an awfully dark line. I think either way, the lesson learned here is that I need a jointer. Yeah, that's glue and you don't really need a jointer for something like this, just check your ripped edges is all before gluing up. For what it's worth, it's pretty common for a guy to pull (or push) material off in a way that your blade snipes the end like that so I wouldn't get too bummed over it being a huge mistake or anything. Personally, I'd just leave it or try the homemade wood filler solution posted above, might want to consider trying to scratch some of the thicker areas out with a razor/exacto knife first if you're up to it.
|
|
#
?
Nov 5, 2015 02:01
|
|
|
Stool update. I've posted this on another woodworking forum, but I figure I could share here as well. A little more progress for this evening. Time in the shop is spotty sometimes. A few minutes here and there. I have one side fit up now, but I'll walk through fitting the other side. The legs on this stool skew 8 degrees in two directions. For me the holding jig is essential for getting all the angles right. I spent the first evening laying out the jig and it is made from scrap melamine I had leaning in the corner. Here is the leg blanks with the cross member blanks sitting across the top. I clamp the cross members so they don't move while I mark everything.  Next I mark the shoulders by using a marking knife and putting a little tic mark on both sides.  Then it is basically connect the dots. I use a t bevel set to 8 degrees to verify they line up and to make a straight line with the knife.  Then I use a marking gage to mark the depth of the tail.  Then I mark the dovetail itself. I eyeball the angle on these.  Then I use a handsaw to get rid of the waste.  Next I put the cross member back in the jig. If I did everything right the shoulders should wedge themselves between the two legs. Then I can transfer the tails onto the legs using a knife.   Next I cut the side of the recess with my saw, and hogged out the waste with my router. Finally I clean it all up with a chisel. This is my first half blind dovetail.    Then repeat: 
|
|
#
?
Nov 5, 2015 18:03
|
|
|
Forstner bits: HarborFreight or spend the money on individual bits? Wont be using them too often, but need them for a Christmas gift project. I like the idea of having a set, and not spending a ton on it, but if the HF ones are going to go dull after a couple uses... then ya. Sointenly fucked around with this message at 18:23 on Nov 5, 2015 |
|
#
?
Nov 5, 2015 18:18
|
|
|
Sointenly posted:Forstner bits: HarborFreight or spend the money on individual bits? Wont be using them too often, but need them for a Christmas gift project. Just buy decent ones of the sizes you need as you need them. HF is good for stuff you don't mind (or expect to) throw out sooner rather than later. I get all my nitrile gloves and rags for staining there, for example.
|
|
#
?
Nov 5, 2015 19:21
|
|
|
mds2 posted:Stool update. I've posted this on another woodworking forum, but I figure I could share here as well. This is really useful. I love watching a project come together, especially when I can see the mundane poo poo that people take for granted. It turns out, those details, make all the difference.
|
|
#
?
Nov 5, 2015 19:22
|
|

|
Sointenly posted:Forstner bits: HarborFreight or spend the money on individual bits? Wont be using them too often, but need them for a Christmas gift project. I have the HF set and have used bits from it sporadically for 6 years. None of them have dulled that I've noticed. Its also handy to have all the sizes on hand for when the need for one arises. I was originally going to buy individuals and am glad I got the set.
|
|
#
?
Nov 6, 2015 05:24
|
|
|
Morning update: I completed the joinery and got the legs glued together. It was nice not needing any clamps. You also see the seat blank in this pic. I glued it up a couple weeks ago.  I realized my biggest fear when assembling. I was really concerned about this happening, and it did! Fixable though. And I wasnt paying attention and sawed too far. Twice!!  I have a couple more cross members to make, but here is the rough shape. I'm not certain what to do on the legs yet. Roundover, or something more elborate? 
|
|
#
?
Nov 6, 2015 15:49
|
|
|
Looking good! I would leave the legs as simple as possible really, looks cool this way.
|
|
#
?
Nov 6, 2015 15:51
|
|

|
How much of a bad idea is it to have a machinist make a set of sleeves to fit over the bearing of a rabbeting bit? I'm really annoyed that it is the only tool in the shed that isn't metric. I like making picture frames and having to deal with the whole 1/16" is 2.somethinginconvenient mm is really annoying. I was thinking about ordering a spare bearing, and have a machinist turn a sleeve from 18/10 steel. Inner diameter a hair under 1", outer diameter 1 1/4" - 2mm. Then heat shrink the sleeve to the bearing.
|
|
#
?
Nov 6, 2015 23:44
|
|
|
Samopsa posted:Looking good! I would leave the legs as simple as possible really, looks cool this way. I made a half-dovetail bench with a very similar design years ago (out of cocobolo, weighs 10,000 pounds). I just did a very slight but consistent 45 degree chamfer on all corners. If you can get it perfect it looks SUPER crisp without taking anything away from the clean look. Round-over will look dopey, IMO. just breaking the corners with paper risks damage over time.
|
|
#
?
Nov 7, 2015 01:15
|
|
|
I really like the corners as they are as well, keeps it looking really sharp IMO. On the topic of corner-chat, I'm making a coffee table for some friends for Christmas and they have requested something that is child-safe for their 2 y/o toddler. The table top is 900x450x40 and my normal preference would just be to leave it square and chunky as I like that look, but I'm wondering what the best bet is to make it safer for a toddler. Router a chamfered edge? Just buy them some child-safe corner stick-ons to go with it?
|
|
#
?
Nov 7, 2015 01:29
|
|

|
Kerro posted:I really like the corners as they are as well, keeps it looking really sharp IMO. You could find out how tall the toddler is, and then make sure the table top isn't right in "put your eye out/fracture your skull" range when the kid inevitably trips near it. You can't be entirely safe with this, obviously, but keeping the head injury range in mind is probably good.
|
|
#
?
Nov 7, 2015 02:24
|
|


|
What I am considering doing is a long arc that goes to the middle of the width of the leg, cut at 45 degrees. I don't know if I can make it look good with the cross members. I like the term dopey to describe rounding over the edges. Reminds me of something I can get at target.
|
|
#
?
Nov 7, 2015 03:16
|
|
|
Kerro posted:I really like the corners as they are as well, keeps it looking really sharp IMO. Round-over everything. The first time their kid busts up on that table, they're gonna be so mad at you. This is over 25 years old. ( I never did fix the near corner laminate on the solid surface) 
Mr. Mambold fucked around with this message at 03:45 on Nov 7, 2015 |
|
#
?
Nov 7, 2015 03:41
|
|
|
Kerro posted:I really like the corners as they are as well, keeps it looking really sharp IMO. As a twice-over toddler-haver myself, I will say one thing: if the kid is at the right height to damage him/herself on the corners, it will only be so for a few months at most. However if you make the table look some way you dislike, it'll be like that forever. What I'm saying is, make the piece look nice and the kid will probably never get hurt and will only be in the danger zone for, like, a few weeks, they grow insanely fast, I wouldn't worry about it at all. Make it stable and hard to tip over, that's about all you can realistically do. e: Just re-read and realized they specifically asked for "toddler-safe." lol. I'm guessing they're first-time parents and this is their only child so far, so they're both a) super cautious, and b) think any stage the kid's in is going to last more than a month. Bad Munki fucked around with this message at 03:47 on Nov 7, 2015 |
|
#
?
Nov 7, 2015 03:45
|
|
|

|
| # ? May 16, 2024 19:07 |
|
|
Thanks for the advice. Yeah, you're right re: being first-time parents - I thought it was probably not likely to be an issue for too long plus it's not like there aren't existing hazards, but I wanted to try and accommodate that. I might just go with getting some stick on corners that they can pull off once she's a little bit older. I'm not sure about setting the height based on the toddler's height. In my mind at least I can picture a trajectory where a really determined toddler could catch their forehead on a coffee table regardless of the dimensions.
|
|
#
?
Nov 7, 2015 04:06
|
|