


|
Can you be more specific about what you are trying to make? Welding nuts may not be the best solution in your case. Perhaps some pics of the nuts you just welded...
|
 #
?
Mar 2, 2016 20:18
#
?
Mar 2, 2016 20:18
|
|


|

|
| # ? May 25, 2024 13:19 |
|
|
I'm working on a belt grinder (link below) and this would be for the tensioning mechanism. It's a hard to explain, but I want to adjust the tension via a threaded rod rather than a spring as I have now. That's where the nuts would go, and there would be a long rod attached to the base that would have a crank, by turning this rod I could force the whole upper assembly to pivot one way or the other, thus tightening or loosening the belt. I dunno if that makes sense... I also tried to weld two short pieces of rod with a nut in the center like this ===<>=== but that also messed up the threads. http://forums.somethingawful.com/showthread.php?threadid=2819334&userid=0&perpage=40&pagenumber=307#post456859550 Don't have any pics and its too late in the evening here to go take any now. Time for sleep. Pretty sure it's a skill problem for me. Perhaps too high amperage (70A with 3/32nds 7018, also tried 50A or so with a cheap 6013 1/16th)
|
|
#
?
Mar 2, 2016 20:58
|
|

|
If you have to couple two rods, I would use a coupling nut with jam nuts and forgo the welding. I'm still not sure what physical configuration you are trying to weld nuts, but perhaps it may be best to get a small piece of steel and just tap the holes you need into it.
|
|
#
?
Mar 2, 2016 21:01
|
|
|
You could braze the nuts (file off any coating first). Much easier than trying to weld them and strong enough for what you need.
|
|
#
?
Mar 3, 2016 00:20
|
|
|
One time I welded two nuts together. Three times, actually. They were part of the gimball mechanism for a potato cannon. Turned out to be unnecessary. Potato cannons don't blow up nearly as often as anticipated. The trick is to use really big nuts. Half inch at least. And also weld them together while they're on a threaded rod; which acts as a heat sink. Tip: Do not weld the nuts to the rod. If you do that, you are doing it wrong. DreadLlama fucked around with this message at 01:09 on Mar 3, 2016 |
|
#
?
Mar 3, 2016 01:05
|
|
|
South Bend 9C update: Before:  After two hour-long dunks in a bucket of TSP and hot water with a little bit of scrub brush work:  There must have been basically zero surface prep and it was probably house paint. There's a decent amount of original paint left on there but not enough to just clean up and run with. Also, I got the serial number card for it: 
|
|
#
?
Mar 3, 2016 02:02
|
|

|
Wow, that paint did come off easy, I can see why you want to paint it now. I'm surprised they made that model in 1945, I stand corrected. I believe mine is a 1946. I still haven't ordered the serial # card yet.
|
|
#
?
Mar 3, 2016 02:23
|
|
|
Mine is a 46 (ordered in 45). If your serial number falls in the right place you may be able to know the year for sure: http://www.wswells.com/serial_number.html
|
|
#
?
Mar 3, 2016 02:42
|
|
|
Not to change the subject but I saw that the one guy from "men at arms reforged"is going to be on forged in fire next week. Should be a pretty good episode, that guys a beast.
|
|
#
?
Mar 3, 2016 07:21
|
|

|
AbsentMindedWelder posted:If you have to couple two rods, I would use a coupling nut with jam nuts and forgo the welding. I'm still not sure what physical configuration you are trying to weld nuts, but perhaps it may be best to get a small piece of steel and just tap the holes you need into it. Like I said, hard to explain, I have a model in my head. I can't use a coupling due to how I want it... Well I could, if i rotated the coupling 90 degrees to the rod and then welded them together.... Hmmm that could work as the coupling nut should be bigger, longer and have more mass. Also good idea, DreadLlama, to screw a rod in to act as a heat sink. Jailbait I'm afraid I don't have any brazing equipment at all, only a soldering iron.
|
|
#
?
Mar 3, 2016 07:22
|
|
|
Can you draw what you're trying to do perhaps? Like, how you intend to use it. Because the only way I can picture what you described before seems like it's going to have a number of strength problems.
|
|
#
?
Mar 3, 2016 17:06
|
|

|
I can take a picture since I managed to make it this night. Not pretty, but it works as I planned. I used several nuts and a threaded rod to protect the threads and act as heat sink. I also welded all the nuts to a flat piece of scrap beforehand.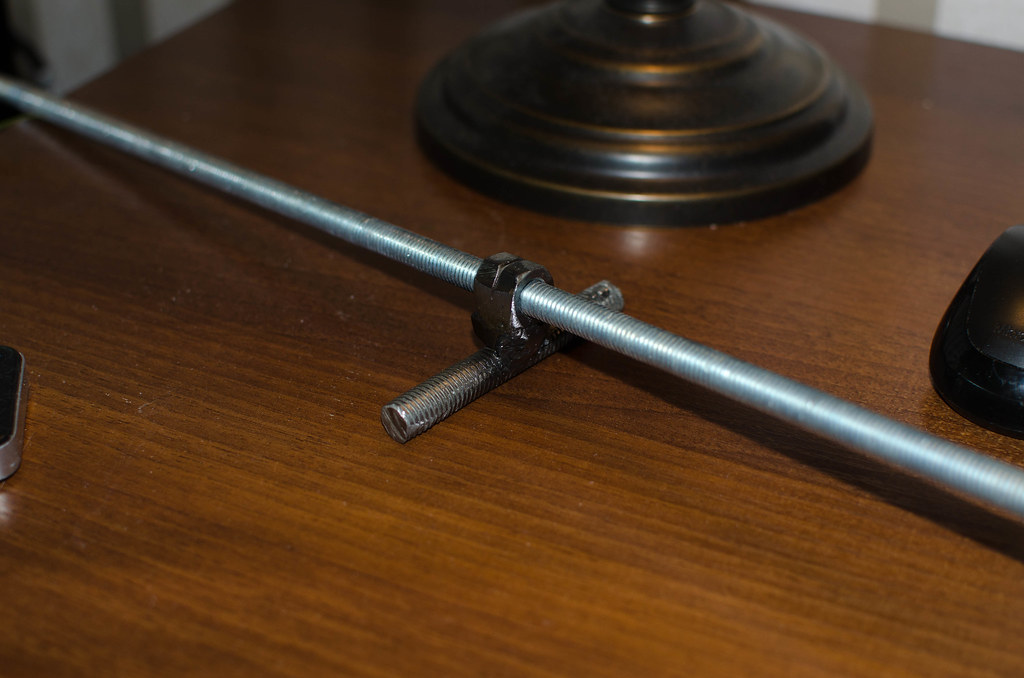 So the short rod just hooks onto the back end of the pivoting upper portion and the long threaded will be attached to the base, turning the long threaded rod will force the upper portion of the belt sander to pivot up or down depending on direction. That way I can apply tension to the belt. It's probably not the strongest joint, probably pretty crappy and ugly by all accounts. But it won't be under a lot of stress, it'll just keep a sanding belt taught. If this still doesn't make sense to anyone, you'll have to wait until I have actually completed it 
|
|
#
?
Mar 3, 2016 20:09
|
|
|
Why wouldn't you just use a coupling nut for that rather than trying to weld together your own out of regular sized nuts? I mean, optimally you make a threaded piece for that our of a block of steel. Should be able to do it with a drill press and taps. Also, things going better than expected. Stock part in the middle for color comparison: 
|
|
#
?
Mar 3, 2016 20:33
|
|
|
I don't have a coupling nut (and I don't live in a city so there's no nearby store open this late I can just walk to, it'd be a 25 mile round trip in that case), and I don't have any taps and I don't have any steel blocks I can drill, my drill press is pretty lovely and barely copes with woodworking. Also, want to learn to weld.
|
|
#
?
Mar 3, 2016 20:42
|
|
|
His Divine Shadow posted:I don't have a coupling nut (and I don't live in a city so there's no nearby store open this late I can just walk to, it'd be a 25 mile round trip in that case), and I don't have any taps and I don't have any steel blocks I can drill, my drill press is pretty lovely and barely copes with woodworking. Also, want to learn to weld. With those constraints I'd say you've done well. Might need to build that weld up a bit more depending on your strength requirements, and if you're just learning to weld you may or may not have gotten enough penetration for it to have much to begin with so give it a good yank to see if it just pops off. If it does, nudge that amperage up a bit or go slower.
|
|
#
?
Mar 3, 2016 20:53
|
|
|
That makes sense now. A coupling nut would have been easier to work with for sure. The cleanest option would be take a piece of 3/8" flat bar or something similar and cut it to size and tap a hole. Good work tho working with what you had on hand ") Motronic posted:Also, things going better than expected. Stock part in the middle for color comparison:
|
|
#
?
Mar 3, 2016 21:47
|
|
|
I figure this thread would appreciate our random little shop. I post some pictures of equipment in the past, but mostly kept any updates in my AI thread, but not everyone cross visits/ect. I've been spending more time working on getting our shop functional. We have several large pieces of equipment that have sat idle for far to long, either due to power issues or broken/missing parts. To remedy this I started cleaning and fixing what I could with what we had on hand and ordered any additional parts needed to get the rest going. Here's the machining/welding area I'll focus on in this thread.   Hiding in here is a Walker Turner 10" Grinder, Boyer-Shultz Surface Grinder, 78 Bridgeport NC, 61 Bridgeport J-Head, 67 Rockwell 14x40 Metal lathe, 12" Rockwell Disc sander, 62 DoAll 36" bandsaw. And a few welders/plasma cutter/ect. The Walker Turner grinder needs a VFD ordered for it. -Might not need due to Rotary Phase Converter The Surface Grinder has a VFD, but needs the speed controller wired up. -Parts ordered The 78 Bridgeport NC needs to be de-grease and surface rust removed, painted, and Centroid Retrofit completed. The 61 Bridgeport J-Head is being replaced with a Lagun FTV-2. -In Progress The Lathe has a broken variable speed drive and needs a overall service/lube. -Hopefully fixed, needs reassembly The disc sander needs a VFD mount/power switch. -Parts ordered And finally the DoAll needs to be listed on craigslist. It's just more then I can use. -Listed today Here's the Lagun we bought last week that's replacing the J-Head. Tomorrow I pick it up.  Two weeks ago I installed the VFD for the disc sander. It's awesome.   Last weekend I repaired the broken finger and adjuster arm on the variable speed for the lathe. I used Aluminum Bronze on AC with 90% EN. It came out ok, not ideal, but it should hold up to our abuse.    Tomorrow I'll grab some pictures of the machinery move. the spyder fucked around with this message at 22:35 on Mar 3, 2016 |
|
#
?
Mar 3, 2016 22:27
|
|
|
AbsentMindedWelder posted:What kind of paint are you using out of curiosity? It's just the ace rust-stop (rustoleum clone) which by my research seems to be getting pretty good reviews....better than rustoleum. A guy down the street painted his entire dozer with it last year and it's still looking good. The color is "campground", by the way. Edit: Spyder that shop is awesome and you have lots of cool toys. Motronic fucked around with this message at 22:48 on Mar 3, 2016 |
|
#
?
Mar 3, 2016 22:44
|
|
|
fps_bill posted:Not to change the subject but I saw that the one guy from "men at arms reforged"is going to be on forged in fire next week. Should be a pretty good episode, that guys a beast. I didn't know it was back on, thanks.
|
|
#
?
Mar 3, 2016 23:50
|
|

|
the spyder posted:I figure this thread would appreciate our random little shop. We most certainly do! Also, hello fellow Lagun buddy! I'd love to see some pics of that surface grinder. Unless you need to vary speed of the motor, just go with the rotary phase converter.
|
|
#
?
Mar 3, 2016 23:59
|
|
|
AbsentMindedWelder posted:That makes sense now. A coupling nut would have been easier to work with for sure. The cleanest option would be take a piece of 3/8" flat bar or something similar and cut it to size and tap a hole. Good work tho working with what you had on hand Thanks, but yeah any excuse to weld and get experience. I finally felt like I was getting somewhere now. weldingtipsandtricks.com had a good article on 7018 and how it's meant to be used, after that I had much more success with it.
|
|
#
?
Mar 4, 2016 14:12
|
|
|
AbsentMindedWelder posted:I would NOT advise a beginner to build a trailer using a cheap starter MIG. You are begging for failure. You need a machine with some balls and some welding experience to ensure good fusion before you start welding on stuff that could injure somebody. If you DID take on such a project I'd urge you to do it with stick welding, and to do destructive testing on test pieces first. With this advise and a look at my schedule I'm dropping £500 on a brand new pretty-close-to-what-i-want certified trailer rather than £300-400 on parts plus welder plus accessories plus stock plus learning to weld. I'm still going to learn to weld at work.
|
|
#
?
Mar 4, 2016 14:35
|
|


|
Related: I'm gonna be stuck with 110V for a while with my dual-voltage machine. I picked up some decent-quality Lincoln flux-core wire rated for multiple passes to use with it for the time being. I wanna build a spring swaging tool for a wireworking project I'm doing, and have to stick the 3/16" spring rod to the ~1" square swage dies pretty securely. I haven't really played around with this welder much yet and have never worked with a non-220V machine. Is this gonna be possible, even with multiple small passes? I can see a big mass of metal stealing heat so fast that getting a proper pool going on anemic current could be impossible. Could preheating the dies with a torch solve that?
|
|
#
?
Mar 4, 2016 17:31
|
|

|
Preheating may help if required. Basically use the smallest diameter wire you can so it needs less amps to melt, and try to get it running in globular or spray transfer mode. (short circuit mode is asking for bad fusion on thick steel) Make up for the small wire with more passes. If you use solid wire or dual shield wire (flux core that also needs a sheidling gas), you can run straight Co2 which will make for a hotter arc. Run tests to see what you can do. Edit: Also, if you shorten your gas cup, or get a longer tip, so that the tip sticks out 1/8" or so instead of being recessed in the gas cup, you will get more balls to the wall. Recessing the tip makes for a softer arc which is good for sheet metal, but not so good for deep fusion. AbsentMindedWelder fucked around with this message at 18:17 on Mar 4, 2016 |
|
#
?
Mar 4, 2016 18:14
|
|
|
Anyone see the latest episode of Forged in Fire with the no electricity rule and the claymore? No one should have won that episode.
|
|
#
?
Mar 4, 2016 18:27
|
|
|
AbsentMindedWelder posted:Preheating may help if required. Basically use the smallest diameter wire you can so it needs less amps to melt, and try to get it running in globular or spray transfer mode. (short circuit mode is asking for bad fusion on thick steel) Make up for the small wire with more passes. If you use solid wire or dual shield wire (flux core that also needs a sheidling gas), you can run straight Co2 which will make for a hotter arc. Run tests to see what you can do. this is extremely useful, thanks!!
|
|
#
?
Mar 4, 2016 20:11
|
|
|
Why does tip to nozzle position have such an affect on how a welder runs? At work we use slip in tips and some guys swear by setting the tip flush with the nozzle. It goods the same thing as turning your heat up or wire speed down. Why?
|
|
#
?
Mar 4, 2016 20:23
|
|
|
fps_bill posted:Why does tip to nozzle position have such an affect on how a welder runs? At work we use slip in tips and some guys swear by setting the tip flush with the nozzle. It goods the same thing as turning your heat up or wire speed down. Why? Arc length is critical. Anyone who is good at stick welding knows what I'm talking about. You can turn the heat up, but if your arc is long it wont' do you much good. I'm not a welding engineer, so I can't give you an exact answer, but keep in mind that your molten metal is travelling across the arc. I suspect the shorter arc length means the metal stays hotter by the time it gets to it's destination. Try different tip stick-outs for yourself in different situations and you will see what I'm talking about.
|
|
#
?
Mar 4, 2016 21:43
|
|
|
I asked our engineer and he said it's a resistance thing. So the closer you get the tip to the arc the less resistance so more heat. As far as arc length with a mig wouldn't that just be a matter of a little bit more wire up or down.
|
|
#
?
Mar 4, 2016 23:56
|
|
|
Brekelefuw posted:Anyone see the latest episode of Forged in Fire with the no electricity rule and the claymore? Yes, and actually I think the problem was it was a somewhat unreasonable first challenge. The no-electricity challenge is based on the premise that anyone who calls themselves a bladesmith must know how to work with charcoal and hand tools, which... yeah, maybe in an ideal world, but not necessarily? In the second bit though, once they had actual power, it's inexcusable that the one dude never re-hardened his blade, given it was so obviously not hardened in the first place. I bet he'd have done better in the final challenge. And then neither of the guys who went to the final challenge had forge setups remotely adequate for hardening and tempering a long blade. They're both still idiots for not actually testing their own hardening, given they had five days... but neither had a setup that was at all conducive to getting the full blade up to full quenching temp and then quenching properly and then tempering down to a reasonable toughness/hardness ratio. I guess they didn't anticipate the situation of "both guy's weapons fail" but that's such an obvious outcome that it was bound to happen. It is true though that in real life, people's swords bent and had to be straightened, so even though it was a pretty sorry finish, I was OK with awarding a win, if only that too soft is better than too brittle when it comes to a weapon. The too-soft blade can still be fixed.
|
|
#
?
Mar 5, 2016 00:08
|
|

|
fps_bill posted:I asked our engineer and he said it's a resistance thing. So the closer you get the tip to the arc the less resistance so more heat. With MIG, that thin wire is not a great conductor at the amount of amps a weld takes. So if the contact tip is farther back, that wire is going to melt before any appreciable amount of amps can flow. That thin wire is going to increase the resistance just as an air gap would. The more wire, the more resistance, and less amps. In any welding process, you just can't compensate for a long arc by changing another variable. This is the reason there are many bad MIG welds out there. It's easy for the operator to manipulate the welding gun, but selecting the proper consumables, and setting the machine up correctly for the job is where most people fail. MIG variables include, the type of wire, the size of the wire, the type of shielding gas, the flow rate of the shielding gas, wire feed speed in inches per minute, welding voltage, contact tip stick out, and operator technique. All of these change depending on what you are doing. That's alot of poo poo to get right, which is why MIG is great for structural steel production work... a welding engineer designs the process, does destructive testing, and creates specifications for the job. MIG welders in people's garages do great with sheet metal, but often fail on structural. Contrast that with stick welding. The variables are type and size of electrode, and how many amps you set the machine at. The rest is all on the operator, whom doesn't really have to know many technical details or have a large stock of various consumables to do good work in a variety of situations.
|
|
#
?
Mar 5, 2016 00:31
|
|
|
Yesterday I picked up a HF ultrasonic cleaner. Been wanting one for quite some, mostly for gun parts, but I figured it might come in usefull for small milling machine parts. I forgot to take some before pictures, but I have a couple mill parts and some dirty/rusty tools sitting in there. Using purple solvent and hot water.  The parts came out super clean, I'm impressed. There was some loose stuff stuck in the threads which was removed very easily with the parts washer brush . The ultrasonic cleaner also removed alot of the rust too. It's still not a replacement for my full size parts washer and kerosene, but it'll be very useful.  The liquid was fairly clear and purple before, but after it is quite dirty and brown. There was lots of sediment in the bottom when I dumped the liquid.  All the stuff was rinsed off with water. I then poured some Evapo-Rust to cover the parts, and covered the bucket with a bunch of plastic bags. I'll let it sit overnight. That monkey wrench has lots of caked on rust that is preventing the little screw from turning by hand (didn't try putting some pliers on it). Curious how that turns out.  About 24 hours later I took the stuff out of the Evapo-Rust. The parts came out very clean. I rinsed them in hot water. The monkey wrench still has a bit of rust left, it would need to soak more. It's screw is hosed, perhaps fixing it and making a new one will be a future lathe project for fun. Everything else came out with absolutely zero rust.  Note that yellow paint on the one socket is unharmed.  There was a bit of sediment in the bottom.  I'll probably polish the tools on the buffing wheel, but not tonight. In the mean time I'm just soaking everything in kerosene until I have a chance to come back to it so it doesn't rust back up on me. I think it's time to put in some fresh kerosene soon. 
AbsentMindedWelder fucked around with this message at 03:53 on Mar 5, 2016 |
|
#
?
Mar 5, 2016 03:50
|
|
|
Oh man, now that you have an ultrasonic cleaner you can make things fully clean, like ready to go into a cleanroom autoclave clean. 1. Put that sucker in a 3-to-1 mixture of water to Simple Green. 2. Wash that fucker 2 or three times with simple green, scrub holes and IDs, rinse with hot de-mineralized water (de-ionized is better) between simple green baths. 3. Into the ultrasonic cleaner with Acetone after wiping it down with a lint free rag and lint free q-tips/swabs. 4. After an hour in the cleaner with the acetone at ~ 35 C, remove it and clean out threads and holes with lint free q-tips/swabs. 5. Repeat 3 and 4 with Isopropyl Alcohol. 6. Place the part into a sealable bag for transport. This is really only useful if you want to clean literally everything off of a part. Like, if you want a really good clean part.
|
|
#
?
Mar 5, 2016 06:11
|
|

|
Brekelefuw posted:Anyone see the latest episode of Forged in Fire with the no electricity rule and the claymore? That episode should never have happened, it was dumb and gimmicky. And what sadist designed a forge with a 2" crank? That thing looked like a toy. I expected a puppet clown to pop out the top.
|
|
#
?
Mar 5, 2016 07:10
|
|

|
I've been disappointed with my Lidl ultrasonic cleaner myself, mostly I've run it with water and dishsoap. We don't got purple stuff here and I dunno what a cheap equivalent is though, so it might just be that. I got a can of gasoline for cleaning stuff.
|
|
#
?
Mar 5, 2016 08:30
|
|
|
His Divine Shadow posted:I've been disappointed with my Lidl ultrasonic cleaner myself, mostly I've run it with water and dishsoap. We don't got purple stuff here and I dunno what a cheap equivalent is though, so it might just be that. I got a can of gasoline for cleaning stuff. Yeah, I've found mine really underwhelming, but I've also only run it with a little bit of soap. Loading it up with degreaser is smart.
|
|
#
?
Mar 5, 2016 17:24
|
|
|
His Divine Shadow posted:I can take a picture since I managed to make it this night. Not pretty, but it works as I planned. I used several nuts and a threaded rod to protect the threads and act as heat sink. I also welded all the nuts to a flat piece of scrap beforehand. And here's what the tensioning mechanism turned out like: http://forums.somethingawful.com/showthread.php?threadid=2819334&pagenumber=308#post457079212
|
|
#
?
Mar 5, 2016 23:44
|
|
|
His Divine Shadow posted:And here's what the tensioning mechanism turned out like: Nice work, that's pretty cool! ------------------------------------- Milling machine update: I won't be taking the head apart unless there's a drat good reason too, so it just needs cleaning on the outside. I wanted to clean it now before I take it off, so I don't make a mess over the other clean parts when I put it back on. I used kerosene, scotchbrite, paper towels, and various brushes. This is part way through the 1st round. Tons of dirt and dust caked on. I put some plastic on the floor to keep all the drips off the floor.  This is what it looks like after a 2nd round of cleaning, and a final rub down with clean rags.    At this point it was time to remove the head from the turret assembly. To take the head off, you get something to hold it in place and them remove the 4 large 19mm cap nuts on the front. The lifting strap with the ratcheting tie down keeping things from slipping out worked better then I expected. I had difficulty removing the round nut that retains the pin of the part that knods the head up and down. I was able to use a 2mm hex key to remove the 4mm set screw, but I do not have the right spanner wrench and the pair of channel locks I tried was not up for the job. I hit it with a bunch of PB blaster until I figure out a solution. (I seem to be out of kroil oil)   I had trouble moving the ram back and forth. It seems the gib for this dovetail is NOT tapered so I was not able to tap it out  I could move it back and forth about 1/4" tho. I could move it back and forth about 1/4" tho. I had no expectation of this working, but I decided to try a ratcheting down to put some force on it. Much to my surprise it actually worked!  After several cycles of loosening, readjusting, and tightening the strap I got it to move this far.  The gib moved about 50% the travel of the ram.  I used piece of wood and a hammer to drive it all the way in, and then finished it up using a taper punch and a beat up screwdriver. Once I find my dial calipers, I will check this to see if it has any kind of taper at all, but I doubt it. The taper on the 3 other gibs in this machine is noticeable 10 feet away.  At this point the ram came out easy peasy.  Chips get in the darnedest places!  There was a casualty while I was hammering on the gib. The hand holding the wood took a hit. Good thing I had leather gloves on.  Here's all the parts laying out.  I ended up finding a larger pair of channel locks that I forgot I had. It broke that round nut loose like butter. After a couple whacks with a 2x4 and a big hammer, I realized the pin was not coming out that way. I'll have to setup the hydraulic press and a saw horse to press it out next time I go back to the shop. At this point it was time to head home to relax and get some food. Not sure if I'll head back this evening or tomorrow. 
|
|
#
?
Mar 6, 2016 00:15
|
|
|
Wow...the head cleaned up nice. If the rest of it does similarly that thing will be looking minty.
|
|
#
?
Mar 6, 2016 00:19
|
|
|

|
| # ? May 25, 2024 13:19 |
|
|
I really enjoy clean-up, resto, and maintenance rundown posts. This one was no exception.
|
|
#
?
Mar 6, 2016 01:31
|
|

