


|
I did not do well. I apparently don't remember how to use washes and my attempt to do pink highlights and color building came out splotchy and uneven. That's two hours right into the simple green bath.
|
 #
?
Mar 13, 2016 03:48
#
?
Mar 13, 2016 03:48
|
|


|

|
| # ? May 13, 2024 08:01 |
|
|
I am impatient so almost never wait more than 24 hours to varnish. Usually I'll finish a mini at night and varnish it the next day. Also, my photographer friend taught me how to not be a dipshit about lighting so I took final pics of this lady:  
|
|
#
?
Mar 13, 2016 04:43
|
|

|
Excellent work. Hopefully I'll get my first bust done tomorrow.
|
|
#
?
Mar 13, 2016 06:17
|
|


|
Greetings, I'm brand new to miniature painting. A friend had given me 4 very old LoTR minis, already primed, for me to learn on. I've done these two so far. I used some metallic gold on the elf, but it's more like a glaze, not a model paint. Any tips or advice how I can get better at this? Areas or technique to focus on next? Please ignore errors related to model preparation (mould lines and such). Thanks!  
|
|
#
?
Mar 13, 2016 08:40
|
|

|
Those look really drat good for first minis! Both - the elf in particular - look like they would benefit from a wash, though, especially the golden armor. Seriously, washes are like skill in a bottle - you take a soft brush and spread it over the area you want washed - it'll gather in the dips and details and shade them for you. I'd use a brown or sepia wash on the golden armor parts, at least, and maybe a black wash on the blue robes. The more armored dude probably would get by with a black or brown wash all over. Black and/or brown washes are nice 'universal' washes - brown wash in particular is excellent for a dirty 'I have been actually fighting' look. On the other hand, if you ant to give the impression of a deep pure clean color, use a wash of the same color - like a blue wash on the elf's robes. Sepia wash, meanwhile, looks awesome on gold, parchment, bone and the like. Once you've washed the mini, you may want to pick out the highlights again with the colors you used originally, and you should have sweet nice tabletop standard minis on your hands! Edit: here's a picture I took ages back as a demonstration for washes. On the left, a mini primed white and with the basic colors blocked out; on the right, a mini from the same squad, same paints, but washed all over with Seraphim Sepia. See how the wash has gathered in all the deeper details, like the panel lines on the armor? Yeah.  Edit edit: Found an even better comparison. Exact same mini, before and after a wash.  
Drake_263 fucked around with this message at 09:21 on Mar 13, 2016 |
|
#
?
Mar 13, 2016 08:57
|
|
|
Been playing with OSL. My brushwork is messy as hell, but it turned out okay.     The lovely phone photos actually make it look better than it does in person, though it has fully desaturated the dark blue I used to highlight the shadowed areas.
|
|
#
?
Mar 13, 2016 09:45
|
|


|
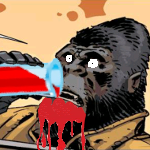
For reds, should I give it a gloss varnish to make it pop more?
|
|
#
?
Mar 13, 2016 09:48
|
|

|
indigoe posted:Greetings, I'm brand new to miniature painting. A friend had given me 4 very old LoTR minis, already primed, for me to learn on. I've done these two so far. I used some metallic gold on the elf, but it's more like a glaze, not a model paint. They're good, especially for your first miniatures. You seem to have nailed the two hardest things to get right for a beginner: thin paints and staying in between the lines. All other techniques and tricks can be learned if you can do those ") Also props on the blue, its really well done as cloth is hard surface to simulate. Also props on the blue, its really well done as cloth is hard surface to simulate.I'd agree washes are a nice and easy way shade a model but if you're going for a clean look then there are two ways to use them, and based on how accurately you were able to keep the paint in the right areas I'd go for the first approach. 1) Carefully apply the darker wash (or thinned paint) into the recesses and anywhere a shadow would fall, the reverse of highlighting which you've already pretty much nailed on the grey armour. You can repeat this process if you like to make some areas darker than others as the wash/paint will cumulatively darken the more its applied. 2) The less accurate way is to wash the entire area in wash/thinned paint but it will require manually cleaning up the flat areas with the base colour again so it's best to do it right after the base colours and before highlighting. Both approaches are time consuming in different ways but if you're steady the first will always be quicker and tidier. Another quick win for helping models to pop is to add a dark division between colour/hard edges, so on your Uruk'Hai (sp?) a very thin line of dark blue/black between each plate, join, arm to chest recess etc.. would really define the armour. Then you could do dark brown/black-brown on the brown/flesh colour where it meets other colours (leg to boots, leg to red, arms-to plate etc..). For me this stage along with the highlights is where I generally become happy with a paintjob and it is where the model will look a lot more 3 dimensional.   These models are a few years old but they both have quite a few contrasting colours next to each other that show what I mean better than some of the Infinity stuff I've been spaming recently. e.g. on the Elf, where the green meets the white, or the metal there's a thinned blue line applied to the green to make a dark shadow, same colour is used where the collar joins the shoulders, and where the metal scales meet the green. For the white areas I used a thinned grey in the same manner, and the creases in the brown were done with blue+black. Same on the Inquisitor guy I used the same colours to edge with the exception of using orange to line the off-white areas
|
|
#
?
Mar 13, 2016 09:53
|
|
|
Richyp, by any chance would you remember the recipe for the inquisitor you just posted, specifically the pale green, the White coat and and the leather as those are the kind of tones I am aiming for in the militia that are my next project. Indigoe I echo the sentiment that these are good for first miniatures. I am not a good painter by any means however I get an immense amount of satisfaction from little improvements every time I paint. I think a lot of the guys who are put off painting are disheartened by it not looking like the great painters we have on here and around the Internet. My other piece of advice, when you are painting models early on is not to spend to much time going over the same miniature again and again. Paint it, tweak it and then declare it done. You can then reflect on what worked and what didn't rather than spending a lot of time, effort and frustration on correcting mistakes or simply things that did not turn out like you thought it did. These things are not so expensive that you can't start again fresh (this negates my personal peeve where I will absolute nail one bit only to ruin it with fluffing up another heinously) i like the Uruk hai colours and the robe on the elf struck me as very well done.
|
|
#
?
Mar 13, 2016 10:57
|
|
|
JackMack posted:Richyp, by any chance would you remember the recipe for the inquisitor you just posted, specifically the pale green, the White coat and and the leather as those are the kind of tones I am aiming for in the militia that are my next project. I can't remember the exact colours, but I would have already been using mostly VMC colours back in 2013 too. Looking at them I think it was: Beige/White Coat - Pale Sand washed with Sepia (probably a few layers in some areas). Flat areas repainted with Pale Sand, raised areas and edges Pale Sand + White. Green - Looks like Russian Green (Great Colour), maybe lightened with Khaki, shaded with a very thin blue wash in the recesses then repainted Russian Green + Khaki, highlighted with a thinned Khaki and pale sand. Leather - VMC US Field Drab, heavy brown wash, reapply US Field Drab, Spot highlights of thinned Pale Sand on tip of boots and edges.
|
|
#
?
Mar 13, 2016 13:21
|
|
|
richyp posted:I can't remember the exact colours, but I would have already been using mostly VMC colours back in 2013 too. Looking at them I think it was: Thanks man, I have lined up triads and actually I think they are similar... I will have to check when I next get the chance to get out to my shed (the baby arrived last week. I have been out once!) I got the VMC military paint set when I was posted out in Cyprus and as such expect to have those paints even if I did not already select them. It was a mistake, I wanted the more general paint set but sending back through BFPO looked too difficult. I like a darker look on my models anyway. The only problem was that when I ordered them I ordered some pink horrors to paint! Did not happen with the palette on offer.
|
|
#
?
Mar 13, 2016 14:49
|
|
|
JackMack posted:Thanks man, I have lined up triads and actually I think they are similar... I will have to check when I next get the chance to get out to my shed (the baby arrived last week. I have been out once!) No worries, you will have those paints then as that's the exact same VMC set I bought many years ago with the same intention . I think I've got about 80% of the paints in that set that are completely unopened. More greys, sand colours and browns than I'll ever need.Red + White + Flat flesh = great organic pink from that set, especially when lightened with a bit of German Orange.
|
|
#
?
Mar 13, 2016 17:20
|
|
|
Someone recently posted pics of some white uniformed mordians, Can someone repost those, and if the one responsible is around, care to share your colour scheme in more details? i've got a bunch of mordians that i want to paint a white uniform on because of the challenge.
|
|
#
?
Mar 13, 2016 20:40
|
|

|
Genghis Cohen posted:I put a load of metal and plastic Eldar in to soak in brown dettol. How long do I have to leave it for before I go nuts with an old toothbrush? Sure are. I'm madly painting for the Independent Characters Hobby Progress Challenge - so far this is the completed stuff *minus the Ork Hunters  and then some close ups   
|
|
#
?
Mar 13, 2016 21:32
|
|

|
Your Steel Legion own so goddamn much, Yeast. It's been a little bit, but I've got more stuff for my Blood Axes! This time it's a unit of Kommandos. While these guys aren't really the best unit in the game, I've always dug the metals (the Nob is among my favorite minis ever) and they fit in thematically with Blood Axes too well not to take! It's a mix of Forgeworld bits, modern plastics, and 2005 metals on these guys.        Some older hams might recognize their camo scheme, which I based on the old 2nd ed Blood Axe Kommandos: 
SRM fucked around with this message at 22:58 on Mar 13, 2016 |
|
#
?
Mar 13, 2016 22:55
|
|

|
Gravitas Shortfall posted:Been playing with OSL. My brushwork is messy as hell, but it turned out okay. Ok? I think it looks great! I'll have to try something with my Frostgrave soldiers.
|
|
#
?
Mar 13, 2016 22:57
|
|


|
Yeast posted:Sure are. I'm madly painting for the Independent Characters Hobby Progress Challenge - so far this is the completed stuff *minus the Ork Hunters Those are rad. Might i interest you in the old steel legion commissar? He is sadly missing his gun arm, but you seem no stranger to converting stuff up
|
|
#
?
Mar 13, 2016 22:57
|
|
|
Yeast, do you want more old metal Steel Legion guys? Are you in the US?
|
|
#
?
Mar 14, 2016 00:28
|
|

|
What I did on my month long probation: Not quite finished as I want to add windblown snow to the basing, but I'm not sure how to do it yet 
|
|
#
?
Mar 14, 2016 01:24
|
|

|
Frobbe posted:Those are rad. Might i interest you in the old steel legion commissar? He is sadly missing his gun arm, but you seem no stranger to converting stuff up I'm just waiting to see if an offer for one goes through or not, I'll PM you if it falls through, and thank you. Ilor posted:Yeast, do you want more old metal Steel Legion guys? Are you in the US? Unfortunately not, I'm in the land of death and high prices. 
|
|
#
?
Mar 14, 2016 01:59
|
|
|
Thanks for the tips and encouragement! I did apply a wash of nuln oil on both models except over the gold. I ended up painting over most of it when trying to add the highlights back. I'm not a huge fan of the look it creates to be honest. I'm getting the Arcadia Quest games through kickstarter in a couple of months and that will come with a ton of minis. I want to do a decent job painting them and that is my main motivation for learning. indigoe fucked around with this message at 11:23 on Mar 14, 2016 |
|
#
?
Mar 14, 2016 11:19
|
|
|
indigoe posted:I did apply a wash of nuln oil on both models except over the gold. I ended up painting over most of it when trying to add the highlights back. I'm not a huge fan of the look it creates to be honest. I'm not a massive fan of black and brown washes used excessively. When washes came out I would pretty much swamp a model in washes then like you said spend too long repainting all the surfaces again which is why I recommended the other approach of applying the directly to the recesses in small controlled amounts or painting with paint's thinned with a medium to achieve the same effects but without the wateriness of a wash. The one exception to the directly applied washes is when I'm painting metal or a large area of "black" (dark grey). Sepia and Brown washes work wonders on gold paint, and Dark Blue washes work quite well over an already highlighted nearly black colour such as a coal grey like colour as it'll darken it without the staining of wash being visible but it'll also tone down the highlights to make them smoother, also fur and hair a prime candidates for washing before highlighting.  That guy was done about 4/5 years ago when I was getting used to playing with washes. The fur was painted a sand colour and then heavily washed with Brown, before a quick drybrush with the original colour, a nice quick and easy solution when priming white where as on black it would be easier to just drybrush various browns. His white hair was done the same way only with a grey wash and the metals were boltgun/whatever its called these days washed with black. The armour however wasn't washed as it'd be a waste of time washing that grey and then having to paint it all over again when the black can be painted straight into the recesses (the feet are a good example, as are the underside of overlapping plates. I also painted a homebrew blue wash over the axe head applying more layers the closer you get to the metal to give a gradient.
|
|
#
?
Mar 14, 2016 13:00
|
|
|
Maybe someone can help me. Since I no longer play Warhammer, I don't have to stick to methods that are conducive to speed painting, so I'm expanding my repertoire of skills. I finally got a really nice detail brush and cleaner and all that jazz. I'm having some trouble tho. In the past, I've always thinned my paint with just water, but I'm experimenting with flow improver and medium, but so far they just don't seem to work as well. I'm trying different ratios, but the paint is either too watery, or dries with a visible, raised texture. What gives?
|
|
#
?
Mar 14, 2016 14:24
|
|

|
Chance II posted:Gatormen Nebalebadingdong posted:Maybe someone can help me. How old are your paints? Are you mixing them properly? I've got some Vallejo that have a lump of pigment sitting in the bottle which refuses to mix - I don't really have to thin those (they become watery otherwise.) I've also got some that have really thickened up over the years - I have to thin a lot or else they go on really thick. Also, I use water and it works just fine. I think the only think you might want to get would be retarder, but that just keeps the paints viable longer.
|
|
#
?
Mar 14, 2016 14:33
|
|
|
berzerkmonkey posted:I think those probably look quite good, though it's hard to tell in the expanded photos - your focus is way off. Some of them are a year old or more and they're GW pots but the consistency still seems okay. I gave all my pots a good stir. About the retarder: I come up with conflicting search results. Is medium and retarder the same thing? No, right?
|
|
#
?
Mar 14, 2016 14:40
|
|
|
Nebalebadingdong posted:Some of them are a year old or more and they're GW pots but the consistency still seems okay. I gave all my pots a good stir. So, different companies will have different terms for the same thing. Any acrylic base, basically colorless paint, is a medium. Anything that slows drying is a retarder. Anything that breaks surface tension is a flow improver. Some products do all three. You can find "retarder medium", and you can also find retarder that is an additive meant to be put in other mediums.
|
|
#
?
Mar 14, 2016 15:01
|
|
|
Are synthetic brushes prone to getting and staying dirtier? I'm cleaning my stuff after every use and my taklon brush is getting bulkier and stiffer every time, even though I'm washing it with real-deal brush soap. Paint thinner seems like a terrible thing to dip a synthetic brush in, too.
|
|
#
?
Mar 14, 2016 15:08
|
|

|
Nebalebadingdong posted:Some of them are a year old or more and they're GW pots but the consistency still seems okay. I gave all my pots a good stir. It's pretty much been covered that it's totally down to the brand what name the medium gets. Some people like to thin with just water, others like to use medium and water. I paint with VMC and some GW paints that I find to be too thick straight from the bottle/pot and usually thin them to stupid levels as I like to paint in almost glaze like coats over white/light grey primer as it gives a wash like shading but can cause brush marks to be visible or pooling marks that you can get from over washing so I started adding in Flow enhancer to eliminate the brush marks and glaze medium + water to thin it to "almost water" consistency but still retaining some control.  I have a pot of water with 1 cap of that flow enhancer to 5 caps of water, and 6 drops of glaze medium that I use to thin the paint on the palette. I'll often add additional drops of glaze medium to the thinned mix if I want to actually use it as a glaze. Vallejo Glaze Medium also contains a retarder which will additionally slow down the paint drying which is nice for VMC as I find they dry extremely fast otherwise. In the past I've used a big tub of W&N Matte Medium which performs a similar purpose without the added advantage of the retarder but it's about 1/10th the cost of the VMC stuff.
|
|
#
?
Mar 14, 2016 15:33
|
|
|
What are peoples experiences with applying gloss varnish to red power armor, purely from an aesthetic standpoint? Also, lava bases for blood angels. Yes/No? DJ Dizzy fucked around with this message at 18:58 on Mar 14, 2016 |
|
#
?
Mar 14, 2016 18:44
|
|
|
grassy gnoll posted:Are synthetic brushes prone to getting and staying dirtier? I'm cleaning my stuff after every use and my taklon brush is getting bulkier and stiffer every time, even though I'm washing it with real-deal brush soap. Isn't taklon really lovely to begin with though?
|
|
#
?
Mar 14, 2016 19:44
|
|

|
signalnoise posted:Isn't taklon really lovely to begin with though? Probably, but I wasn't going to drop the change on a series 7 for babby's first brush just so I could gently caress it up. Still, it seems weird that it'd only last six months with regular care. I'm mostly asking to see if it's my brush or bad habits so I don't kill a good brush when I replace this one.
|
|
#
?
Mar 14, 2016 21:31
|
|
|
Nebalebadingdong posted:Maybe someone can help me. I always add water, even if I use flow aid and especially if I use some sort of medium. That typically means that I have to add more paint to those mixtures than if I just used water.
|
|
#
?
Mar 14, 2016 22:08
|
|


|
I have an aerosol rattle can of matte varnish that I would much rather apply with my airbrush. Can I just spray it into a dropper then put it in my airbrush?
|
|
#
?
Mar 15, 2016 01:12
|
|
|
TouchToneDialing posted:I have an aerosol rattle can of matte varnish that I would much rather apply with my airbrush. Can I just spray it into a dropper then put it in my airbrush? Look up decanting spraypaint.
|
|
#
?
Mar 15, 2016 01:19
|
|

|
TouchToneDialing posted:I have an aerosol rattle can of matte varnish that I would much rather apply with my airbrush. Can I just spray it into a dropper then put it in my airbrush? I highly suggest against putting spraypaint through your airbrush, especially when airbrush-ready matte varnish exists.
|
|
#
?
Mar 15, 2016 01:39
|
|
|
grassy gnoll posted:Probably, but I wasn't going to drop the change on a series 7 for babby's first brush just so I could gently caress it up. "Last six months" is really a pretty meaningless descriptor. It depends heavily on how much you're painting. If you're painting several times a week without being super anal about cleaning, six months is totally reasonable for a beater brush. It also depends how many brushes you use. If you're spreading the love out over a half dozen brushes and cleaning decently well, they'll last six times as long as if you use a single brush for everything. My general strategy if I want a brush to really last is to gently clean it until I think I've gotten everything, then clean it for that long again. This is generally reserved for brushes I really like/are expensive. It won't make a poo poo brush last forever, but that's how you make a nice one last.
|
|
#
?
Mar 15, 2016 02:16
|
|
|
Does anyone have any recommendations for places to get neodymium magnets (e: in the US)? I have a mini that has some pretty fragile wings, and I want to magnetize them so they fit in storage better.
Avenging Dentist fucked around with this message at 07:55 on Mar 15, 2016 |
|
#
?
Mar 15, 2016 07:49
|
|

|
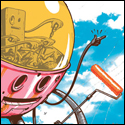
 So i did this last night, i'm a real beginner so nothing too complicated but any simple tips to improve the look? also are they just too bright, do they look a bit clownish? The dude with red is the only one i'd say i put the main colours on, the others are just there for show.
|
|
#
?
Mar 15, 2016 09:47
|
|
|
Avenging Dentist posted:Does anyone have any recommendations for places to get neodymium magnets (e: in the US)? I have a mini that has some pretty fragile wings, and I want to magnetize them so they fit in storage better. I get all mine from https://www.kjmagnetics.com/ Some goon in this thread recommended it to me. They're great. Make sure you select the USPS shipping option so you only pay a few bux for shipping.
|
|
#
?
Mar 15, 2016 11:48
|
|
|

|
| # ? May 13, 2024 08:01 |
|
|
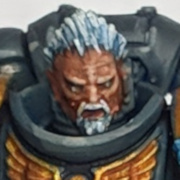
Ran out of time painting this guy as I spent way to long pissing about with the of white and blue blending but I'm pleased with how they turned out. They almos look cell shaded. I exaggerated the shadows more than normal as you can see on the underside of the "white" shoulder pad where I left it almost grey then jumped to yellow before actually painting any white at all. The blue was a stupid number of layers from Prussian Blue to Stone Grey (the colour the shoulder pads are based) + White via Blue-Grey and Turquoise. Need to finish the reds and the brown/fake golds later.
|
|
#
?
Mar 15, 2016 12:43
|
|