|
With the Northkin CID wrapped up, I'm been really hyped to paint my trollbloods again. Still a WIP.  
|
 #
?
Aug 1, 2017 17:33
#
?
Aug 1, 2017 17:33
|
|


|

|
| # ? May 9, 2024 05:47 |
|
|
Alokgen posted:With the Northkin CID wrapped up, I'm been really hyped to paint my trollbloods again. Awesome crystals!
|
|
#
?
Aug 1, 2017 17:39
|
|

|
Munchables posted:I need some help comin up with a disco paint scheme for marines, anybody got some ideas? I'd look to do something vibrant and colorful, but maybe a flashier crystalline look would work? By way of helping with your several-days-old request, here's an Oath Thread crosspost! Dr. Gargunza posted:Oath Complete! Apparently I had a slightly uneven surface on the ball, or uneven drying of the chrome paint before it reached the surface; it's slightly pebbly. But the effect actually resembles a disco ball, weirdly enough!
|
|
#
?
Aug 1, 2017 19:09
|
|


|
How easy is it to swap tips/needles etc and go for e detail on a patriot 105?
|
|
#
?
Aug 1, 2017 21:57
|
|


|
w00tmonger posted:How easy is it to swap tips/needles etc and go for e detail on a patriot 105? Its just a couple of parts at the front and the needle.
|
|
#
?
Aug 1, 2017 22:09
|
|

|
Alokgen posted:With the Northkin CID wrapped up, I'm been really hyped to paint my trollbloods again. This is super cool.
|
|
#
?
Aug 1, 2017 22:13
|
|

|
darnon posted:Specifically if you are going to be using enamel then you want one rated for organic solvents. A 5925 filter should be one for the abovementioned 5000 series mask. Yeah. For the most part just particulate filters are fine with acrylics. Enamels you'll want the organic rated filters like darnon says. The main thing about the 3m masks is that the filters will have the same threading, and are cheaper if your city has an industrial safety supply shop. Getting it from home depot or whatever usually is almost twice the price, with filters that don't fit anything else but that weird brand they carry, and you'll probably never find filters that fit your mask again. The 5000/6000/6500/7000 (I have the 5/7k) can swap filters. The 7k has a flat profile and downward air outlet, so that you can wear face masks/visors/welding helmets over it, and it won't fog up your lens much at all. Keep it in mind if you do shop kind of things so you can put it to dual use I guess. I've used 2091 filters for welding and grinding and it makes a huge difference. Save some headache and just look at 3m's site, there's adapters that let you stack/remove the filters differently with inserts - other filters have threading built in, but cost a little more. So just try to figure which method you'll be using to paint the most and go from there, at least you'll be able to change out filters you do get if you do different stuff in the future.
|
|
#
?
Aug 1, 2017 23:51
|
|
|
Indolent Bastard in a different thread entirely posted:What was your process for painting the horns on the helmets? Also your beards. Well, the secret to most of the work on these guys was good old-fashioned zenithal priming. Over an undercoat of Vallejo Black Surface Primer (I'm trying to get through my supply so I can use more Stynylrez), I sprayed Badger grey and white primers per the usual instructions. That did most of the work of highlighting/shading the entire model, but worked especially well for rounded surfaces like the horns and the body of the beards. From there, the paint on the horns was a really thin coat of some light tan-ish colors (Vallejo Air Wood and P3 Rucksack Tan), thinned to the point of being almost a glaze. Then I followed with some Agrax Earthshade washes along the bottoms where the black primer half-showed through (very thin coats of both the paint and the wash). The next color I used was Rakarth Flesh, but in two different ways as the two sets of horns have different textures. Old Giant's horns were smoother, so I applied the Rakarth in almost a drybrush over the surface, blending to the midtone halfway down the horns. Young Giant's horns had more cracks in them, so for those I applied the Rakarth in stripes/streaks, tapering towards the points on the horns. (I have no pictures of any of these steps, sorry.) I did the beards by deciding what color I wanted to end up with, and building up the color from a much darker base. The grey beard, for example, is about 6 or 7 progressively lighter greys, starting with VMC Black Grey and going all the way up to GW Ulthuan Grey (almost-white). A couple of times in the process, I washed the whole surface of what I'd done so far with Nuln Oil Gloss, which ran nicely into the channels between the "strands of hair" in the beard. A lot of drybrushing was involved, but the lighter colors were focused towards the upper parts of the "curves" in the hair. Once I finished the beard, a quick blast of half-matte/half-satin varnish helped kill some of the shine from the gloss varnish. The red beard was a similar process, but with only about 4-5 colors, starting from a dark brown base (VGA Charred Brown) and working up through some terra-cotta reds all the way up to VMC Pale Sand (thanks for the tip, Avenging Dentist!). At a couple of points, I hit the surface with two different washes: GW Agrax Earthshade Gloss, and then Reikland Fleshshade Gloss towards the end to shift the whole color scheme closer to a strawberry-blond scheme. (I've been wanting to find a good method for red hair for a while, so this giant was sort of an experiment.) Hope that helps! I've been pretty swamped at work, but I can try to cobble together a list of some of the colors I used in the next day or so.
|
|
#
?
Aug 2, 2017 02:03
|
|
|
VolatileSky posted:The 5000/6000/6500/7000 (I have the 5/7k) can swap filters. The 7k has a flat profile and downward air outlet, so that you can wear face masks/visors/welding helmets over it, and it won't fog up your lens much at all. Keep it in mind if you do shop kind of things so you can put it to dual use I guess. I've used 2091 filters for welding and grinding and it makes a huge difference.
|
|
#
?
Aug 2, 2017 02:13
|
|
|
Dr. Gargunza posted:Well, the secret to most of the work on these guys was good old-fashioned zenithal priming. Over an undercoat of Vallejo Black Surface Primer (I'm trying to get through my supply so I can use more Stynylrez), I sprayed Badger grey and white primers per the usual instructions. That did most of the work of highlighting/shading the entire model, but worked especially well for rounded surfaces like the horns and the body of the beards. I think the thing I need to do is figure out exactly how zenithal priming works. I've seen described a bunch of times I've even seen some videos but for some reason I just don't understand it. I see what supposed to happen but every time I try it it just absolutely gets covered the very first time I apply paint anything the priming just vanishes. 
|
|
#
?
Aug 2, 2017 04:03
|
|

|
Indolent Bastard posted:I think the thing I need to do is figure out exactly how zenithal priming works. I've seen described a bunch of times I've even seen some videos but for some reason I just don't understand it. I see what supposed to happen but every time I try it it just absolutely gets covered the very first time I apply paint anything the priming just vanishes. Predictably, I believe the answer is "thin your paints."
|
|
#
?
Aug 2, 2017 05:51
|
|
|
I'm looking to get into painting little plastic men, and I've got my eye on the space marine half of the Dark Imperium. I want to paint them up like Raptors. The FLGS near me only sells citadel products, and it's the only wargames store in my city, maybe my country (Vietnam). Can anyone recommend a good starter set of paints I could have shipped to me? I'm hoping to buy as few single pots of paint as possible, but I know I'll end up grabbing some shades and stuff. I have literally nothing to get into this hobby, so any advice on brushes and the like would also be really helpful.
|
|
#
?
Aug 2, 2017 08:52
|
|


|
Beast Pussy posted:I'm looking to get into painting little plastic men, and I've got my eye on the space marine half of the Dark Imperium. I want to paint them up like Raptors. The FLGS near me only sells citadel products, and it's the only wargames store in my city, maybe my country (Vietnam). Can anyone recommend a good starter set of paints I could have shipped to me? I'm hoping to buy as few single pots of paint as possible, but I know I'll end up grabbing some shades and stuff. I have literally nothing to get into this hobby, so any advice on brushes and the like would also be really helpful.  incoming. By the time I post this I'll probably have been badly beaten. incoming. By the time I post this I'll probably have been badly beaten.Starter sets are all kind of themed around certain colour schemes. I'd grab paints as you need them to be honest, building up a collection slowly. Don't forget you can mix paints so there's no urgent need to get light green 1,light green 2 and raptor highlight green when a decent base green can be lightened with a bone colour ") For a "starter kit" I'd recommend: General Stuff - Brushes: I'd go with a size 2 and 0 and see how they feel. Don't blow your cash on expensive sable ones until you're more confident with techniques. - A hobby knife - (optional) Clippers, though you can cut from the sprues with a knife carefully. Paints Primer In an ideal world spray but not everywhere has the best conditions but brush on primer is fine, just takes longer. - Black: Good for darker models, pain for lighter colours without lots of layers. More forgiving of error. - White: Reverse of above. Generally you paint down to darker vs lighting up from dark. - Grey: Swiss army knife, great for working in either direction. It's down to preference, I like grey for most things but I wouldn't paint large groups of primarily black models by hand when the primer will base coat for free. Likewise painting red on Grey is a bit faster over grey as you can usually skip a coat or 2. White's great for one off models where you really want to take your time or for bright units, or heavily washed undead ") Here's a model I've done in each primer that uses the other colours too, and as you can see white on grey and black works, as does black on white and grey etc...  Colours - Black: Citadel: Abaddon or VMC: Matt Black 950 - White: Citadel: Ceramite White* or VMC: White 951 - Red: Citadel Mephiston Red*, VMC: Carmine Red 926) - Green: Citadel: Warpstone Glow, VMC: Intermediate Green 891) - Blue: Citadel: Macragge Blue*, VMC: Ultramarine Blue 839) - Yellow: Citadel: Averland Sunset* VMC: Flat Yellow 953) * These are base paints and it's very thick either water it down more than normal for layers or get a layer version such as: White Scar, Evil Sunz Scarlett, Calgar Blue, and Flash Gitz Yellow respectively. Using those you can make any shade you like but I'd also recommend these: Optional but drat useful - Bone/Sand Colour: Citadel: Ushabti Bone, VMC: Pale Sand 837. This colour is 90% of the time better than using a pure white for lightening colours, or for very bright highlights. It'll mix nicely with Red to get a lighter colour thats less yellow than orange, or less pink than white. And for raptors will make a good highlight when mixed with an olive green colour. - A Dark Brown: Citadel: Mournfang Brown, VMC: Chocolate Brown 872. Similar to above, but also a great base coat for gold and some reds. - A medium grey: Citadel: Administratum Grey or Eshin Grey (Darker), VMC: Medium Sea Grey 870 or VMC: Basalt Grey 869 (Darker). Use it as a fixed mid point rather than mixing black/white all the time. - Neutral Metal: Citadel: Leadbelcher, VMC: Gunmetal Grey 863 - Gold: Citadel: Gehennas Gold, VMC: Metallic Gold 996 Shades Also grab at least these two shades to make your life easier - Agrax Earthshade: Wash over pretty much any metal to make it look better, in white recesses to add a warm shade, over red, green or yellow for free dark shading. - Nuln Oil: Pretty much same as above but better for Greys and Blues. - (Optional): Drakkenhof Nightshade: I use this on metals rather than black/brown usually to give it a less dulled look than black. Also great on skin in the dark recesses. TLDR; It looks like a lot but really: A Primer, Black, White, Grey, Red, Green, Brown, Blue, Yellow, Silver, Gold and 2 different colour washes will do 90% of all tasks.
|
|
#
?
Aug 2, 2017 10:02
|
|
|
Just because I'm paranoid, is this a  zone for stuff that is painted? Or is there a quality bar I should try to reach first. zone for stuff that is painted? Or is there a quality bar I should try to reach first.
|
|
#
?
Aug 2, 2017 10:42
|
|

|
professor_curly posted:Just because I'm paranoid, is this a Anything that is painted, and after people have stopped foaming at the mouth and screaming THIN YOUR PAINTS and DRILL YOUR BARRELS while literally shaking with rage, they'll be able to give advice to help you reach whatever quality bar you want to reach.
|
|
#
?
Aug 2, 2017 11:06
|
|


|
I would not consider clippers optional. They aren't that expensive and make life infinitely easier.
|
|
#
?
Aug 2, 2017 11:34
|
|
|
So here is my latest modelling/painting project. I'm trying to get out of the mindset of making what I think is a really cool model, then thinking "You'll just make that look worse by painting it." So this is my counts as Living Saint, loosely based around the events of a Dark Heresy campaign.  I'm mostly happy with how this turned out, but I'm trying to figure out a way to get colors to have that almost glowing effect. Specifically the lantern,  I tried going over it in lighter colors, but it seemed to make it duller somehow. I considered trying to put an actual little light in there, but I couldn't figure out a way for the logistics of that to work. I also tried to use a Sepia wash on the lantern to try and make it seem like golden light was coming out, but that effect doesn't really seem to have worked either.
|
|
#
?
Aug 2, 2017 11:38
|
|
|
Looks good. Glowing is usually produced with an effect called Object Source Lighting (OSL). So you would start the lantern at a white or light yellow, then slowly blend out in circles to darker yellows to create the light source - then you cast that light onto nearby objects by painting that yellow on them. Looks like this: An actual good painter will be able to give you a quick tutorial, but until then, thin your paints (your white and blue look a little thick, it's better to do multiple layers of watered down paint than few layers of thick paint)
|
|
#
?
Aug 2, 2017 11:46
|
|
|
Beer4TheBeerGod posted:I would not consider clippers optional. They aren't that expensive and make life infinitely easier. They do make life a lot easier, I was trying to keep the cost down to a minimum with just essentials. As someone who just had to re-buy all supplies from scratch (over 30yrs worth of stuff all got trashed a couple years back ) I know how expensive it can be. True story though, I only bought my first clippers about 3 years ago professor_curly posted:So here is my latest modelling/painting project. I'm trying to get out of the mindset of making what I think is a really cool model, then thinking "You'll just make that look worse by painting it." Looks good, just gonna have to say thin your paints (a bit more). For lighting I did this guy a few years ago to have a go at OSL.  From memory I painted the darkest blue first and then layered lighter blues all the way to the centre of the sword. Then picked out points where it would look like light would hit (inside cloak, ground etc..) and hit those with the same colours but in much smaller amounts, with the darkest colour being the most prominent. Adding a dark glaze over the edges helped blend it to the black if I recall. For the lantern I'd do the whole of the inside in a thin dark yellow and hit some edges in the same colour, then highlight up to almost white in the centre of the bulb. It's tricky as it can be daunting to slap a colour over an area that's already painted for fear of ruining it, that's why I'd try on something else first that you're not afraid of messing with. richyp fucked around with this message at 11:58 on Aug 2, 2017 |
|
#
?
Aug 2, 2017 11:48
|
|
|
Signal posted:Predictably, I believe the answer is "thin your paints." Yeah, probably. It just feels weird thinning them to the point they are translucent.Plus they really change character when they get that thin. They kind of separate and get more difficult to work with. Indolent Bastard fucked around with this message at 13:40 on Aug 2, 2017 |
|
#
?
Aug 2, 2017 13:37
|
|
|
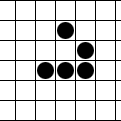
Indolent Bastard posted:I think the thing I need to do is figure out exactly how zenithal priming works. I've seen described a bunch of times I've even seen some videos but for some reason I just don't understand it. I see what supposed to happen but every time I try it it just absolutely gets covered the very first time I apply paint anything the priming just vanishes. It's not that difficult. Bulbasaur has a good explanation on his blog. (Note that his 45/90 degree explanations are reversed.) To steal his image:  You paint the entire model black. Everything. head, shoulder, knees, toes. Let this dry. You then hold your airbrush/spray can at a 45 degree angle from above, and spray a light layer of gray, going around the model. Again, this is from the top 45 degrees only - do not spray the entire model and cover your black shading. Imagine your model is on a turntable, and you're holding still, spraying at an angle as it spins. Finally, spray directly down on top of your model with a light coat of white. You'll hit the top of the head, shoulders, backpack, and that's about it. You're shooting for an effect that looks like you have a lightbulb directly over the head of your model (it's a similar principle as OSL.) Don't spray heavy coats - you can always add paint if you really need to. berzerkmonkey fucked around with this message at 15:25 on Aug 3, 2017 |
|
#
?
Aug 2, 2017 13:44
|
|
|
Token warning; be weary of weather conditions while priming. Too much humidity can affect the surface of the end result. Temperatures can affect drying as well. I've only had humidity bite me once and it was on a test item, but I don't know how I would have fixed it. If it was a mini I'd be rather miffed.
|
|
#
?
Aug 2, 2017 14:08
|
|

|
Have any of you used Citadel's Averland spray as a base for painting yellow? If so, how was it? I'm tempted to get a can, as a shortcut instead of hand brushing it on. I'm thinking start with Averland, then shade and paint details, then clean up with a mix of Yriel & Averland for the final pre-highlight layer.
|
|
#
?
Aug 2, 2017 14:17
|
|

|
Started on the Ancient earlier, first time I've regretted completely assembling a model prior to painting as that banner was a pain to paint while holding the model. The banner's pretty much done, armour needs tidying up and a third highlight stage plus the details need dulling down with a wash. Metals are still based coat only. . .
|
|
#
?
Aug 2, 2017 14:31
|
|
|
Has anyone tried using Sakura Micron pens for doing tattoo's? I saw it suggested somewhere and thought I'd try it out. Thing is, as soon as any paint/water touches the tattoo the ink immediately runs. Which means I can't touch up any paint or put a glaze/varnish over it unless I'm missing something.
|
|
#
?
Aug 2, 2017 15:39
|
|

|
Backed a kickstarter for an army transporter case that uses magnets to hold your models in place, What i ended up with was an amazing mobile paint station It can comfortably hold a bunch of models (even with my patented lolly stick method) there's an option for paint storage and it's cheap! it's the A-case+ where the kickstarter started shipping last week (before estimated time, too!) Also there's some ultramarines in i that i've been working on.
|
|
#
?
Aug 2, 2017 15:46
|
|

|
Lovely Joe Stalin posted:Have any of you used Citadel's Averland spray as a base for painting yellow? If so, how was it? I'm tempted to get a can, as a shortcut instead of hand brushing it on. I'm thinking start with Averland, then shade and paint details, then clean up with a mix of Yriel & Averland for the final pre-highlight layer. I have, actually. I bought a can to prime my friends Skavenblight Scramblers. It goes on really, really thin. I actually had to hit it with two coats of primer to get an even coverage, but the effect once complete is really smooth. Much smoother than I'm able to get with a brush, anyway. I'll take some photos of them tonight when I get home. They're still primed yellow. I need to get started on them. richyp posted:Started on the Ancient earlier, first time I've regretted completely assembling a model prior to painting as that banner was a pain to paint while holding the model. The banner's pretty much done, armour needs tidying up and a third highlight stage plus the details need dulling down with a wash. Metals are still based coat only. Your painting skills are absolutely beautiful and I could stare at your miniatures all day. Zuul the Cat fucked around with this message at 16:08 on Aug 2, 2017 |
|
#
?
Aug 2, 2017 15:59
|
|
|
Ugleb posted:Has anyone tried using Sakura Micron pens for doing tattoo's? I saw it suggested somewhere and thought I'd try it out. Thing is, as soon as any paint/water touches the tattoo the ink immediately runs. Which means I can't touch up any paint or put a glaze/varnish over it unless I'm missing something. I use them for eyes and found I have to let it sit for about 25 hours for the ink to completely dry before I can put any paint or varnish on top of it. If you're waiting that long and it's still running maybe hit it with a hair dryer?
|
|
#
?
Aug 2, 2017 16:00
|
|
|
head58 posted:I use them for eyes and found I have to let it sit for about 25 hours for the ink to completely dry before I can put any paint or varnish on top of it. If you're waiting that long and it's still running maybe hit it with a hair dryer? I left it overnight and went to work, so probably about 20 hours which I thought would be plenty, but maybe not!
|
|
#
?
Aug 2, 2017 17:02
|
|
|
Indolent Bastard posted:Yeah, probably. It just feels weird thinning them to the point they are translucent.Plus they really change character when they get that thin. They kind of separate and get more difficult to work with. This is one of the reasons I went with Reaper paints. They don't separate at all. I started out with Vallejo and it was driving me crazy.
|
|
#
?
Aug 2, 2017 17:39
|
|

|
This thread/best thread. You guys just answered a ton of questions I just had, incredible paint jobs and a bunch of useful tips. Miniature carrying case chat: What are your favorites? I have some game plus foams for my tau at the moment, but I need something better for my chaos. The game plus plucks are glued really badly to the stiff foam bottom, and I was looking for something pre-cut. I like the KR foams, but I was hoping for something a little nicer other than those cardboard/old CD case boxes they use. I have a nice waterproof tackle bag from Okeechobee that fits the game plus foams nicely, but it is a soft bag, and the foams get a bit mushed without the rigidity. I hear the new citadel boxes are nice, but they're so pricey. anyone have a lesser known favorite they swear by?
|
|
#
?
Aug 2, 2017 18:25
|
|


|
Feldherr looks good if you don't mind soft-shell cases (some of them have support inside though to keep them sturdier). I've been meaning to grab a bunch of their stuff.
Avenging Dentist fucked around with this message at 18:30 on Aug 2, 2017 |
|
#
?
Aug 2, 2017 18:28
|
|

|
I've been using an adidas shoebox to get my AdMech around. I have a feldherr case, but i'm not really a fan of it. I'll be picking up the Citadel Crusader one this month.
|
|
#
?
Aug 2, 2017 18:39
|
|
|
Kabuki Shipoopi posted:The game plus plucks are glued really badly to the stiff foam bottom, and I was looking for something pre-cut. Really? I've never had any issues with Game Plus stuff. How old are they? All of mine are from the last year.
|
|
#
?
Aug 2, 2017 18:46
|
|


|
Zuul the Cat posted:I've been using an adidas shoebox to get my AdMech around. I have a feldherr case, but i'm not really a fan of it. I'll be picking up the Citadel Crusader one this month. What are your issues with the Feldherr cases? They look pretty good to me, although I was planning on getting small cases since I only play skirmish games, so the GW cases would be excessive overkill. And I try to avoid giving GW money anyway.
|
|
#
?
Aug 2, 2017 18:51
|
|
|
Indolent Bastard posted:Yeah, probably. It just feels weird thinning them to the point they are translucent.Plus they really change character when they get that thin. They kind of separate and get more difficult to work with.  Unfortunately, the term "thin" has two separate, distinct meanings when it comes to paints: 1) consistency and 2) opacity. The first is what people are generally talking about when they say, "thin your paints" as paints with a heavy consistency leave brush marks on a mini. These look gross on flat areas and can obscure subtle details cast into the mini. Consistency is a function of the physical viscosity (and surface tension) of the paint. The second is what people are talking about in regards to painting over zenithal priming, namely that the paint needs to be translucent enough that the colors underneath show through. Opacity is a function of the pigment density of the paint (i.e. how many pigment molecules per unit volume). Different paints have different consistencies and pigment densities. For instance, most mini paints (especially premium paints like Scale 75) have pigment densities that are off the charts compared to lovely craft paints you get from Michaels, hence they are more opaque and tend to get better coverage in fewer coats. This variation in pigment density is the fundamental difference between GW's "bases" and "shades," by the way. Similarly, paints designed for airbrushing have a lighter consistency (lower viscosity) than paints designed for brush-work, hence they "flow" more easily. Part of the problem is that most acrylic paints aren't just pigment molecules suspended in water, they are pigment molecules suspended in a water-soluble medium. Further, they aren't pigment molecules of a single color, they are generally molecules of several colors whose admixture produces a particular shade (e.g. green and brown molecules that make a nice olive drab color). Worse, that water-based medium has a certain (fairly narrow) pH in which it actually does its job of binding all of the pigment molecules together in a more-or-less even way. Simply adding water to a paint changes the pH of the mixture, causing the medium to "break," which is exactly the separating effect you're describing. If you want to keep this separation from happening, you need to "thin" your paint not with water, but with acrylic medium. Or more likely, acrylic medium and water, because most acrylic media have a consistency that is similar to paint (i.e. "thick" enough to show brush strokes). One notable exception is GW's "Lahmian Medium," which can be used to "thin" a paint in both consistency and opacity at the same time. But like all things GW, it costs the earth; you can achieve much the same effect with water+Liquitex matte medium, available from any craft store for dirt cheap. This multiple definition of the term "thin" can be one of the most confusing and frustrating things for people new to the hobby, because people who've been painting for a while know from context which one is being discussed. And understanding this dual axis system between consistency and opacity makes a lot of the other terms that people carelessly throw around (wash, filter, shade, tint, etc.) make a hell of a lot more sense. Does that help? Also, now for some Naffatun:   
|
|
#
?
Aug 2, 2017 19:11
|
|

|
Zuul the Cat posted:Your painting skills are absolutely beautiful and I could stare at your miniatures all day. Thanks Hopefully I I'll finish him tomorrow before moving on to an actual full squad rather than another character model.Ilor posted:OK, because no one has explained this in a while, I'm going to go on a little diatribe about the word "thin." This is a good post (and an awesome Naffatun). To add to the thickness of paint, I remember back in the day when learning to paint I'd get frustrated with "thinned paint" bleeding over an area when using it and getting internally angry and ignoring the advice, as thicker paint controlled better. Turns out I was using a brush wrong and loading it up. After thinning paints with water (not so much medium as mentioned above), wiping the brush clean after mixing and then redrawing the brush through the newly thinned mixture while carefully turning the brush made all the difference. Watch any video on youtube of a decent painter (Duncan's videos are good examples), after thinning the paint they'll wipe the brush dry on a palette/tissue before reloading their brush carefully from the mixed paint rather than stirring the water in and applying straight from the brush which is still loaded with water.
|
|
#
?
Aug 2, 2017 19:24
|
|
|
Avenging Dentist posted:What are your issues with the Feldherr cases? They look pretty good to me, although I was planning on getting small cases since I only play skirmish games, so the GW cases would be excessive overkill. Nothing really. It's a solid case. I have the small force one. I just like the squiggle line foam the new GW cases have.
|
|
#
?
Aug 2, 2017 19:25
|
|
|
Indolent Bastard posted:Yeah, probably. It just feels weird thinning them to the point they are translucent.Plus they really change character when they get that thin. They kind of separate and get more difficult to work with. Pretty much everything Ilor just said, but I'd also like to suggest glaze medium as an option for thinning your paints. Glaze medium (especially when shaken well enough, looking at you, past me) behaves a lot like matte medium, but also makes the paint more translucent. Glazes thinned with this stuff work really well over zenithal priming; they let the pre-shading and -highlighting of the primer show through, and you just brush thin layers of color over them. Building up multiple layers means you can control the intensity of the color, and you let the zenithal priming do a lot of the work for you. The only downside is, glazes take a lot longer (you want to let them dry between layers). But the end result is really subtle and looks nice from tabletop distance. Fun fact: I did the skin on the giants by laying down somewhat harsh shadows and highlights (all the way up to Pale Sand in spots), then painting a thin glaze of the midtone over everything to soften the contrast and blend all the tones together. (Did anyone repost that Powerfisted link about zenithal-glazes? I'm phone posting atm and my spellchecker has apparently declared war on me.) e: those Naffatun 
Dr. Gargunza fucked around with this message at 19:35 on Aug 2, 2017 |
|
#
?
Aug 2, 2017 19:33
|
|
|

|
| # ? May 9, 2024 05:47 |
|
|
Indolent Bastard posted:Yeah, probably. It just feels weird thinning them to the point they are translucent.Plus they really change character when they get that thin. They kind of separate and get more difficult to work with. I've said this before: If when you paint the paint goes on the model and looks how you want it, it means its too thick. You *want* your paint to be nearly translucent and runny. Too runny means you went overboard on water, but overboard is better than not using enough. Are you using a wet palette? That can help. When you put a layer on the model, you should be able to see some of the primer still through the coat. It *should* take at least 2 coats to get to the color you want. If you're doing it in one coat, its way too thick. Just gotta train yourself as a painter to recognize that paint looks different when you put it on the model from when it dries.
|
|
#
?
Aug 2, 2017 19:51
|
|